2023 DODGE CHALLENGER height
[x] Cancel search: heightPage 33 of 300

GETTING TO KNOW YOUR VEHICLE31
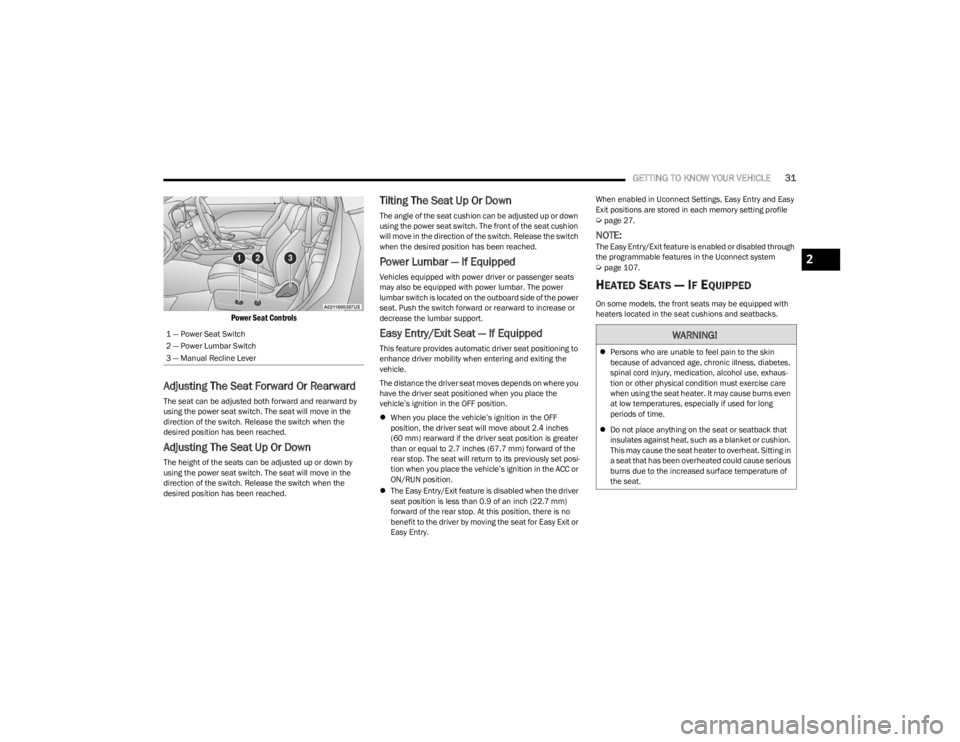
Power Seat Controls
Adjusting The Seat Forward Or Rearward
The seat can be adjusted both forward and rearward by
using the power seat switch. The seat will move in the
direction of the switch. Release the switch when the
desired position has been reached.
Adjusting The Seat Up Or Down
The height of the seats can be adjusted up or down by
using the power seat switch. The seat will move in the
direction of the switch. Release the switch when the
desired position has been reached.
Tilting The Seat Up Or Down
The angle of the seat cushion can be adjusted up or down
using the power seat switch. The front of the seat cushion
will move in the direction of the switch. Release the switch
when the desired position has been reached.
Power Lumbar — If Equipped
Vehicles equipped with power driver or passenger seats
may also be equipped with power lumbar. The power
lumbar switch is located on the outboard side of the power
seat. Push the switch forward or rearward to increase or
decrease the lumbar support.
Easy Entry/Exit Seat — If Equipped
This feature provides automatic driver seat positioning to
enhance driver mobility when entering and exiting the
vehicle.
The distance the driver seat moves depends on where you
have the driver seat positioned when you place the
vehicle’s ignition in the OFF position.
When you place the vehicle’s ignition in the OFF
position, the driver seat will move about 2.4 inches
(60 mm) rearward if the driver seat position is greater
than or equal to 2.7 inches (67.7 mm) forward of the
rear stop. The seat will return to its previously set posi -
tion when you place the vehicle’s ignition in the ACC or
ON/RUN position.
The Easy Entry/Exit feature is disabled when the driver
seat position is less than 0.9 of an inch (22.7 mm)
forward of the rear stop. At this position, there is no
benefit to the driver by moving the seat for Easy Exit or
Easy Entry. When enabled in Uconnect Settings, Easy Entry and Easy
Exit positions are stored in each memory setting profile
Úpage 27.
NOTE:The Easy Entry/Exit feature is enabled or disabled through
the programmable features in the Uconnect system
Úpage 107.
HEATED SEATS — IF EQUIPPED
On some models, the front seats may be equipped with
heaters located in the seat cushions and seatbacks.
1 — Power Seat Switch
2 — Power Lumbar Switch
3 — Manual Recline Lever
WARNING!
Persons who are unable to feel pain to the skin
because of advanced age, chronic illness, diabetes,
spinal cord injury, medication, alcohol use, exhaus -
tion or other physical condition must exercise care
when using the seat heater. It may cause burns even
at low temperatures, especially if used for long
periods of time.
Do not place anything on the seat or seatback that
insulates against heat, such as a blanket or cushion.
This may cause the seat heater to overheat. Sitting in
a seat that has been overheated could cause serious
burns due to the increased surface temperature of
the seat.
2
23_LA_OM_EN_USC_t.book Page 31
Page 36 of 300

34GETTING TO KNOW YOUR VEHICLE
HEAD RESTRAINTS
Head restraints are designed to reduce the risk of injury by
restricting head movement in the event of a rear impact.
Head restraints should be adjusted so that the top of the
head restraint is located above the top of your ear.
NOTE:Do not reverse the head restraints (making the rear of the
head restraint face forward) in an attempt to gain addi -
tional clearance to the back of your head.
Reactive Head Restraints — Front Seats
The front driver and passenger seats are equipped with
Reactive Head Restraints (RHR). In the event of a rear
impact, the RHR will automatically extend forward
minimizing the gap between the back of the occupants
head and the RHR. The RHR will automatically return to their normal position
following a rear impact. If the RHR do not return to their
normal position, see an authorized dealer immediately.
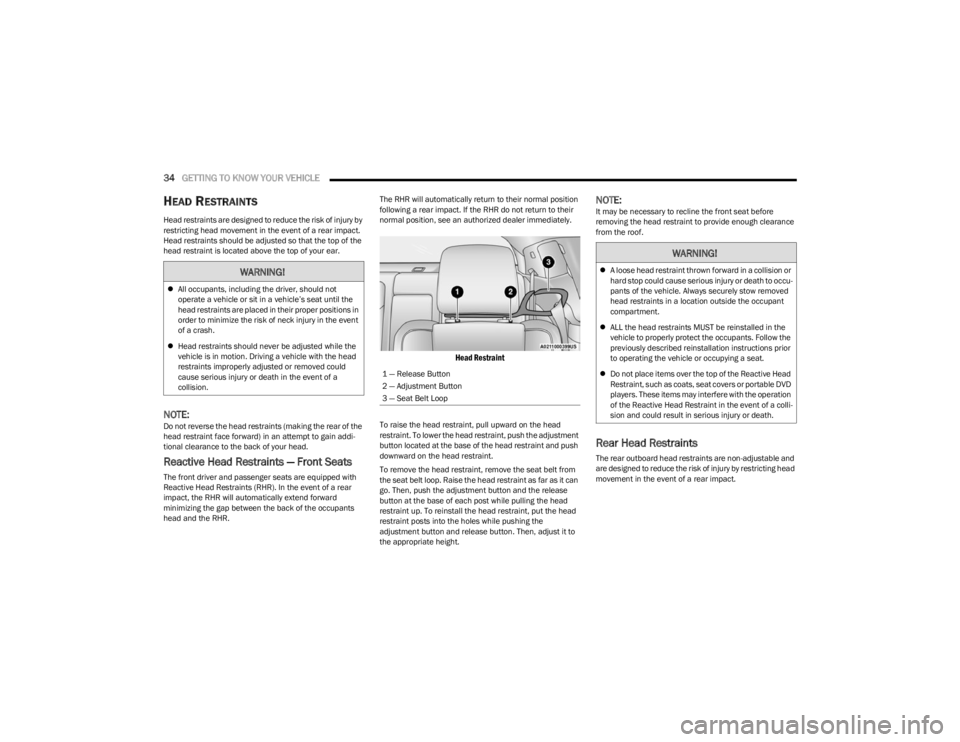
Head Restraint
To raise the head restraint, pull upward on the head
restraint. To lower the head restraint, push the adjustment
button located at the base of the head restraint and push
downward on the head restraint.
To remove the head restraint, remove the seat belt from
the seat belt loop. Raise the head restraint as far as it can
go. Then, push the adjustment button and the release
button at the base of each post while pulling the head
restraint up. To reinstall the head restraint, put the head
restraint posts into the holes while pushing the
adjustment button and release button. Then, adjust it to
the appropriate height.
NOTE:It may be necessary to recline the front seat before
removing the head restraint to provide enough clearance
from the roof.
Rear Head Restraints
The rear outboard head restraints are non-adjustable and
are designed to reduce the risk of injury by restricting head
movement in the event of a rear impact.
WARNING!
All occupants, including the driver, should not
operate a vehicle or sit in a vehicle’s seat until the
head restraints are placed in their proper positions in
order to minimize the risk of neck injury in the event
of a crash.
Head restraints should never be adjusted while the
vehicle is in motion. Driving a vehicle with the head
restraints improperly adjusted or removed could
cause serious injury or death in the event of a
collision.
1 — Release Button
2 — Adjustment Button
3 — Seat Belt Loop
WARNING!
A loose head restraint thrown forward in a collision or
hard stop could cause serious injury or death to occu -
pants of the vehicle. Always securely stow removed
head restraints in a location outside the occupant
compartment.
ALL the head restraints MUST be reinstalled in the
vehicle to properly protect the occupants. Follow the
previously described reinstallation instructions prior
to operating the vehicle or occupying a seat.
Do not place items over the top of the Reactive Head
Restraint, such as coats, seat covers or portable DVD
players. These items may interfere with the operation
of the Reactive Head Restraint in the event of a colli -
sion and could result in serious injury or death.
23_LA_OM_EN_USC_t.book Page 34
Page 101 of 300

STARTING AND OPERATING99
COMMON TOWING DEFINITIONS
The following trailer towing related definitions will assist
you in understanding the following information:
Gross Vehicle Weight Rating (GVWR)
The GVWR is the total allowable weight of your vehicle.
This includes driver, passengers, cargo and tongue
weight. The total load must be limited so that you do not
exceed the GVWR
Úpage 97.
Gross Trailer Weight (GTW)
The GTW is the weight of the trailer plus the weight of all
cargo, consumables, and equipment (permanent or
temporary) loaded in or on the trailer in its "loaded and
ready for operation" condition.
The recommended way to measure GTW is to put your fully
loaded trailer on a vehicle scale. The entire weight of the
trailer must be supported by the scale.
Gross Combination Weight Rating (GCWR)
The GCWR is the total allowable weight of your vehicle and
trailer when weighed in combination.
Gross Axle Weight Rating (GAWR)
The GAWR is the maximum capacity of the front and rear
axles. Distribute the load over the front and rear axles
evenly. Make sure that you do not exceed either front or
rear GAWR
Úpage 97.
Tongue Weight (TW)
The TW is the downward force exerted on the hitch ball by
the trailer. You must consider this as part of the load on
your vehicle.
Trailer Frontal Area
The frontal area is the maximum height multiplied by the
maximum width of the front of a trailer.
Trailer Sway Control (TSC)
The TSC can be a mechanical telescoping link that can be
installed between the hitch receiver and the trailer tongue
that typically provides adjustable friction associated with
the telescoping motion to dampen any unwanted trailer
swaying motions while traveling.
If equipped, the electronic TSC recognizes a swaying
trailer and automatically applies individual wheel brakes
and/or reduces engine power to attempt to eliminate the
trailer sway.
Weight-Carrying Hitch
A weight-carrying hitch supports the trailer tongue weight,
just as if it were luggage located at a hitch ball or some
other connecting point of the vehicle. These kinds of
hitches are commonly used to tow small and medium
sized trailers.
Weight-Distributing Hitch
A weight-distributing system works by applying leverage
through spring (load) bars. They are typically used for
heavier loads to distribute trailer tongue weight to the tow
vehicle's front axle and the trailer axle(s). When used in
accordance with the manufacturer's directions, it provides
for a more level ride, offering more consistent steering and
brake control thereby enhancing towing safety. The
addition of a friction/hydraulic sway control also dampens
sway caused by traffic and crosswinds and contributes
positively to tow vehicle and trailer stability. Trailer sway
control and a weight distributing (load equalizing) hitch
are recommended for heavier Tongue Weights (TW) and
may be required depending on vehicle and trailer
configuration/loading to comply with Gross Axle Weight
Rating (GAWR) requirements.WARNING!
It is important that you do not exceed the maximum
front or rear GAWR. A dangerous driving condition can
result if either rating is exceeded. You could lose control
of the vehicle and have a collision.
WARNING!
An improperly adjusted Weight Distributing Hitch
system may reduce handling, stability, braking
performance, and could result in a collision.
Weight Distributing Systems may not be compatible
with Surge Brake Couplers. Consult with your hitch
and trailer manufacturer or a reputable Recreational
Vehicle dealer for additional information.
4
23_LA_OM_EN_USC_t.book Page 99
Page 188 of 300

186SAFETY
Summary Of Recommendations For Restraining Children In Vehicles
NOTE:If your vehicle is not equipped with a rear seat, FCA US LLC
recommends that you do not allow children 12 years old
and under to ride in your vehicle. If the rear seats are not
present in your vehicle, NEVER install a child restraint in
these positions. If you must install a forward facing child
restraint in the front passenger seat, then you must use
the seat belt system to secure the restraint. A top tether
strap extension may be needed to reach the tether anchor
on the rear shelf directly behind the passenger seat.
Infant And Child Restraints
Safety experts recommend that children ride rear-facing in
the vehicle until they are two years old or until they reach
either the height or weight limit of their rear-facing child
restraint. Two types of child restraints can be used
rear-facing: infant carriers and convertible child seats. The infant carrier is only used rear-facing in the vehicle. It
is recommended for children from birth until they reach
the weight or height limit of the infant carrier. Convertible
child seats can be used either rear-facing or
forward-facing in the vehicle. Convertible child seats often
have a higher weight limit in the rear-facing direction than
infant carriers do, so they can be used rear-facing by
children who have outgrown their infant carrier but are still
less than at least two years old. Children should remain
rear-facing until they reach the highest weight or height
allowed by their convertible child seat.
Child Size, Height, Weight Or Age
Recommended Type Of Child Restraint
Infants and ToddlersChildren who are two years old or younger and who have
not reached the height or weight limits of their child
restraint Either an Infant Carrier or a Convertible Child Restraint,
facing rearward in a rear seat of the vehicle
Small Children Children who are at least two years old or who have
outgrown the height or weight limit of their rear-facing child
restraint Forward-Facing Child Restraint with a five-point Harness,
facing forward in a rear seat of the vehicle
Larger Children Children who have outgrown their forward-facing child
restraint, but are too small to properly fit the vehicle’s seat
belt Belt Positioning Booster Seat and the vehicle seat belt,
seated in a rear seat of the vehicle
Children Too Large for Child Restraints Children 12 years old or younger, who have outgrown the
height or weight limit of their booster seat Vehicle Seat Belt, seated in a rear seat of the vehicle
WARNING!
Never place a rear-facing child restraint in front of an
air bag. A deploying passenger front air bag can
cause death or serious injury to a child 12 years or
younger, including a child in a rear-facing child
restraint.
Never install a rear-facing child restraint in the front
seat of a vehicle. Only use a rear-facing child
restraint in the rear seat. If the vehicle does not have
a rear seat, do not transport a rear-facing child
restraint in that vehicle.
23_LA_OM_EN_USC_t.book Page 186
Page 189 of 300

SAFETY187
Older Children And Child Restraints
NOTE:If your vehicle is not equipped with a rear seat, FCA US LLC
recommends that you do not allow children 12 years old
and under to ride in your vehicle. If the rear seats are not
present in your vehicle, NEVER install a child restraint in
these positions. If you must install a forward facing child
restraint in the front passenger seat, then you must use
the seat belt system to secure the restraint. A top tether
strap extension may be needed to reach the tether anchor
on the rear shelf directly behind the passenger seat.
Children who are two years old or who have outgrown their
rear-facing convertible child seat can ride forward-facing
in the vehicle. Forward-facing child seats and convertible
child seats used in the forward-facing direction are for
children who are over two years old or who have outgrown
the rear-facing weight or height limit of their rear-facing
convertible child seat. Children should remain in a
forward-facing child seat with a harness for as long as
possible, up to the highest weight or height allowed by the
child seat.
All children whose weight or height is above the
forward-facing limit for the child seat should use a
belt-positioning booster seat until the vehicle’s seat belts
fit properly. If the child cannot sit with knees bent over the
vehicle’s seat cushion while the child’s back is against the
seatback, they should use a belt-positioning booster seat.
The child and belt-positioning booster seat are held in the
vehicle by the seat belt.
Children Too Large For Booster Seats
NOTE:If your vehicle is not equipped with a rear seat, FCA US LLC
recommends that you do not allow children 12 years old
and under to ride in your vehicle. If the rear seats are not
present in your vehicle, NEVER install a child restraint in
these positions.
Children who are large enough to wear the shoulder belt
comfortably, and whose legs are long enough to bend over
the front of the seat when their back is against the
seatback, should use the seat belt in a rear seat. Use this simple 5-step test to decide whether the child can
use the vehicle’s seat belt alone:
1. Can the child sit all the way back against the back of
the vehicle seat?
2. Do the child’s knees bend comfortably over the front of the vehicle seat while the child is still sitting all the
way back?
3. Does the shoulder belt cross the child’s shoulder between the neck and arm?
4. Is the lap part of the belt as low as possible, touching the child’s thighs and not the stomach?
5. Can the child stay seated like this for the whole trip?
If the answer to any of these questions was “no,” then the
child still needs to use a booster seat in this vehicle. If the
child is using the lap/shoulder belt, check seat belt fit
periodically and make sure the seat belt buckle is latched.
A child’s squirming or slouching can move the belt out of
position. If the shoulder belt contacts the face or neck,
move the child closer to the center of the vehicle, or use a
booster seat to position the seat belt on the child correctly.
WARNING!
Improper installation can lead to failure of an infant
or child restraint. It could come loose in a collision.
The child could be badly injured or killed. Follow the
child restraint manufacturer’s directions exactly
when installing an infant or child restraint.
After a child restraint is installed in the vehicle, do
not move the vehicle seat forward or rearward
because it can loosen the child restraint attach-
ments. Remove the child restraint before adjusting
the vehicle seat position. When the vehicle seat has
been adjusted, reinstall the child restraint.
When your child restraint is not in use, secure it in the
vehicle with the seat belt or LATCH anchorages, or
remove it from the vehicle. Do not leave it loose in
the vehicle. In a sudden stop or accident, it could
strike the occupants or seatbacks and cause serious
personal injury.
WARNING!
Never allow a child to put the shoulder belt under an
arm or behind their back. In a crash, the shoulder belt
will not protect a child properly, which may result in
serious injury or death. A child must always wear both
the lap and shoulder portions of the seat belt correctly.
6
23_LA_OM_EN_USC_t.book Page 187
Page 257 of 300

SERVICING AND MAINTENANCE255
TIRE SIZING CHART
EXAMPLE:
Example Size Designation: P215/65R15XL 95H, 215/65R15 96H, LT235/85R16C, T145/80D18 103M, 31x10.5 R15 LT
P = Passenger car tire size based on US design standards, or
"....blank...." = Passenger car tire based on European design standards, or
LT = Light truck tire based on US design standards, or
T or S = Temporary spare tire or
31 = Overall diameter in inches (in)
215, 235, 145 = Section width in millimeters (mm)
65, 85, 80 = Aspect ratio in percent (%)
Ratio of section height to section width of tire, or
10.5 = Section width in inches (in)
R = Construction code
"R" means radial construction, or
"D" means diagonal or bias construction
15, 16, 18 = Rim diameter in inches (in)
8
23_LA_OM_EN_USC_t.book Page 255
Page 293 of 300

291
Seats ................................................................................ 28Adjustment .................................................................28
Easy Entry ...................................................................31
Head Restraints .........................................................34
Heated ........................................................................31
Height Adjustment ..................................................... 30
Power ..........................................................................30
Rear Folding ........................................................ 28
, 30
Seatback Release ...................................................... 30
Tilting ............................................................ 28
, 30, 33
Vented ........................................................................32
Ventilated ...................................................................32
Security Alarm ................................................... 19
, 20, 66
Arm The System .........................................................19
Sentry Key (Immobilizer).................................................15
Sentry Key Replacement ................................................15
Service Assistance ....................................................... 280
Service Contract ........................................................... 282
Service Manuals........................................................... 283
Settings, Audio ............................................................. 131
Shift Indicator Light.........................................................77 Shifting.............................................................................78 Automatic Transmission..................................... 78
, 79
Shoulder Belts .............................................................. 174
Side View Mirror Adjustment ..........................................35
Signals, Turn................................................... 42
, 69, 198
Sirius Satellite Radio ................................................... 126 Favorites.................................................................. 129
Replay ...................................................................... 128
SiriusXM Satellite Radio Browse in SXM ........................................................ 129Favorites.................................................................. 129
Replay ...................................................................... 128 Snow Chains (Tire Chains) ...........................................267
Snow Tires .....................................................................264
Spare Tires ........................................202
, 264, 265, 266
Specifications Fuel (Gasoline)......................................................... 278
Oil .............................................................................278
Speed Control (Cruise Control) ...................................... 84 Sport Mode ..................................................................... 83
Starting ............................................................................ 71 Automatic Transmission ........................................... 71
Button......................................................................... 15
Cold Weather ............................................................. 74
Engine Fails To Start ................................................. 74
Remote....................................................................... 17
Starting And Operating ................................................... 71
Starting Procedures ........................................................ 71
Steering Column Lock .............................................................. 24
Power ......................................................................... 83
Tilt Column ................................................................. 24
Wheel, Heated ........................................................... 25
Wheel, Tilt .................................................................. 24
Steering Wheel Audio Controls ....................................124
Steering Wheel Mounted Sound System .................... 124
Storage ...................................................................49
, 269
Storage, Vehicle .....................................................48, 269
Store Radio Presets ...................................................... 131
Storing Your Vehicle ..................................................... 269
Stuck, Freeing ............................................................... 220
Sun Roof ................................................................... 52
, 53
Supplemental Restraint System – Air Bag ..................180
Symbol Glossary ............................................................... 9
Synthetic Engine Oil ...................................................... 232
System, Remote Starting ............................................... 17
TTelescoping Steering Column ........................................ 24
Temperature Control, Automatic (ATC) ......................... 48
Tilt Steering Column ....................................................... 24 Time Delay Headlight ................................................................... 41
Tire And Loading Information Placard ........................ 258
Tire Markings ................................................................ 254
Tire Safety Information ................................................ 253
Tire Service Kit .......................................... 211
, 212, 213
Tire Service Kit — If Equipped
b
.............................. 206
Tires .......................................... 198, 261, 264, 265, 268
Aging (Life Of Tires) ................................................. 263 Air Pressure ............................................................. 261
Chains ...................................................................... 267Changing.........................................................202
, 203
Compact Spare........................................................ 265 General Information............................. 261
, 264, 265
High Speed .............................................................. 262 Inflation Pressure .................................................... 261
Jacking ............................................................ 202
, 203
Life Of Tires ............................................................. 263
Load Capacity .......................................................... 258
Pressure Monitoring System (TPMS) .............. 67
, 168
Quality Grading........................................................ 268 Radial ....................................................................... 262
Replacement ........................................................... 263
Rotation ................................................................... 268
Safety .............................................................. 253
, 261
Sizes......................................................................... 255
Snow Tires ............................................................... 264 Spare Tires .................................. 202
, 264, 265, 26611
23_LA_OM_EN_USC_t.book Page 291