Page 105 of 256

Traction
When driving on wet or slushy roads, it is possible for a
wedge of water to build-up between the tire and road
surface. This is hydroplaning and may c")
STARTING AND OPERATING103
(Continued)
Traction
When driving on wet or slushy roads, it is possible for a
wedge of water to build-up between the tire and road
surface. This is hydroplaning and may cause partial or
complete loss of vehicle control and stopping ability.
To reduce this possibility, the following precautions should
be observed:
Slow down during rainstorms or when the roads are
slushy.
Slow down if the road has standing water or puddles.
Replace the tires when tread wear indicators first
become visible.
Keep tires properly inflated.
Maintain sufficient distance between your vehicle and
the vehicle in front of you to avoid a collision in a
sudden stop.
DRIVING THROUGH WATER
Driving through water more than a few inches/centimeters
deep will require extra caution to ensure safety and prevent
damage to your vehicle.
Flowing/Rising Water Shallow Standing Water
Although your vehicle is capable of driving through shallow
standing water, consider the following Warnings and
Cautions before doing so.
WARNING!
Do not drive on or across a road or path where water is
flowing and/or rising (as in storm run-off). Flowing water can
wear away the road or path's surface and cause your vehicle
to sink into deeper water. Furthermore, flowing and/or rising
water can carry your vehicle away swiftly. Failure to follow
this warning may result in injuries that are serious or fatal to
you, your passengers, and others around you.
WARNING!
Driving through standing water limits your vehicle’s
traction capabilities. Do not exceed 5 mph (8 km/h)
when driving through standing water.
Driving through standing water limits your vehicle’s
braking capabilities, which increases stopping
distances. Therefore, after driving through standing
water, drive slowly and lightly press on the brake
pedal several times to dry the brakes.
Failure to follow these warnings may result in injuries
that are serious or fatal to you, your passengers, and
others around you.
CAUTION!
Always check the depth of the standing water before
driving through it. Never drive through standing
water that is deeper than the bottom of the tire rims
mounted on the vehicle.
Determine the condition of the road or the path that
is under water and if there are any obstacles in the
way before driving through the standing water.
Do not exceed 5 mph (8 km/h) when driving through
standing water. This will minimize wave effects.
Driving through standing water may cause damage
to your vehicle’s drivetrain components. Always
inspect your vehicle’s fluids (i.e., engine oil, transmis -
sion, axle, etc.) for signs of contamination (i.e., fluid
that is milky or foamy in appearance) after driving
through standing water. Do not continue to operate
the vehicle if any fluid appears contaminated, as this
may result in further damage. Such damage is not
covered by the New Vehicle Limited Warranty.
Getting water inside your vehicle’s engine can cause
it to lock up and stall out, and cause serious internal
damage to the engine. Such damage is not covered
by the New Vehicle Limited Warranty.
CAUTION!
4
23_RUV_OM_EN_US_t.book Page 103
Page 106 of 256

MULTIMEDIA
UCONNECT SYSTEMS
For detailed information about your Uconnect 5 With
7-inch Display or Uconnect 5/5 NAV With 10.1-inch
Display system, refer to your Uconnect Radio Ins")
104
(Continued)
MULTIMEDIA
UCONNECT SYSTEMS
For detailed information about your Uconnect 5 With
7-inch Display or Uconnect 5/5 NAV With 10.1-inch
Display system, refer to your Uconnect Radio Instruction
Manual.
NOTE:Uconnect screen images are for illustration purposes only
and may not reflect exact software for your vehicle.
CYBERSECURITY
Depending on applicability, your vehicle may be able to
send or receive information from a wired or wireless
network. This information allows systems and features in
your vehicle to function properly.
Your vehicle may be equipped with certain security features to
reduce the risk of unauthorized and unlawful access to vehicle
systems and wireless communications. Vehicle software
technology continues to evolve over time and FCA US LLC,
working with its suppliers, evaluates and takes appropriate
steps as needed. As always, if you experience unusual
behavior, contact an authorized dealer immediately,
Ú
page 240, or refer to your Uconnect Radio Instruction
Manual for additional contact information.
The risk of unauthorized and unlawful access to your
vehicle systems may still exist, even if the most recent
version of vehicle software (such as Uconnect software) is
installed.NOTE:To help further improve user experience, features,
stability, etc., and minimize the potential risk of a
security breach, vehicle owners should routinely
check www.driveuconnect.com (US Residents) or
www.driveuconnect.ca (Canadian Residents) to learn
about available Uconnect software updates.
WARNING!
ONLY insert trusted devices/components into your
vehicle. Media of unknown origin could possibly
contain malicious software, and if installed in your
vehicle, it may increase the possibility for vehicle
systems to be breached.
As always, if you experience unusual vehicle
behavior, take your vehicle to an authorized dealer
immediately.
WARNING!
23_RUV_OM_EN_US_t.book Page 104
Page 107 of 256

MULTIMEDIA105
UCONNECT SETTINGS
The Uconnect system uses a combination of buttons on
the touchscreen and buttons on the faceplate located on
the center of the instrument panel. These buttons allow
you to access and change the Customer Programmable
Features. Many features can vary by vehicle.
Buttons on the faceplate are located below and/or beside
the Uconnect system in the center of the instrument
panel. In addition, there is a SCROLL/ENTER control knob
located on the right side. Turn the control knob to scroll
through menus and change settings. Push the center of
the control knob one or more times to select or change a
setting.
Your Uconnect system may also have SCREEN OFF and
MUTE buttons on the faceplate.
Push the SCREEN OFF button on the faceplate to turn off
the Uconnect screen. Push the button again or tap the
screen to turn the screen on.
Press the Back Arrow button to exit out of a Menu or
certain option on the Uconnect system.
Push and hold the Power button on the radio’s faceplate
for a minimum of 15 seconds to reset the radio.
CUSTOMER PROGRAMMABLE FEATURES
Uconnect 5/5 NAV With 10.1-inch Display
For the Uconnect 5 With 7-inch Display and the Uconnect
5/5 NAV With 10.1-inch Display
Press the Vehicle button, then press the Settings tab on
the top of the touchscreen. In this menu, the Uconnect
system allows you to access all of the available
programmable features.
NOTE:
Only one touchscreen area may be selected at a time.
Depending on the vehicle’s options, feature settings
may vary.
When making a selection, press the button on the
touchscreen to enter the desired menu. Once in the
desired menu, press and release the preferred setting
option until a check mark appears next to the setting,
showing that setting has been selected. Once the setting
is complete, press the Vehicle button to exit to the screen.
Pressing the Up or Down Arrow button on the right side of
the screen will allow you to toggle up or down through the
available settings.
1 — Uconnect Buttons On The Touchscreen
2 — Uconnect Buttons On The Faceplate
5
23_RUV_OM_EN_US_t.book Page 105
Page 108 of 256

106MULTIMEDIA
KeySense
The vehicle’s KeySense settings are protected by a unique four-digit PIN, which the vehicle owner creates when accessing the specific settings for the first time. This four-digit PIN
can only be reset by an authorized dealer.
After pressing the KeySense button on the touchscreen, and entering the KeySense PIN, the following settings will be available:
NOTE:Depending on the vehicle’s options, feature settings may vary.
Setting Name Description
Forward Collision Warning SensitivityThis setting will change the distance at which the Forward Collision Warning (FCW) alert sounds. The “Medium”
setting will have the FCW system signal when an object is in view, and the possibility of a collision is detected. The
“Near” setting will have the FCW system signal when the object is closer to the vehicle. The “Far” setting will have the
FCW system signal when an object is at a far distance from the vehicle.
Forward Collision Warning This setting will turn the Forward Collision Warning system on or off. The “Warning Only” setting will provide only an
audible chime when a collision is detected. The “Warning + Active Braking” setting will provide an audible chime and
apply some brake pressure when a collision is detected.
ParkSense This setting will change the type of ParkSense alert when a close object is detected. The “Sound Only” setting will
provide an audible chime when an object is detected. The “Sound and Display” setting will provide both an audible
chime and a visual display when an object is detected.
Front ParkSense Volume
This setting adjusts the volume of the Front ParkSense system. The available settings are “Low”, “Medium”, and “High”.
Rear ParkSense Volume
This setting adjusts the volume of the Rear ParkSense system. The available settings are “Low”, “Medium”, and “High”.
Rear ParkSense Braking Assist This setting will turn the Rear ParkSense Braking Assist on or off.
Blind Spot Alert This setting will change the type of alert provided when an object is detected in a vehicle’s blind spot. The “Lights”
setting will activate the Blind Spot Alert lights on the outside mirrors. The “Lights & Chime” setting will activate both
the lights on the outside mirrors and an audible chime.
Maximum Vehicle Speed This setting adjusts the Maximum Vehicle Speed. This feature can be set to 65, 70, 75, 80, or 85 mph (90, 95, 100,
105 or 110 km/h) by using the “-” and “+” options.
Start Up Fuel Level Message This setting will turn the Start Up Fuel Level Message on or off.
Earlier Low Fuel Alert This setting will turn the Earlier Low Fuel Alert on or off.
23_RUV_OM_EN_US_t.book Page 106
Page 109 of 256

MULTIMEDIA107
My Profile
When the My Profile button is pressed on the touchscreen, the system displays options related to the vehicle’s profiles.
NOTE:Depending on the vehicle’s options, feature settings may vary.
Setting Name Description
LanguageThis setting will change the language of the Uconnect system and Instrument Cluster Display. The available languages
are English, Français, Español, and Italiano.
Display Mode The setting will adjust the display for the radio to “Auto” or “Manual”. “Manual” allows for more customization with the
radio display.
Display Brightness Headlights On This setting will allow you to set the brightness when the headlights are on. To access this setting, Display Mode must
be set to “Manual”. The “+” setting will increase the brightness; the “-” will decrease the brightness.
Display Brightness Headlights Off This setting will allow you to set the brightness when the headlights are off. To access this setting, Display Mode must
be set to “Manual”. The “+” setting will increase the brightness; the “-” will decrease the brightness.
Set Theme This setting will allow you to change the theme of the radio.
Theme Mode This setting will allow you to adjust the brightness of your theme. Setting options are “Light”, “Dark” and “Auto”. Select
to show themes in Light or Dark mode. “Auto” changes the theme with the headlights.
Units This setting changes the “Speed” (MPH or km/h), “Distance” (mi or km), “Fuel Consumption” (MPG [US], MPG [UK],
L/100 km, or km/L), “Pressure” (psi, kPa, or bar), “Temperature” (°C or °F), and “Current Consumption” (MPG [US],
MPG [UK], L/100 km, or km/L) units of measurement independently.
Touchscreen Beep This setting will allow you to turn the touchscreen beep on or off.
Show Main Category Bar Labels This setting will allow the main category bar labels to be shown on or off.
Navigation Next Turn Displayed in Cluster This setting will display navigation prompts in the Instrument Cluster Display.
Phone Pop-Ups Displayed In Cluster This setting will display smartphone notifications and messages in the Instrument Cluster Display.
System Text Size This setting will allow you to change the text on the radio to “Standard”, “Large”, and “Taller”.
Time Format
This setting will allow you to set the time format (AM/PM). Sync Time With GPS must be “Off” for this setting to be available.
The “12 hrs” setting will set the time to a 12-hour format. The “24 hrs” setting will set the time to a 24-hour format.
5
23_RUV_OM_EN_US_t.book Page 107
Page 110 of 256

108MULTIMEDIA
Voice Options This setting will allow you to change the voice options for the radio to “Male” or “Female”.
Wake Up Word This setting will allow you to turn the voice recognition “Wake Up” word on or off.
Voice Barge-in This setting will allow you to turn the voice recognition barge-in feature on or off.
Show Command List This setting will allow the Command List to be shown on or off.
Key Off Power Delay This setting will keep certain electrical features running after the engine is turned off. When any door is opened, the
electronics will deactivate. The available settings are “0 sec”, “45 sec”, “5 min”, and “10 min”.
Radio Off With Door
This setting will turn the radio off when the driver or passenger door is opened. The available settings are “On” and “Off”.
App Drawer Favoriting Popups This setting will allow you to favorite app drawer pop-ups with “On” and “Off” options.
App Drawer Unfavoritings Popups This setting will allow you to unfavorite app drawer pop-ups with “On” and “Off” options.
New Text Message Popups This setting will allow you to have pop-up notifications for new text messages. This setting options are “On” and “Off”.
Missed Calls Message This setting will allow you to have pop-up notifications for missed calls. This setting options are “On” and “Off”.
Navigation Popups This setting will allow you to have pop-up notifications for Navigation. This setting options are “On” and “Off”.
Navigation Settings This setting will allow you to customize the settings within Navigation Mode.
Auto-On Driver Heated Seat & Steering Wheel This setting will activate the vehicle’s comfort systems and heated seats or heated steering wheel when the vehicle is
remote started or ignition is started. The “Off” setting will not activate the comfort systems. The “Remote Start”
setting will only activate the comfort systems when using Remote Start. The “All Start” setting will activate the comfort
systems whenever the vehicle is started.
Audio Settings This setting will take you to the audio settings for the vehicle profiles.
Reset App Drawer to Default Order This setting will reset the app drawer to its factory default layout.
Restore Settings to Default This setting will return all the previously changed settings to their factory defaults.
More Profile Options This setting will give access to more profile options.
Setting Name Description
23_RUV_OM_EN_US_t.book Page 108
Page 111 of 256

MULTIMEDIA109
Display
After pressing the Display button on the touchscreen, the following settings will be available:
NOTE:Depending on the vehicle’s options, feature settings may vary.
Setting Name Description
LanguageThis setting will change the language of the Uconnect system and Instrument Cluster Display. The available languages
are English, Français, Español, and Italiano.
Display Mode This setting will allow you to set the brightness manually or have the system set it automatically. The “Auto” setting has
the system automatically adjust the display brightness. The “Manual” setting will allow the user to adjust the
brightness of the display.
Display Brightness With Headlights ON/Brightness This setting will allow you to set the brightness when the headlights are on. To access this setting, Display Mode must
be set to Manual. The “+” setting will increase the brightness; the “-” will decrease the brightness.
Display Brightness With Headlights OFF/Brightness This setting will allow you to set the brightness when the headlights are off. To access this setting, Display Mode must
be set to Manual. The “+” setting will increase the brightness; the “-” will decrease the brightness.
Set Theme This setting will allow you to change the theme of the radio.
Theme Mode This setting will allow you to adjust the brightness of your theme. Setting options are “Light”, “Dark” and “Auto”. Select
to show themes in Light or Dark mode. “Auto” changes the theme with the headlights.
Units This setting changes the “Speed” (MPH or km/h), “Distance” (mi or km), “Fuel Consumption” (MPG [US], MPG [UK],
L/100 km, or km/L), “Pressure” (psi, kPa, or bar), “Temperature” (°C or °F), and “Current Consumption” (MPG [US],
MPG [UK], L/100 km, or km/L) units of measurement independently.
Touchscreen Beep This setting will allow you to turn the touchscreen beep on or off.
Show Main Category Bar Labels This setting will allow the main category bar labels to be shown on or off.
Control Screen Timeout This setting allows you to set the Control Screen to turn off automatically after five seconds or stay open until
manually closed.
Navigation Next Turn Displayed in Cluster This setting will display navigation prompts in the Instrument Cluster Display.
Phone Pop-Ups Displayed In Cluster This setting will display smartphone notifications and messages in the Instrument Cluster Display.
Ready To Drive Pop-Ups This setting will enable the Ready To Drive Pop-Ups in the Instrument Cluster Display.
5
23_RUV_OM_EN_US_t.book Page 109
Page 112 of 256

110MULTIMEDIA
Safety & Driving Assistance
After pressing the Safety & Driving Assistance button on the touchscreen, the following settings will be available:
NOTE:Depending on the vehicle’s options, feature settings may vary.
Setting Name Description
Forward Collision Warning Sensitivity — Located In Automatic
Emergency Braking SubmenuThis setting will change the distance at which the Forward Collision Warning (FCW) alert sounds. The “Medium”
setting will have the FCW system signal when an object is in view, and the possibility of a collision is detected. The
“Near” setting will have the FCW system signal when the object is closer to the vehicle. The “Far” setting will have the
FCW system signal when an object is at a far distance from the vehicle.
Forward Collision Warning — Located In Automatic
Emergency Braking Submenu This setting will turn the Forward Collision Warning system on or off. The “Off” setting will deactivate the FCW system.
The “Warning Only” setting will provide only an audible chime when a collision is detected. The “Warning + Active
Braking” setting will provide an audible chime and apply some brake pressure when a collision is detected.
Pedestrian Emergency Braking — Located In Automatic
Emergency Braking Submenu This setting will turn the Pedestrian Emergency Braking system “Off” or to “Warning & Active Braking”.
ParkSense This setting will change the type of ParkSense alert when a close object is detected. The “Sound Only” setting will
provide an audible chime when an object is detected. The “Sound and Display” setting will provide both an audible
chime and a visual display when an object is detected.
Rear ParkSense Volume
This setting adjusts the volume of the Rear ParkSense system. The available settings are “Low”, “Medium”, and “High”.
Rear ParkSense Braking Assist This setting will turn the Rear ParkSense Braking Assist on or off.
Sliding Door Alert This setting will turn the Sliding Door Alert on and off.
Blind Spot Alert This setting will change the type of alert provided when an object is detected in a vehicle’s blind spot. The “Off” setting
will turn off Blind Spot Alert. The “Lights” setting will activate the Blind Spot Alert lights on the outside mirrors.
The “Lights & Chime” setting will activate both the lights on the outside mirrors and an audible chime.
Hill Start Assist This setting will turn the Hill Start Assist system on or off.
KeySense This setting will access KeySense features.
Rear Seat Alert When this setting is turned on and the rear doors are opened while the engine is running, or if the engine is turned on
within 10 minutes of the door opening, a message will appear to check the rear seat when the vehicle is powered OFF.
23_RUV_OM_EN_US_t.book Page 110
 1
1 2
2 3
3 4
4 5
5 6
6 7
7 8
8 9
9 10
10 11
11 12
12 13
13 14
14 15
15 16
16 17
17 18
18 19
19 20
20 21
21 22
22 23
23 24
24 25
25 26
26 27
27 28
28 29
29 30
30 31
31 32
32 33
33 34
34 35
35 36
36 37
37 38
38 39
39 40
40 41
41 42
42 43
43 44
44 45
45 46
46 47
47 48
48 49
49 50
50 51
51 52
52 53
53 54
54 55
55 56
56 57
57 58
58 59
59 60
60 61
61 62
62 63
63 64
64 65
65 66
66 67
67 68
68 69
69 70
70 71
71 72
72 73
73 74
74 75
75 76
76 77
77 78
78 79
79 80
80 81
81 82
82 83
83 84
84 85
85 86
86 87
87 88
88 89
89 90
90 91
91 92
92 93
93 94
94 95
95 96
96 97
97 98
98 99
99 100
100 101
101 102
102 103
103 104
104 105
105 106
106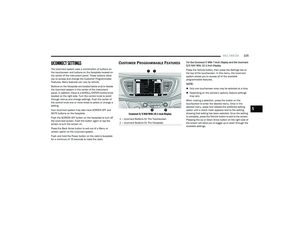 107
107 108
108 109
109 110
110 111
111 112
112 113
113 114
114 115
115 116
116 117
117 118
118 119
119 120
120 121
121 122
122 123
123 124
124 125
125 126
126 127
127 128
128 129
129 130
130 131
131 132
132 133
133 134
134 135
135 136
136 137
137 138
138 139
139 140
140 141
141 142
142 143
143 144
144 145
145 146
146 147
147 148
148 149
149 150
150 151
151 152
152 153
153 154
154 155
155 156
156 157
157 158
158 159
159 160
160 161
161 162
162 163
163 164
164 165
165 166
166 167
167 168
168 169
169 170
170 171
171 172
172 173
173 174
174 175
175 176
176 177
177 178
178 179
179 180
180 181
181 182
182 183
183 184
184 185
185 186
186 187
187 188
188 189
189 190
190 191
191 192
192 193
193 194
194 195
195 196
196 197
197 198
198 199
199 200
200 201
201 202
202 203
203 204
204 205
205 206
206 207
207 208
208 209
209 210
210 211
211 212
212 213
213 214
214 215
215 216
216 217
217 218
218 219
219 220
220 221
221 222
222 223
223 224
224 225
225 226
226 227
227 228
228 229
229 230
230 231
231 232
232 233
233 234
234 235
235 236
236 237
237 238
238 239
239 240
240 241
241 242
242 243
243 244
244 245
245 246
246 247
247 248
248 249
249 250
250 251
251 252
252 253
253 254
254 255
255