2023 CHRYSLER PACIFICA lock
[x] Cancel search: lockPage 37 of 328

GETTING TO KNOW YOUR VEHICLE35
2. Tilt seat rearward to lock the seat back into its original
position.
NOTE:Push downward to ensure the rear latches are in the
locked position.
3. Lift the recline handle and return the seat back to the seating position.
Manually Folding Third Row Seats —
If Equipped
NOTE:
You may experience deformation in the seat cushion
from the seat belt buckles, or wrinkling of the seat
fabric if the seats are left folded for an extended period
of time. This is normal and by simply unfolding the
seats to the open position, over time the seat cushion
may return to its normal shape. Having an occupant sit
in the seat, or massaging the fabric by hand may
smooth away any excess wrinkling.
Permanent wrinkles may still result.
1. Lower the center head restraint down to the seatback by pushing the button on the guide and
pushing the head restraint down.
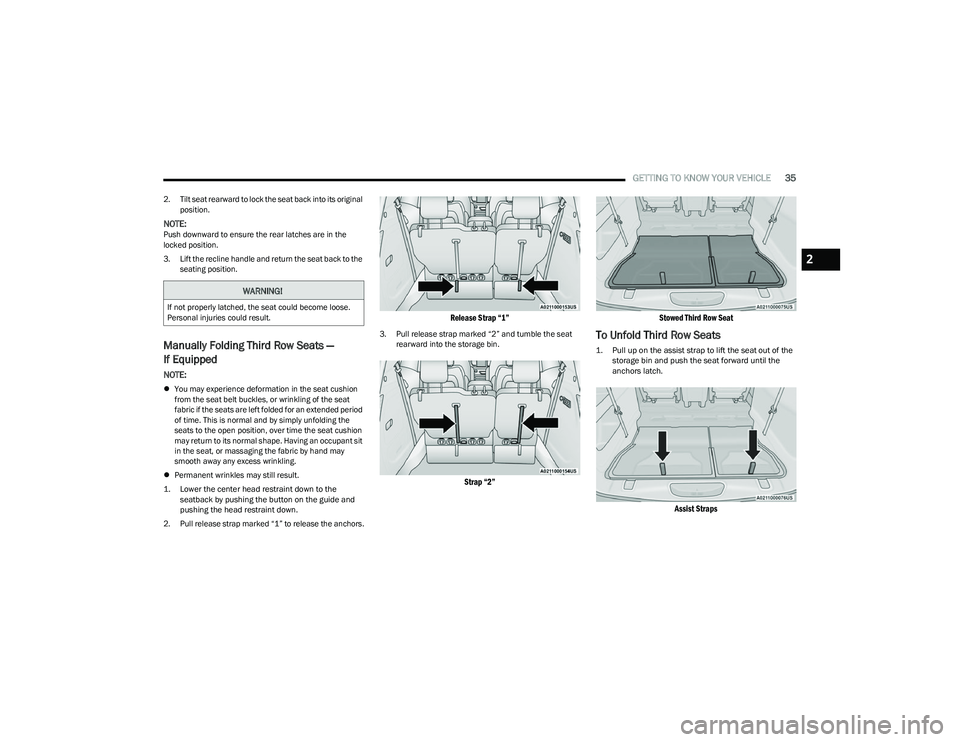
2. Pull release strap marked “1” to release the anchors.
Release Strap “1”
3. Pull release strap marked “2” and tumble the seat rearward into the storage bin.
Strap “2” Stowed Third Row Seat
To Unfold Third Row Seats
1. Pull up on the assist strap to lift the seat out of the
storage bin and push the seat forward until the
anchors latch.
Assist Straps
WARNING!
If not properly latched, the seat could become loose.
Personal injuries could result.
2
23_RUP_OM_EN_USC_t.book Page 35
Page 39 of 328

GETTING TO KNOW YOUR VEHICLE37
NOTE:
To abort seat operation while seat is in motion, push
the Auto Advance ‘n Return button, or push the front
power seat button to stop the seat movement. Pushing
the Auto Advance ‘n Return button again will return the
front seat to the original starting location.
The Auto Advance ‘n Return system includes obstacle
detection. When the system detects an obstacle, the
seat will stop, reverse direction, and return to the
previous location. A message will be displayed in the
instrument cluster indicating that an obstacle has been
detected.
If the front seat is already in a location that will allow
space for Stow ‘n Go of the second row seat, the front
seat will not move and a message will be displayed in
the instrument cluster.
If calibration of the front seat is lost, the seat will auto -
matically recalibrate when the Auto Advance ‘n Return
button is pushed. This may result in the seat cushion
moving forward and downward, before moving to the
location that will allow space for the second row Stow
‘n Go seat movement.
SECOND ROW STOW 'N GO
For Manual Seats: To stow the seat in the floor, move the
front seat all the way forward using the manual seat
adjustment bar. Move the seatback all the way forward
using the recliner handle located on the outboard side of
the cushion. Move the seat height to at least mid position
using the height adjuster handle in the outboard side of
the cushion. For Power Seats:
Push the Auto Advance ‘n Return button
located on the B-pillar trim (if equipped)
Úpage 36.
1. To access the storage area, remove the floor mat (if equipped) and place the lock rod in the locked
position.
Lock Rod
NOTE:
Push the lock rod inward for the unlocked position.
Pull outward on the lock rod for the locked
position.
For information on storage bin function with the
seats rearward
Úpage 72.
2. Pull the latch located near the second row seat to open the floor panel.
Floor Latch
3. Pull the floor panel and position it toward the front seats while folding the top half down, and rest it
against the front seats.
Push Panel Forward
4. Remove the plastic storage bin (if equipped) from the storage area, and store in a safe location.
2
23_RUP_OM_EN_USC_t.book Page 37
Page 40 of 328

38GETTING TO KNOW YOUR VEHICLE
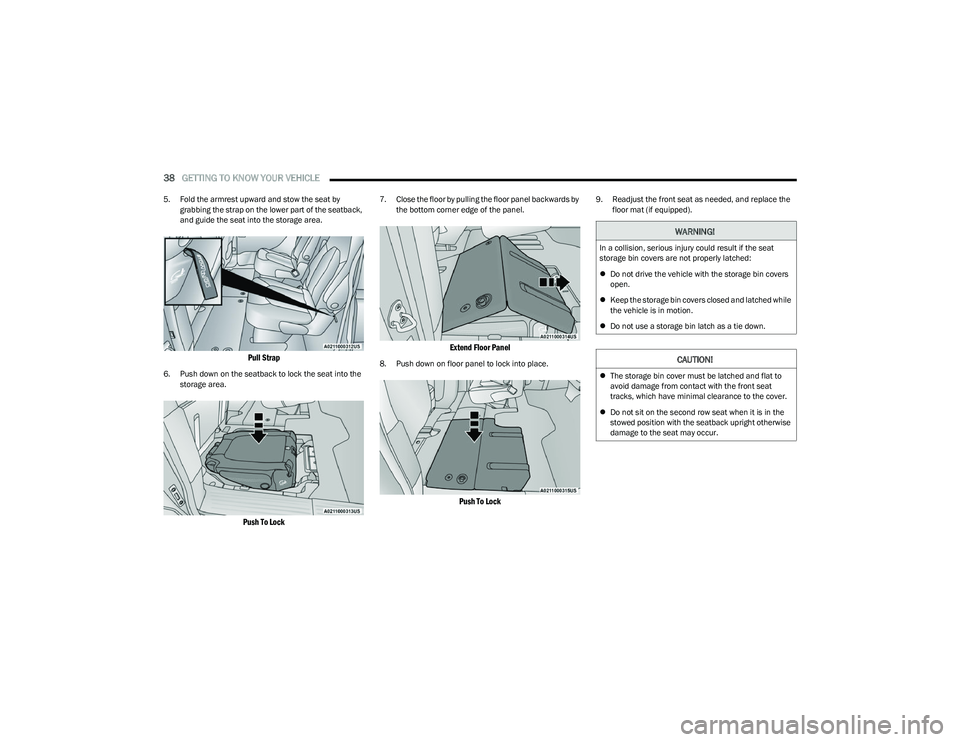
5. Fold the armrest upward and stow the seat by
grabbing the strap on the lower part of the seatback,
and guide the seat into the storage area.
Pull Strap
6. Push down on the seatback to lock the seat into the storage area.
Push To Lock
7. Close the floor by pulling the floor panel backwards by the bottom corner edge of the panel.
Extend Floor Panel
8. Push down on floor panel to lock into place.
Push To Lock
9. Readjust the front seat as needed, and replace the floor mat (if equipped).
WARNING!
In a collision, serious injury could result if the seat
storage bin covers are not properly latched:
Do not drive the vehicle with the storage bin covers
open.
Keep the storage bin covers closed and latched while
the vehicle is in motion.
Do not use a storage bin latch as a tie down.
CAUTION!
The storage bin cover must be latched and flat to
avoid damage from contact with the front seat
tracks, which have minimal clearance to the cover.
Do not sit on the second row seat when it is in the
stowed position with the seatback upright otherwise
damage to the seat may occur.
23_RUP_OM_EN_USC_t.book Page 38
Page 41 of 328

GETTING TO KNOW YOUR VEHICLE39
TO UNSTOW SECOND ROW SEATS
For Manual Seats: To unstow the seat from the floor, move
the front seat all the way forward using the manual seat
adjustment bar.
For Power Seats: Push the Auto Advance ‘n Return button
located on the B-pillar trim (if equipped)
Úpage 36.
1. To access the storage area, remove the floor mat (if equipped) and place the lock rod in the unlocked
position.
Lock Rod
NOTE:
Push the lock rod inward for the unlocked position.
Pull outward on the lock rod for the locked posi -
tion.
2. Pull the latch located near the second row seat to open the floor panel.
Floor Latch
3. Pull the floor panel and position it toward the front seats while folding the top half down and rest it
against the front seats.
Push Panel Forward
4. Pull the strap located on the seat and pull the seat out of the storage area. Push the seat rearward
making sure that it locks into the floor. Fold the
seatback into the upright position and pull the
headrest up.
NOTE:The seatback may be locked, if it is, it will be necessary to
use the recliner handle to unlock the back before folding
into the upright position.
Pull Strap
5. Replace the plastic storage bin into the storage area.
6. To position the floor panel back into its original state, grab the bottom corner and extend it outward.
Extend Panel
2
23_RUP_OM_EN_USC_t.book Page 39
Page 42 of 328

40GETTING TO KNOW YOUR VEHICLE
7. Lay the floor panel flat and push down until it clicks
into position.
Push Down To Lock
8. Readjust the front seat as needed, and replace the floor mat (if equipped).
POWER ADJUSTMENT (FRONT SEATS) —
I
F EQUIPPED
Some models may be equipped with eight-way power
seats for the driver and front passenger. The power seat
switches are located on the outboard side of the seat. The
switches control the movement of the seat cushion and
the seatback.
Driver Power Seat Switches
Adjusting The Seat Forward Or Rearward
The seat can be adjusted both forward and rearward by
using the seat switch. The seat will move in the direction
of the switch. Release the switch when the desired
position has been reached.
WARNING!
In a collision, you or others in your vehicle could be
injured if seats are not properly latched to their floor
attachments. Always be sure the seats are fully
latched.
Sitting in a seat with the head restraint in its lowered
position could result in serious injury or death in a
collision. Always make sure the head restraints are in
their upright positions when the seat is to be occu -
pied.
1 — Seat Switch
2 — Seatback Switch
3 — Lumbar Switch
WARNING!
Adjusting a seat while driving may be dangerous.
Moving a seat while driving could result in loss of
control which could cause a collision and serious
injury or death.
Seats should be adjusted before fastening the seat
belts and while the vehicle is parked. Serious injury
or death could result from a poorly adjusted seat
belt.
Do not ride with the seatback reclined so that the
shoulder belt is no longer resting against your chest.
In a collision you could slide under the seat belt,
which could result in serious injury or death.
CAUTION!
Do not place any article under a power seat or impede
its ability to move as it may cause damage to the seat
controls. Seat travel may become limited if movement
is stopped by an obstruction in the seat's path.
23_RUP_OM_EN_USC_t.book Page 40
Page 44 of 328

42GETTING TO KNOW YOUR VEHICLE
POWER ADJUSTMENT (REAR SEATS) —
I
F EQUIPPED
Third Row Power Recline — If Equipped
The power recline feature, located on the trim panel next
to the seat, adjusts the seatback angle forward/rearward
for occupant comfort.
Reclining The Seatback
The angle of the seatback can be adjusted forward or
rearward. Push and hold the forward or rearward button,
the seat will move in the direction of the button push.
Release the button when the desired position is reached.
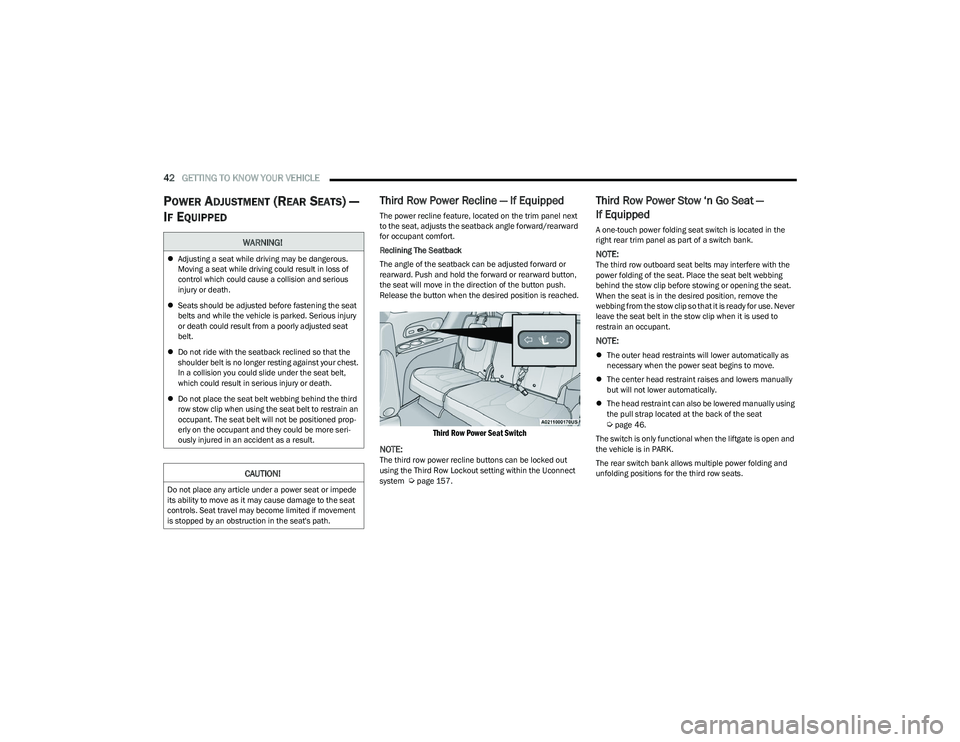
Third Row Power Seat Switch
NOTE:
The third row power recline buttons can be locked out
using the Third Row Lockout setting within the Uconnect
system
Úpage 157.
Third Row Power Stow ‘n Go Seat —
If Equipped
A one-touch power folding seat switch is located in the
right rear trim panel as part of a switch bank.
NOTE:The third row outboard seat belts may interfere with the
power folding of the seat. Place the seat belt webbing
behind the stow clip before stowing or opening the seat.
When the seat is in the desired position, remove the
webbing from the stow clip so that it is ready for use. Never
leave the seat belt in the stow clip when it is used to
restrain an occupant.
NOTE:
The outer head restraints will lower automatically as
necessary when the power seat begins to move.
The center head restraint raises and lowers manually
but will not lower automatically.
The head restraint can also be lowered manually using
the pull strap located at the back of the seat
Úpage 46.
The switch is only functional when the liftgate is open and
the vehicle is in PARK.
The rear switch bank allows multiple power folding and
unfolding positions for the third row seats.
WARNING!
Adjusting a seat while driving may be dangerous.
Moving a seat while driving could result in loss of
control which could cause a collision and serious
injury or death.
Seats should be adjusted before fastening the seat
belts and while the vehicle is parked. Serious injury
or death could result from a poorly adjusted seat
belt.
Do not ride with the seatback reclined so that the
shoulder belt is no longer resting against your chest.
In a collision you could slide under the seat belt,
which could result in serious injury or death.
Do not place the seat belt webbing behind the third
row stow clip when using the seat belt to restrain an
occupant. The seat belt will not be positioned prop -
erly on the occupant and they could be more seri -
ously injured in an accident as a result.
CAUTION!
Do not place any article under a power seat or impede
its ability to move as it may cause damage to the seat
controls. Seat travel may become limited if movement
is stopped by an obstruction in the seat's path.
23_RUP_OM_EN_USC_t.book Page 42
Page 52 of 328

50GETTING TO KNOW YOUR VEHICLE
POWER FOLDING OUTSIDE MIRRORS —
I
F EQUIPPED
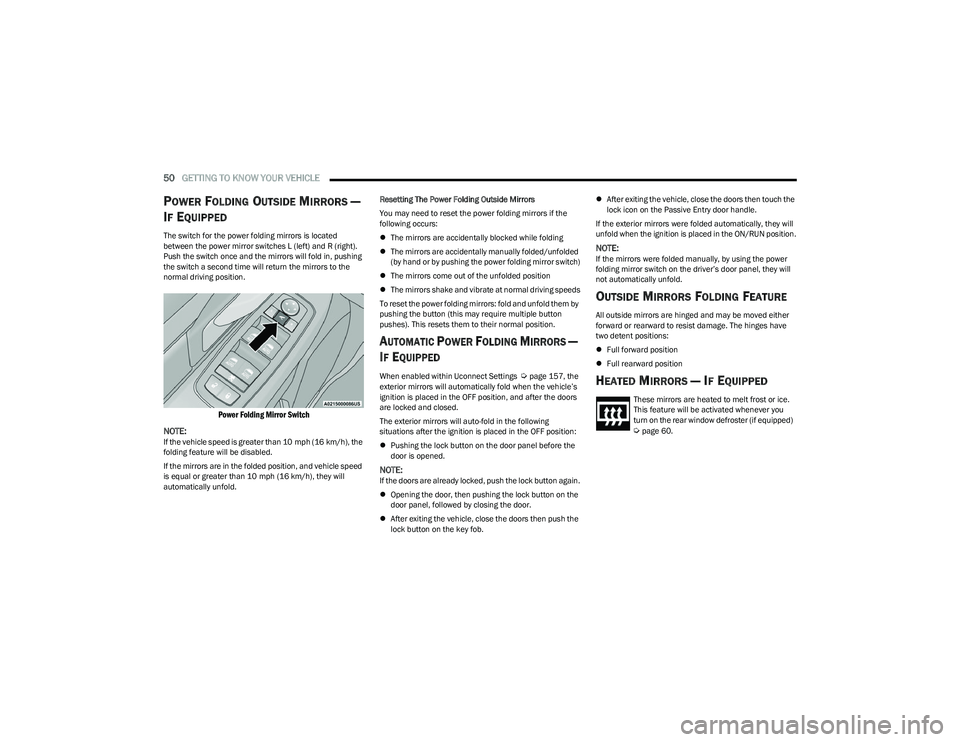
The switch for the power folding mirrors is located
between the power mirror switches L (left) and R (right).
Push the switch once and the mirrors will fold in, pushing
the switch a second time will return the mirrors to the
normal driving position.
Power Folding Mirror Switch
NOTE:
If the vehicle speed is greater than 10 mph (16 km/h), the
folding feature will be disabled.
If the mirrors are in the folded position, and vehicle speed
is equal or greater than 10 mph (16 km/h), they will
automatically unfold. Resetting The Power Folding Outside Mirrors
You may need to reset the power folding mirrors if the
following occurs:
The mirrors are accidentally blocked while folding
The mirrors are accidentally manually folded/unfolded
(by hand or by pushing the power folding mirror switch)
The mirrors come out of the unfolded position
The mirrors shake and vibrate at normal driving speeds
To reset the power folding mirrors: fold and unfold them by
pushing the button (this may require multiple button
pushes). This resets them to their normal position.
AUTOMATIC POWER FOLDING MIRRORS —
I
F EQUIPPED
When enabled within Uconnect Settings Úpage 157, the
exterior mirrors will automatically fold when the vehicle’s
ignition is placed in the OFF position, and after the doors
are locked and closed.
The exterior mirrors will auto-fold in the following
situations after the ignition is placed in the OFF position:
Pushing the lock button on the door panel before the
door is opened.
NOTE:If the doors are already locked, push the lock button again.
Opening the door, then pushing the lock button on the
door panel, followed by closing the door.
After exiting the vehicle, close the doors then push the
lock button on the key fob.
After exiting the vehicle, close the doors then touch the
lock icon on the Passive Entry door handle.
If the exterior mirrors were folded automatically, they will
unfold when the ignition is placed in the ON/RUN position.
NOTE:If the mirrors were folded manually, by using the power
folding mirror switch on the driver’s door panel, they will
not automatically unfold.
OUTSIDE MIRRORS FOLDING FEATURE
All outside mirrors are hinged and may be moved either
forward or rearward to resist damage. The hinges have
two detent positions:
Full forward position
Full rearward position
HEATED MIRRORS — IF EQUIPPED
These mirrors are heated to melt frost or ice.
This feature will be activated whenever you
turn on the rear window defroster (if equipped)
Úpage 60.
23_RUP_OM_EN_USC_t.book Page 50
Page 57 of 328

GETTING TO KNOW YOUR VEHICLE55
HEADLIGHT SWITCH
The headlight switch is located on the left side of the
instrument panel. The switch controls the operation of the
headlights, parking lights, instrument panel lights, interior
lights, and the fog lights.
Headlight Switch Headlight Switch (Vehicles Sold In Canada Only)
NOTE:
Vehicles sold in Canada are equipped with a headlight
switch with an AUTO and ON detent but without an OFF
detent. Headlights will be deactivated when the headlight
switch is placed in the parking lights position. However,
the Daytime Running Lights (DRLs) will be activated along
with the front and rear marker lights. The DRLs may be
deactivated when the parking brake is engaged.
From the O (off) position, rotate the headlight switch
clockwise to the first detent for parking light and
instrument panel light operation. Rotate the headlight
switch to the second detent for headlight, parking light
and instrument panel operation.
NOTE:For vehicles sold in Canada, rotate the headlight switch
clockwise from the parking light and instrument panel
light position to the first detent to turn on the headlights
also. Rotate to the second detent, AUTO position, to turn
on automatic headlights, parking lights, and instrument
panel lights.
DAYTIME RUNNING LIGHTS (DRLS) —
I
F EQUIPPED
The headlights or LED light bars on your vehicle will
illuminate when the engine is started. This provides a
constant lights on condition until the ignition is placed in
the OFF position. If the parking brake is applied, the
Daytime Running Lights (DRLs) will turn off.
NOTE:
For vehicles sold in Canada, the Daytime Running
Lights will automatically deactivate when the front fog
lights are turned on.
If allowed by law in the country in which the vehicle was
purchased, the Daytime Running Lights can be turned
on or off using the Uconnect system
Úpage 157.
On some vehicles, the Daytime Running Lights may
deactivate, or reduce intensity, on one side of the
vehicle (when a turn signal is activated on that side), or
on both sides of the vehicle (when the hazard warning
lights are activated).
1 — Rotate Headlight Control
2 — Push Fog Light Control
3 — Ambient Light Dimmer Control
4 — Instrument Panel Dimmer Control
1 — Rotate Headlight Control
2 — Push Fog Light Control
3 — Ambient Light Dimmer Control
4 — Instrument Panel Dimmer Control
2
23_RUP_OM_EN_USC_t.book Page 55