Page 49 of 268

47
REAR OVERHEAD LIGHT
The rear overhead lights are activated or
deactivated by on/off switches located on the
front overhead console or within the rear
overhead lights themselves.Rear Overhead Light
The light turns on when a door is opened.
NOTE:
The light will turn off automatically after a few
minutes if a door is left open. To turn it on again,
open another door or close and reopen the same
door.
INSTRUMENT PANEL DIMMER CONTROL
With the daytime running lights or headlights on,
push the dimmer control upward and hold to
increase the instrument panel brightness and the
control button icons. Push the dimmer control
downward and hold to decrease brightness.
Release the control when the desired brightness
level has been reached.
Dimmer Control
WINDSHIELD WIPERS AND
WASHERS
The windshield wiper stalk is located on the right
side of the steering wheel.
The windshield wipers will only operate with the
ignition is placed in the ACC or ON/RUN position.
1 — Passenger Rear Overhead Light
2 — Driver Side Rear Overhead Light
3 — Driver Side Rear Overhead Light Switch
4 — Passenger Side Rear Overhead Light Switch
CAUTION!
Turn the windshield wipers off when driving
through an automatic car wash. Damage to
the windshield wipers may result if the wiper
control is left in any position other than off.
In cold weather, always turn off the wiper
switch and allow the wipers to return to the
“park” position before turning off the engine.
If the wiper switch is left on and the wipers
freeze to the windshield, damage to the
wiper motor may occur when the vehicle is
restarted.
Always remove any buildup of snow that
prevents the windshield wiper blades from
returning to the off position. If the windshield
wiper control is turned off and the blades
cannot return to the off position, damage to
the wiper motor may occur.
23_GU_OM_EN_USC_t.book Page 47
Page 50 of 268
 activates the first (low) level
continuous speed of the windshield wi")
GETTING TO KNOW YOUR VEHICLE
48
WINDSHIELD WIPER OPERATION
Rotating the switch to the Low Continuous Wiper
Speed position (2) activates the first (low) level
continuous speed of the windshield wipers in
manual mode.
Rotating the switch to the High Continuous Wiper
Speed position (1) activates the second (high)
level continuous speed of the windshield wipers
in manual mode.Windshield Wiper Stalk Rain Sensors
Rotating the switch to the Low Sensitivity Rain
Sensing position (4), activates the first, less
sensitive level of the Rain Sensing function.
Rotating the switch to the High Sensitivity Rain
Sensing position (3), activates the second, more
sensitive level of the Rain Sensing function
Ú
page 48.
Windshield Washer
To use the washer, pull the windshield wiper lever
toward the steering wheel and hold.
Both the windshield washer jet and the
windshield wiper will be activated. The wipers and
washers will continue to operate until you let go
of the lever.
The windshield wiper stops working three strokes
after the stalk is released, followed by a final
stroke six seconds later to complete the cycle.
Mist
Push the lever upward to the MIST position and
release for a single wiping cycle.
NOTE:
The Mist feature does not activate the washer
pump; therefore, no washer fluid will be sprayed
on the windshield. The wash function must be
used in order to spray the windshield with washer
fluid.
For information on wiper care and replacement,
see
Ú
page 210.
RAIN SENSING WIPERS
This feature senses rain or snowfall on the
windshield and automatically activates the
wipers. The Rain Sensor is located behind the
interior rearview mirror.
Rain Sensor
Rotate the end of the multifunction lever to one of
four settings to activate this feature.
1 — High Continuous Wiper Speed
2 — Low Continuous Wiper Speed
3 — High Sensitivity Rain Sensing
4 — Low Sensitivity Rain Sensing
5 — Windshield Wiper Off
WARNING!
Sudden loss of visibility through the
windshield could lead to a collision. You might
not see other vehicles or other obstacles. To
avoid sudden icing of the windshield during
freezing weather, warm the windshield with
the defroster before and during windshield
washer use.
23_GU_OM_EN_USC_t.book Page 48
Page 51 of 268
 when the
windshield is dry, to wiper at continuous speed
(fast operation) with intense rain.
Activatio")
49
The sensor has an adjustment range that varies
progressively from wiper still (no stroke) when the
windshield is dry, to wiper at continuous speed
(fast operation) with intense rain.
Activation
Rotating the wiper switch to the Low Sensitivity
Rain Sensing position (4) or High Sensitivity Rain
Sensing position (3) activates the rain sensor.
The activation of the rain sensor system is done
by tapping the wiper stalk upwards while the
switch is in the Low Sensitivity Rain Sensing
position (4) or High Sensitivity Rain Sensing
position (3).
The variation in sensitivity during rain sensor
operation is also signaled by a stroke of the wiper.
If the windshield washer is used with the rain
sensor activated, the normal washing cycle is
performed, and then the rain sensor resumes its
normal automatic operation.
NOTE:
Keep the glass in the sensor area clean.
Deactivation
To turn off the Rain Sensing Wipers, use the wiper
switch or place the ignition in the OFF position.
In the event of malfunction of the rain sensor
while it is active, the windshield wiper operates
intermittently at a speed consistent with the
sensitivity setting of the rain sensor, whether or
not there is rain on the glass for as long as the
sensor failure is indicated on the display.The sensor continues to operate and it is
possible to set the windshield wiper to continuous
mode (1 or 2). The failure indication remains on
for as long as the sensor is active.
The rain sensor is able to recognize and automat
-
ically adjust itself in the presence of the following
conditions:
Presence of dirt on the controlled surface
(e.g. salt, dirt, etc.).
Presence of streaks of water caused by the
worn window wiper blades.
Difference between day and night.
REAR WINDOW WIPER/WASHER
Push the windshield wiper lever downward to
activate/deactivate continuous rear wiper
operation.
Push the windshield wiper lever towards the
instrument panel to activate the rear window
washer (a brief push activates one washing cycle,
keeping the stalk pushed washes continuously
until the stalk is released).
Shifting the vehicle into REVERSE with the
windshield wiper operating activates a single
cycle of the rear window wiper.
HEADLAMP WASHERS — IF EQUIPPED
The windshield wiper lever operates the headlight
washers when the ignition is in the ON position
and the headlights are turned on. To use the
headlight washers, pull the lever toward you and
release it. The headlight washers will spray a
timed high-pressure spray of washer fluid onto
each headlight lens. In addition, the windshield
washers will spray the windshield and the
windshield wipers will cycle.
NOTE:
The headlight washers work on every tenth wash
cycle request.
CLIMATE CONTROLS
The Climate Control system allows you to regulate
the temperature, air flow, and direction of air
circulating throughout the vehicle. The controls
are located on the touchscreen and on the
instrument panel below the radio.
23_GU_OM_EN_USC_t.book Page 49
Page 52 of 268
GETTING TO KNOW YOUR VEHICLE
50
AUTOMATIC DUAL-ZONE CLIMATE CONTROL SYSTEM
Automatic Climate Control System
1 — Driver Temperature Adjustment Knob9 — Passenger Temperature Adjustment Knob
2 — Driver Side AUTO Button (Automatic Operation) 10 — SYNC Button (Set Temperature Alignment) Driver/Passenger Side
3 — Driver Side Air Distribution Selection Button 11 — Passenger Heated Seat Button — If Equipped
4 — Max Defrost Button 12 — Air Conditioning Button
5 — Blower Speed Adjustment Knob 13 — Steering Wheel Heater Button — If Equipped
6 — Rear Defrost Button 14 — Driver Heated Seat Button — If Equipped
7 — Passenger Side Air Distribution Selection Button 15 — Air Recirculation Button
8 — Passenger Side AUTO Button (Automatic Operation)
23_GU_OM_EN_USC_t.book Page 50
Page 53 of 268
51
Automatic Climate Control System (Touchscreen Controls)
1 — Driver Side Temperature Adjustment Bar8 — Heated Rear Window On/Off Button
2 — Driver Side Air Distribution Buttons 9 — MAX-DEF Activation/Deactivation Button (Rapid Defrosting/Demisting)
3 — Fan Speed Adjustment Button 10 — Air Recirculation On/Off Button
4 — Passenger Side Air Distribution Buttons 11 — Climate Control System Compressor On/Off Button
5 — Passenger Side Temperature Adjustment Bar 12 — Driver Side AUTO Button (Automatic Operation)
6 — SYNC Button 13 — Climate Control System On/Off Button
7 — Passenger Side AUTO Button (Automatic Operation)
CAUTION!
The system uses R1234yf refrigerant, which does not pollute the environment in the event of accidental leakage. Under no circumstances use R134a
and R12 fluids, which are incompatible with the components of this system.
23_GU_OM_EN_USC_t.book Page 51
Page 54 of 268

GETTING TO KNOW YOUR VEHICLE
52
Description
The Automatic Dual Zone Climate Control System
adjusts the temperature and air distribution
independently between the driver and
passenger.
The system maintains the set temperature inside
the passenger compartment and compensates
for outside temperature change.
NOTE:
The reference temperature is 72°F (22°C) for
optimal comfort management.
The automatic setting will adjust the following to
maintain comfort within the passenger
compartment:
Air temperature from the driver/front
passenger side vents
Air distribution from the driver/front passenger
side vents
Fan speed (continuous variation of the air flow)
Compressor variations (for cooling/dehumid-
ifying the air)
Air recirculation
The Climate Control System can also be operated
manually by using the buttons and knobs on the
faceplate.
Manual selections will override the automatic
settings, which are stored until the AUTO button is
pushed. If the system intervenes for safety
reasons, the automatic setting will take control of
the system.
The following operations will not deactivate the
automatic (AUTO) function:
Air Recirculation activation/deactivation
A/C activation/deactivation
SYNC function activation
Rear Window Defrost activation/deactivation
When in AUTO mode, the vehicle’s internal
temperature is controlled according to the set
temperature.
The following can be manually set or adjusted:
Driver/passenger air temperature
Blower speed (continuous variation)
Air distribution (seven positions for driver and
passenger)
A/C activation
Front Defroster
Air recirculation
Rear Defroster
System deactivation
A/C Compressor
Push the A/C button or the icon to activate or
deactivate the A/C compressor (indicator
illuminated when activated). The A/C compressor
will remain off even after the engine has stopped.
When the A/C compressor is turned off, the
system deactivates air recirculation to prevent
the windows from fogging up. If the climate
control system can maintain the temperature,
with the A/C turned off, the AUTO feature will
remain on and the AUTO button indicator light will
not switch off.
To restore automatic control of the A/C
compressor, push the A/C button or the icon or
the AUTO button. With the A/C compressor off,
the air speed can be set manually using the Air
Speed Adjustment Knob. When the A/C compressor is on, and the engine
is running, air speed cannot be lower than the
minimum speed (only one indicator light is lit).
NOTE:
When the A/C is off, the Climate Control system
can not produce air that is colder than the current
outside temperature. Under certain environ
-
mental conditions, windows could fog up rapidly
since the air is not dehumidified.
Air Recirculation And Air Quality System (AQS)
Air Recirculation is managed according
to the following operating mode:
Automatic engagement: indicator is
illuminated above the “A” on the
Air Recirculation Button
Forced activation (air circulation always
activated): indicator illuminated above
the icon on the Air Recirculation Button
Forced deactivation (air recirculation always
off with intake of outside air): both indicators
not illuminated on the Air Recirculation Button
The three operating conditions are obtained by
pushing the Air Recirculation Button in
sequence.
Enabling The Air Quality System (AQS) Function —
If Equipped
When the automatic recirculation function is
selected, the AQS function automatically
activates internal air recirculation when the
outside air is polluted (e.g. in heavy traffic and
tunnels).
23_GU_OM_EN_USC_t.book Page 52
Page 55 of 268

53
At low external temperatures or in high humidity,
the automatic function turns off to avoid fogging
up the windows. The user can select the function
again by pushing the Air Recirculation Button.
In automatic operation, air recirculation will be
controlled by the system according to outside
environmental conditions.
NOTE:
With the AQS function active and after the
internal air recirculation system has been
functioning for a set amount of time, the
Climate Control System enables air intake to
cycle the air in the passenger compartment for
a set time. The AQS function is disabled during
the air changes.
The engagement of the recirculation system
makes it possible to reach the required heating
or cooling conditions faster. It is, however,
inadvisable to use it on rainy/cold days as it
can increase the possibility of the windows
fogging. When the outside temperature is low,
recirculation is forced off to prevent the
windows from fogging up.
Front Defrost Air comes from the windshield and side
window demist outlets. Use Defrost
mode with maximum temperature
settings for best windshield and side
window defrosting and defogging.
Rear Defrost
Push the Rear Defrost button to activate
(indicators illuminated) the Rear
Defroster. The Rear Defrost will turn off after 20 minutes or
once the engine is turned off.
NOTE:
To avoid damage, do not apply stickers over the
interior heating filaments of the Rear Defroster.
Front Defrost And MAX-DEF Function
Push the MAX-DEF button (indicator
illuminated) to defrost the windshield
and side windows.
While in MAX-DEF function, the air conditioner
will:
Activate the air conditioner compressor when
the weather allows
Turn air recirculation off
Set the maximum air temperature (HI) on both
the driver and passenger side
Activate a blower speed based on the
temperature of the engine coolant
Adjust the air flow towards the windshield and
front side windows
Activate the Rear Window Defrost
Display the fan speed (indicators illuminated)
and current air distribution setting
NOTE:
The MAX-DEF function remains active for approx -
imately three minutes once the engine coolant
reaches the proper temperature.
When the function is on, AUTO mode will
deactivate. The only manual operations possible
are adjusting blower speed and turning off the
Rear Window Defrost. Pushing the Air Recirculation button switches
off the MAX-DEF function.
Air Temperature Adjustment
Rotate the driver or passenger Temperature
Adjustment Knob clockwise for warmer
temperatures or counterclockwise for cooler
temperatures. The set temperatures are shown
on the radio system.
Push the SYNC button to sync the driver and
passenger air temperatures.
Rotate the passenger Temperature Adjustment
Knob to cancel the SYNC function. This will set a
new passenger side temperature.
Rotate the Temperature Adjustment Knob fully
clockwise to engage the HI (maximum heating)
setting or fully counterclockwise to engage the
LO (maximum cooling) setting. To deactivate
these functions, rotate the Temperature
Adjustment Knob to the desired temperature.
Rear passengers’ temperature is linked to driver
side selection.
AUTO Button
When the AUTO button is pushed (indicator
illuminated), the Climate Control system automat
-
ically adjusts the following settings:Quantity and distribution of air flow in the
passenger compartment
The air conditioner
Air recirculation
Cancels any manual settings
Selecting the AUTO function illuminates the
indicator on the A/C button.
23_GU_OM_EN_USC_t.book Page 53
Page 56 of 268

GETTING TO KNOW YOUR VEHICLE
54
If air distribution or the fan speed is manually
adjusted, the AUTO button indicator will turn off to
indicate that the Climate Control system is no
longer in AUTO mode.
After a manual adjustment, push the AUTO
button to resume the automatic system.
SYNC Button
Push the SYNC button (indicator illuminated) to
sync the passenger side air temperature with the
driver side air temperature.
This function makes temperature regulation
easier when the driver is traveling alone.
Turn the passenger Temperature Adjustment
Knob or push the passenger side Air Distribution
Selection Button to change the passenger side
air temperature and return to separate air
temperature management.
Blower Speed
Turn the Blower Speed Knob to increase or
decrease the blower speed. The speed is
displayed with lighted indicators in the radio
system display.
Maximum fan speed = all indicators
illuminated on the radio system display
Minimum fan speed = one indicator
illuminated on the radio system display
The fan can be turned off by rotating the Blower
Speed Knob counterclockwise to the off position
(all segments on the radio system display are
turned off).
NOTE:
To restore automatic control of the fan speed,
push the AUTO button. Air Distribution Selection
Push the Air Distribution Selection button on the
faceplate to change the mode of air distribution.
NOTE:
In AUTO mode, the Climate Controls automati
-
cally manage the air distribution. When set manu -
ally, the respective symbols on the radio system
indicate the air distribution setting.
Panel Mode
Air comes from the outlets in the
instrument panel to ventilate the chest
and face. Each of these outlets can be
individually adjusted to direct the flow of
air. The air vanes of the center outlets and
outboard outlets can be moved up and down or
side to side to regulate airflow direction. There is
a shut-off wheel located below the air vanes to
shut off or adjust the amount of airflow from
these outlets.
Bi-Level Mode
Air comes from the instrument panel
outlets and floor outlets. A slight amount
of air is directed through the defrost and
side window demister outlets.
NOTE:
Bi-Level mode is designed under comfort condi -
tions to provide cooler air out of the panel outlets
and warmer air from the floor outlets.
Floor Mode
Air comes from the floor outlets. A slight
amount of air is directed through the
defrost and side window demister
outlets. This setting heats the
passenger compartment the quickest. Mix Mode
Air is directed through the floor, defrost,
and side window demister outlets. This
setting works best in cold or snowy
conditions that require extra heat to the
windshield. This setting is good for maintaining
comfort while reducing moisture on the
windshield.
Front Defrost And Panel Mode
Air flow is distributed between the
windshield demisting/defrosting vents
and side/central dashboard vents.
This setting allows air to flow to the
windshield on sunny days.
Front Defrost And Bi-Level Mode
Air flow is distributed to all vents.
Switching The Climate Control System On/Off
To Turn Off The Climate Control System
Rotate the Air Speed Adjustment Knob
completely counterclockwise to turn off the
Climate Control system.
When the air conditioner is off:Air recirculation is on
The A/C compressor is off
The fan is off
The heated rear window can be activated/
deactivated
NOTE:
The Climate Control system stores the previously
set temperatures and resumes operation when
any button on the system is pushed.
23_GU_OM_EN_USC_t.book Page 54
 1
1 2
2 3
3 4
4 5
5 6
6 7
7 8
8 9
9 10
10 11
11 12
12 13
13 14
14 15
15 16
16 17
17 18
18 19
19 20
20 21
21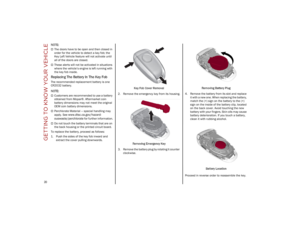 22
22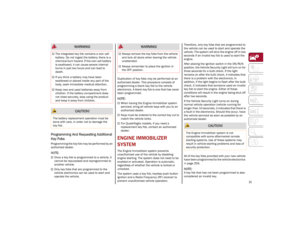 23
23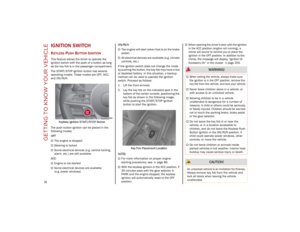 24
24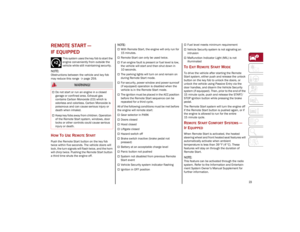 25
25 26
26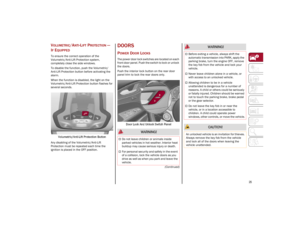 27
27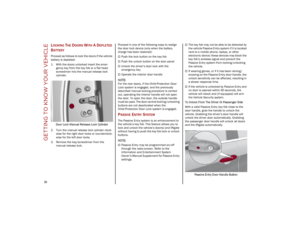 28
28 29
29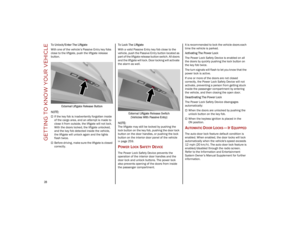 30
30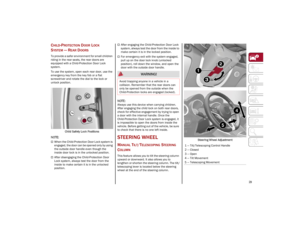 31
31 32
32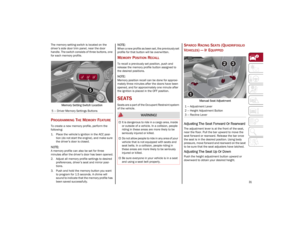 33
33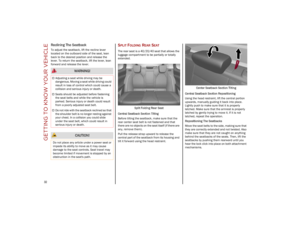 34
34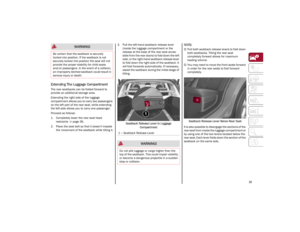 35
35 36
36 37
37 38
38 39
39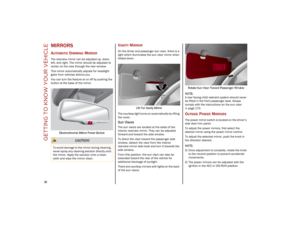 40
40 41
41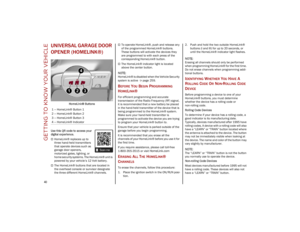 42
42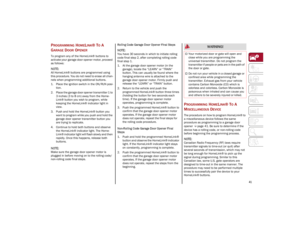 43
43 44
44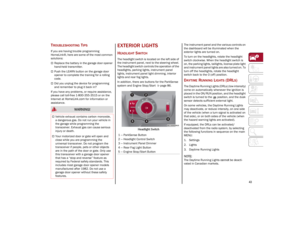 45
45 46
46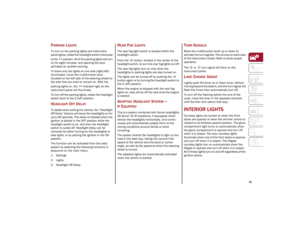 47
47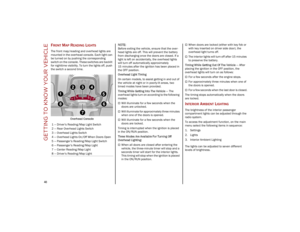 48
48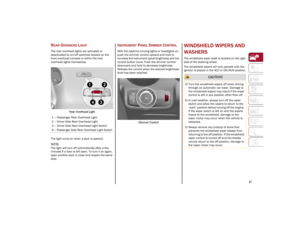 49
49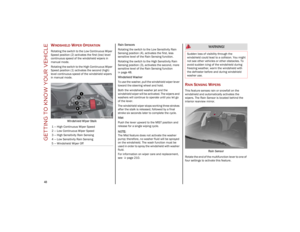 50
50 51
51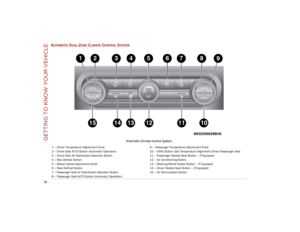 52
52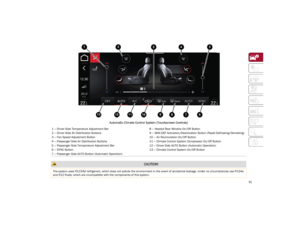 53
53 54
54 55
55 56
56 57
57 58
58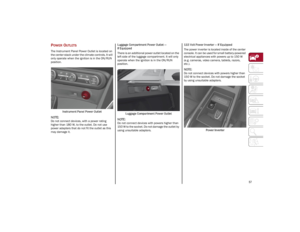 59
59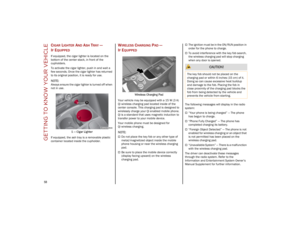 60
60 61
61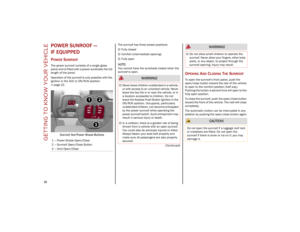 62
62 63
63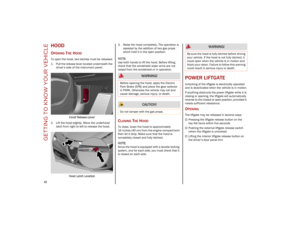 64
64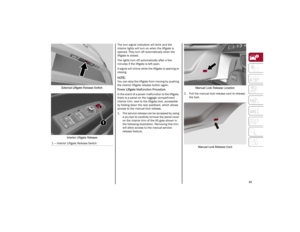 65
65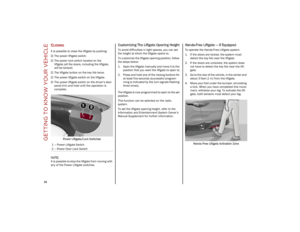 66
66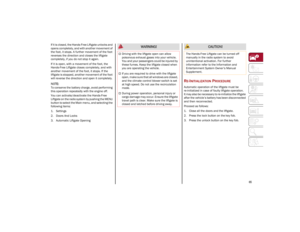 67
67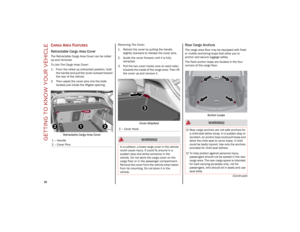 68
68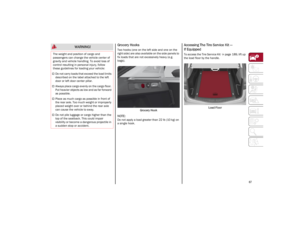 69
69 70
70 71
71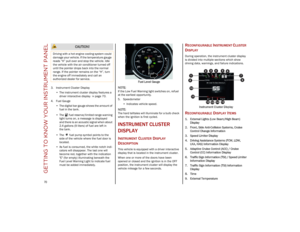 72
72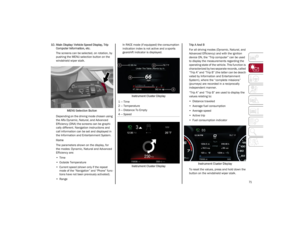 73
73 74
74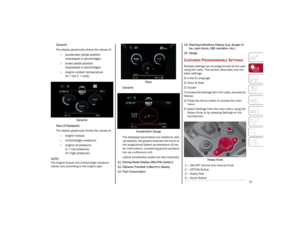 75
75 76
76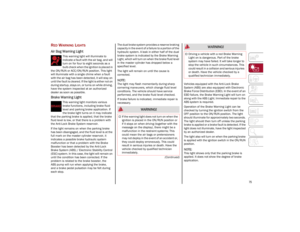 77
77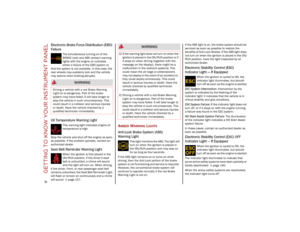 78
78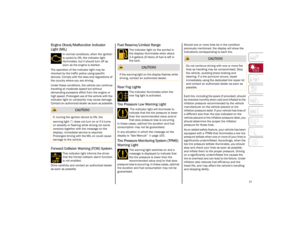 79
79 80
80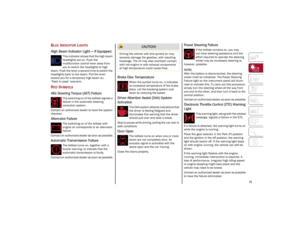 81
81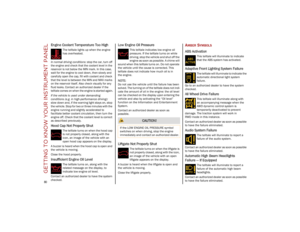 82
82 83
83 84
84 85
85 86
86 87
87 88
88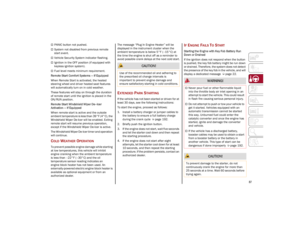 89
89 90
90 91
91 92
92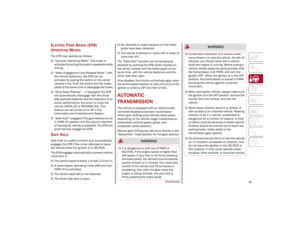 93
93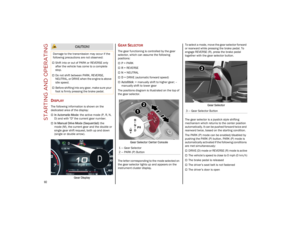 94
94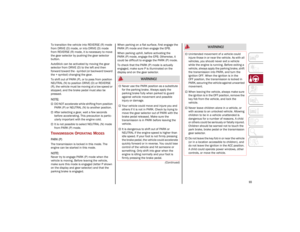 95
95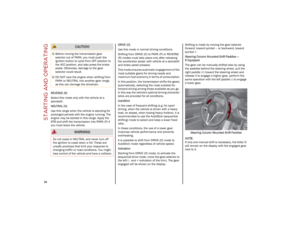 96
96 97
97 98
98 99
99 100
100 101
101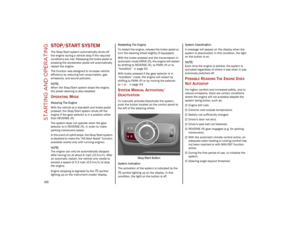 102
102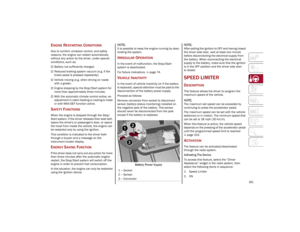 103
103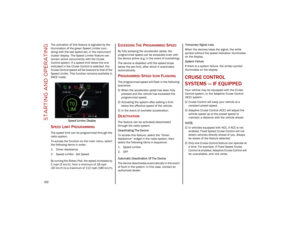 104
104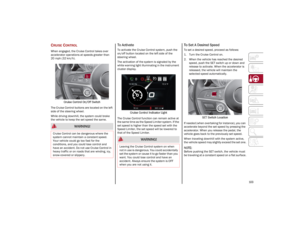 105
105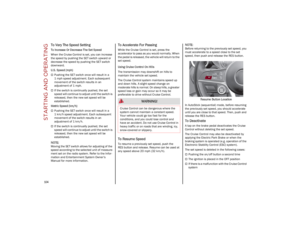 106
106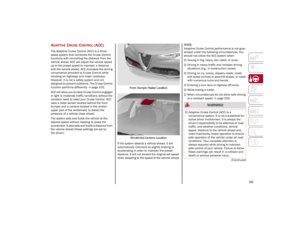 107
107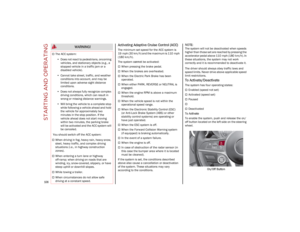 108
108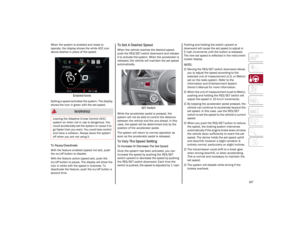 109
109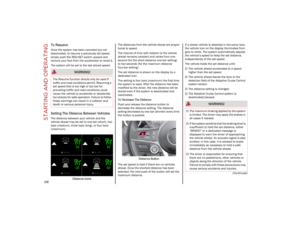 110
110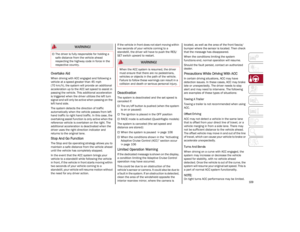 111
111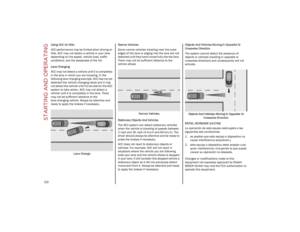 112
112 113
113 114
114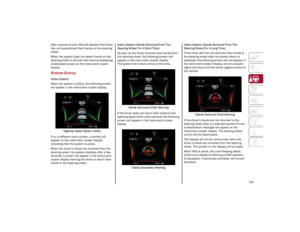 115
115 116
116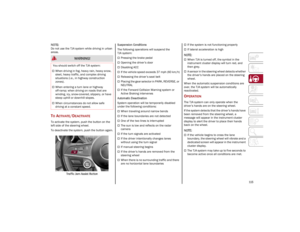 117
117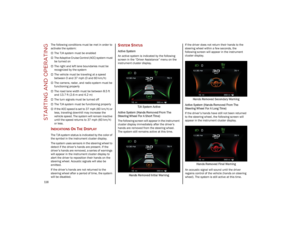 118
118 119
119 120
120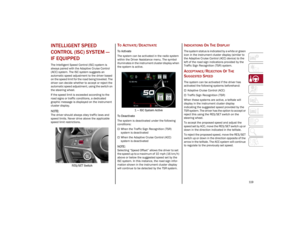 121
121 122
122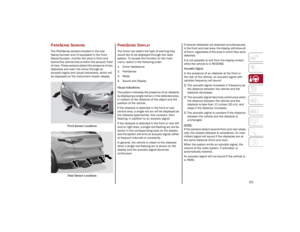 123
123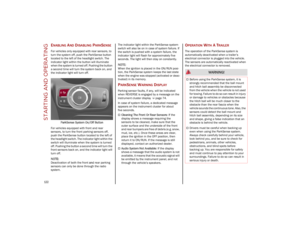 124
124 125
125 126
126 127
127 128
128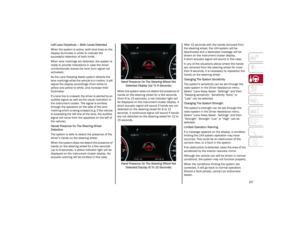 129
129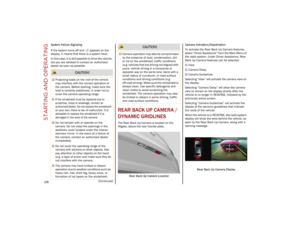 130
130 131
131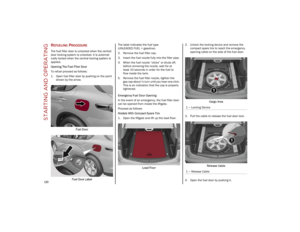 132
132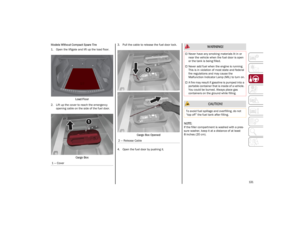 133
133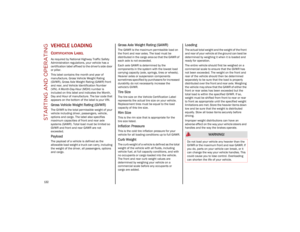 134
134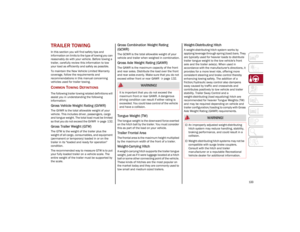 135
135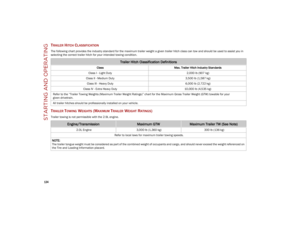 136
136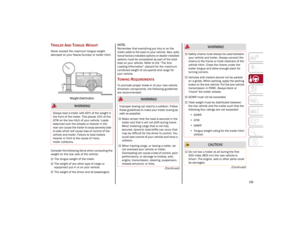 137
137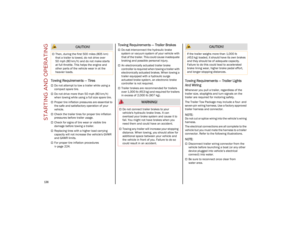 138
138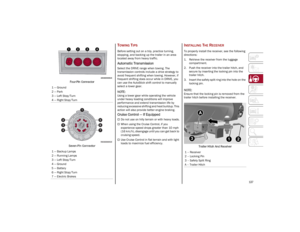 139
139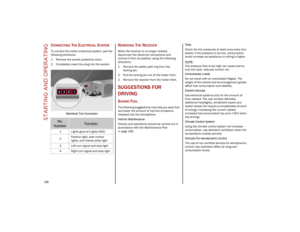 140
140 141
141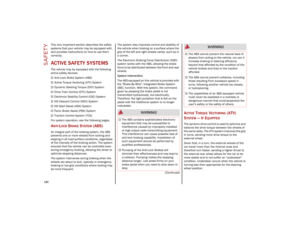 142
142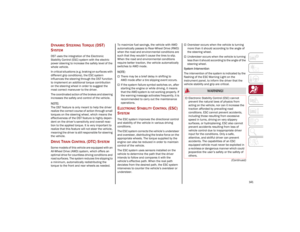 143
143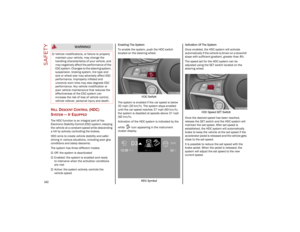 144
144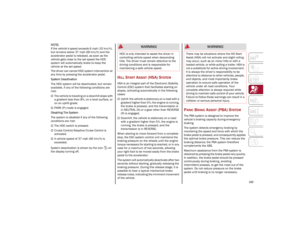 145
145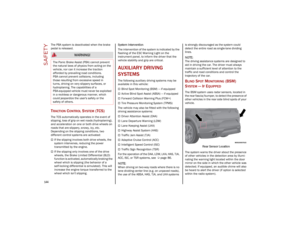 146
146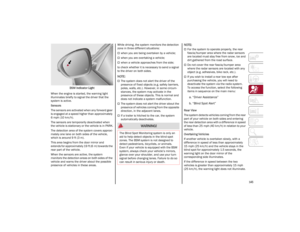 147
147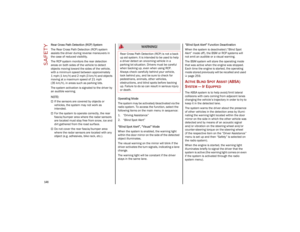 148
148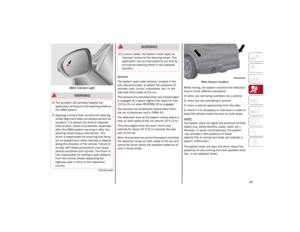 149
149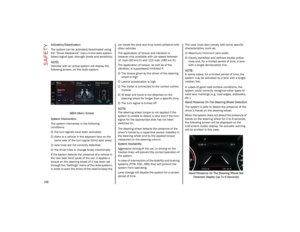 150
150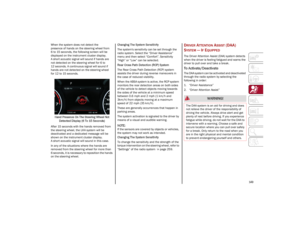 151
151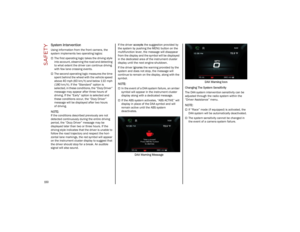 152
152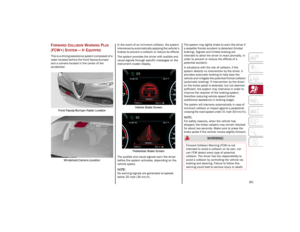 153
153 154
154 155
155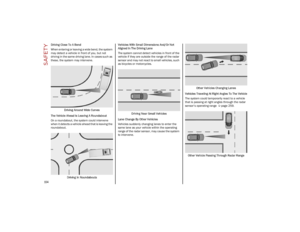 156
156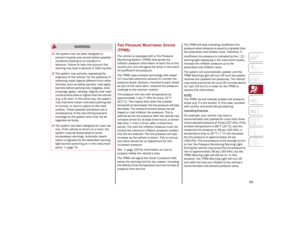 157
157 158
158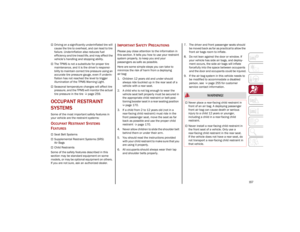 159
159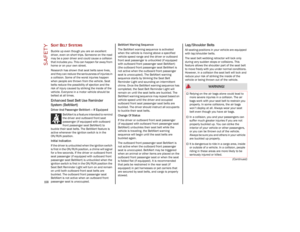 160
160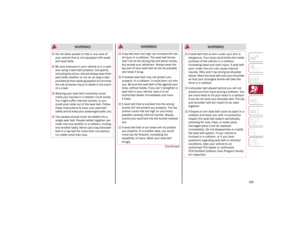 161
161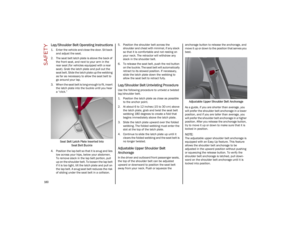 162
162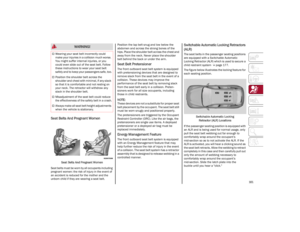 163
163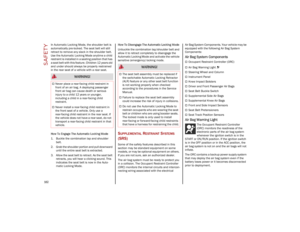 164
164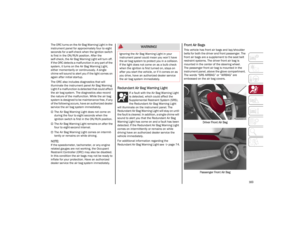 165
165 166
166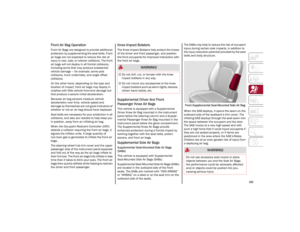 167
167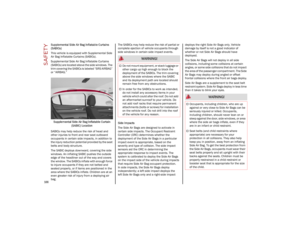 168
168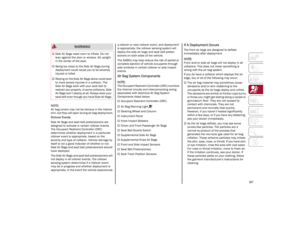 169
169 170
170 171
171 172
172 173
173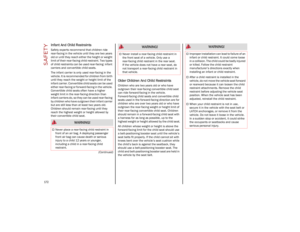 174
174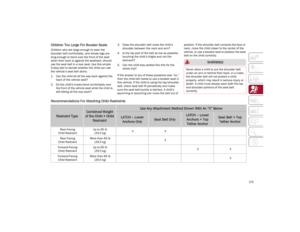 175
175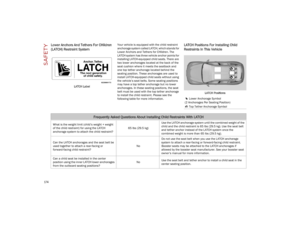 176
176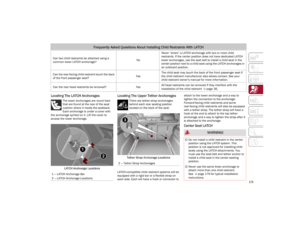 177
177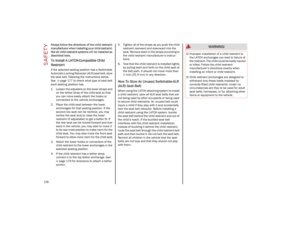 178
178 179
179 180
180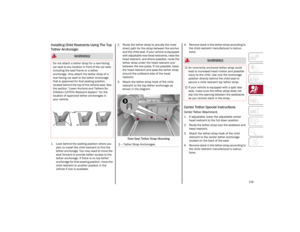 181
181 182
182 183
183 184
184 185
185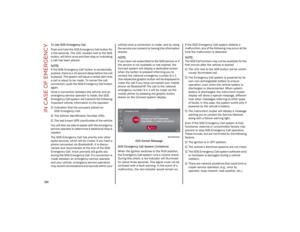 186
186 187
187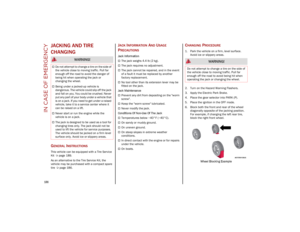 188
188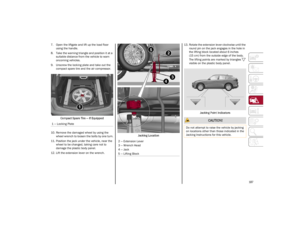 189
189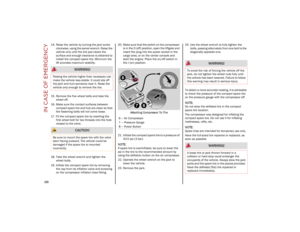 190
190 191
191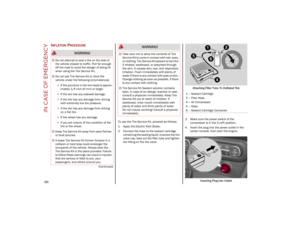 192
192 193
193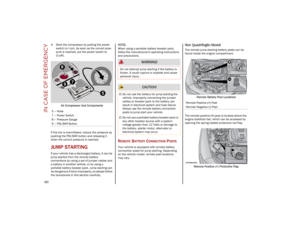 194
194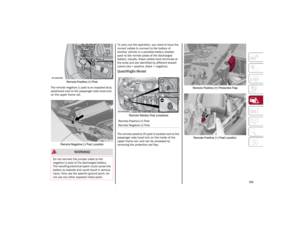 195
195 196
196 197
197 198
198 199
199 200
200 201
201 202
202 203
203 204
204 205
205 206
206 207
207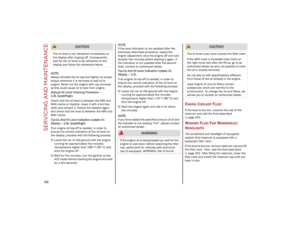 208
208 209
209 210
210 211
211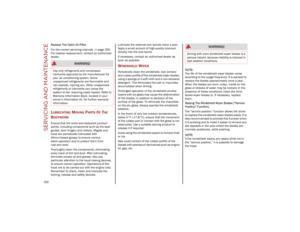 212
212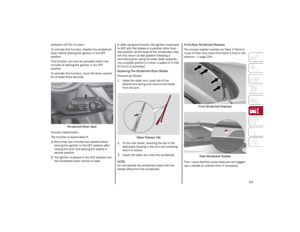 213
213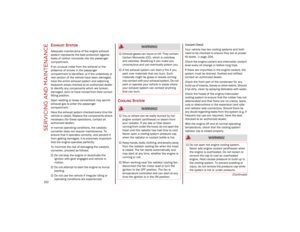 214
214 215
215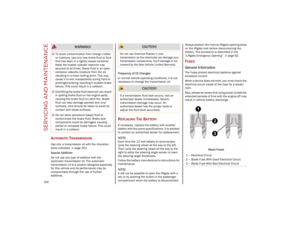 216
216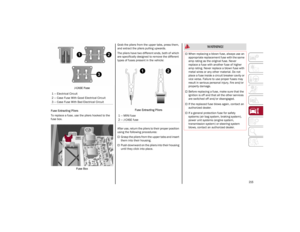 217
217 218
218 219
219 220
220 221
221 222
222 223
223 224
224 225
225 226
226 227
227 228
228 229
229 230
230 231
231 232
232 233
233 234
234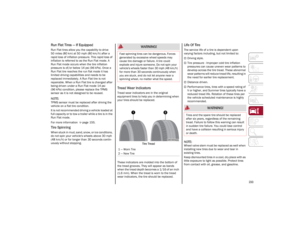 235
235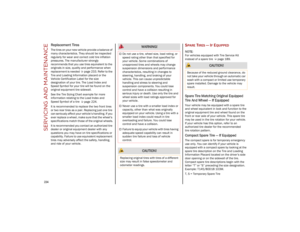 236
236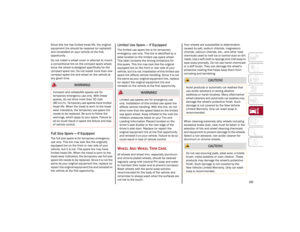 237
237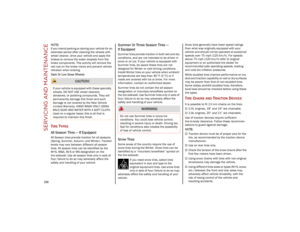 238
238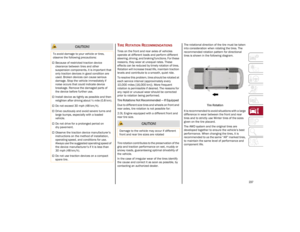 239
239 240
240 241
241 242
242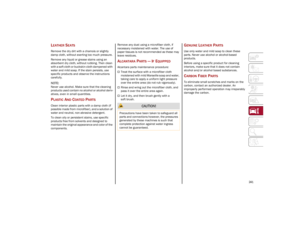 243
243 244
244 245
245 246
246 247
247 248
248 249
249 250
250 251
251 252
252 253
253 254
254 255
255 256
256 257
257 258
258 259
259 260
260 261
261 262
262 263
263 264
264 265
265 266
266 267
267

1 — Driver Side Temperature Adjustment Bar8 — Heated Rear Window On/Off Button
2 — Driver Side Air Distribution Buttons 9 — MAX-DEF")