2022 TOYOTA YARIS CROSS flat tire
[x] Cancel search: flat tirePage 371 of 618

369
6
CV Owner's Manual_Europe_M52N20_en
6-3. Do-it-yourself maintenance
Maintenance and care
determined and the inflation pres-
sures are not being displayed on the multi-information display, if the infla-tion pressure of a tire drops, the tire
pressure warning light will come on.
■If the tire pressure warning system is not initialized properly
●In the following situations, initialization may take longer than usual to be com-pleted or may not be possible. (Usu-
ally, the vehicle will need to be driven for approximately 10 to 30 minutes to complete initialization.) If initialization
is not complete after driving approxi- mately 30 minutes, continue driving for a while.
• If the vehicle is driven on an unpaved road, it may take longer to complete initialization.
• If the vehicle is backed up while per- forming initialization, data collected during initialization will be cleared and
it will take longer than normal to com- plete.• If the vehicle is driven in heavy traffic
or another situation where other vehi- cles are driven close by, it may take time for the system to recognize the
tire pressure warning valve and trans- mitters of your vehicle over those of other vehicles.
If initialization is not complete after driv-
ing for approximately 1 hour, park the
vehicle in a safe place for more than 15
minutes and then drive the vehicle
again.
●In the following situations, initialization will not be started or was not com-
pleted properly and the system will not operate properly. Perform the initial-ization procedure again.
• If, when attempting to start initializa- tion, the tire pressure warning light does not blink 3 times.
• If, when the vehicle has been driven for about 20 minutes after performing initialization, the tire pressure warning
light blinks for approximately 1 minute and then illuminates.
●If initialization cannot be completed
after performing the above procedure,
contact any authorized Toyota retailer or Toyota authorized repairer, or any reliable repairer.
The tire pressure warning valve
and transmitter is equipped with a
unique ID code. When replacing a
tire pressure warning valve and
transmitter, it is necessary to regis-
ter the ID code.
The ID codes can be registered on
of the multi-information display.
1 Park the vehicle in a safe place,
wait for approximately 15 min-
utes or more and perform the
procedure.
2 Turn the engine switch to ON.
Operate the registering ID codes func-
tion cannot be performed while the vehicle is moving.
3 Press / (7-inch display)
or / (4.2-inch display) of
the meter control switch to
select .
WARNING
■When initializing the tire pres- sure warning system
Do not initialize the tire pressure
warning system without first adjusting the tire inflation pressure to the speci-fied level. Otherwise, the tire pressure
warning light may not come on even if the tire inflation pressure is low, or it may come on when the tire inflation
pressure is actually normal.
Registering ID codes
Page 372 of 618

370
CV Owner's Manual_Europe_M52N20_en
6-3. Do-it-yourself maintenance
4Press / (7-inch display)
or / (4.2-inch display) to
select “Vehicle Settings” and
then press .
5 Press / to select “TPWS
setting” and then press .
6 Press / to select “Identi-
fying Each Wheel & Position”.
Then press and hold until
the tire pressure warning light
blinks slowly 3 times.
Then a message will be displayed on the multi-information display.
When registration is being performed, the tire pressure warning light will blink for approximately 1 minute then illumi-
nate and “--” will be displayed for the inflation pressure of each tire on the multi-information display.
7 Drive straight (with occasional
left and right turns) at approxi-
mately 40 km/h (25 mph) or
more for approximately 10 to 30
minutes.
Registration is complete when the tire pressure warning light turns off and the inflation pressure of each tire is dis-
played on the multi-information display.
Registration may take longer than approximately 1 hour in certain situa-tions, such as when the vehicle is
stopped for a long time at traffic lights, etc. ( P.371)
8Initializing the tire pressure
warning system. ( P.367)
■When registering ID codes
●Before performing ID code registra- tion, make sure that no wheels with tire pressure warning valve and trans-
mitters installed are near the vehicle.
●Make sure to initialize the tire pres-
sure warning system after registering the ID codes. If the system is initial-ized before registering the ID codes,
the initialized values will be invalid.
●As the tires will be warm when regis-
tration is completed, make sure to allow the tires to cool before perform-ing initialization.
■Canceling ID code registration
●To cancel ID code registration after it has been started, operate the multi-
information display again to select “Identifying Each Wheel & Position”. ( P.369)
●If ID code registration has been can-
celed, the tire pressure warning light will blink for approximately 1 minute when the engine switch is turned to
ON mode and then illuminate. The tire pressure warning system will be oper-ational when the tire pressure warning
light turns off.
●If the warning light does not turn off
even after several minutes have elapsed, ID code registration may not have been canceled correctly. To can-
cel registration, perform the ID code registration start procedure again and then turn the engine switch off before
driving.
Page 374 of 618

372
CV Owner's Manual_Europe_M52N20_en
6-3. Do-it-yourself maintenance
■How to change between wheel
sets
1 Have the vehicle fitted with the
preferred wheel set.
2 Press / (7-inch display)
or / (4.2-inch display) of
the meter control switch to
select .
3 Press / (7-inch display)
or / (4.2-inch display) to
select “Vehicle Settings” and
then press .
4 Press / to select “TPWS
setting” and then press .
5 Press / to select “Identi-
fying Each Wheel & Position”.
Then press and hold until
the tire pressure warning light
blinks slowly 3 times. Afterward,
turns on after flashing for 1 min-
ute.
After 2 minutes, registration of a second
wheel set is being performed and the
tire pressure warning light will turn off.
6 Initialize the tire pressure warn-
ing system. ( P.367)
If the tire inflation pressure settings for
the installed tire changes, initialization operations are required, but if the same tire inflation pressure, initialization is
not required.
7 Drive straight (with occasional
left and right turns) at approxi-
mately 40 km/h (25 mph) or
more for approximately 10 to 30
minutes.
Registration of a second wheel set is complete when the tire pressure warn-ing light turns off and the inflation pres-
sure of each tire is displayed on the multi-information display.
■Certifications for the tire pressure warning system
P. 6 0 8
Page 375 of 618

373
6
CV Owner's Manual_Europe_M52N20_en
6-3. Do-it-yourself maintenance
Maintenance and care
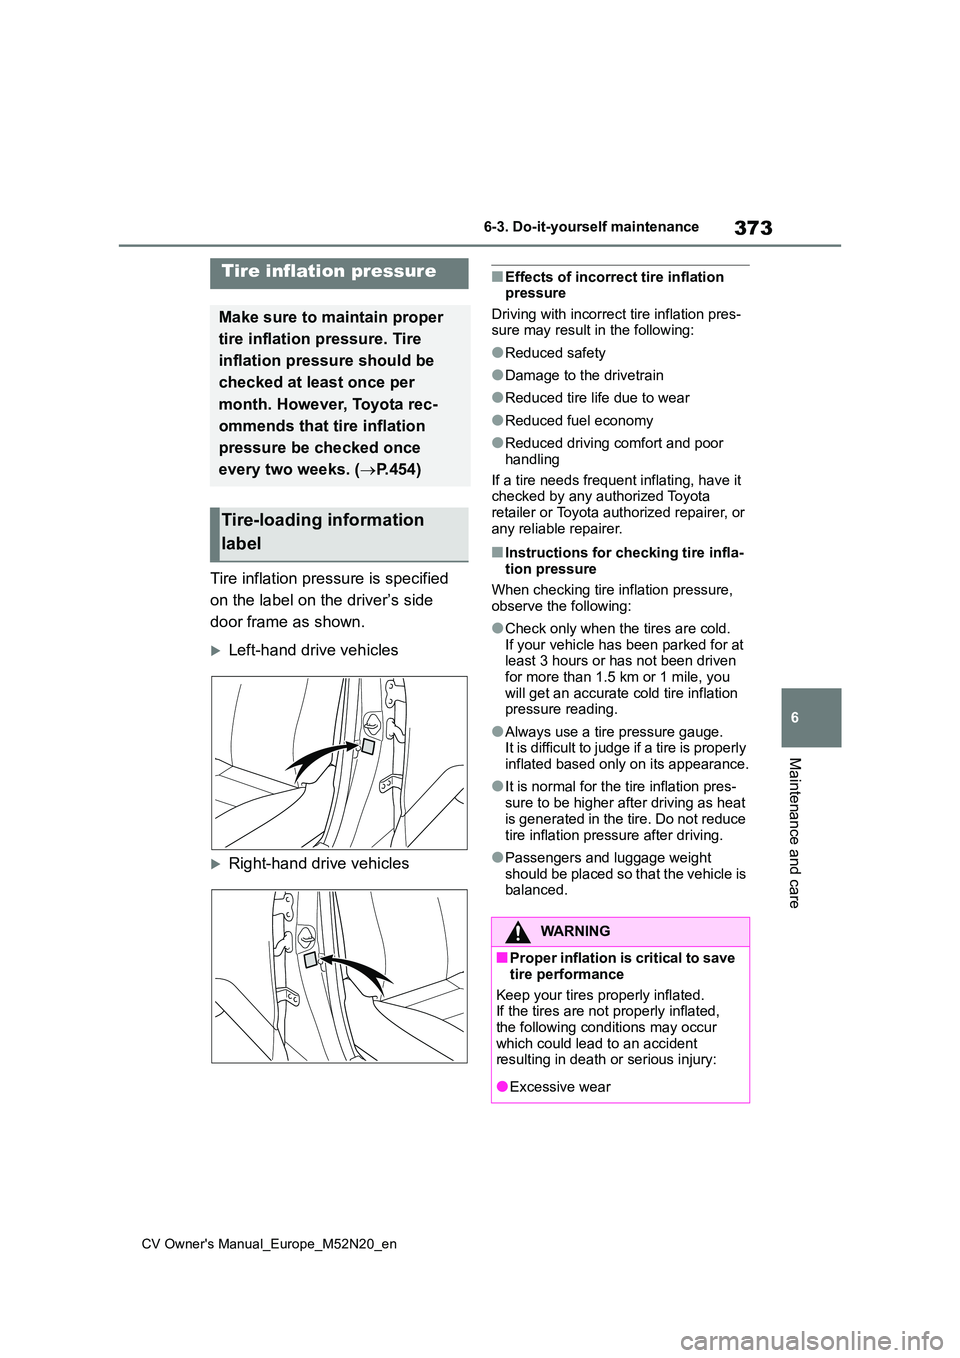
Tire inflation pressure is specified
on the label on the driver’s side
door frame as shown.
Left-hand drive vehicles
Right-hand drive vehicles
■Effects of incorrect tire inflation pressure
Driving with incorrect tire inflation pres- sure may result in the following:
●Reduced safety
●Damage to the drivetrain
●Reduced tire life due to wear
●Reduced fuel economy
●Reduced driving comfort and poor
handling
If a tire needs frequent inflating, have it checked by any authorized Toyota
retailer or Toyota authorized repairer, or any reliable repairer.
■Instructions for checking tire infla-tion pressure
When checking tire inflation pressure, observe the following:
●Check only when the tires are cold.If your vehicle has been parked for at least 3 hours or has not been driven
for more than 1.5 km or 1 mile, you will get an accurate cold tire inflation pressure reading.
●Always use a tire pressure gauge.It is difficult to judge if a tire is properly
inflated based only on its appearance.
●It is normal for the tire inflation pres-
sure to be higher after driving as heat is generated in the tire. Do not reduce
tire inflation pressure after driving.
●Passengers and luggage weight
should be placed so that the vehicle is balanced.
Tire inflation pressure
Make sure to maintain proper
tire inflation pressure. Tire
inflation pressure should be
checked at least once per
month. However, Toyota rec-
ommends that tire inflation
pressure be checked once
every two weeks. ( P.454)
Tire-loading information
label
WARNING
■Proper inflation is critical to save
tire performance
Keep your tires properly inflated. If the tires are not properly inflated,
the following conditions may occur which could lead to an accident resulting in death or serious injury:
●Excessive wear
Page 376 of 618

374
CV Owner's Manual_Europe_M52N20_en
6-3. Do-it-yourself maintenance
When replacing wheels, care
should be taken to ensure that they
are equivalent to those removed in
load capacity, diameter, rim width
and inset*.
Replacement wheels are available
at any authorized Toyota retailer or
Toyota authorized repairer, or any
reliable repairer.
*: Conventionally referred to as offset.
Toyota does not recommend using
the following:
Wheels of different sizes or types
Used wheels
Bent wheels that have been
straightened
■When replacing wheels
The wheels of your vehicle are equipped with tire pressure warning valves and
transmitters that allow the tire pressure warning system to provide advance warning in the event of a loss in tire
inflation pressure. Whenever wheels are replaced, the tire pressure warning valves and transmitters must be
installed. ( P.366)
WARNING
●Uneven wear
●Poor handling
●Possibility of blowouts resulting
from overheated tires
●Air leaking from between tire and
wheel
●Wheel deformation and/or tire dam-
age
●Greater possibility of tire damage
while driving (due to road hazards, expansion joints, sharp edges on the road, etc.)
NOTICE
■When inspecting and adjusting tire inflation pressure
B e s ur e t o pu t th e t i r e v al ve ca ps ba ck
on. If a valve cap is not installed, dirt or moisture may get into the valve and
cause an air leak, resulting in decreased tire inflation pressure.
Wheels
If a wheel is bent, cracked or
heavily corroded, it should be
replaced. Otherwise, the tire
may separate from the wheel
or cause a loss of handling
control.
Wheel selection
Page 381 of 618

379
6
CV Owner's Manual_Europe_M52N20_en
6-3. Do-it-yourself maintenance
Maintenance and care
shops or camera stores.
●Replace only with the same or equiva- lent type recommended by the manu-
facturer.
●Dispose of used batteries according to
local laws.
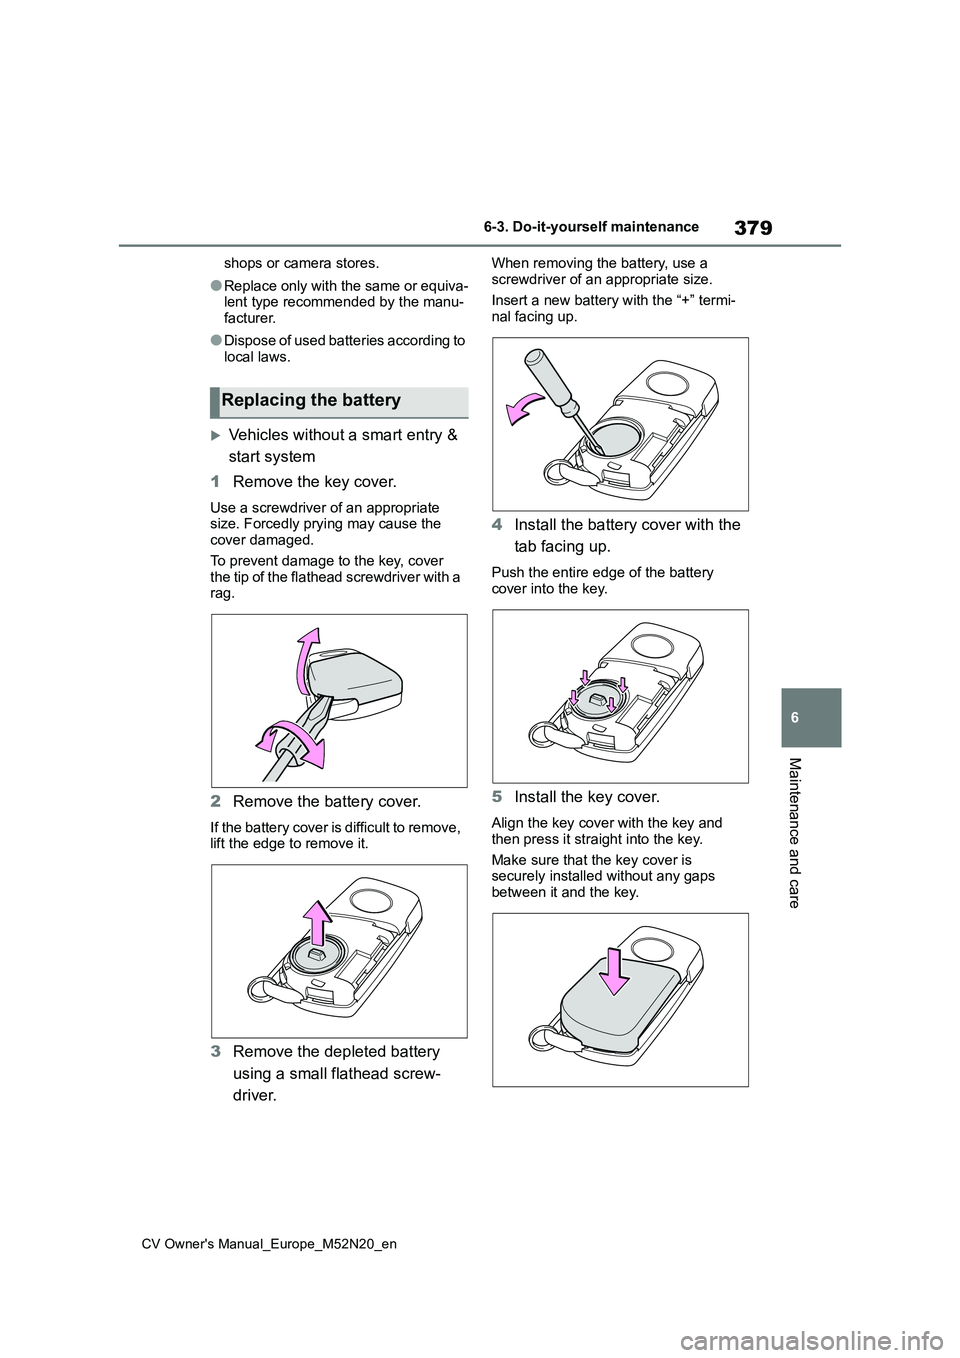
Vehicles without a smart entry &
start system
1 Remove the key cover.
Use a screwdriver of an appropriate size. Forcedly prying may cause the cover damaged.
To prevent damage to the key, cover the tip of the flathead screwdriver with a rag.
2 Remove the battery cover.
If the battery cover is difficult to remove, lift the edge to remove it.
3 Remove the depleted battery
using a small flathead screw-
driver.
When removing the battery, use a
screwdriver of an appropriate size.
Insert a new battery with the “+” termi- nal facing up.
4 Install the battery cover with the
tab facing up.
Push the entire edge of the battery cover into the key.
5 Install the key cover.
Align the key cover with the key and
then press it straight into the key.
Make sure that the key cover is securely installed without any gaps
between it and the key.
Replacing the battery
Page 395 of 618

7
393
CV Owner's Manual_Europe_M52N20_en
7
When trouble arises
When trouble arises
7-1. Essential information
Emergency flashers .......... 394
If your vehicle has to be
stopped in an emergency 394
If the vehicle is submerged or
water on the road is rising
....................................... 395
7-2. Steps to take in an emer-
gency
If your vehicle needs to be
towed .............................. 397
If you think something is wrong
....................................... 401
Fuel pump shut off system 402
If a warning light turns on or a
warning buzzer sounds... 403
If a warning message is dis-
played ............................. 413
If you have a flat tire (vehicles
with an emergency tire punc-
ture repair kit) ................. 415
If you have a flat tire (vehicles
with a spare tire) ............. 426
If the engine will not start .. 435
If you lose your keys ......... 436
If the electronic key does not
operate properly (vehicles
with a smart entry & start sys-
tem) ................................ 437
If the vehicle battery is dis-
charged .......................... 439
If your vehicle overheats... 442
If the vehicle becomes stuck
....................................... 444
Page 400 of 618

398
CV Owner's Manual_Europe_M52N20_en
7-2. Steps to take in an emergency
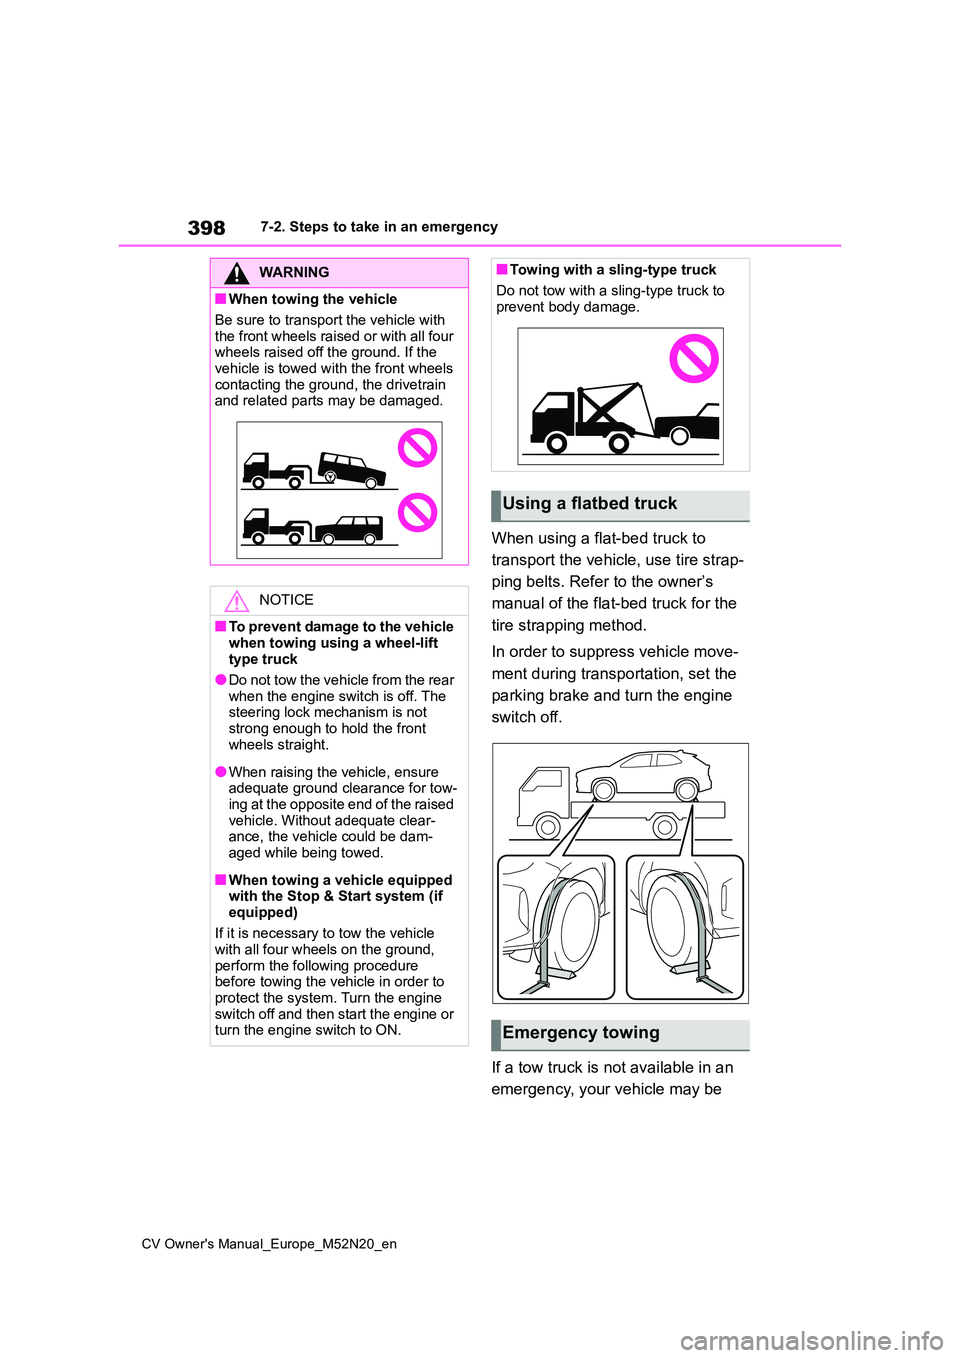
When using a flat-bed truck to
transport the vehicle, use tire strap-
ping belts. Refer to the owner’s
manual of the flat-bed truck for the
tire strapping method.
In order to suppress vehicle move-
ment during transportation, set the
parking brake and turn the engine
switch off.
If a tow truck is not available in an
emergency, your vehicle may be
WARNING
■When towing the vehicle
Be sure to transport the vehicle with
the front wheels raised or with all four wheels raised off the ground. If the vehicle is towed with the front wheels
contacting the ground, the drivetrain and related parts may be damaged.
NOTICE
■To prevent damage to the vehicle
when towing using a wheel-lift type truck
●Do not tow the vehicle from the rear
when the engine switch is off. The steering lock mechanism is not strong enough to hold the front
wheels straight.
●When raising the vehicle, ensure adequate ground clearance for tow-ing at the opposite end of the raised
vehicle. Without adequate clear- ance, the vehicle could be dam-aged while being towed.
■When towing a vehicle equipped with the Stop & Start system (if
equipped)
If it is necessary to tow the vehicle with all four wheels on the ground,
perform the following procedure before towing the vehicle in order to protect the system. Turn the engine
switch off and then start the engine or turn the engine switch to ON.
■Towing with a sling-type truck
Do not tow with a sling-type truck to prevent body damage.
Using a flatbed truck
Emergency towing