2022 TOYOTA VENZA HYBRID check oil
[x] Cancel search: check oilPage 15 of 548
15Pictorial index
To prevent freezing (windshield wiper de-icer)*...........P.317, 327
Precautions against car wash
(Rain-sensing windshield wipers)
*.......................................P.371
Replacing the wiper insert .................................... ...............P.419
Fuel filler door ............................................... .....................P.227
Refueling method ............................................... ..................P.227
Fuel type/fuel tan k capacity .................................................P.477
Tires ....................................................................................P.397
Tire size/inflation pressure ................................... ................P.482
Winter tires/tire chain ........................................ ...................P.304
Checking/rotation/tire pressur e warning system ..................P.397
Coping with flat tires......................................... ....................P.453
Hood ....................................................................................P.385
Opening ........................................................ .......................P.385
Engine oil ..................................................... ........................P.478
Coping with overheat ........................................... ................P.470
Warning messages ..............................................................P.449
Headlights..................................................... ......................P.215
Fog lights
*............................................................... ............P.221
Parking lights .....................................................................P.215
Daytime running lights .. ....................................................P.215
Turn signal lights ...............................................................P.208
Side marker lights ............................................. .................P.215
Tail lights/stop lights ........................................ .................P.215
Tail lights .................................................... ........................P.215
License plate lights........................................... .................P.215
Back-up lights
Exterior lights for driving
(Replacing: P.428)
E
F
G
H
I
J
K
L
M
N
O
P
Q
Page 91 of 548
912-1. Instrument cluster
2
Vehicle status information and indicators
By keeping the indicator needle
within Eco area, more Eco-friendly
driving can be achieved.
Power area
Shows that an Eco-friendly driving
range is being exceeded (during full
power driving etc.)
*: When used in this manual, “regen- eration” refers to the conversion of
energy created by the movement
of the vehicle into electrical
energy.
In the following situ ation, the Hybrid
System Indicator does not operate.
●“READY” indicator is not illumi-
nated.
●The shift position is in a range
other than D or S.
■Outside temperature display
●In the following si tuations, the cor-
rect outside tempe rature may not
be displayed, or the display may
take longer than normal to
change.
• When stopped, or driving at low
speeds (less than 12 mph [20
km/h])
• When the outside temperature
has changed suddenly (at the
entrance/exit of a garage, tunnel,
etc.)
●When “--” or “E” is displayed, the
system may be malfunctioning.
Take your vehicle to your Toyota
dealer.
●Displays the outside temperature
within the range of -40°F (-40°C)
to 122°F (50°C).
●When the outside temperature is
approximately 37°F (3°C) or
lower, the indicator will flash
for approximately 10 seconds,
then stay on.
■Liquid crystal display
P.97
Switches the items of the odom-
eter, trip meter A, trip meter B
and (oil maintenance) by
pressing the “ODO TRIP”
switch.
When the trip meter is dis-
played, pressing and holding the
EWARNING
■The information display at
low temperatures
Allow the interior of the vehicle to
warm up before using the liquid
crystal information display. At
extremely low temperatures, the
display monitor may respond
slowly, and display changes may
be delayed.
For example, there is a lag
between the driver’s shifting and
the new shift range appearing on
the display. This lag could cause
the driver to downshift again,
causing rapid and excessive
engine braking and possibly an
accident resulting in death or
injury.
NOTICE
■To prevent damage to the
engine and its components
The engine may be overheating if
the engine coolant temperature
gauge is in the red zone (“H”). In
this case, immediately stop the
vehicle in a safe place, and check
the engine after it has cooled
completely. ( P.470)
Using the “ODO TRIP”
switch
Page 95 of 548
952-1. Instrument cluster
2
Vehicle status information and indicators
range is being exceeded (during full
power driving etc.)
*: When used in this manual, “regen-eration” refers to the conversion of
energy created by the movement
of the vehicle into electrical
energy.
In the following situ ation, the Hybrid
System Indicator does not operate.
●“READY” indicator is not illumi-
nated.
●The shift position is in a range
other than D or S.
■Outside temperature display
●In the following si tuations, the cor-
rect outside tempe rature may not
be displayed, or the display may
take longer than normal to
change.
• When stopped, or driving at low speeds (less than 12 mph [20
km/h])
• When the outside temperature has changed suddenly (at the
entrance/exit of a garage, tunnel,
etc.)
●When “--” or “E” is displayed, the
system may be malfunctioning.
Take your vehicle to your Toyota
dealer.
●Displays the outside temperature
within the range of -40°F (-40°C)
to 122°F (50°C).
●When the outside temperature is
approximately 37°F (3°C) or
lower, the indicator will flash
for approximately 10 seconds,
then stay on.
■Liquid crystal display
P.107
Switches the items of the odom-
eter, trip meter A, trip meter B
and (oil maintenance) by
pressing the “ODO TRIP”
switch.
When the trip meter is dis-
played, pressing and holding the
switch will reset the trip meter.
WARNING
■The information display at
low temperatures
Allow the interior of the vehicle to
warm up before using the liquid
crystal information display. At
extremely low temperatures, the
display monitor may respond
slowly, and display changes may
be delayed.
For example, there is a lag
between the driver’s shifting and
the new shift range appearing on
the display. This lag could cause
the driver to downshift again,
causing rapid and excessive
engine braking and possibly an
accident resulting in death or
injury.
NOTICE
■To prevent damage to the
engine and its components
The engine may be overheating if
the engine coolant temperature
gauge is in the red zone (“H”). In
this case, immediately stop the
vehicle in a safe place, and check
the engine after it has cooled
completely. ( P.470)
Using the “ODO TRIP”
switch
Page 247 of 548
2474-5. Using the driving support systems
4
Driving
■Lane departure alert func-
tion
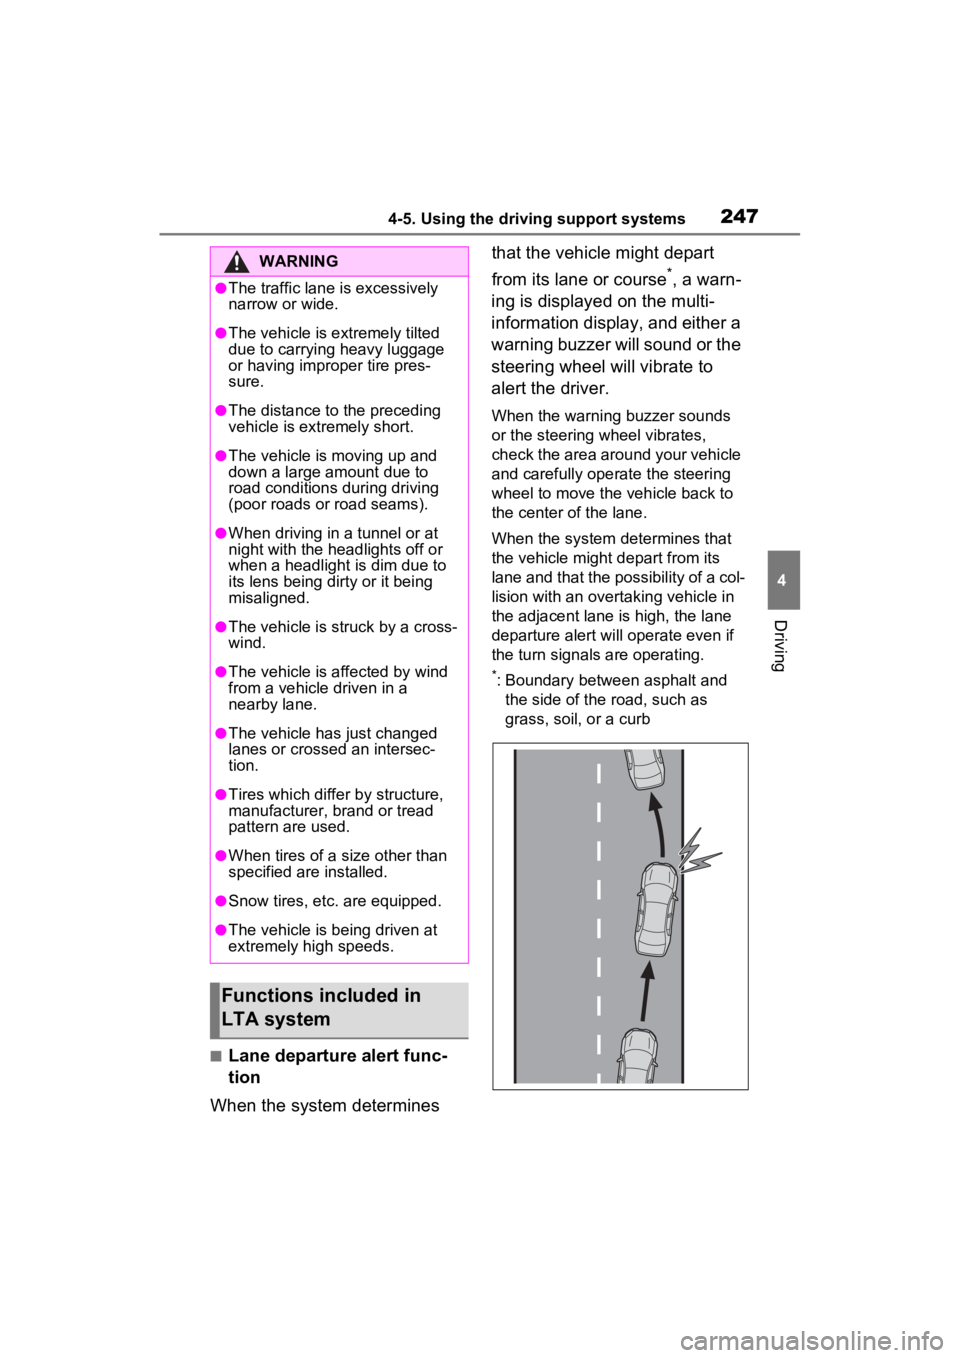
When the system determines that the vehicle might depart
from its lane or course
*, a warn-
ing is displayed on the multi-
information display, and either a
warning buzzer will sound or the
steering wheel will vibrate to
alert the driver.
When the warning buzzer sounds
or the steering wheel vibrates,
check the area around your vehicle
and carefully operate the steering
wheel to move the vehicle back to
the center of the lane.
When the system determines that
the vehicle might depart from its
lane and that the possibility of a col-
lision with an overta king vehicle in
the adjacent lane is high, the lane
departure alert will operate even if
the turn signals are operating.
*: Boundary between asphalt and the side of the road, such as
grass, soil, or a curb
WARNING
●The traffic lane is excessively
narrow or wide.
●The vehicle is extremely tilted
due to carrying heavy luggage
or having improper tire pres-
sure.
●The distance to the preceding
vehicle is extremely short.
●The vehicle is moving up and
down a large amount due to
road conditions during driving
(poor roads or road seams).
●When driving in a tunnel or at
night with the headlights off or
when a headlight is dim due to
its lens being dirty or it being
misaligned.
●The vehicle is struck by a cross-
wind.
●The vehicle is affected by wind
from a vehicle driven in a
nearby lane.
●The vehicle has just changed
lanes or crossed an intersec-
tion.
●Tires which differ by structure,
manufacturer, b rand or tread
pattern are used.
●When tires of a size other than
specified are installed.
●Snow tires, etc. are equipped.
●The vehicle is being driven at
extremely high speeds.
Functions included in
LTA system
Page 309 of 548
3094-6. Driving tips
4
Driving
WARNING
●When driving off-road or in rug-
ged terrain, do not drive at
excessive speeds, jump, make
sharp turns, strike objects, etc.
This may cause loss of control
or vehicle rollover causing
death or serious injury. You are
also risking expensive damage
to your vehicle’s suspension
and chassis.
NOTICE
■To prevent water damage
Take all necessary safety mea-
sures to ensure that water dam-
age to the hybrid battery (traction
battery), hybrid s ystem or other
components does not occur.
●Water entering the engine com-
partment may cause severe
damage to the hybrid system.
Water entering the interior may
cause the hybrid battery (trac-
tion battery) stowed under the
rear seats to short circuit.
●Water entering t he hybrid trans-
mission and rear electric motor
(traction motor) will cause dete-
rioration in transmission quality.
The malfunction indicator may
come on, and the vehicle may
not be drivable.
●Water can wash the grease
from wheel bearings, causing
rusting and premature failure,
and may also enter the hybrid
transmission case, reducing the
gear oil’s lubricating qualities.
■When you drive through
water
If driving through water, such as
when crossing shallow streams,
first check the depth of the water
and the bottom of the riverbed for
firmness. Drive slowly and avoid
deep water.
■Inspection after off-road driv-
ing
●Sand and mud that has accu-
mulated around brake discs
may affect braking efficiency
and may damage brake system
components.
●Always perform a maintenance
inspection after each day of off-
road driving that has taken you
through rough terrain, sand,
mud, or water. For scheduled
maintenance information, refer
to the “Scheduled Maintenance
Guide” or “Owner’s Manual
Supplement”.
Page 377 of 548
3776-2. Maintenance
6
Maintenance and care
6-2.Maintenance
■Repair and replacement
It is recommended that genuine
Toyota parts be used for repairs to
ensure performanc e of each sys-
tem. If non-Toyota p arts are used in
replacement or if a repair shop other
than a Toyota dealer performs
repairs, confirm the warranty cover-
age.
■Allow inspection and repairs to
be performed by a Toyota
dealer
●Toyota technicians are well-
trained specialists and are kept up
to date with the latest service
information. They are well
informed about the operations of
all systems on your vehicle.
●Keep a copy of the repair order. It
proves that the maintenance that
has been performed is under war-
ranty coverage. If any problem
should arise while your vehicle is
under warranty, your Toyota
dealer will promptly take care of it.
General maintenance should be
performed on a daily basis. This
can be done by yourself or by a
Toyota dealer.
Scheduled maintenance should
be performed at specified inter-
vals according to the mainte-
nance schedule.
For details about maintenance
items and schedules, refer to the
“Scheduled Maintenance Guide” or
“Owner’s Manual Supplement”.
Maintenance require-
ments
To ensure safe and econom-
ical driving, day-to-day care
and regular maintenance
are essential. It is the
owner’s responsibility to
perform regular checks.
Toyota recommends the fol-
lowing maintenance:
WARNING
■If your vehicle is not properly
maintained
Improper maintenance could
result in serious damage to the
vehicle and possible death or seri-
ous injury.
■Handling of the 12-volt bat-
tery
●Engine exhaust, some of its
constituents, and a wide variety
of automobile components con-
tain or emit chemicals known to
the State of California to cause
cancer and birth defects and
other reproductive harm. Work
in a well ventilated area.
●Oils, fuels and fluids contained
in vehicles as well as waste pro-
duced by component wear con-
tain or emit chemicals known to
the State of California to cause
cancer and birth defects or
other reproductive harm. Avoid
exposure and wash any
affected area immediately.
●12-volt battery posts, terminals
and related accessories con-
tain lead and lead compounds
which are known to cause brain
damage. Wash your hands after
handling. ( P.394)
General maintenance
Scheduled maintenance
Page 379 of 548
3796-2. Maintenance
6
Maintenance and care
General maintenance
Listed below are the general
maintenance items that
should be performed at the
intervals specified in the
“Owner’s Warranty Informa-
tion Booklet” or “Owner’s
Manual Supplement/Sched-
uled Maintenance Guide”. It
is recommended that any
problem you notice should
be brought to the attention
of your Toyota dealer or
qualified service shop for
advice.
WARNING
■If the hybrid system is run-
ning
Turn the hybrid system off and
ensure that there is adequate
ventilation before performing
maintenance checks.
Engine compartment
ItemsCheck points
Brake fluid
Is the brake fluid at
the correct level?
( P.392)
Engine/power
control unit
coolant
Is the
engine/power con-
trol unit coolant at
the correct level?
( P.391)
Engine oil
Is the engine oil at
the correct level?
( P.388)
Exhaust sys-
temThere should not
be any fumes or
strange sounds.
Radiator/con-
denser
The radiator and
condenser should
be free from for-
eign objects.
( P.392)
Washer fluid
Is there sufficient
washer fluid?
( P.393)
Luggage compartment
ItemsCheck points
12-volt batteryCheck the connec-
tions. ( P.394)
Vehicle interior
ItemsCheck points
Accelerator
pedal
• The accelerator
pedal should
move smoothly
(without uneven
pedal effort or
catching).
Hybrid trans-
mission “Park”
mechanism
• When parked on a slope and the
shift position is in
P, is the vehicle
securely
stopped?
ItemsCheck points
Page 389 of 548
3896-3. Do-it-yourself maintenance
6
Maintenance and care
check the oil level on the dip-
stick.
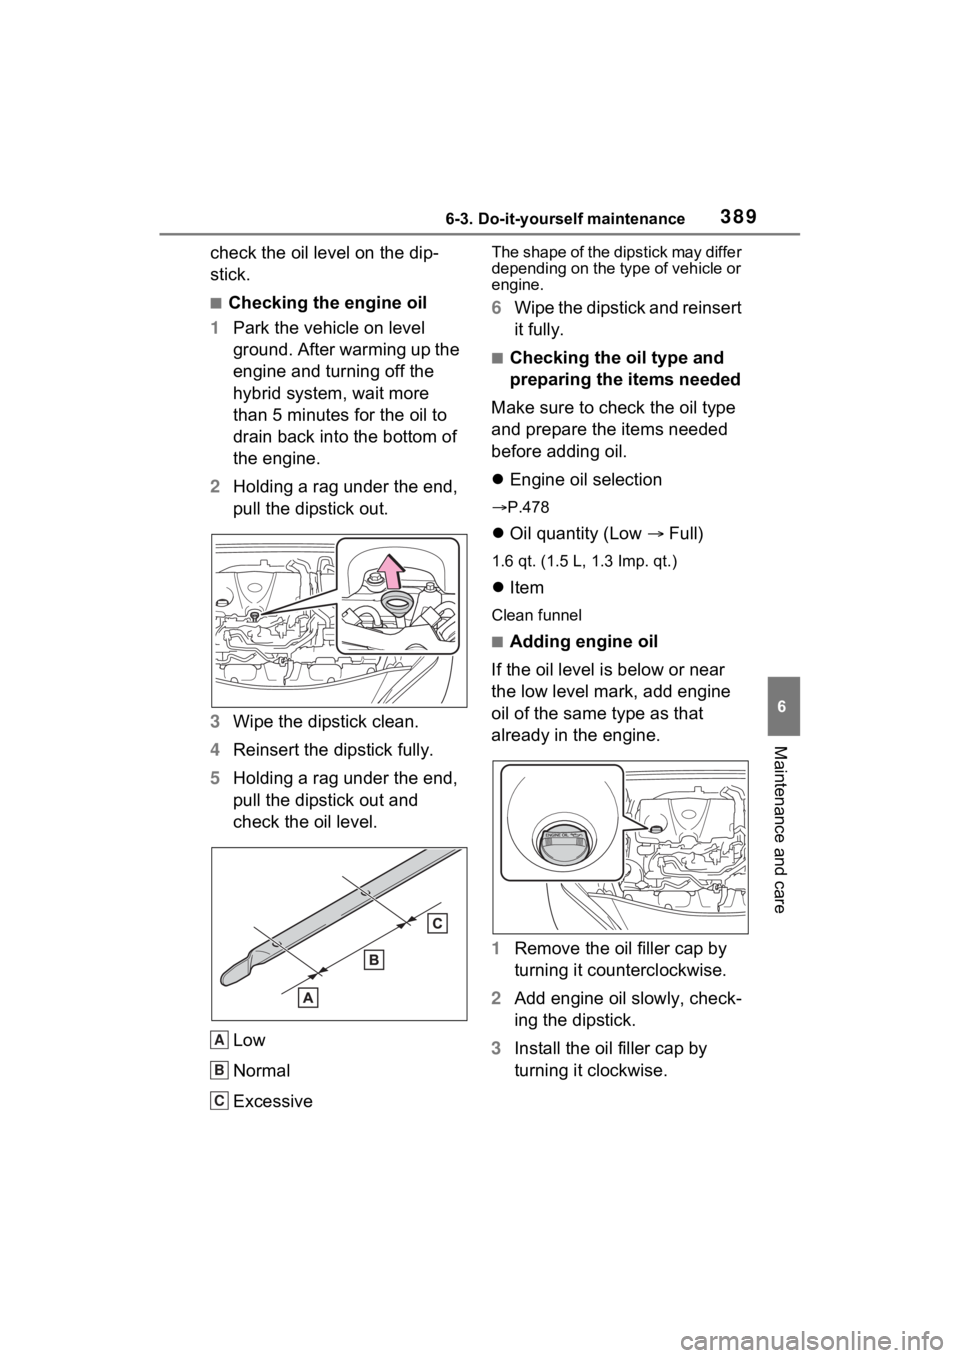
■Checking the engine oil
1 Park the vehicle on level
ground. After warming up the
engine and turning off the
hybrid system, wait more
than 5 minutes for the oil to
drain back into the bottom of
the engine.
2 Holding a rag under the end,
pull the dipstick out.
3 Wipe the dipstick clean.
4 Reinsert the dipstick fully.
5 Holding a rag under the end,
pull the dipstick out and
check the oil level.
Low
Normal
Excessive
The shape of the dipstick may differ
depending on the type of vehicle or
engine.
6Wipe the dipstick and reinsert
it fully.
■Checking the oil type and
preparing the items needed
Make sure to check the oil type
and prepare the items needed
before adding oil.
Engine oil selection
P.478
Oil quantity (Low Full)
1.6 qt. (1.5 L, 1.3 Imp. qt.)
Item
Clean funnel
■Adding engine oil
If the oil level is below or near
the low level mark, add engine
oil of the same type as that
already in the engine.
1 Remove the oil filler cap by
turning it counterclockwise.
2 Add engine oil slowly, check-
ing the dipstick.
3 Install the oil filler cap by
turning it clockwise.
A
B
C