2022 TOYOTA TUNDRA HYBRID change time
[x] Cancel search: change timePage 361 of 618
3614-5. Using the driving support systems
Owners Manual_USA_M0C031_en
4
Driving
■Shifting from “4L” to “4H”
1 Stop the vehicle completely
and continue to depress the
brake pedal.
2 Shift the shift lever to N.
3 Push and shift the front-
wheel drive control switch to
“4H”.
The “4L” indicator will go off.
■When the front-wheel drive con-
trol switch is shifted to “4L”
VSC is automatically turned off.
■If the “4H” indicator flashes
The transfer mode may not suc-
cessfully change. Drive straight
ahead while accelerating or deceler-
ating, or drive in reverse.
■If the “4H” indicator is ON and
the “4L” indicator continues to
flash
A message will be displayed in the
multi-information display. Follow a
message, shift the shift lever to D or
R and drive the vehicle slowly, then
stop.
■If the “4H” indicator continues
to flash and the “4L” indicator
is ON
A message will be displayed in the
multi-information display. Follow a
message, shift the shift lever to D or
R and drive the vehicle slowly, then
stop.
■If the “4H” indicator is ON and
the “4L” indicator continues to
flash and a buzzer sounds
The shift lever is not in N and/or the
vehicle is moving . Stop the vehicle
completely, shift th e shift lever to N
and make sure that the indicator
stops flashing.
■If the “4H” indicator continues
to flash and the “4L” indicator
is ON and a buzzer sounds
The shift lever is not in N and/or the
vehicle is moving. Stop the vehicle
completely, shift the shift lever to N
and make sure that the indicator
stops flashing
■If the “4H” and “4L” indicator
flashes rapidly
There may be a malfunction in the
four-wheel drive system. Have the
vehicle inspected by your Toyota
dealer immediately.
■Four-wheel drive usage fre-
quency
You should drive in four-wheel drive
for at least 10 miles (16 km) each
month. This will assure that the front
drive components are lubricated.
WARNING
■Shifting the front-wheel drive
control switch from “2H” to
“4H” while driving
Never operate the front-wheel
drive control switch if the wheels
are slipping. Stop the slipping or
spinning before shifting.
■When the vehicle is parked
If the shift lever is moved before
the “4L” indicator turns on/off, the
transfer mode may not be shifted
completely. The transfer mode
disengages both the front and
rear driveshafts from the power-
train and allows the vehicle to
move regardless of the shift posi-
tion. (At this time, the indicator
blinks and the buzzer sounds.)
Therefore, the vehicle is free to
roll even if the automatic trans-
mission is in P. You or someone
else could be seriously injured.
You must complete the shifting of
the transfer mode before placing
transmission in P.
Page 372 of 618
3724-5. Using the driving support systems
Owners Manual_USA_M0C031_en
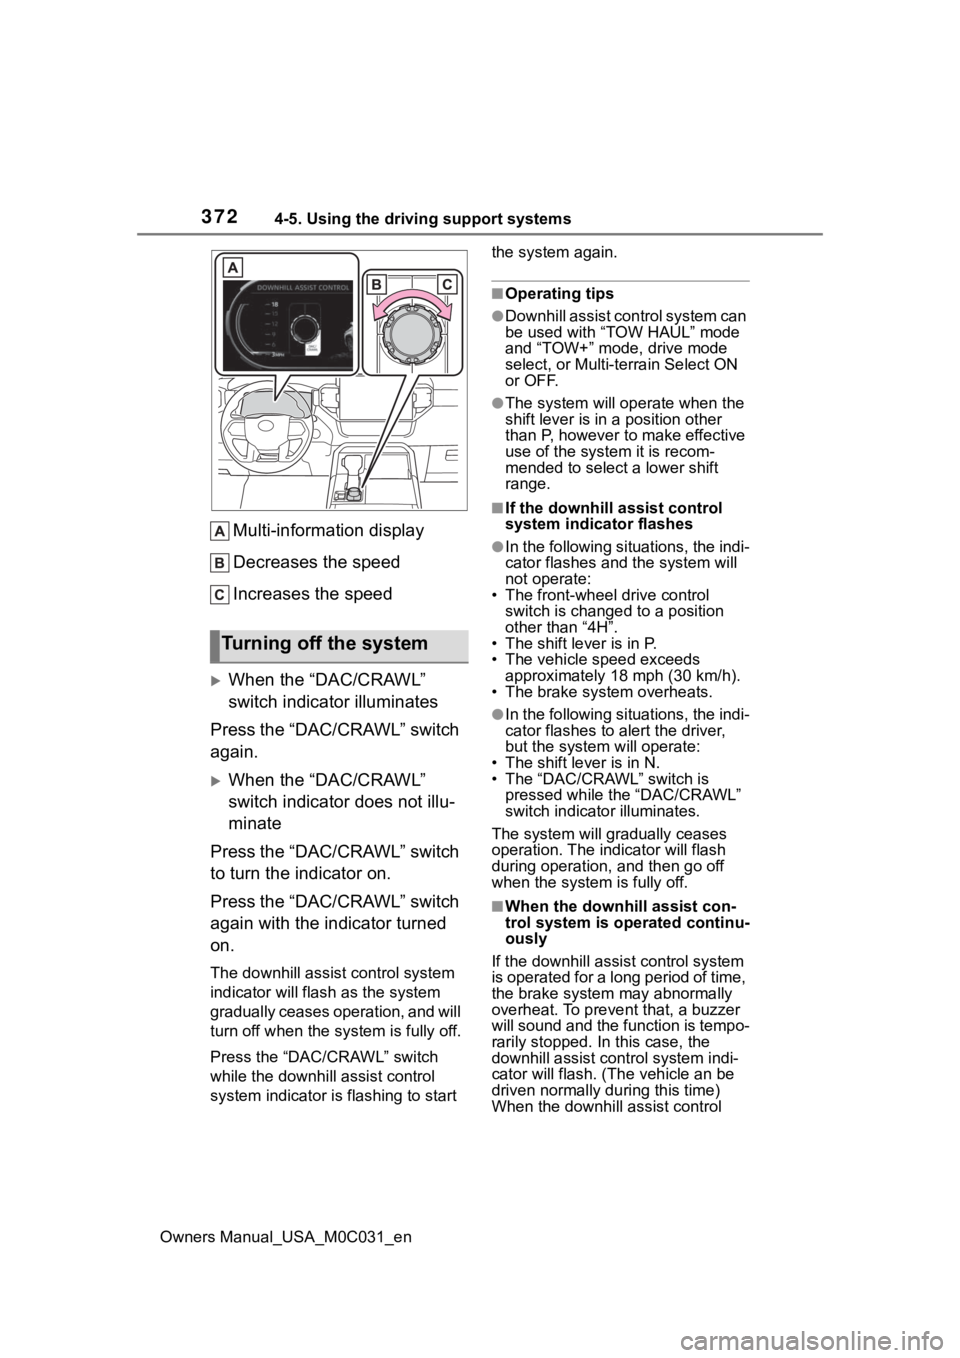
Multi-information display
Decreases the speed
Increases the speed
When the “DAC/CRAWL”
switch indicator illuminates
Press the “DAC/CRAWL” switch
again.
When the “DAC/CRAWL”
switch indicator does not illu-
minate
Press the “DAC/CRAWL” switch
to turn the indicator on.
Press the “DAC/CRAWL” switch
again with the indicator turned
on.
The downhill assist control system
indicator will flash as the system
gradually ceases operation, and will
turn off when the system is fully off.
Press the “DAC/CRAWL” switch
while the downhill assist control
system indicator is flashing to start the system again.
■Operating tips
●Downhill assist con
trol system can
be used with “TOW HAUL” mode
and “TOW+” mode, drive mode
select, or Multi-terrain Select ON
or OFF.
●The system will op erate when the
shift lever is in a position other
than P, however to make effective
use of the system it is recom-
mended to select a lower shift
range.
■If the downhill a ssist control
system indicator flashes
●In the following situ ations, the indi-
cator flashes and the system will
not operate:
• The front-wheel drive control switch is changed to a position
other than “4H”.
• The shift lever is in P.
• The vehicle speed exceeds approximately 18 mph (30 km/h).
• The brake system overheats.
●In the following situ ations, the indi-
cator flashes to alert the driver,
but the system will operate:
• The shift lever is in N.
• The “DAC/CRAWL” switch is pressed while the “DAC/CRAWL”
switch indicator illuminates.
The system will gradually ceases
operation. The indicator will flash
during operation, and then go off
when the system is fully off.
■When the downhill assist con-
trol system is operated continu-
ously
If the downhill assist control system
is operated for a long period of time,
the brake system may abnormally
overheat. To preve nt that, a buzzer
will sound and the function is tempo-
rarily stopped. In this case, the
downhill assist control system indi-
cator will flash. (Th e vehicle an be
driven normally during this time)
When the downhill assist control
Turning off the system
Page 380 of 618
3804-5. Using the driving support systems
Owners Manual_USA_M0C031_en
Select the item desired to be
setup and select as follows on
the multi-information screen
(P.100):
1 Press or on the meter
control switch and then select
.
2 Press or on the meter
control switch, select “Trailer
Settings”, and then press and
hold on the meter control
switch.
3 According to the display,
select the desired setting and
then press .
Changing trailer brake type or
trailer ID will cause the current
“gain” setting to reset to zero.
Make sure to set the “gain” as
described in the following sec-
tion.
“Gain” setting on trailer brake
controller should be set for a
specific towing condition. “Gain”
setting should be adjusted each
time the vehicle load, trailer
load, road conditions, or
weather changes. Setting the
“gain” value to 0 will disable the
trailer brake controller output. 1
Make sure the trailer brakes
are in good working condition
and functioning normally. See
trailer dealer if necessary.
2 Hook up the trailer and make
proper electrical connections.
3 Select the correct type of
trailer brakes that are
equipped on the trailer by
using the multi-information
display.
4 Drive vehicle with trailer
attached on a level road sur-
face similar to towing condi-
tion and in traffic-free
environment. Driving speed
should be approximately 20 -
25 mph [35 - 40 km/h].
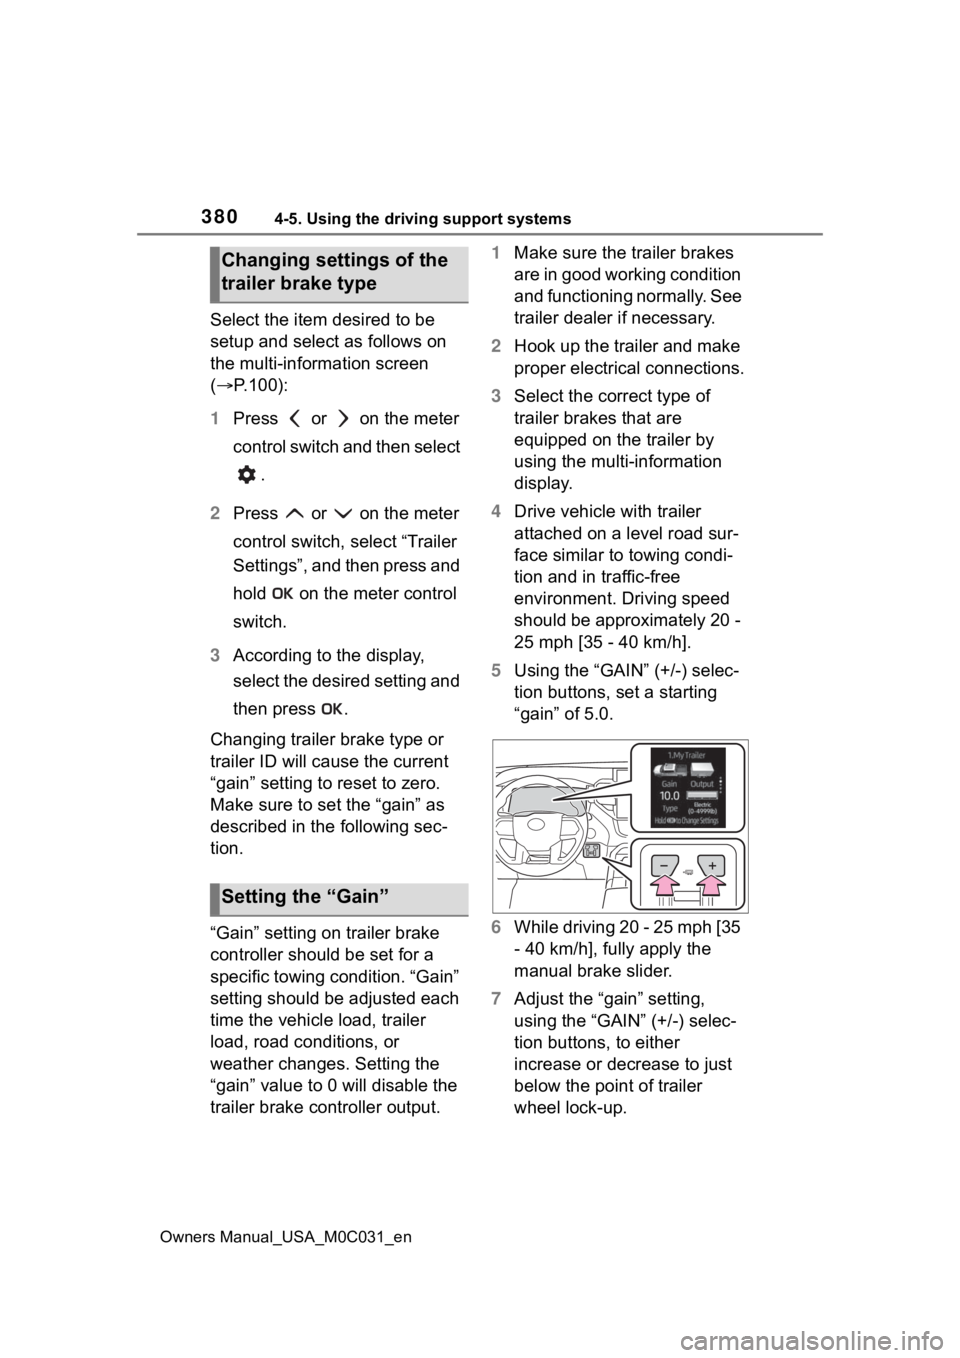
5 Using the “GAIN” (+/-) selec-
tion buttons, set a starting
“gain” of 5.0.
6 While driving 20 - 25 mph [35
- 40 km/h], fully apply the
manual brake slider.
7 Adjust the “gain” setting,
using the “GAIN” (+/-) selec-
tion buttons, to either
increase or decrease to just
below the point of trailer
wheel lock-up.
Changing settings of the
trailer brake type
Setting the “Gain”
Page 382 of 618
3824-5. Using the driving support systems
Owners Manual_USA_M0C031_en
*: If equipped
1Select “Trailer Settings” from
( P.96) on the multi-
information display and add a
trailer according to the dis-
play. 2
Press the switch to turn the
system ON.
3 Continue or reselect the
trailer in the message dis-
played on the multi-informa-
tion display.
When the selected trailer is being
used for the first time, setup (cali-
bration) is nece ssary (→P.384).
Once calibration is completed, it is
retained for future use and the sys-
tem will automatically detect the
trailer.
The driver needs to change the
trailer selection when using a differ-
ent trailer. The system does not
automatically recognize the trailer
from the saved trailers list.
4 Once trailer is detected, shift
the shift lever to R to activate
Guidance mode.
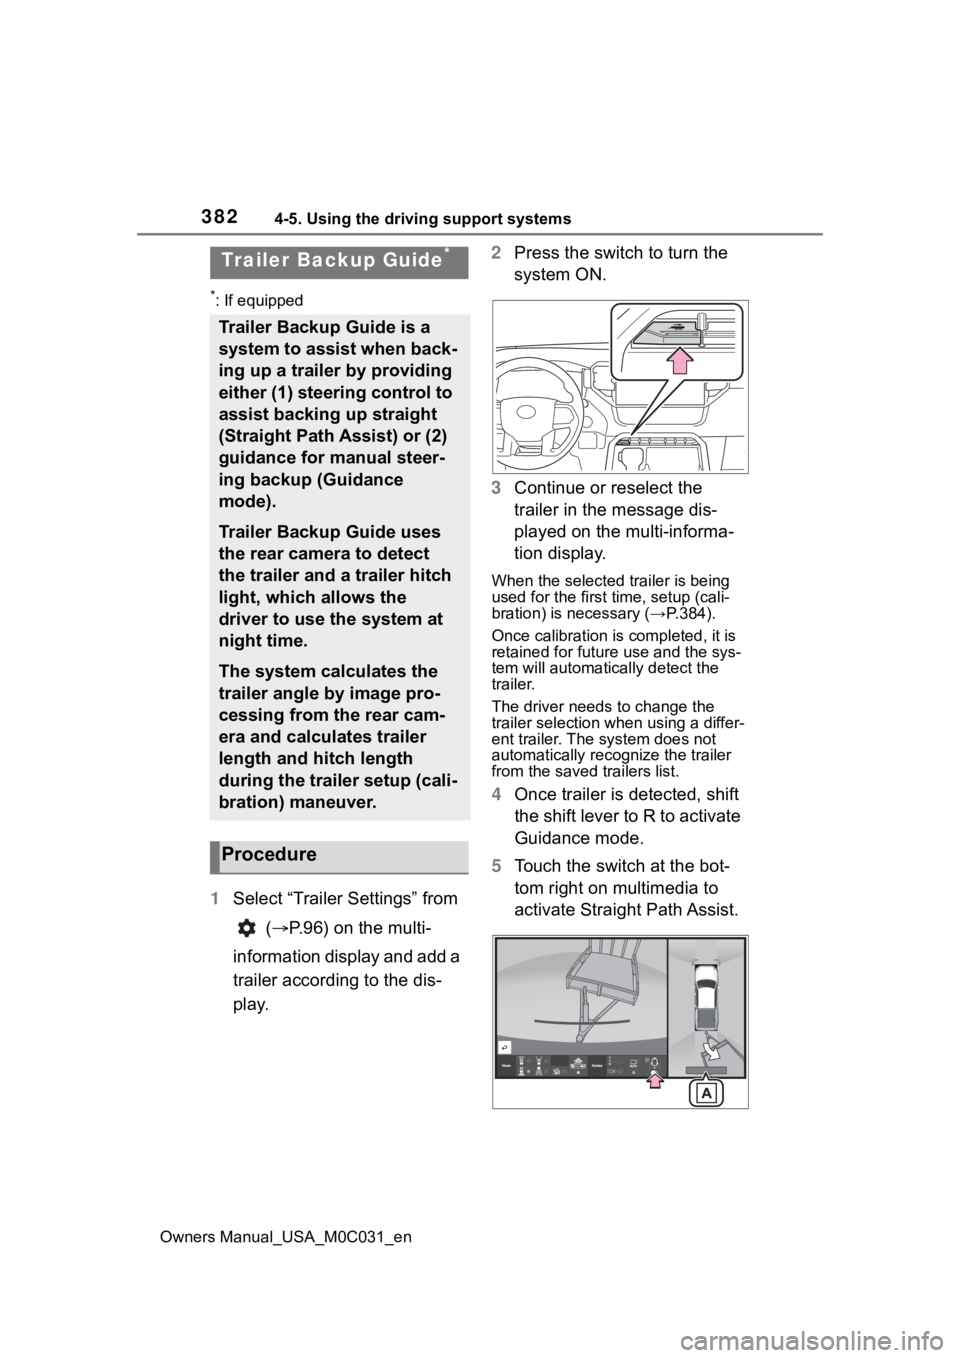
5 Touch the switch at the bot-
tom right on multimedia to
activate Straight Path Assist.
Trailer Backup Guide*
Trailer Backup Guide is a
system to assist when back-
ing up a trailer by providing
either (1) steering control to
assist backing up straight
(Straight Path Assist) or (2)
guidance for manual steer-
ing backup (Guidance
mode).
Trailer Backup Guide uses
the rear camera to detect
the trailer and a trailer hitch
light, which allows the
driver to use the system at
night time.
The system calculates the
trailer angle by image pro-
cessing from the rear cam-
era and calculates trailer
length and hitch length
during the trailer setup (cali-
bration) maneuver.
Procedure
Page 383 of 618
3834-5. Using the driving support systems
Owners Manual_USA_M0C031_en
4
Driving
“Trailer Direction”
When using Straight Path Assist,
the driver can override the system
using the steering wheel to adjust
the trailer direction. Upon release of
the steering wheel, Straight Path
Assist re-activates with a revised
straight back target direction.
■When adding the trailer
Use the meter control switches to
select the trailer type. ( P. 9 6 )
1 Press or to select .
2 Press or to select “Trailer
Settings” and then press and
hold .
3 According to the display, select
the desired setting and then
press . ( P.100)
Trailer Settings are not available
while Trailer Backup Guide system
is active.
The system is designed to support
trailers with single or multi-axles
using a ball hitch. The system does
not support fifth wheel or gooseneck
trailers.
Bring the vehicle and trailer to a
large open space like an empty
parking lot. Activate Trailer
Backup Guide system and fol-
low the instructions displayed on
the multi-information dis-
play/multimedia.
For best calibration results, do
not exceed 5 mph (8 km/h). 1
Drive straight forward slowly
(5 mph [8 km/h] or less) while
holding the steering wheel
straight.
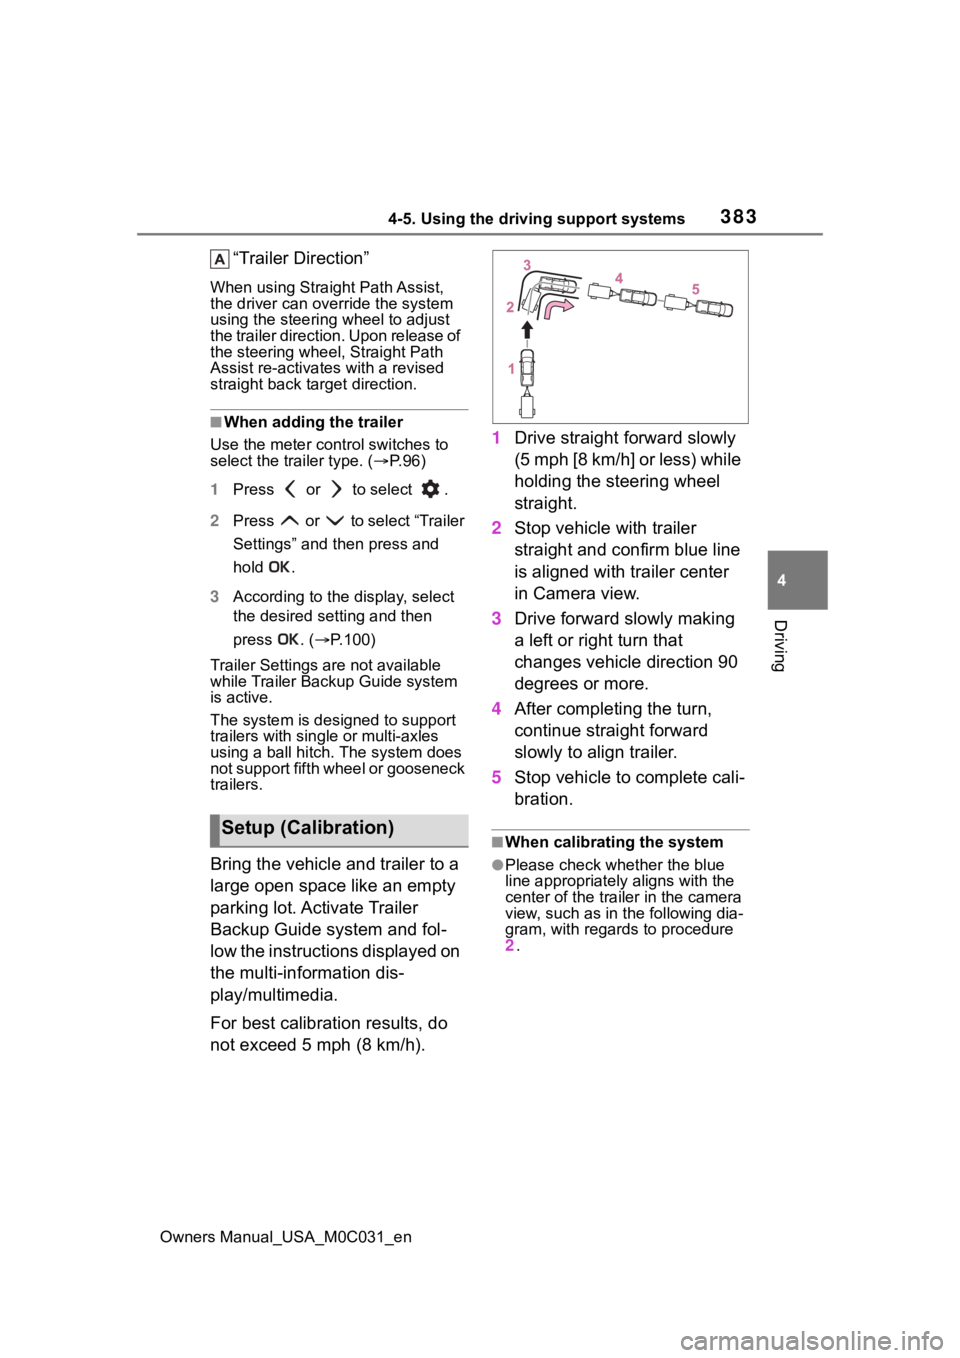
2 Stop vehicle with trailer
straight and confirm blue line
is aligned with trailer center
in Camera view.
3 Drive forward slowly making
a left or right turn that
changes vehicle direction 90
degrees or more.
4 After completing the turn,
continue straight forward
slowly to align trailer.
5 Stop vehicle to complete cali-
bration.
■When calibrating the system
●Please check whether the blue
line appropriately aligns with the
center of the trailer in the camera
view, such as in the following dia-
gram, with regards to procedure
2 .
Setup (Calibration)
Page 384 of 618
3844-5. Using the driving support systems
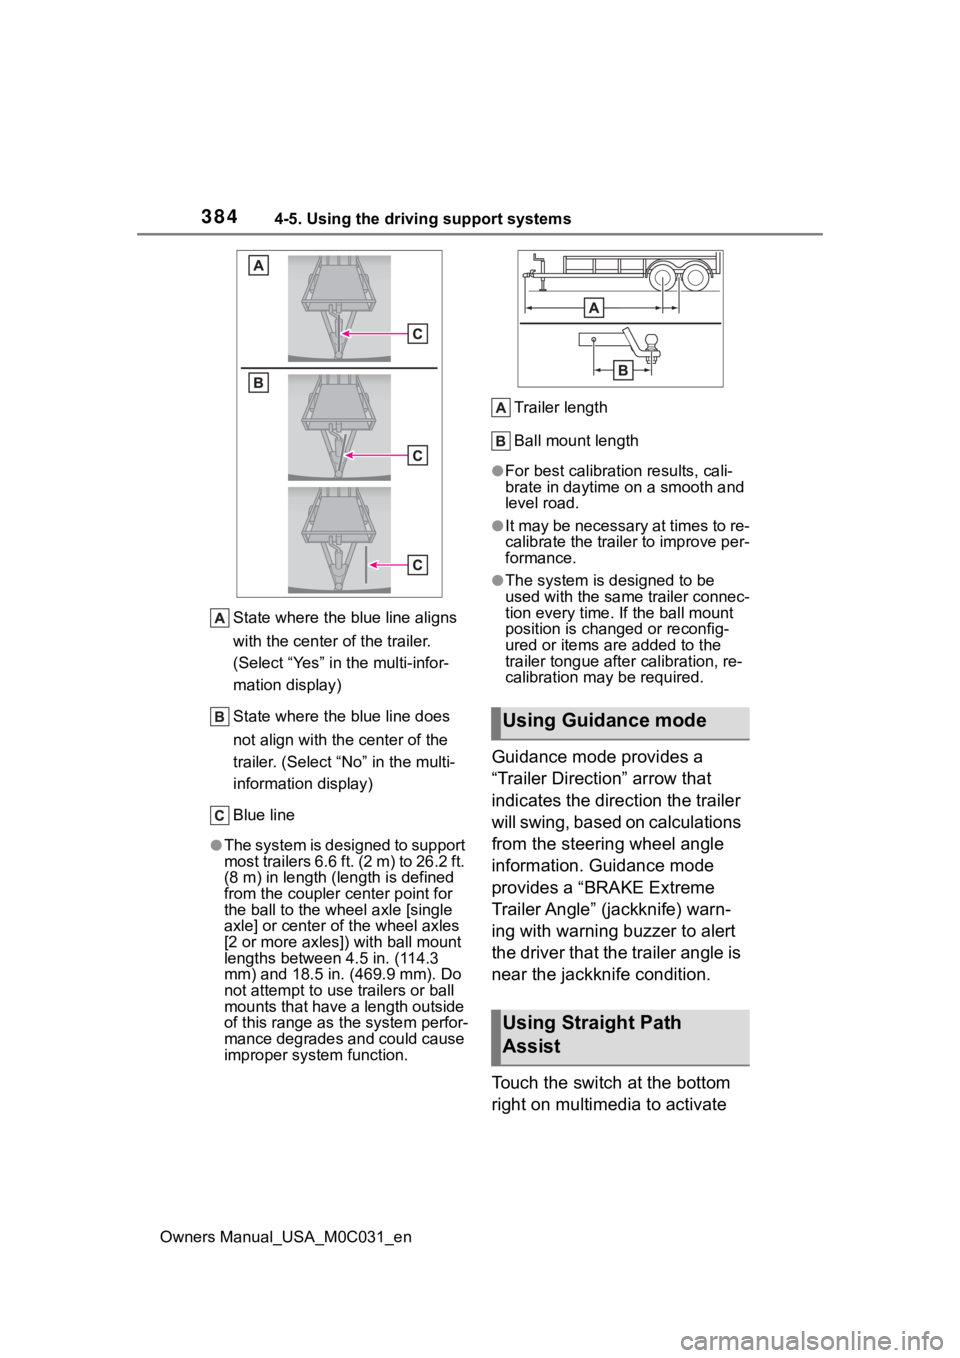
Owners Manual_USA_M0C031_enState where the blue line aligns
with the center of the trailer.
(Select “Yes” in the multi-infor-
mation display)
State where the blue line does
not align with the center of the
trailer. (Select “
No” in the multi-
information display)
Blue line
●The system is designed to support
most trailers 6.6 ft. (2 m) to 26.2 ft.
(8 m) in length (length is defined
from the coupler c enter point for
the ball to the wheel axle [single
axle] or center o f the wheel axles
[2 or more axles]) with ball mount
lengths between 4.5 in. (114.3
mm) and 18.5 in. ( 469.9 mm). Do
not attempt to use trailers or ball
mounts that have a length outside
of this range as t he system perfor-
mance degrades and could cause
improper system function. Trailer length
Ball mount length
●For best calibration results, cali-
brate in daytime on a smooth and
level road.
●It may be necessary at times to re-
calibrate the trailer to improve per-
formance.
●The system is designed to be
used with the same trailer connec-
tion every time. If the ball mount
position is changed or reconfig-
ured or items are added to the
trailer tongue
after calibration, re-
calibration may be required.
Guidance mode provides a
“Trailer Direction” arrow that
indicates the direction the trailer
will swing, based on calculations
from the steering wheel angle
information. Guidance mode
provides a “BRAKE Extreme
Trailer Angle” (jackknife) warn-
ing with warning buzzer to alert
the driver that the trailer angle is
near the jackknife condition.
Touch the switch at the bottom
right on multimedia to activate
Using Guidance mode
Using Straight Path
Assist
Page 386 of 618
3864-5. Using the driving support systems
Owners Manual_USA_M0C031_en
WARNING
■Cautions regarding the use of
the system
In order for this system to perform
as designed, the vehicle must be
driven safely and the driver must
control the speed to keep it within
operating parameters and to
avoid a collision.
As there is a limit to the degree of
control performance that this sys-
tem can provide, do not overly
rely on this system. The driver is
always responsible for paying
attention to the vehicle’s sur-
roundings and driving safely. This
system does not control braking
(or steering when in Guidance
mode). Driver needs to control
vehicle speed, control braking,
(and steering when in Guidance
mode,) and stop the vehicle to
avoid any collision. Failure to fol-
low this warning could result in
property damage, serious injury
or death.
■When using the Trailer
Backup Guide
For proper system performance,
observe the following precautions.
Failure to do so may lead to an
accident resulting in property
damage, serious injury, or death.
●Keep the tailgat e fully latched.
●Keep the rear camera clean at
all times.
●Do not change the installation
position or direction of the rear
camera or remove it.
●Do not modify the trailer hitch
light. (→P.386)
●Make sure nothing can obstruct
the rear camera view of the
trailer.
The system is designed to oper-
ate in various weather and lighting
conditions and on different ground
surfaces (asphalt , grass, gravel,
etc.), however performance can
still be affected by various envi-
ronmental factors (e.g. shadow
passing over the tr ailer or dimin-
ished contrast between trailer and
the ground leading to trailer
detection being lost, etc.) so
always drive carefully, remain
alert and aware of your surround-
ings, and do not overly rely on the
system.
Page 399 of 618
4015-1. Using the air conditioning system and defogger
Owners Manual_USA_M0C031_en
5
Interior features
fan speed and downwards to
decrease the fan speed.
Press the “OFF” switch to turn the
fan off.
■Change the airflow mode
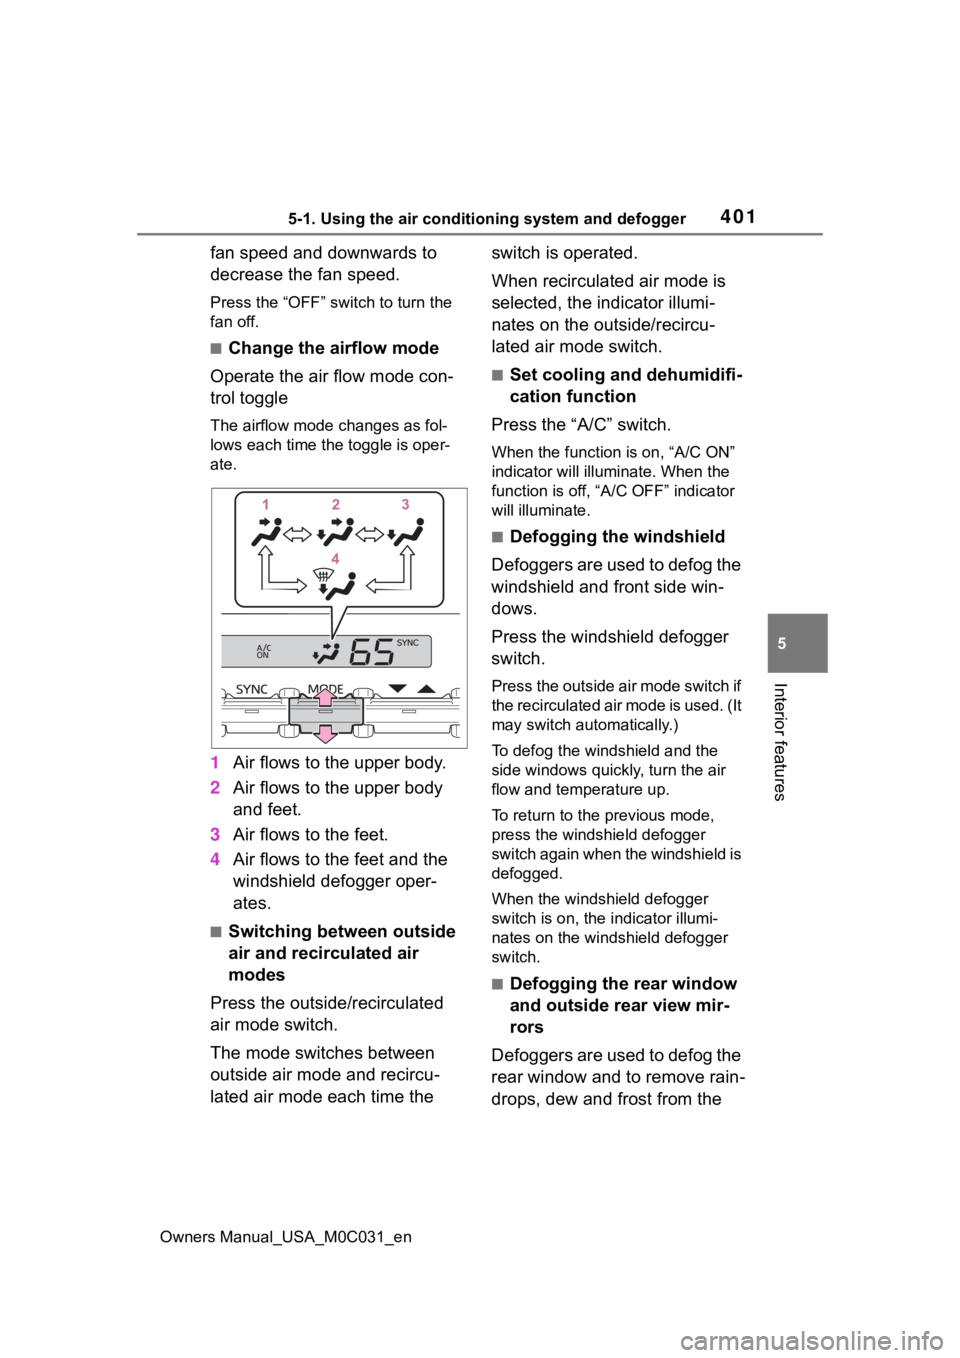
Operate the air flow mode con-
trol toggle
The airflow mode changes as fol-
lows each time the toggle is oper-
ate.
1 Air flows to the upper body.
2 Air flows to the upper body
and feet.
3 Air flows to the feet.
4 Air flows to the feet and the
windshield defogger oper-
ates.
■Switching between outside
air and recirculated air
modes
Press the outside/recirculated
air mode switch.
The mode switches between
outside air mode and recircu-
lated air mode each time the switch is operated.
When recirculated air mode is
selected, the indicator illumi-
nates on the outside/recircu-
lated air mode switch.
■Set cooling and dehumidifi-
cation function
Press the “A/C” switch.
When the function is on, “A/C ON”
indicator will illumi nate. When the
function is off, “A/ C OFF” indicator
will illuminate.
■Defogging the windshield
Defoggers are used to defog the
windshield and front side win-
dows.
Press the windshield defogger
switch.
Press the outside air mode switch if
the recirculated air mode is used. (It
may switch automatically.)
To defog the windshield and the
side windows quickly, turn the air
flow and temperature up.
To return to the previous mode,
press the windshield defogger
switch again when the windshield is
defogged.
When the windshield defogger
switch is on, the indicator illumi-
nates on the windshield defogger
switch.
■Defogging the rear window
and outside rear view mir-
rors
Defoggers are used to defog the
rear window and to remove rain-
drops, dew and frost from the