2022 TOYOTA TUNDRA HYBRID rear view mirror
[x] Cancel search: rear view mirrorPage 309 of 618
3094-5. Using the driving support systems
Owners Manual_USA_M0C031_en
4
Driving
*: If equipped
●The screen illustrations used in
this text are intended as exam-
ples, and may differ from the
image that is actually displayed on
the screen.
The panoramic view monitor is a
supplemental device intended to
assist the driver when checking
around the vehicle. When using,
be sure to visually check all
around the vehicle both directly
and using the mirrors before
proceeding. If you do not, you
may hit another vehicle or possi- bly cause an accident.
Pay attention to the following
precautions when using the
panoramic view monitor.
Panoramic view moni-
tor*
Panoramic view monitor
assists the driver in viewing
the surroundings, when
operating at low speeds, by
combining the front, side
and rear cameras and dis-
playing a complete vehicle
overhead image on the
screen.
When you press the camera
switch or shift the shift lever
to R while the power switch
is in ON, the panoramic
view monitor operates.
The monitor displays vari-
ous views of the position
and surroundings of the
vehicle.
Driving precautions
WARNING
●Never depend on the panoramic
view monitor entirely. The
image and the position of the
guide lines displayed on the
screen may differ from the
actual state. Use caution just as
you would when driving any
other vehicle.
●Always make sure to check all
around the vehicle with your
own eyes when driving.
●Never drive while looking only at
the screen as the image on the
screen is different from actual
conditions. If you are driving
while looking only at the screen,
you may hit a
person or an
object, resulting in an accident.
When driving, be sure to check
the vehicle’s surroundings with
your own eyes and the vehicle’s
mirrors.
●Depending on the circum-
stances of the vehicle (number
of passengers, amount of lug-
gage, etc.), the position of the
guide lines displayed on the
screen may change. Be sure to
check visually around the vehi-
cle before proceeding.
Page 310 of 618
3104-5. Using the driving support systems
Owners Manual_USA_M0C031_en
WARNING
●Do not use the panoramic view
monitor system in the following
cases:
• On icy or slick road surfaces, or in snow
• When using tire chains or emer- gency tires
• When the front door or the tail- gate is not closed completely
• On roads that are not flat or straight, such as curves or
slopes
• If the suspension has been modified or tires of a size other
than specified are installed
●In low temperatures, the screen
may darken or the image may
become faint. The image could
distort when the vehicle is mov-
ing, or you may become unable
to see the image on the screen.
Be sure to visually check all
around the vehicle both directly
and using the mirrors before
proceeding.
●If the tire sizes are changed, the
position of the guide lines dis-
played on the screen may
change.
●The camera uses a special lens.
The distances between objects
and pedestrians that appear in
the image displayed on the
screen will differ from the actual
distances. ( P.335)
●When an aftermarket part is
installed in the display area of
the screen.
NOTICE
●In panoramic view/moving
view/see-through view, the sys-
tem combines images taken
from the front, back, left and
right side cameras into a single
image. There are limits to the
range and content that can be
displayed. Familiarize yourself
with the characteristics of the
panoramic view monitor system
before using it.
●Image clarity may decline at the
four corners of t he panoramic
view/moving view/see-through
view. However, this is not a mal-
function, as these are the
regions along the border of
each camera image where the
images are combined.
●Depending on lighting condi-
tions near each of the cameras,
bright and dark patches may
appear on the panoramic
view/moving view/see-through
view.
●The panoramic view/moving
view/see-through view display
does not extend higher than the
installation pos ition and image
capture range o f each camera.
●There are blind spots around
the vehicle. Accordingly, there
are regions not displayed in
panoramic view.
●Three-dimensional objects dis-
played in wide fr ont view, rear
view or side view may not be
displayed in panoramic
view/moving view/see-through
view.
Page 318 of 618
3184-5. Using the driving support systems
Owners Manual_USA_M0C031_en
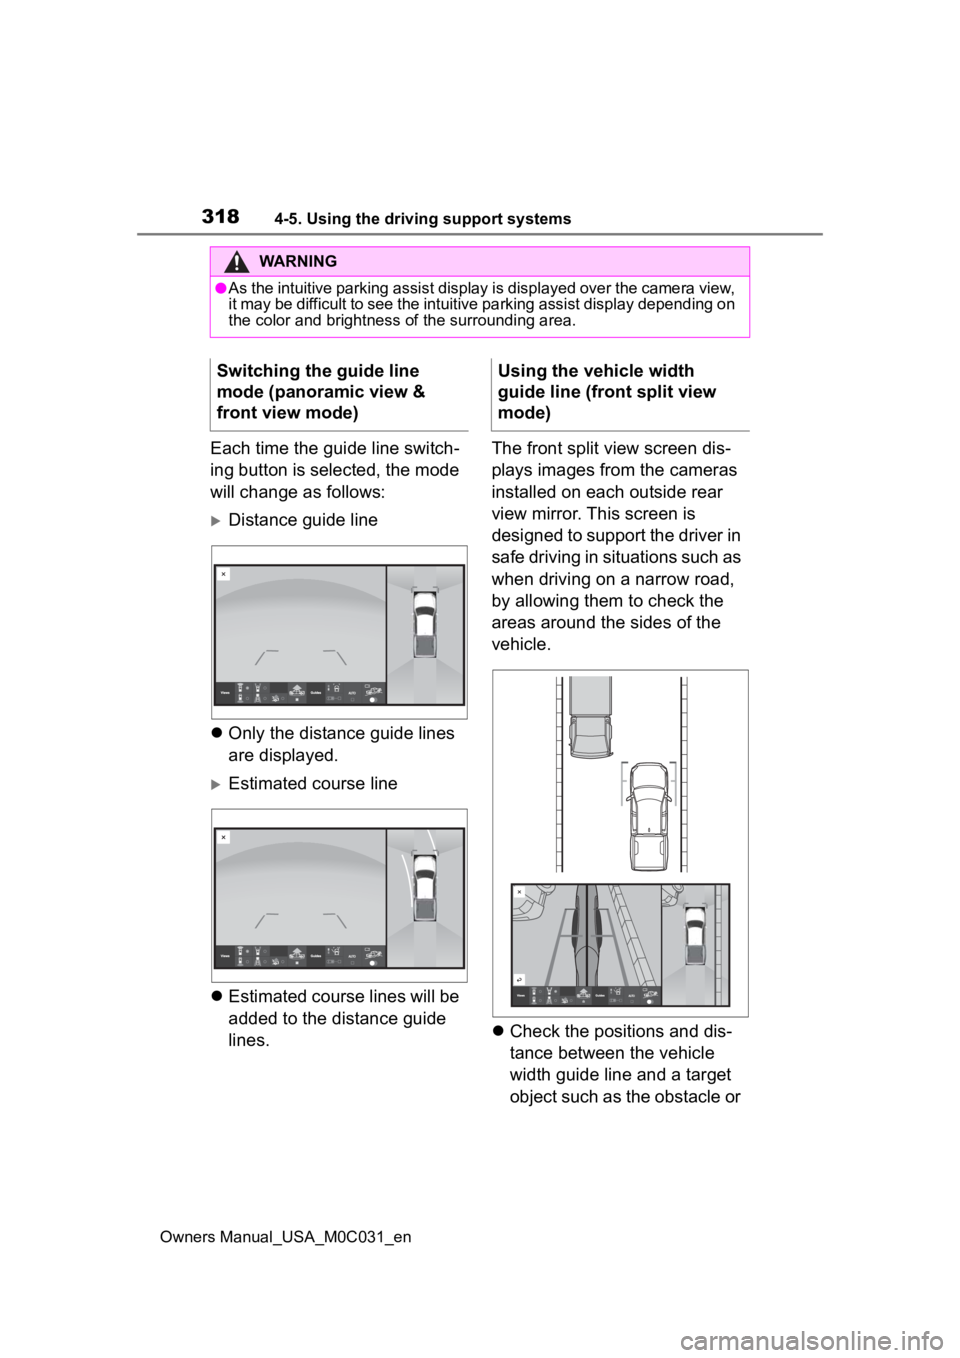
Each time the guide line switch-
ing button is selected, the mode
will change as follows:
Distance guide line
Only the distance guide lines
are displayed.
Estimated course line
Estimated course lines will be
added to the distance guide
lines. The front split view screen dis-
plays images from the cameras
installed on each outside rear
view mirror. This screen is
designed to support the driver in
safe driving in situations such as
when driving on a narrow road,
by allowing them to check the
areas around the sides of the
vehicle.
Check the positions and dis-
tance between the vehicle
width guide line and a target
object such as the obstacle or
WARNING
●As the intuitive parking assist display is displayed over the c amera view,
it may be difficult to see the intuitive parking assist display depending on
the color and brightness of the surrounding area.
Switching the guide line
mode (panoramic view &
front view mode)Using the vehicle width
guide line (front split view
mode)
Page 398 of 618
4005-1. Using the air conditioning system and defogger
Owners Manual_USA_M0C031_en
5-1.Using the air conditioning system and defogger
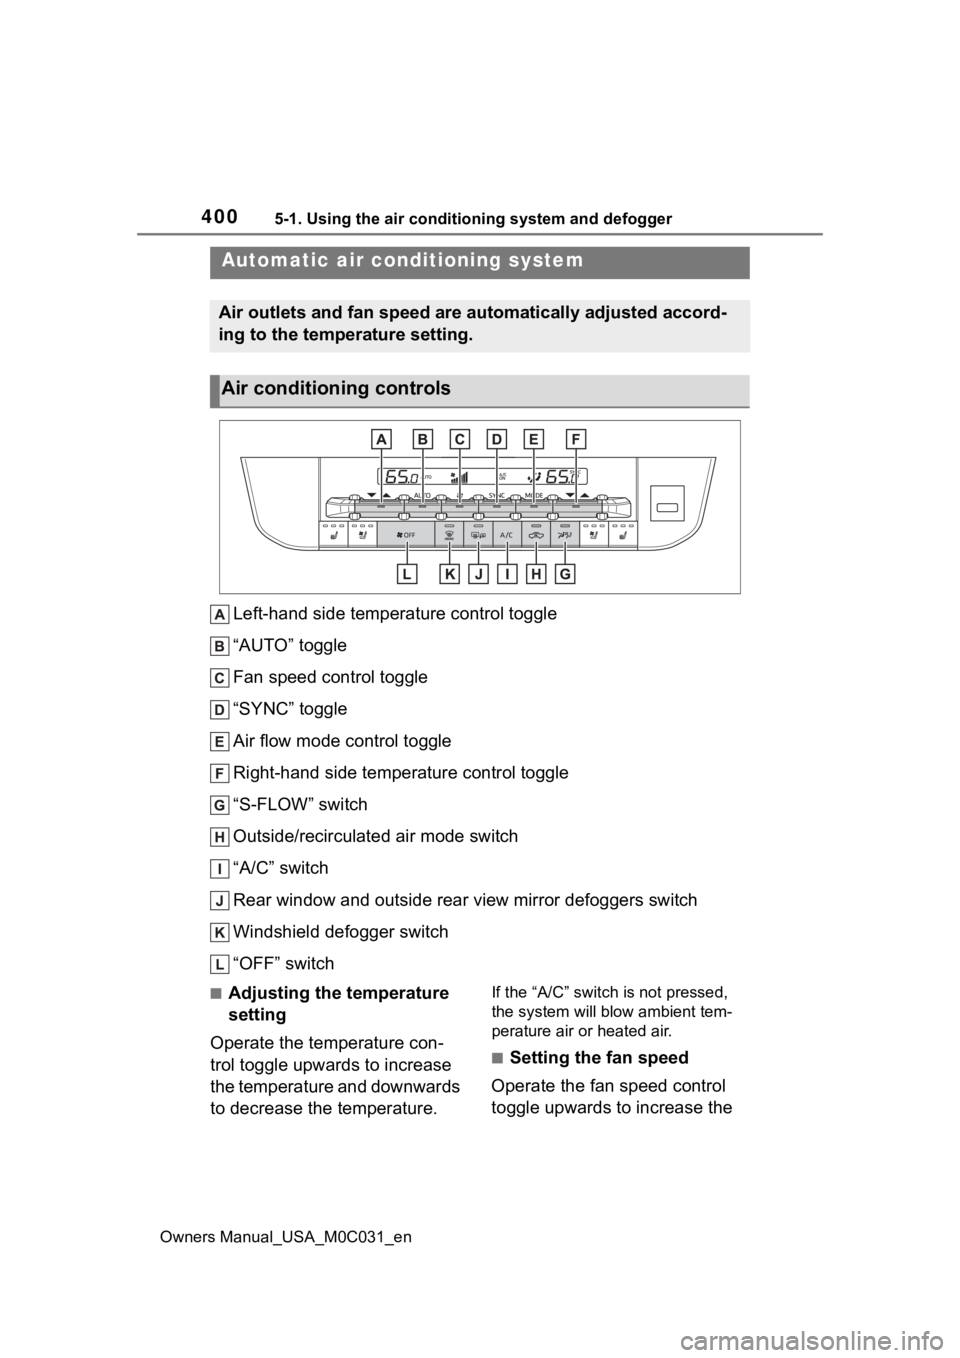
Left-hand side temperature control toggle
“AUTO” toggle
Fan speed control toggle
“SYNC” toggle
Air flow mode control toggle
Right-hand side temperature control toggle
“S-FLOW” switch
Outside/recirculated air mode switch
“A/C” switch
Rear window and outside rear view mirror defoggers switch
Windshield defogger switch
“OFF” switch
■Adjusting the temperature
setting
Operate the temperature con-
trol toggle upwards to increase
the temperature and downwards
to decrease the temperature.If the “A/C” switch is not pressed,
the system will blow ambient tem-
perature air or heated air.
■Setting the fan speed
Operate the fan speed control
toggle upwards to increase the
Automatic air conditioning system
Air outlets and fan speed are automatically adjusted accord-
ing to the temperature setting.
Air conditioning controls
Page 400 of 618

4025-1. Using the air conditioning system and defogger
Owners Manual_USA_M0C031_en
outside rear view mirrors.
Press the rear window and out-
side rear view mirror defoggers
switch.
The defoggers will automatically
turn off after 15 minutes.
When the rear window and outside
rear view mirror defoggers switch is
on, the indicator illuminates on the
rear window and ou tside rear view
mirror defoggers switch.
■When the outside temperature
exceeds 75°F (24°C) and the air
conditioning system is on
●In order to reduce the air condi-
tioning power consumption, the air
conditioning system may switch to
recirculated air mode automati-
cally.
This may also reduce fuel con-
sumption.
●Recirculated air mode is selected
as a default mode when the power
switch is turned to ON.
It is possible to switch to outside air
mode at any time by pressing the
outside air mode switch.
■Fogging up of the windows
●The windows will easily fog up
when the humidity in the vehicle is
high. Turning the cooling and
dehumidification function on will
dehumidify the air from the outlets
and defog the windshield effec-
tively.
●If you turn the cooling and dehu-
midification function off, the win-
dows may fog up more easily.
●The windows may fog up if the
recirculated air mode is used.
■When driving on dusty roads
Close all windows. If dust thrown up
by the vehicle is still drawn into the
vehicle after closing the windows, it
is recommended that the air intake mode be set to outside air mode and
the fan speed to a
ny setting except
off.
■Outside/recirculated air mode
●Setting to the recirculated air
mode temporarily is recom-
mended in preventing dirty air
from entering the vehicle interior
and helping to c ool the vehicle
when the outside air temperature
is high.
●Outside/recirculated air mode may
automatically switch depending on
the temperature setting or the
inside temperature.
■When the outside temperature
falls to nearly 32°F (0°C)
The dehumidification function may
not operate even when “A/C” switch
is pressed.
■Ventilation and air conditioning
odors
●To let fresh air in, set the air condi-
tioning system to the outside air
mode.
●During use, various odors from
inside and outside the vehicle may
enter into and accumulate in the
air conditioning system. This may
then cause odor to be emitted
from the vents.
●In order to suppr ess odors that
occur when the air conditioning
system starts, the air flow mode
may change to blow air to the feet
or air may stop blowing for a short
period of time immediately after
the air conditioning system is
started in automatic mode.
●When parking, the system auto-
matically switches to outside air
mode to encourage better air cir-
culation throughout the vehicle,
helping to reduce odors that occur
when starting the vehicle.
■Air conditioning filter
P.479
Page 401 of 618
4035-1. Using the air conditioning system and defogger
Owners Manual_USA_M0C031_en
5
Interior features
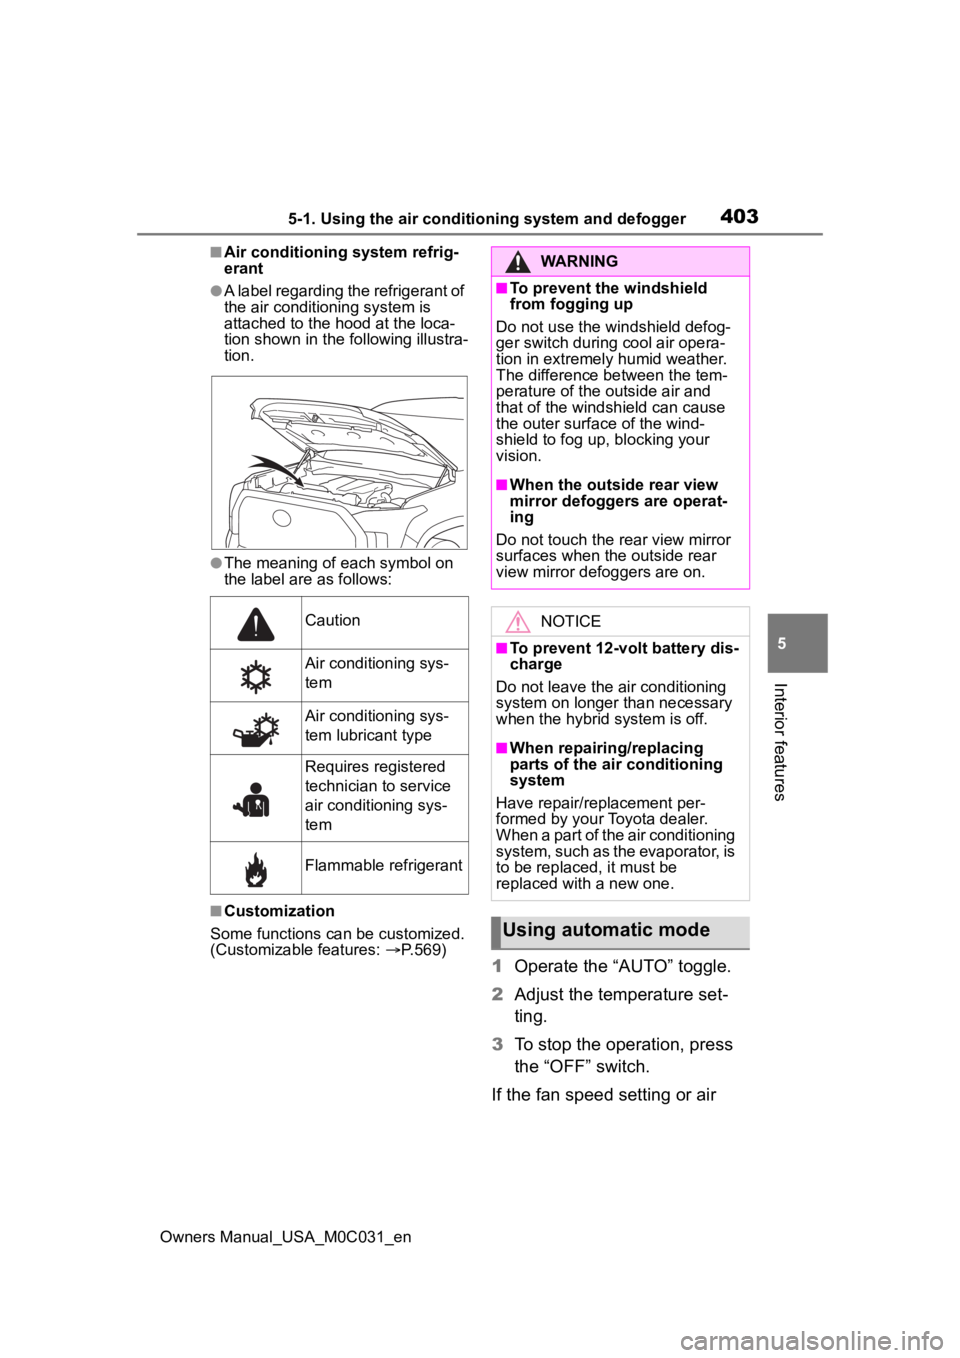
■Air conditioning system refrig-
erant
●A label regarding the refrigerant of
the air conditioning system is
attached to the ho od at the loca-
tion shown in the f ollowing illustra-
tion.
●The meaning of each symbol on
the label are as follows:
■Customization
Some functions can be customized.
(Customizable features: P.569)
1 Operate the “AUTO” toggle.
2 Adjust the temperature set-
ting.
3 To stop the operation, press
the “OFF” switch.
If the fan speed setting or air
Caution
Air conditioning sys-
tem
Air conditioning sys-
tem lubricant type
Requires registered
technician to service
air conditioning sys-
tem
Flammable refrigerant
WARNING
■To prevent the windshield
from fogging up
Do not use the windshield defog-
ger switch during cool air opera-
tion in extremely humid weather.
The difference between the tem-
perature of the outside air and
that of the windshield can cause
the outer surface of the wind-
shield to fog up, blocking your
vision.
■When the outside rear view
mirror defoggers are operat-
ing
Do not touch the rear view mirror
surfaces when the outside rear
view mirror def oggers are on.
NOTICE
■To prevent 12-volt battery dis-
charge
Do not leave the air conditioning
system on longer than necessary
when the hybrid system is off.
■When repairing/replacing
parts of the air conditioning
system
Have repair/replacement per-
formed by your Toyota dealer.
When a part of the air conditioning
system, such as the evaporator, is
to be replaced, it must be
replaced with a new one.
Using automatic mode
Page 403 of 618
4055-1. Using the air conditioning system and defogger
Owners Manual_USA_M0C031_en
5
Interior features
To turn on the “SYNC” mode,
operate the “SYNC” toggle
upwards or downwards.
The driver’s side temperature con-
trol toggle can be used to adjust the
temperature for the driver’s and
front passenger’s side. To enter
individual mode, operate the front
passenger’s side temperature con-
trol toggle or press the “SYNC” tog-
gle again.
When the “SYNC” mode is on, the
“SYNC” indicator is illuminate.
This feature is used to prevent
ice from building up on the wind-
shield and wiper blades.
Press the rear window and out-
side rear view mirror defoggers
switch.
The windshield wiper de-icer will
automatically turn off after 15 min-
utes.
Turning the rear window and out-
side rear view mirror defoggers on
will turn the windshield wiper de-
icer on.
When the rear window and outside
rear view mirror defoggers switch is
on, the indicator illuminates on the
rear window and ou tside rear view
mirror defoggers switch.
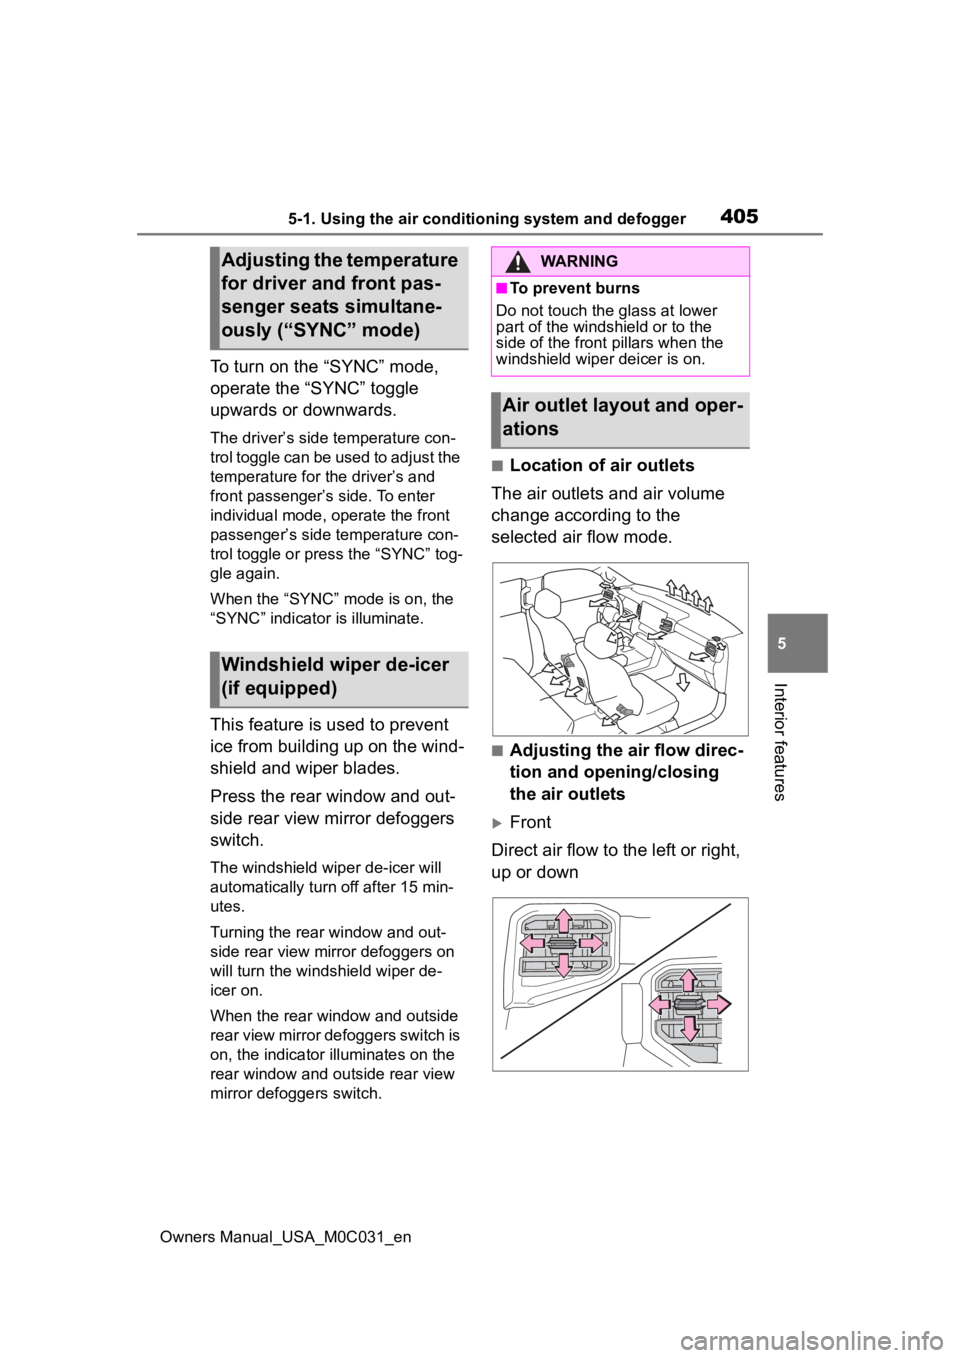
■Location of air outlets
The air outlets and air volume
change according to the
selected air flow mode.
■Adjusting the air flow direc-
tion and opening/closing
the air outlets
Front
Direct air flow to the left or right,
up or down
Adjusting the temperature
for driver and front pas-
senger seats simultane-
ously (“SYNC” mode)
Windshield wiper de-icer
(if equipped)
WARNING
■To prevent burns
Do not touch the glass at lower
part of the windshield or to the
side of the front p illars when the
windshield wiper deicer is on.
Air outlet layout and oper-
ations
Page 431 of 618
4335-4. Using the other interior features
Owners Manual_USA_M0C031_en
5
Interior features
■HomeLink® programming pro-
cedure
The programming procedures can
also be found at the following URL.
Website: www.homelink.com/toyota
For support, contact customer sup-
port at the following.
Help Line: 1-800-355-3515
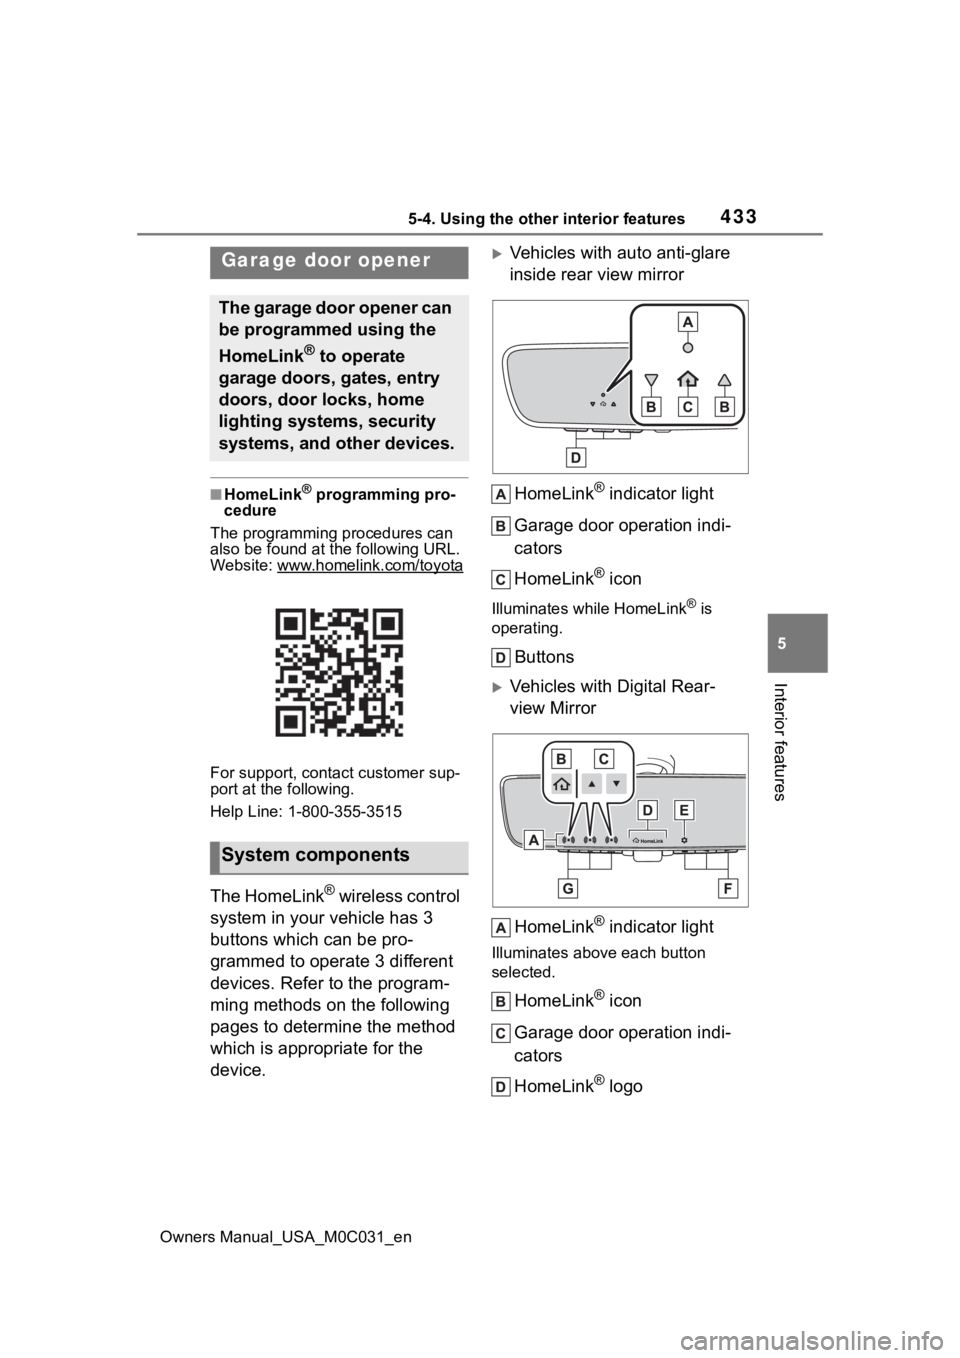
The HomeLink® wireless control
system in your vehicle has 3
buttons which can be pro-
grammed to operate 3 different
devices. Refer to the program-
ming methods on the following
pages to determine the method
which is appropriate for the
device.
Vehicles with auto anti-glare
inside rear view mirror
HomeLink
® indicator light
Garage door operation indi-
cators
HomeLink
® icon
Illuminates while HomeLink® is
operating.
Buttons
Vehicles with Digital Rear-
view Mirror
HomeLink
® indicator light
Illuminates above each button
selected.
HomeLink® icon
Garage door operation indi-
cators
HomeLink
® logo
Garage door opener
The garage door opener can
be programmed using the
HomeLink
® to operate
garage doors, gates, entry
doors, door locks, home
lighting systems, security
systems, and other devices.
System components