2022 TOYOTA TUNDRA HYBRID height
[x] Cancel search: heightPage 20 of 618
20Pictorial index
Owners Manual_USA_M0C031_en
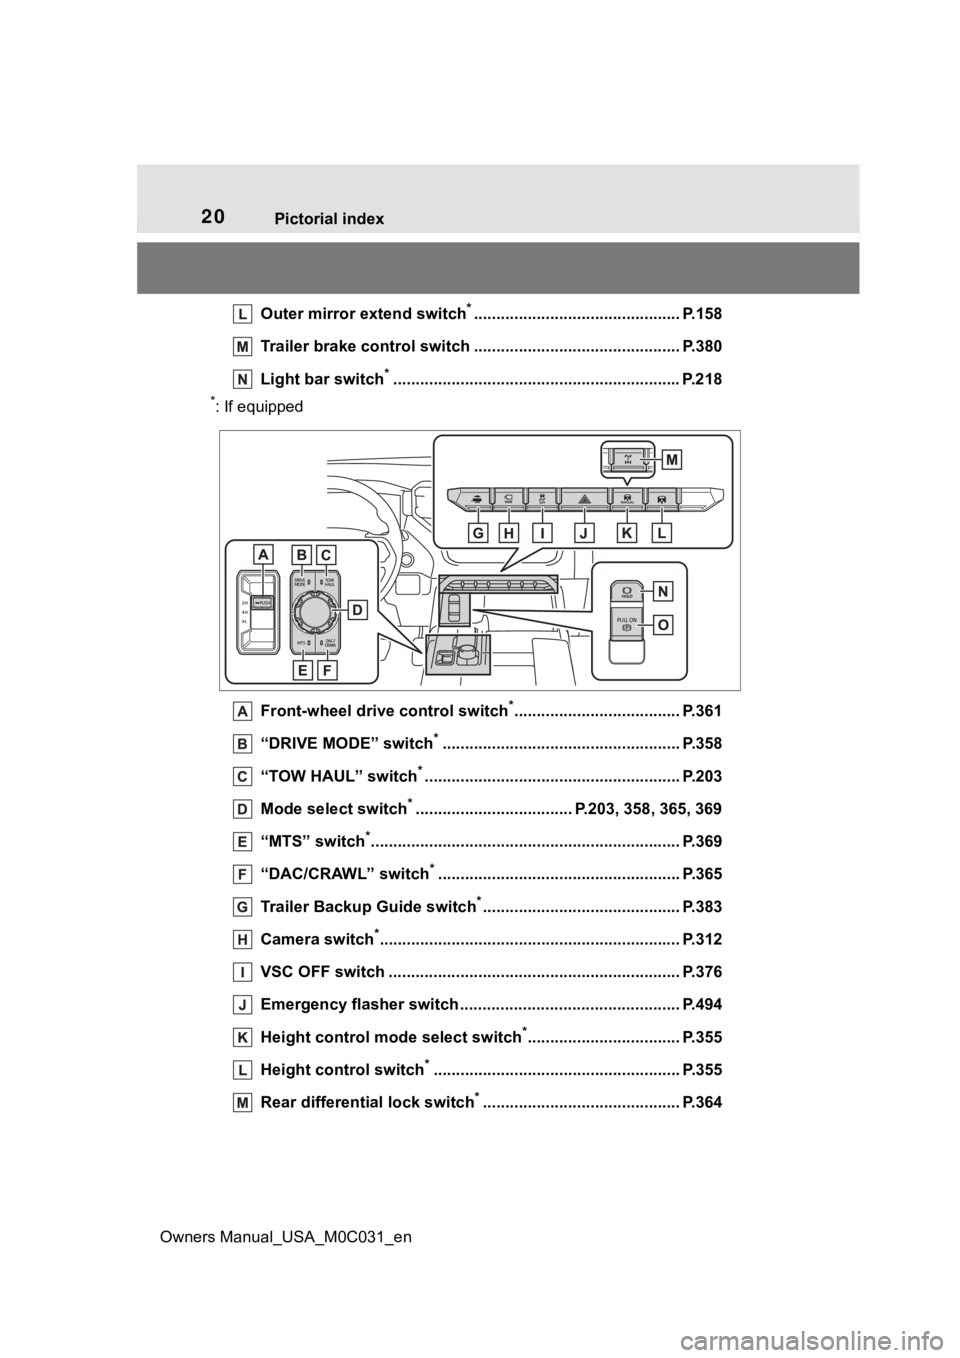
Outer mirror extend switch*.............................................. P.158
Trailer brake control switc h .............................................. P.380
Light bar switch
*............................................................... .P.218
*: If equipped
Front-wheel drive control switch
*..................................... P.361
“DRIVE MODE” switch
*..................................................... P.358
“TOW HAUL” switch
*......................................................... P.203
Mode select switch
*................................... P.203, 358, 365, 369
“MTS” switch
*............................................................... ...... P.369
“DAC/CRAWL” switch
*...................................................... P.365
Trailer Backup Guide switch
*............................................ P.383
Camera switch
*............................................................... .... P.312
VSC OFF switch ................................................. ................ P.376
Emergency flasher switch ....................................... .......... P.494
Height control mode select switch
*.................................. P.355
Height control switch
*....................................................... P.355
Rear differential lock switch
*............................................ P.364
Page 33 of 618
331-1. For safe use
Owners Manual_USA_M0C031_en
1
For safety and security
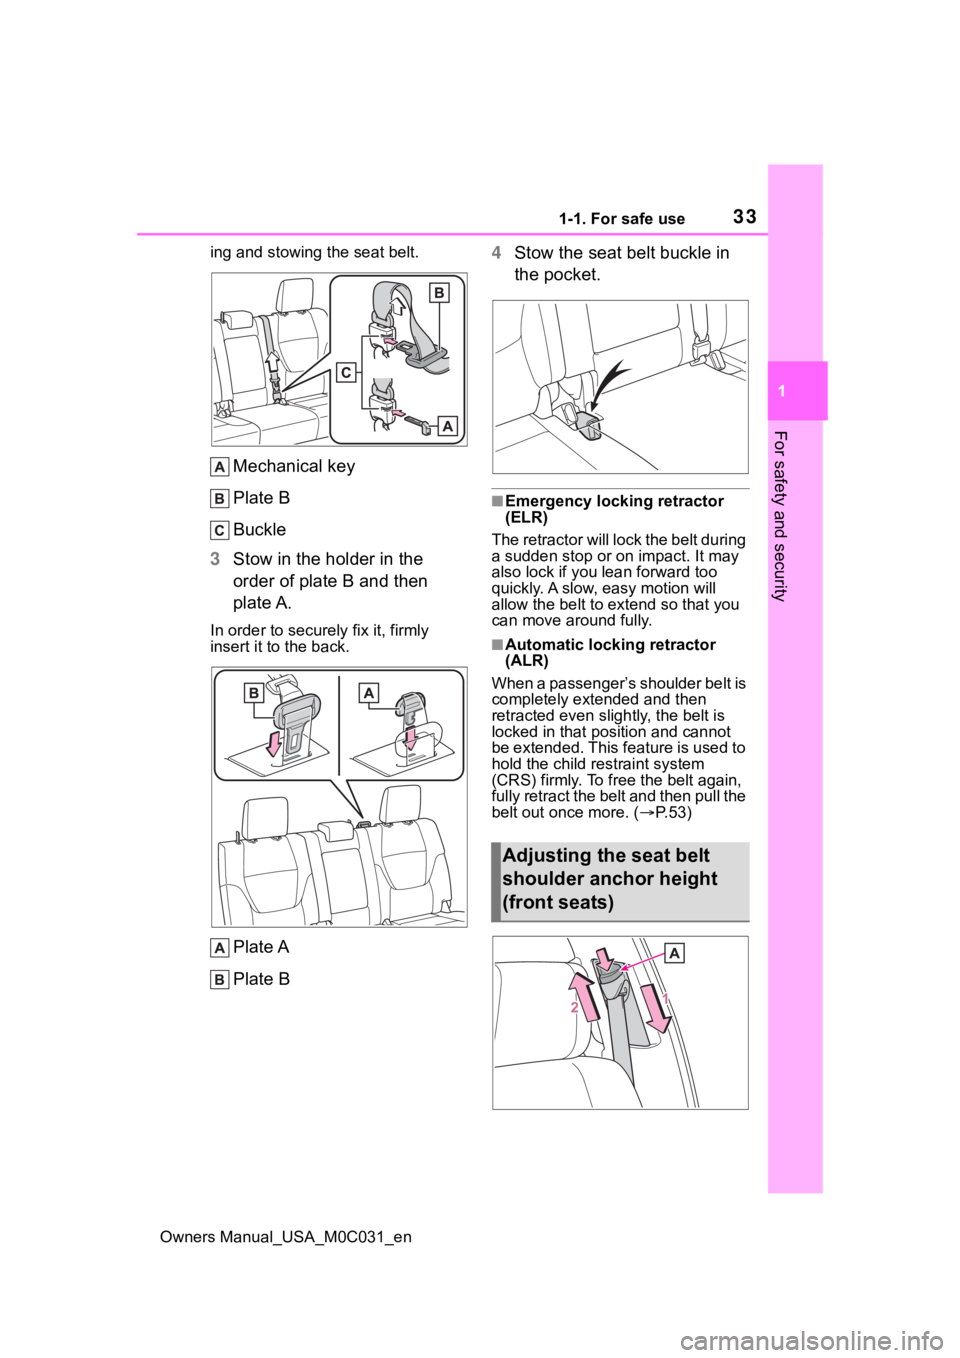
ing and stowing the seat belt.
Mechanical key
Plate B
Buckle
3 Stow in the holder in the
order of plate B and then
plate A.
In order to securely fix it, firmly
insert it to the back.
Plate A
Plate B 4
Stow the seat belt buckle in
the pocket.
■Emergency locking retractor
(ELR)
The retractor will lock the belt during
a sudden stop or on impact. It may
also lock if you lean forward too
quickly. A slow, easy motion will
allow the belt to extend so that you
can move around fully.
■Automatic locking retractor
(ALR)
When a passenger’s shoulder belt is
completely extended and then
retracted even slightly, the belt is
locked in that position and cannot
be extended. This feature is used to
hold the child restraint system
(CRS) firmly. To free the belt again,
fully retract the belt and then pull the
belt out once more. ( P. 5 3 )
Adjusting the seat belt
shoulder anchor height
(front seats)
Page 34 of 618
341-1. For safe use
Owners Manual_USA_M0C031_en
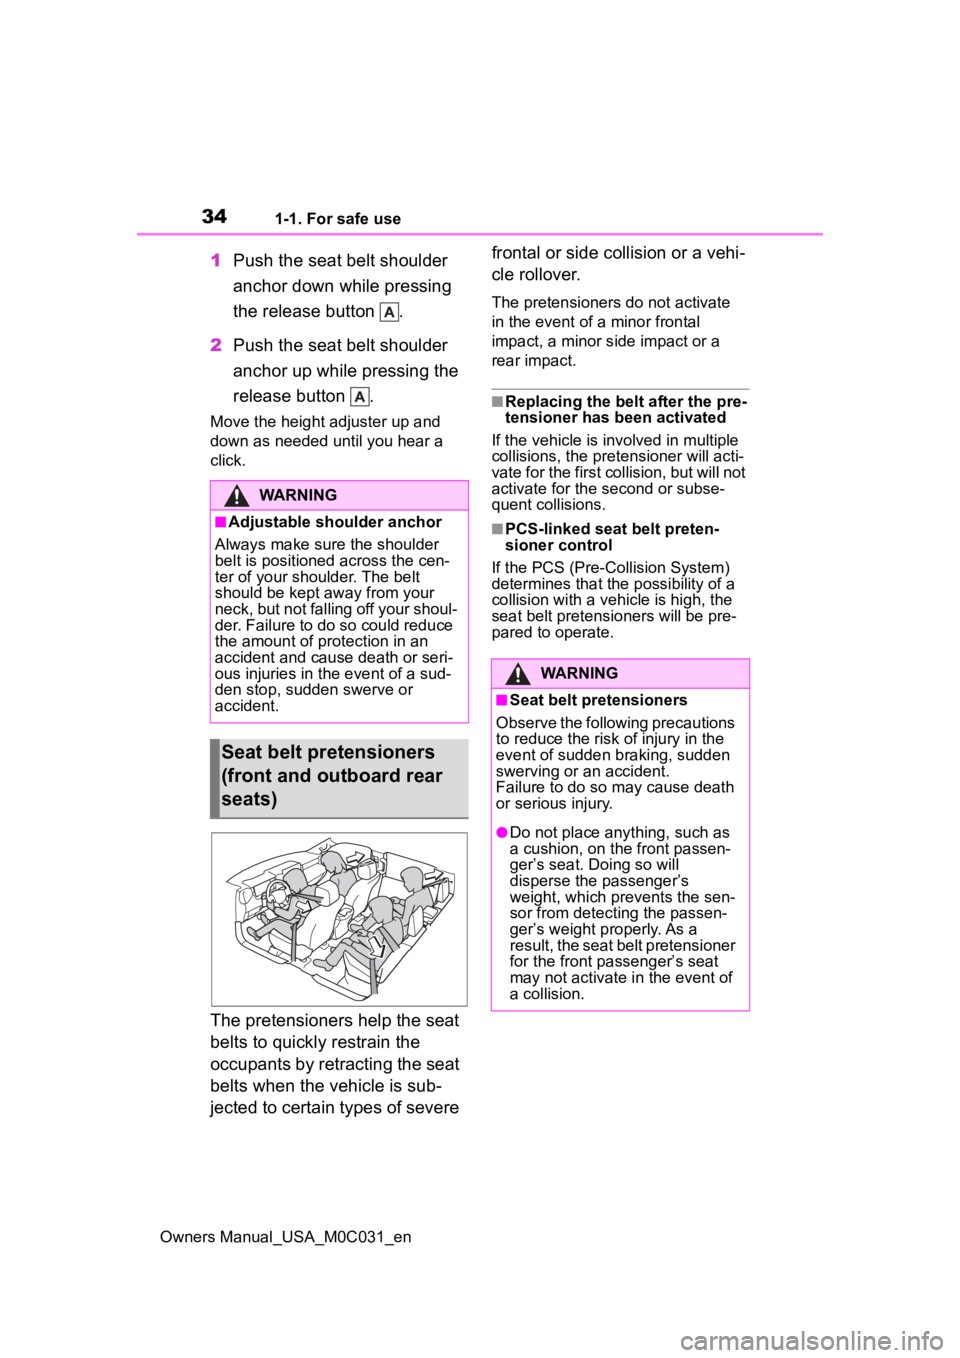
1Push the seat belt shoulder
anchor down while pressing
the release button .
2 Push the seat belt shoulder
anchor up while pressing the
release button .
Move the height adjuster up and
down as needed until you hear a
click.
The pretensioners help the seat
belts to quickly restrain the
occupants by retracting the seat
belts when the vehicle is sub-
jected to certain types of severe frontal or side collision or a vehi-
cle rollover.
The pretensioners do not activate
in the event of a minor frontal
impact, a minor s
ide impact or a
rear impact.
■Replacing the belt after the pre-
tensioner has been activated
If the vehicle is involved in multiple
collisions, the pretensioner will acti-
vate for the first collision, but will not
activate for the second or subse-
quent collisions.
■PCS-linked seat belt preten-
sioner control
If the PCS (Pre-Collision System)
determines that the possibility of a
collision with a vehi cle is high, the
seat belt pretensioners will be pre-
pared to operate.
WARNING
■Adjustable shoulder anchor
Always make sure the shoulder
belt is positioned across the cen-
ter of your shoulder. The belt
should be kept away from your
neck, but not falling off your shoul-
der. Failure to do so could reduce
the amount of protection in an
accident and cause death or seri-
ous injuries in the event of a sud-
den stop, sudden swerve or
accident.
Seat belt pretensioners
(front and outboard rear
seats)
WARNING
■Seat belt pretensioners
Observe the following precautions
to reduce the risk of injury in the
event of sudden braking, sudden
swerving or an accident.
Failure to do so may cause death
or serious injury.
●Do not place anything, such as
a cushion, on the front passen-
ger’s seat. Doing so will
disperse the passenger’s
weight, which prevents the sen-
sor from detecting the passen-
ger’s weight properly. As a
result, the seat belt pretensioner
for the front passenger’s seat
may not activate in the event of
a collision.
Page 133 of 618
1333-3. Adjusting the seats
Owners Manual_USA_M0C031_en
3
Before driving
3-3.Adjusting the seats
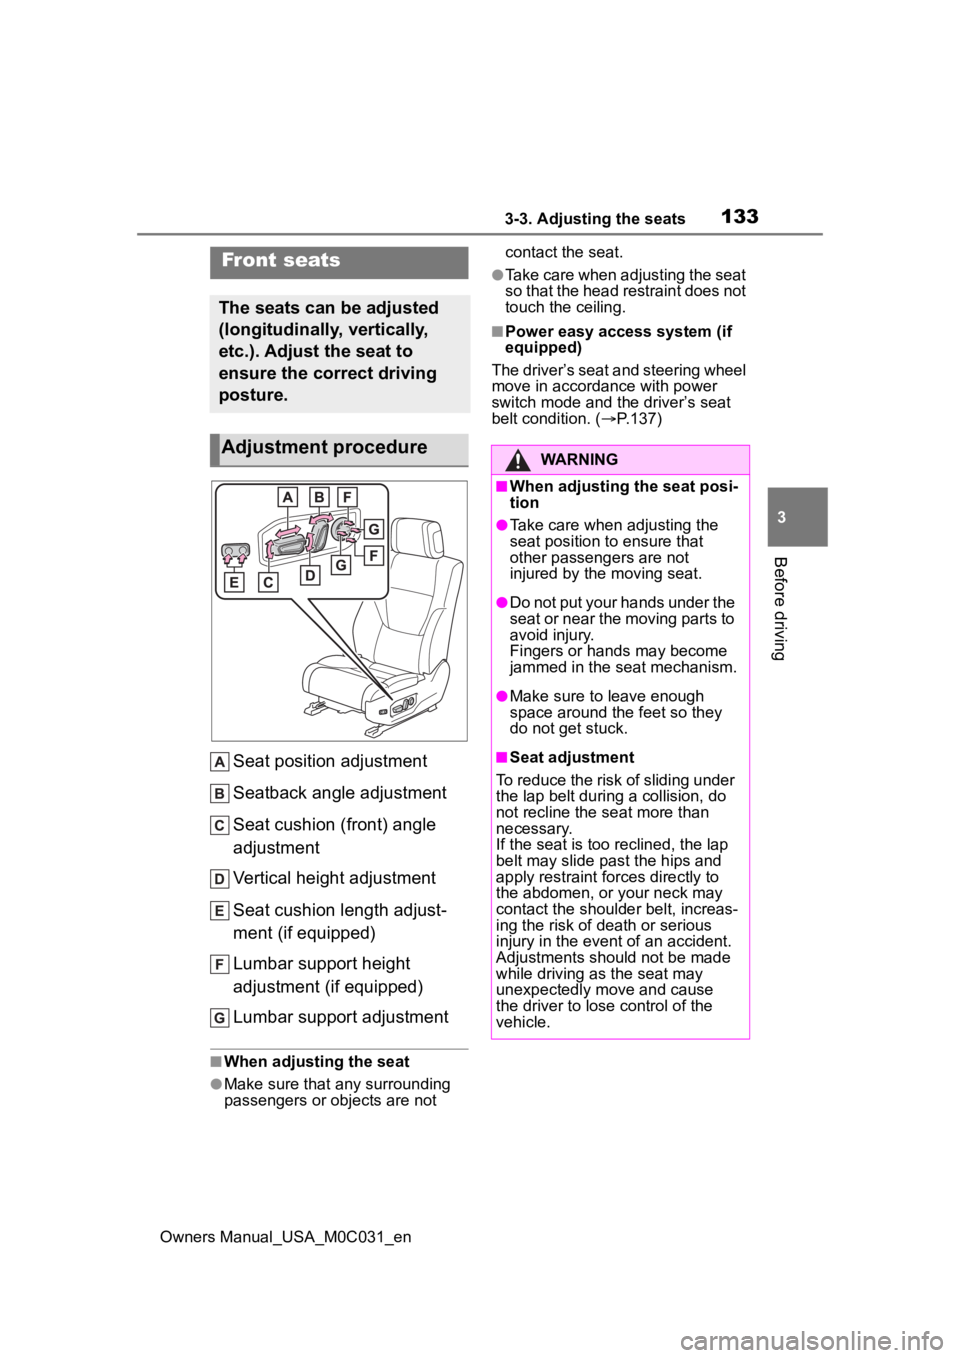
Seat position adjustment
Seatback angle adjustment
Seat cushion (front) angle
adjustment
Vertical height adjustment
Seat cushion length adjust-
ment (if equipped)
Lumbar support height
adjustment (if equipped)
Lumbar support adjustment
■When adjusting the seat
●Make sure that any surrounding
passengers or ob jects are not contact the seat.
●Take care when adjusting the seat
so that the head restraint does not
touch the ceiling.
■Power easy access system (if
equipped)
The driver’s seat and steering wheel
move in accordance with power
switch mode and th e driver’s seat
belt condition. ( P.137)
Front seats
The seats can be adjusted
(longitudinally, vertically,
etc.). Adjust the seat to
ensure the correct driving
posture.
Adjustment procedureWARNING
■When adjusting the seat posi-
tion
●Take care when adjusting the
seat position to ensure that
other passengers are not
injured by the moving seat.
●Do not put your hands under the
seat or near the moving parts to
avoid injury.
Fingers or hands may become
jammed in the seat mechanism.
●Make sure to leave enough
space around the feet so they
do not get stuck.
■Seat adjustment
To reduce the risk of sliding under
the lap belt during a collision, do
not recline the se at more than
necessary.
If the seat is too reclined, the lap
belt may slide past the hips and
apply restraint for ces directly to
the abdomen, or your neck may
contact the shoulder belt, increas-
ing the risk of death or serious
injury in the event of an accident.
Adjustments should not be made
while driving as the seat may
unexpectedly move and cause
the driver to lose control of the
vehicle.
Page 138 of 618
1383-3. Adjusting the seats
Owners Manual_USA_M0C031_en
view mirrors to the desired
positions.
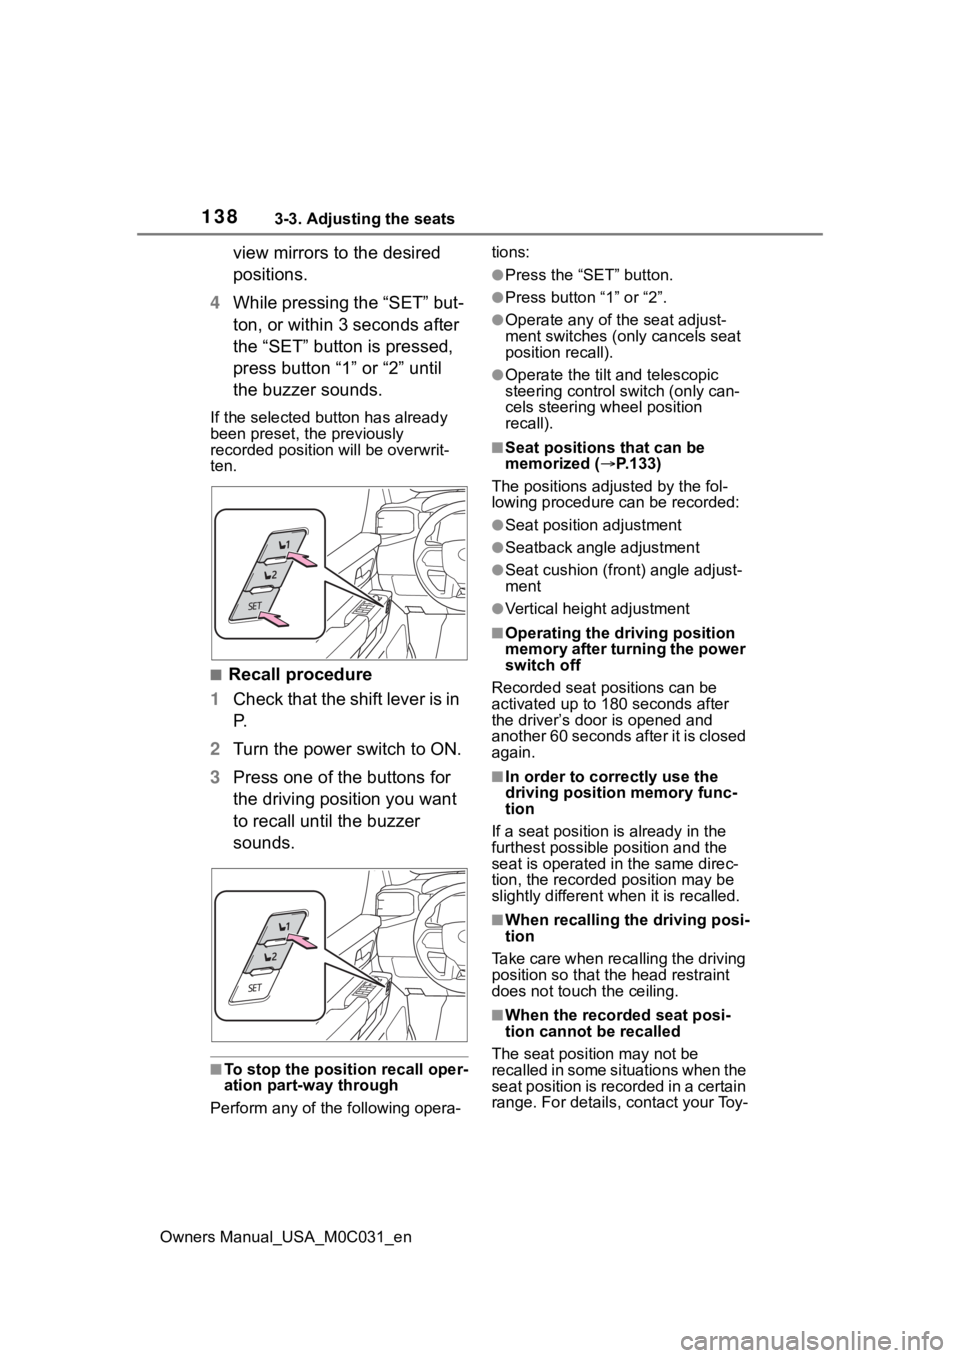
4 While pressing the “SET” but-
ton, or within 3 seconds after
the “SET” button is pressed,
press button “1” or “2” until
the buzzer sounds.
If the selected button has already
been preset, the previously
recorded position will be overwrit-
ten.
■Recall procedure
1 Check that the shift lever is in
P.
2 Turn the power switch to ON.
3 Press one of the buttons for
the driving position you want
to recall until the buzzer
sounds.
■To stop the position recall oper-
ation part-way through
Perform any of the following opera- tions:
●Press the “SET” button.
●Press button “1” or “2”.
●Operate any of t
he seat adjust-
ment switches (only cancels seat
position recall).
●Operate the tilt and telescopic
steering control switch (only can-
cels steering wheel position
recall).
■Seat positions that can be
memorized ( P.133)
The positions adjusted by the fol-
lowing procedure can be recorded:
●Seat position adjustment
●Seatback angle adjustment
●Seat cushion (front) angle adjust-
ment
●Vertical height adjustment
■Operating the driving position
memory after turning the power
switch off
Recorded seat positions can be
activated up to 180 seconds after
the driver’s door is opened and
another 60 seconds after it is closed
again.
■In order to corre ctly use the
driving position memory func-
tion
If a seat position is already in the
furthest possible position and the
seat is operated in the same direc-
tion, the recorded position may be
slightly different w hen it is recalled.
■When recalling the driving posi-
tion
Take care when recalling the driving
position so that the head restraint
does not touch the ceiling.
■When the recorded seat posi-
tion cannot be recalled
The seat positi on may not be
recalled in some situations when the
seat position is recorded in a certain
range. For details, contact your Toy-
Page 141 of 618
1413-3. Adjusting the seats
Owners Manual_USA_M0C031_en
3
Before driving
■Rear seats
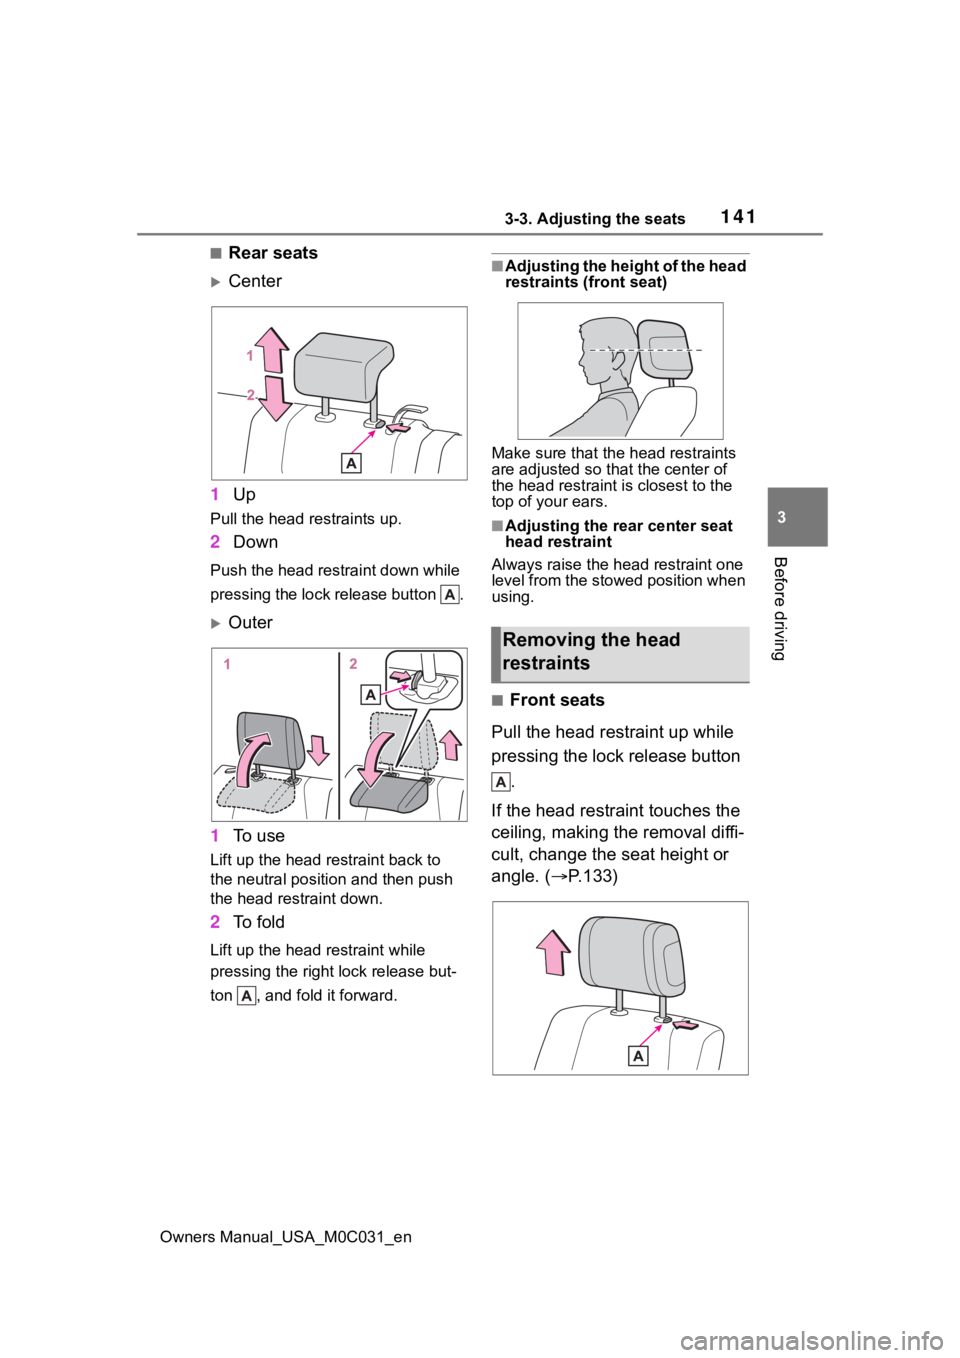
Center
1 Up
Pull the head restraints up.
2Down
Push the head restraint down while
pressing the lock release button .
Outer
1 To u s e
Lift up the head restraint back to
the neutral position and then push
the head restraint down.
2To fold
Lift up the head restraint while
pressing the right lock release but-
ton , and fold it forward.
■Adjusting the height of the head
restraints (front seat)
Make sure that the head restraints
are adjusted so that the center of
the head restraint i s closest to the
top of your ears.
■Adjusting the rear center seat
head restraint
Always raise the head restraint one
level from the stowed position when
using.
■Front seats
Pull the head restraint up while
pressing the lock release button .
If the head restraint touches the
ceiling, making the removal diffi-
cult, change the seat height or
angle. ( P.133)
Removing the head
restraints
Page 145 of 618

1453-4. Adjusting the steering wheel and mirrors
Owners Manual_USA_M0C031_en
3
Before driving
*: If equipped
The height of the rear view mir-
ror can be adjusted to suit your
driving posture.
Adjust the height of the rear
view mirror by moving it up and
down.
Responding to the level of
brightness of the headlights of vehicles behind, the reflected
light is automatically reduced.
Turn the automatic anti-glare
function mode on/off
When the automatic anti-glare func-
tion is in ON mode, the indicator
illuminates.
The function will set to ON mode
each time the power switch is
turned to ON.
Pressing the button turns the func-
tion to OFF mode. (The indicator
also turns off.)
■To prevent sensor error
To ensure that the sensors operate
properly, do not touch or cover
them.
Inside rear view mir-
ror*
The rear view mirror’s posi-
tion can be adjusted to
enable sufficient confirma-
tion of the rear view.
Adjusting the height of
rear view mirror
WARNING
■Caution while driving
Do not adjust the position of the
mirror while driving.
Doing so may lead to mishandling
of the vehicle and cause an acci-
dent, resulting in death or serious
injury.
Anti-glare function
Page 147 of 618
1473-4. Adjusting the steering wheel and mirrors
Owners Manual_USA_M0C031_en
3
Before driving
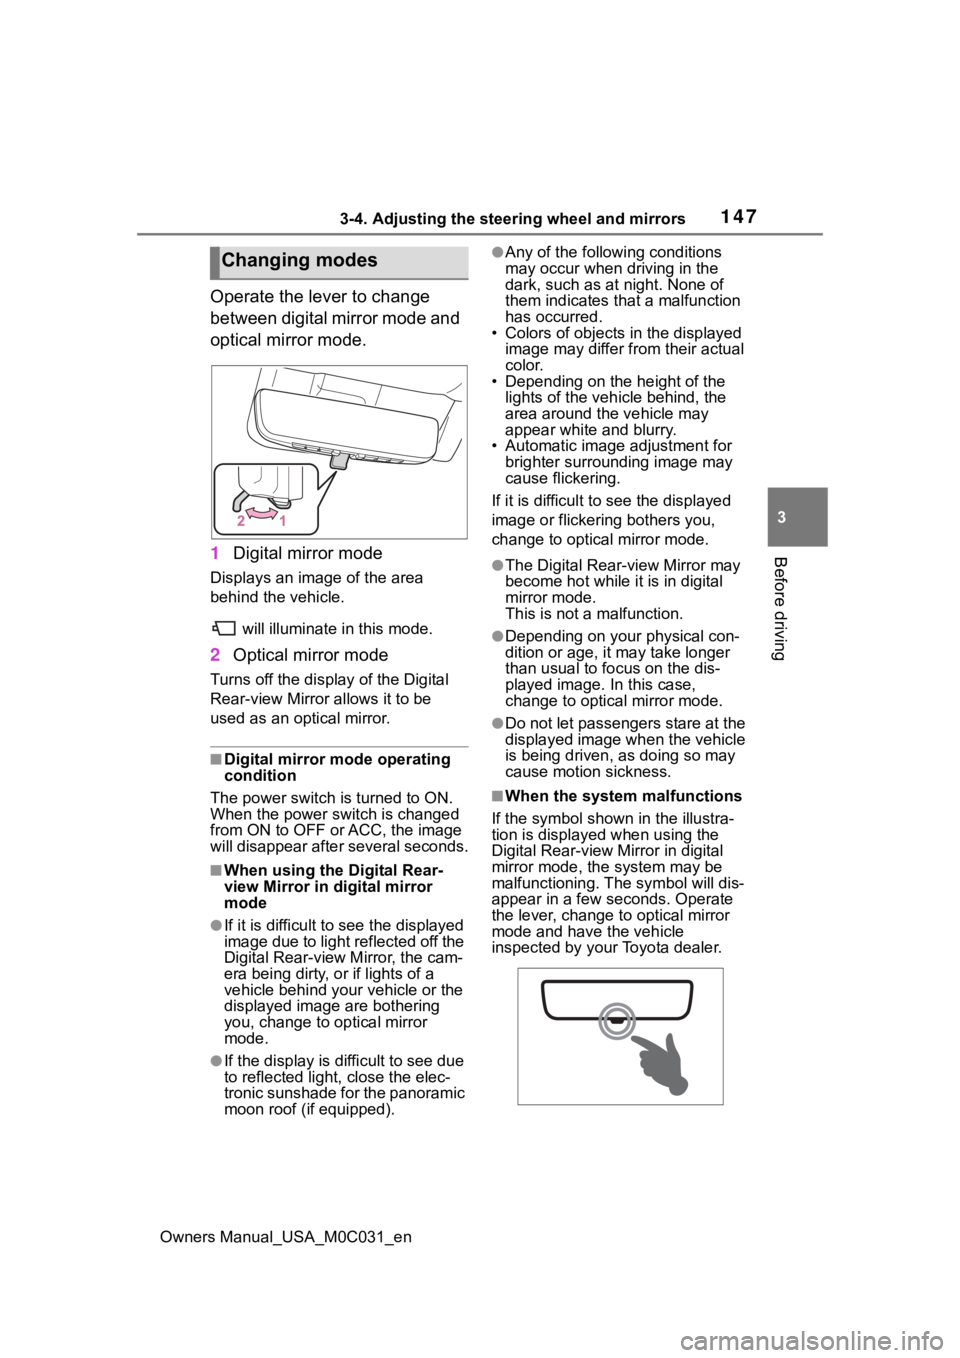
Operate the lever to change
between digital mirror mode and
optical mirror mode.
1 Digital mirror mode
Displays an image of the area
behind the vehicle.
will illuminate in this mode.
2Optical mirror mode
Turns off the display of the Digital
Rear-view Mirror allows it to be
used as an optical mirror.
■Digital mirror mode operating
condition
The power switch is turned to ON.
When the power switch is changed
from ON to OFF or ACC, the image
will disappear afte r several seconds.
■When using the Digital Rear-
view Mirror in digital mirror
mode
●If it is difficult to see the displayed
image due to light reflected off the
Digital Rear-view M irror, the cam-
era being dirty, or if lights of a
vehicle behind your vehicle or the
displayed image are bothering
you, change to optical mirror
mode.
●If the display is difficult to see due
to reflected light, close the elec-
tronic sunshade for the panoramic
moon roof (if equipped).
●Any of the following conditions
may occur when driving in the
dark, such as at night. None of
them indicates that a malfunction
has occurred.
• Colors of objects in the displayed
image may differ from their actual
color.
• Depending on the height of the
lights of the vehicle behind, the
area around the vehicle may
appear white and blurry.
• Automatic image adjustment for brighter surrounding image may
cause flickering.
If it is difficult to see the displayed
image or flickering bothers you,
change to optical mirror mode.
●The Digital Rear-view Mirror may
become hot while it is in digital
mirror mode.
This is not a malfunction.
●Depending on your physical con-
dition or age, it may take longer
than usual to fo cus on the dis-
played image. In this case,
change to optical mirror mode.
●Do not let passengers stare at the
displayed image when the vehicle
is being driven, as doing so may
cause motion sickness.
■When the system malfunctions
If the symbol shown in the illustra-
tion is displayed when using the
Digital Rear-view Mirror in digital
mirror mode, the system may be
malfunctioning. The symbol will dis-
appear in a few seconds. Operate
the lever, change to optical mirror
mode and have the vehicle
inspected by your Toyota dealer.
Changing modes