2022 TOYOTA COROLLA drive belt
[x] Cancel search: drive beltPage 68 of 678

661-3. Emergency assistance
WA R N I N G
• When any related equipment (such
as the “SOS” button panel, indicator
lights, microphone, speaker, DCM, antenna, or any wires connecting
the equipment) is malfunctioning,
damaged or broken, the Emer- gency Call cannot be made.
• During an Emergency Call, the sys-
tem makes repeated attempts to connect to the eCall control center.
However, if it cannot connect to the
eCall control center due to poor radio wave reception, the system
may not be able to connect to the
cellular network and the call may finish without connecting. The red
indicator light will blink for approxi-
mately 30 seconds to indicate this disconnection.
●If the battery’s voltage decreases or there is a disconnection, the system
may not be able to connect to the
eCall control center.
■When the Emergency Call sys-
tem is replaced with a new one
The Emergency Call system should
be registered. Contact any authorized
Toyota retailer or Toyota authorized repairer, or any reliable repairer.
■For your safety
●Please drive safely.
The function of this system is to
assist you in making the Emer- gency Call in case of accidents
such as traffic accidents or sudden
medical emergencies, and it does not protect the driver or passengers
in any way. Please drive safely and
fasten your seatbelts at all times for your safety.
●In case of an emergency, make lives the top priority.
●If you smell anything burning or other unusual smells, leave the
vehicle and evacuate to a safe area
immediately.
●If the airbags deploy when the sys-
tem is operating normally, the sys- tem makes emergency call. The
system also makes emergency call
when the vehicle is struck from the rear or rolls over, even if the airbags
do not deploy.
●For safety, do not make the Emer-
gency Call while driving.
Making calls during driving may cause mishandling of the steering
wheel, which may lead to unex-
pected accidents. Stop the vehicle and confirm the
safety of your surroundings before
making the Emergency Call.
●When changing fuses, please use
the specified fuses. Using other fuses may cause ignition or smoke
in the circuit and lead to a fire.
●Using the system while there is
smoke or an unusual smell may
cause a fire. Stop using the system immediately and consult any
authorized Toyota retailer or Toyota
authorized repairer, or any reliable repairer.
NOTICE
■To prevent damage
Do not pour any liquids onto the
“SOS” button panel, etc. and do not impact it.
Page 84 of 678

822-1. Instrument cluster
*1: These lights come on when the
engine switch is turned to ON to indi-
cate that a system check is being
performed. They will turn off after the
engine is started, or after a few sec-
onds. There may be a malfunction in
a system if the lights do not come
on, or turn off. Have the vehicle
inspected by any authorized Toyota
retailer or Toyota authorized repairer,
or any reliable repairer.
*2: As these lights are displayed on the
multi-information display, they will
not turn on when a system check, as
described in*1 above, is being per-
formed.
*3: This light illuminates on the
multi-information display.
ABS warning light*1 ( P.473)
Brake Override System warn-
ing light/Drive-S tart Control
warning light*3 ( P.473)
(Red)
Electric power steering sys-
tem warning light*1 ( P.474)
(Yellow)
Electric power steering sys-
tem warning light*1 ( P.474)
Low fuel level warning light
( P.474)
Driver’s and front passen-
ger’s seat belt reminder light
( P.474)
Rear passengers’ seat
belt reminder lights (if
equipped) ( P.474)
Low windshield washer fluid
warning light*1 (if equipped)
( P.475)
Tire pressure warning light*1
( P.475)
(Orange)
LTA indicator (if equipped)
( P.475)
LDA indicator (if equipped)
( P.475)
(Flashes)
Toyota parking assist-sensor
OFF indicator*1 (if equipped)
( P.476)
(Flashes)
RCTA OFF indicator*1 (if
equipped) ( P.476)
(Flashes)
PKSB OFF indicator*1 (if
equipped) ( P.476)
(Flashes or illumi-nates)
PCS warning light*1 (if
equipped) ( P.477)
(Yellow)
Cruise control indicator (if
equipped) ( P.477)
Slip indicator*1 ( P.477)
(Flashes)
Parking brake indicator
( P.478)
(Flashes)
Brake hold operated indica-
tor*1 (if equipped) ( P.478)
Page 128 of 678
1263-3. Adjusting the seats
3-3.Adjusting the seats
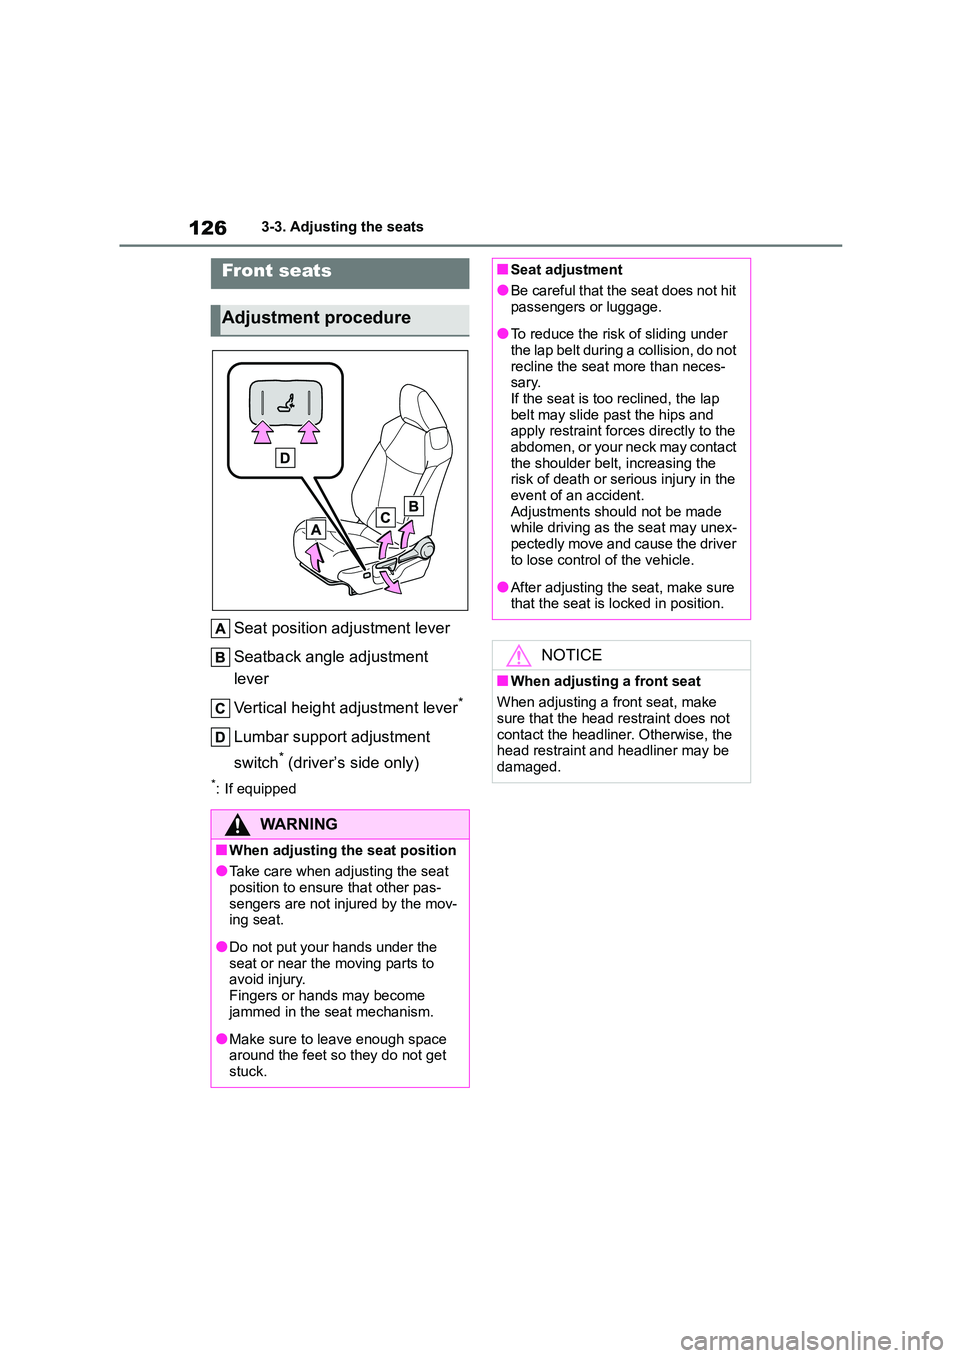
Seat position adjustment lever
Seatback angle adjustment
lever
Vertical height adjustment lever*
Lumbar support adjustment
switch* (driver’s side only)
*: If equipped
Front seats
Adjustment procedure
WA R N I N G
■When adjusting the seat position
●Take care when adjusting the seat position to ensure that other pas-
sengers are not injured by the mov-
ing seat.
●Do not put your hands under the
seat or near the moving parts to avoid injury.
Fingers or hands may become
jammed in the seat mechanism.
●Make sure to leave enough space
around the feet so they do not get
stuck.
■Seat adjustment
●Be careful that the seat does not hit
passengers or luggage.
●To reduce the risk of sliding under
the lap belt during a collision, do not
recline the seat more than neces- sary.
If the seat is too reclined, the lap
belt may slide past the hips and apply restraint forces directly to the
abdomen, or your neck may contact
the shoulder belt, increasing the risk of death or serious injury in the
event of an accident.
Adjustments should not be made while driving as the seat may unex-
pectedly move and cause the driver
to lose control of the vehicle.
●After adjusting the seat, make sure
that the seat is locked in position.
NOTICE
■When adjusting a front seat
When adjusting a front seat, make
sure that the head restraint does not
contact the headliner. Otherwise, the head restraint and headliner may be
damaged.
Page 129 of 678
127
3
3-3. Adjusting the seats
Before driving
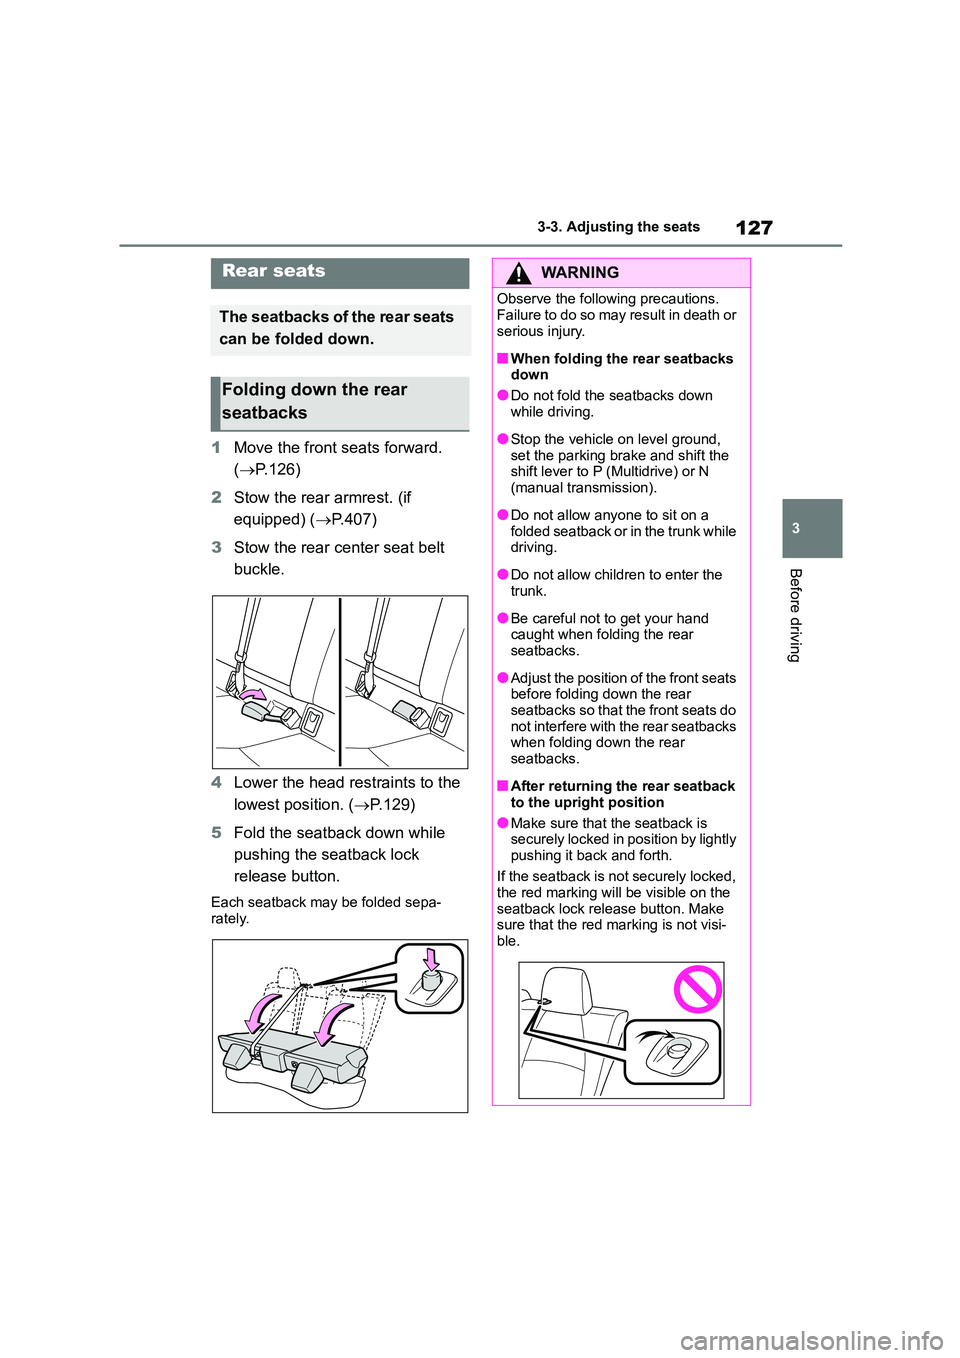
1 Move the front seats forward.
( P.126)
2 Stow the rear armrest. (if
equipped) ( P.407)
3 Stow the rear center seat belt
buckle.
4 Lower the head restraints to the
lowest position. ( P.129)
5 Fold the seatback down while
pushing the seatback lock
release button.
Each seatback may be folded sepa- rately.
Rear seats
The seatbacks of the rear seats
can be folded down.
Folding down the rear
seatbacks
WA R N I N G
Observe the following precautions.
Failure to do so may result in death or
serious injury.
■When folding the rear seatbacks
down
●Do not fold the seatbacks down
while driving.
●Stop the vehicle on level ground, set the parking brake and shift the
shift lever to P (Multidrive) or N
(manual transmission).
●Do not allow anyone to sit on a
folded seatback or in the trunk while driving.
●Do not allow children to enter the trunk.
●Be careful not to get your hand caught when folding the rear
seatbacks.
●Adjust the position of the front seats
before folding down the rear
seatbacks so that the front seats do not interfere with the rear seatbacks
when folding down the rear
seatbacks.
■After returning the rear seatback
to the upright position
●Make sure that the seatback is
securely locked in position by lightly
pushing it back and forth.
If the seatback is not securely locked,
the red marking will be visible on the
seatback lock releas e button. Make sure that the red marking is not visi-
ble.
Page 130 of 678
1283-3. Adjusting the seats
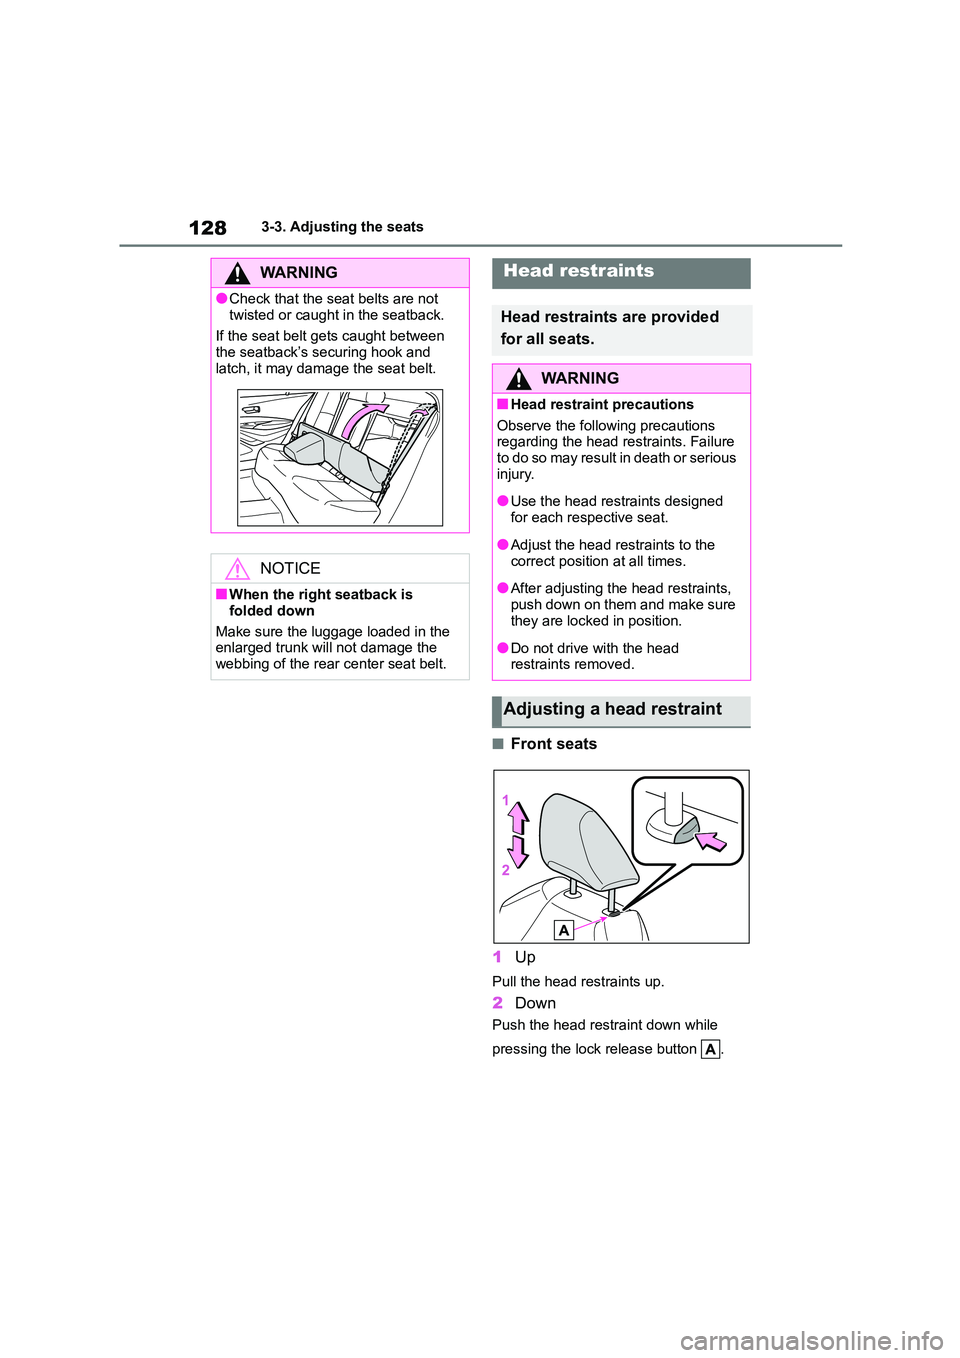
■Front seats
1 Up
Pull the head restraints up.
2Down
Push the head restraint down while
pressing the lock release button .
WA R N I N G
●Check that the seat belts are not
twisted or caught in the seatback.
If the seat belt gets caught between the seatback’s securing hook and
latch, it may damage the seat belt.
NOTICE
■When the right seatback is
folded down
Make sure the luggage loaded in the
enlarged trunk will not damage the
webbing of the rear center seat belt.
Head restraints
Head restraints are provided
for all seats.
WA R N I N G
■Head restraint precautions
Observe the following precautions
regarding the head restraints. Failure to do so may result in death or serious
injury.
●Use the head restraints designed
for each respective seat.
●Adjust the head restraints to the
correct position at all times.
●After adjusting the head restraints,
push down on them and make sure
they are locked in position.
●Do not drive with the head
restraints removed.
Adjusting a head restraint
Page 176 of 678
1744-2. Driving procedures
into P, the parking brake will be
set, and the parking brake indi-
cator and parking brake light will
turn on.
Operate the shift lever with the
vehicle stopped and the brake
pedal depressed.
The parking brake may not operate
automatically if the shift lever is moved
quickly.
In this case, it is necessary to operate
the parking brake switch. ( P.173)
Vehicles with a manual transmis-
sion
When the engine is off, the parking
brake will be set, and the parking
brake indicator and parking brake
light turn on.
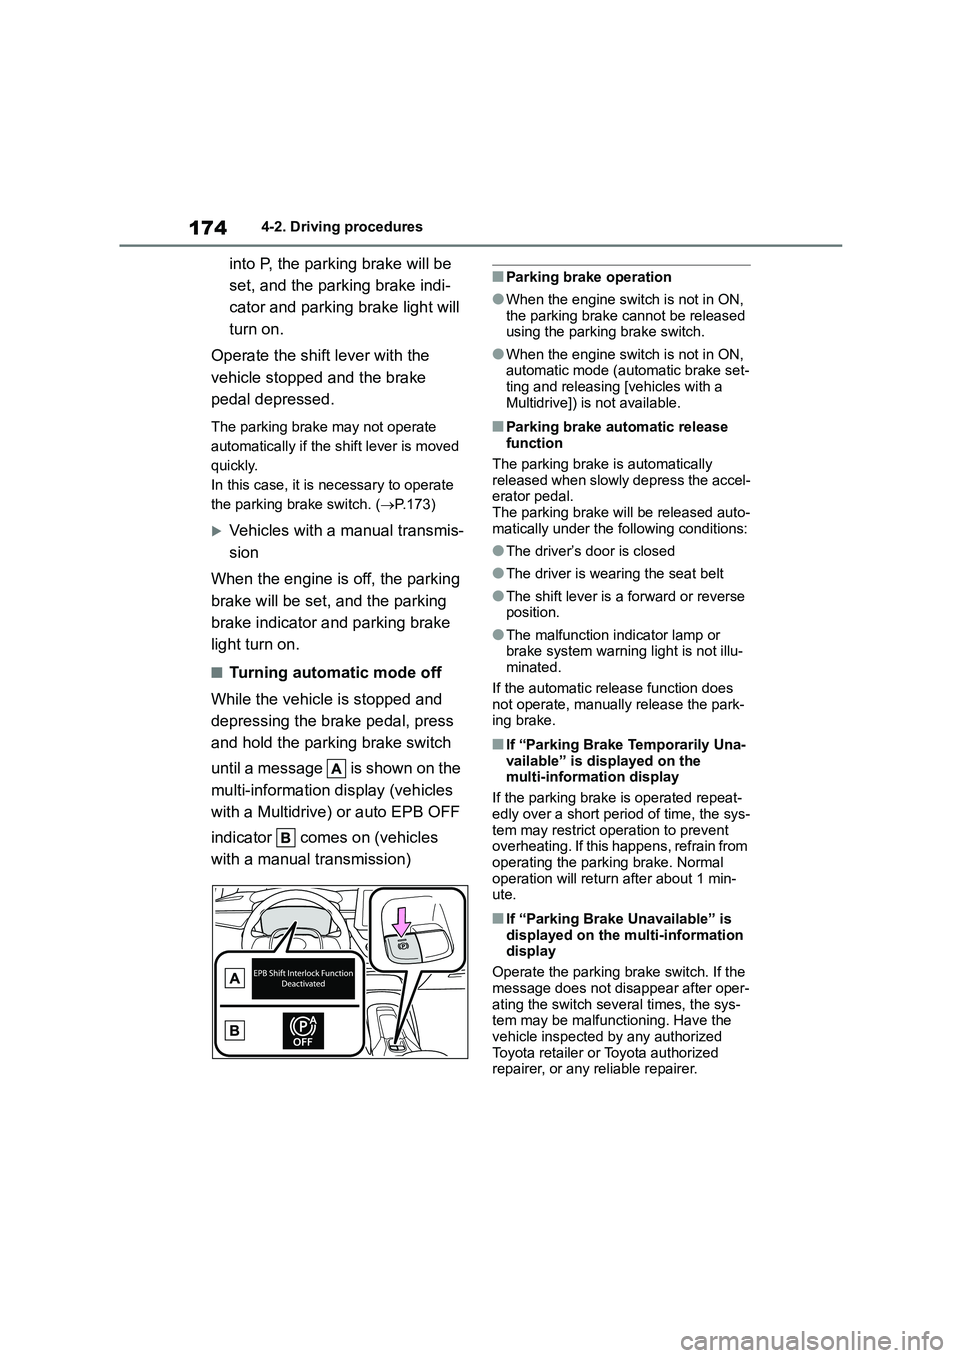
■Turning automatic mode off
While the vehicle is stopped and
depressing the brake pedal, press
and hold the parking brake switch
until a message is shown on the
multi-information display (vehicles
with a Multidrive ) or auto EPB OFF
indicator comes on (vehicles
with a manual transmission)
■Parking brake operation
●When the engine switch is not in ON,
the parking brake cannot be released using the parking brake switch.
●When the engine switch is not in ON, automatic mode (automatic brake set-
ting and releasing [vehicles with a
Multidrive]) is not available.
■Parking brake automatic release function
The parking brake is automatically
released when slowly depress the accel- erator pedal.
The parking brake will be released auto-
matically under the following conditions:
●The driver’s door is closed
●The driver is wearing the seat belt
●The shift lever is a forward or reverse position.
●The malfunction indicator lamp or brake system warning light is not illu-
minated.
If the automatic release function does not operate, manually release the park-
ing brake.
■If “Parking Brake Temporarily Una-
vailable” is displayed on the multi-information display
If the parking brake is operated repeat-
edly over a short period of time, the sys-
tem may restrict operation to prevent overheating. If this happens, refrain from
operating the parking brake. Normal
operation will return after about 1 min- ute.
■If “Parking Brake Unavailable” is
displayed on the multi-information
display
Operate the parking brake switch. If the
message does not disappear after oper-
ating the switch several times, the sys- tem may be malfunctioning. Have the
vehicle inspected by any authorized
Toyota retailer or Toyota authorized repairer, or any reliable repairer.
Page 178 of 678
1764-2. Driving procedures
*: If equipped
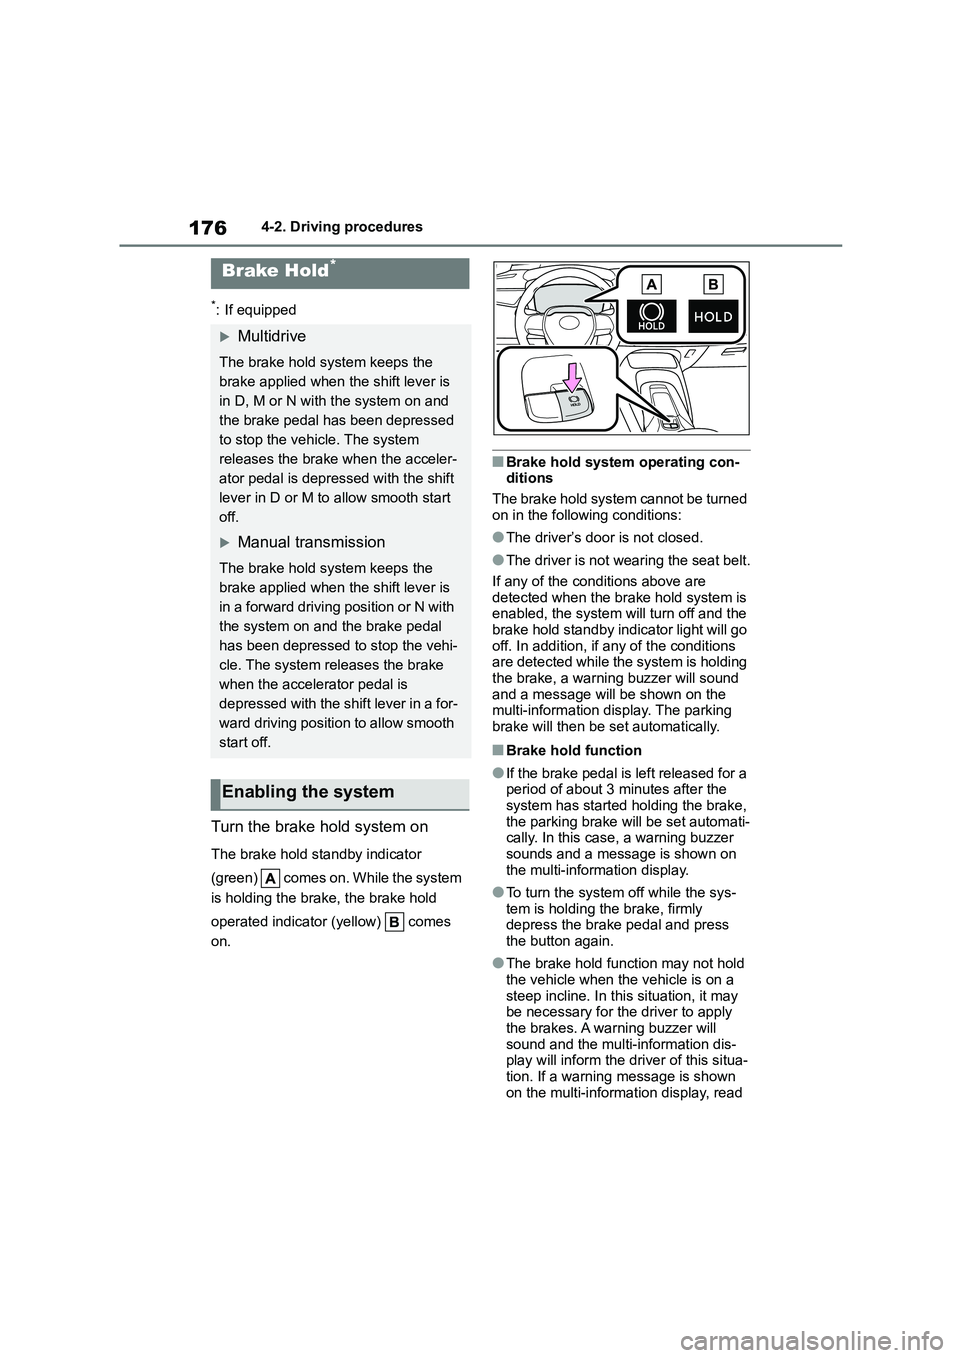
Turn the brake hold system on
The brake hold standby indicator
(green) comes on. While the system
is holding the brake, the brake hold
operated indicator (yellow) comes
on.
■Brake hold system operating con- ditions
The brake hold system cannot be turned
on in the following conditions:
●The driver’s door is not closed.
●The driver is not wearing the seat belt.
If any of the conditions above are
detected when the brake hold system is enabled, the system will turn off and the
brake hold standby indicator light will go
off. In addition, if any of the conditions are detected while t he system is holding
the brake, a warning buzzer will sound
and a message will be shown on the multi-information display. The parking
brake will then be set automatically.
■Brake hold function
●If the brake pedal is left released for a
period of about 3 minutes after the
system has started holding the brake, the parking brake will be set automati-
cally. In this case, a warning buzzer
sounds and a message is shown on the multi-information display.
●To turn the system off while the sys-tem is holding the brake, firmly
depress the brake pedal and press
the button again.
●The brake hold function may not hold
the vehicle when the vehicle is on a
steep incline. In this situation, it may be necessary for the driver to apply
the brakes. A warning buzzer will
sound and the multi-information dis- play will inform the driver of this situa-
tion. If a warning message is shown
on the multi-information display, read
Brake Hold*
Multidrive
The brake hold system keeps the
brake applied when the shift lever is
in D, M or N with the system on and
the brake pedal has been depressed
to stop the vehicle. The system
releases the brake when the acceler-
ator pedal is depressed with the shift
lever in D or M to allow smooth start
off.
Manual transmission
The brake hold system keeps the
brake applied when the shift lever is
in a forward driving position or N with
the system on and the brake pedal
has been depressed to stop the vehi-
cle. The system releases the brake
when the accelerator pedal is
depressed with the shift lever in a for-
ward driving position to allow smooth
start off.
Enabling the system
Page 179 of 678
177
4
4-2. Driving procedures
Driving
the message and follow the instruc-
tions.
■When the parking brake is set auto- matically while the system is hold-
ing the brakes
Perform any of the following operations to release the parking brake.
●Depress the accelerator pedal. (The parking brake will not be released
automatically if the seat belt is not fas-
tened.)
●Operate the parking brake switch with
the brake pedal depressed.
Make sure that the parking brake indica-
tor light goes off. ( P.173)
■When an inspection at any author-
ized Toyota retailer or Toyota authorized repairer, or any reliable
repairer is necessary
When the brake hold standby indicator (green) does not illuminate even when
the brake hold switch is pressed with the
brake hold system operating conditions met, the system may be malfunctioning.
Have the vehicle inspected at any
authorized Toyota retailer or Toyota authorized repairer, or any reliable
repairer.
■If “Brake Hold Malfunction Press
Brake to Deactivate Visit Your Dealer” or “Brake Hold Malfunction
Visit Your Dealer” is displayed on
the multi-information display
The system may be malfunctioning.
Have the vehicle inspected by any
authorized Toyota retailer or Toyota authorized repairer, or any reliable
repairer.
■Warning messages and buzzers
Warning messages and buzzers are
used to indicate a system malfunction or to inform the driver of the need for cau-
tion. If a warning message is shown on
the multi-information display, read the message and follow the instructions.
■If the brake hold operated indicator
flashes
P.478
WA R N I N G
■When the vehicle is on a steep
incline
When using the brake hold system on a steep incline exercise caution. The
brake hold function may not hold the
vehicle in such a situation.
■When stopped on a slippery road
The system cannot stop the vehicle
when the gripping ability of the tires has been exceeded. Do not use the
system when stopped on a slippery
road.
NOTICE
■When parking the vehicle
The brake hold system is not designed for use when parking the
vehicle for a long period of time. Turn-
ing the engine switch off while the system is holdi ng the brake may
release the brake, which would cause
the vehicle to move. When operating
the engine switch, depress the brake pedal, shift the shift lever to P
(Multidrive) or N (manual transmis-
sion) and set the parking brake.