Page 431 of 678
429
7
7-3. Do-it-yourself maintenance
Maintenance and care
Check if the treadwear indicators
are showing on the tires. Also
check the tires for uneven wear,
such as excessive wear on one
side of the tread.
Check the spare tire condition and
pressure if not rotated.
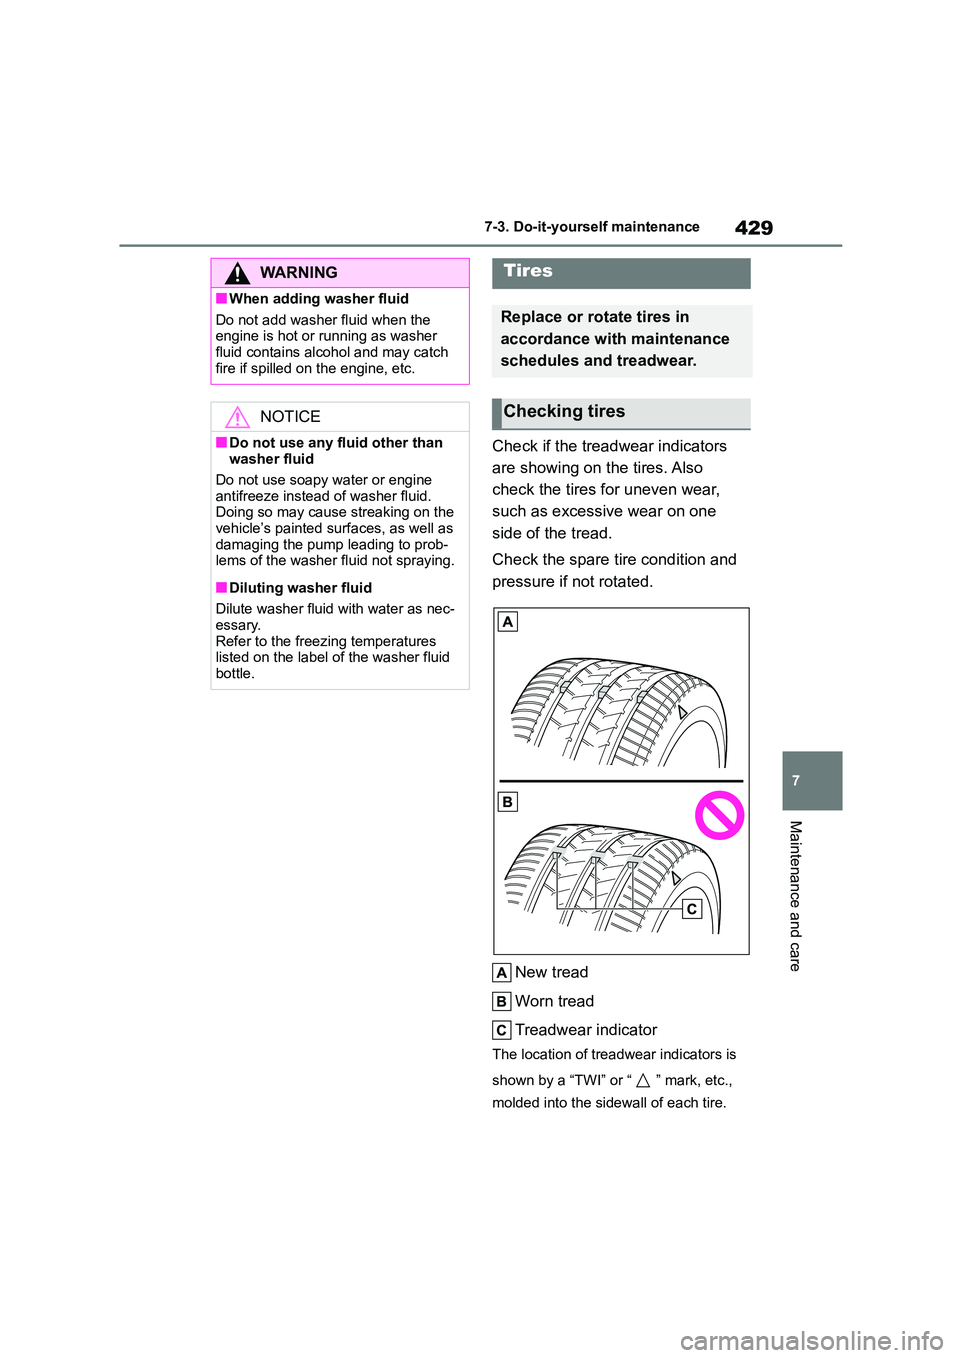
New tread
Worn tread
Treadwear indicator
The location of treadwear indicators is
shown by a “TWI” or “ ” mark, etc.,
molded into the sidewall of each tire.
WA R N I N G
■When adding washer fluid
Do not add washer fluid when the
engine is hot or running as washer fluid contains alcohol and may catch
fire if spilled on the engine, etc.
NOTICE
■Do not use any fluid other than washer fluid
Do not use soapy water or engine
antifreeze instead of washer fluid. Doing so may cause streaking on the
vehicle’s painted surfaces, as well as
damaging the pump leading to prob- lems of the washer fluid not spraying.
■Diluting washer fluid
Dilute washer fluid with water as nec-
essary.
Refer to the freezing temperatures listed on the label of the washer fluid
bottle.
Tires
Replace or rotate tires in
accordance with maintenance
schedules and treadwear.
Checking tires
Page 444 of 678
4427-3. Do-it-yourself maintenance
■The tire pressure warning sys-
tem must be init ialized in the
following circumstances:
When rotating front and rear tires
which have different tire inflation
pressures.
When changing the tire size.
When the tire inflation pressure
is changed such as when chang-
ing traveling speed or load
weight.
When the tire pressure warning
system is initialized , the current tire
inflation pressure is set as the
benchmark pressure.
■How to initialize the tire pres-
sure warning system
1 Park the vehicle in a safe place
and turn the engine switch off.
Initialization cannot be performed while
the vehicle is moving.
2 Adjust the tire inflation pressure
to the specified co ld tire inflation
pressure level. ( P.533)
Make sure to adjust the tire pressure to
the specified cold tire inflation pressure level. The tire pressure warning system
will operate based on this pressure
level.
3 Turn the engine switch to ON.
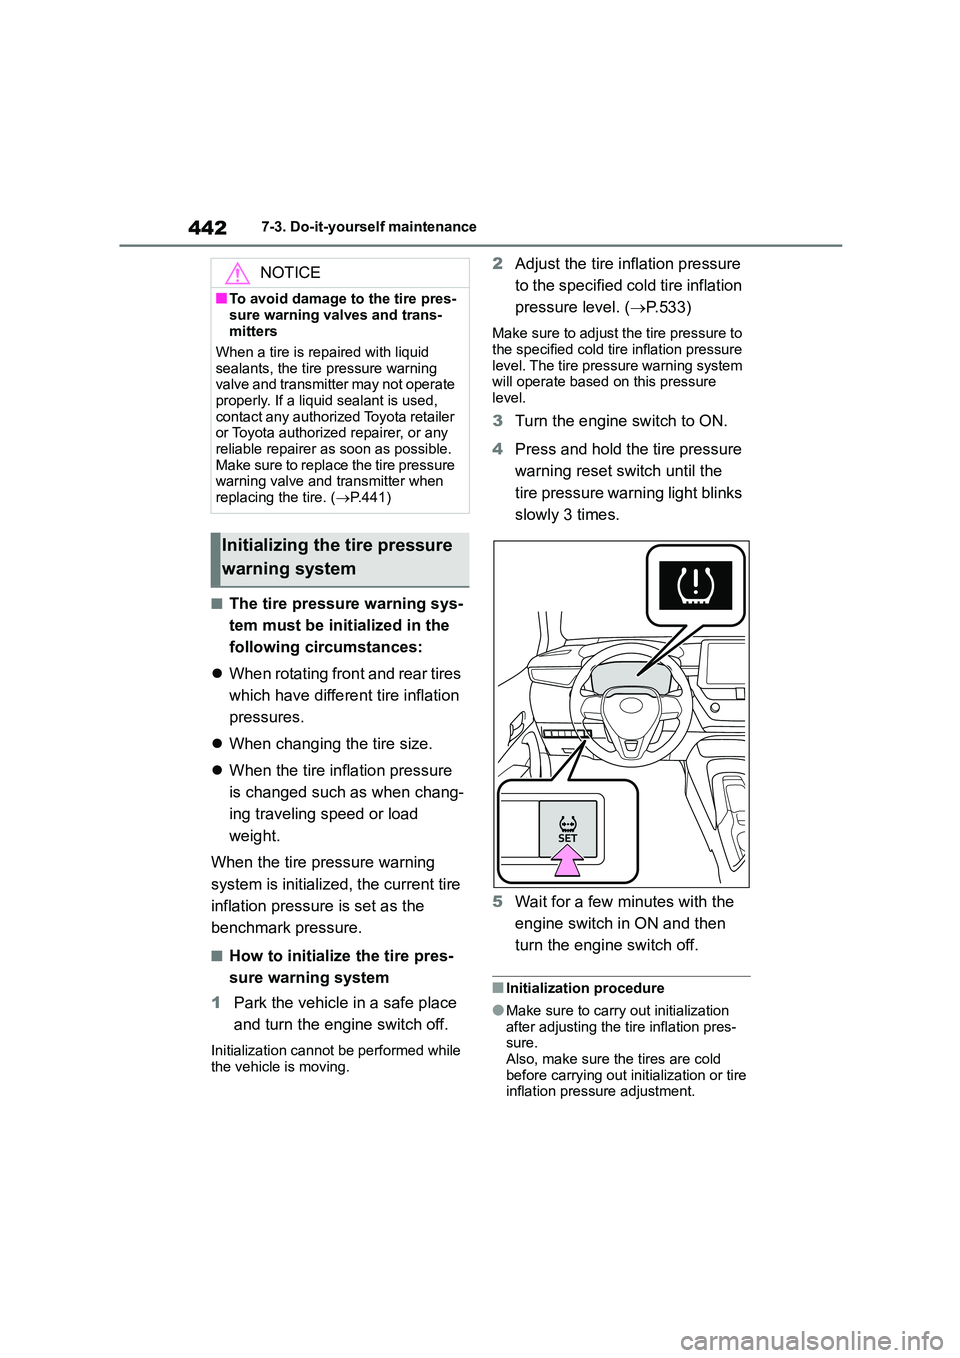
4 Press and hold the tire pressure
warning reset switch until the
tire pressure warning light blinks
slowly 3 times.
5 Wait for a few minutes with the
engine switch in ON and then
turn the engine switch off.
■Initialization procedure
●Make sure to carry out initialization
after adjusting the tire inflation pres- sure.
Also, make sure the tires are cold
before carrying out initialization or tire inflation pressure adjustment.
NOTICE
■To avoid damage to the tire pres-
sure warning valves and trans-
mitters
When a tire is repaired with liquid
sealants, the tire pressure warning
valve and transmitter may not operate properly. If a liquid sealant is used,
contact any authorized Toyota retailer
or Toyota authorized repairer, or any
reliable repairer as soon as possible. Make sure to replace the tire pressure
warning valve and transmitter when
replacing the tire. ( P.441)
Initializing the tire pressure
warning system
Page 445 of 678
443
7
7-3. Do-it-yourself maintenance
Maintenance and care
●If you have accidentally turned the
engine switch off during initialization, it is not necessary to press the reset
switch again as initialization will
restart automatically when the engine switch is turned to ON the next time.
●If you accidentally press the reset switch when initialization is not neces-
sary, adjust the tire inflation pressure
to the specified level when the tires are cold, and conduct initialization
again.
■When initialization of the tire pres-
sure warning system has failed
Initialization can be completed in a few
minutes. However, in the following
cases, the settings have not been recorded and the system will not oper-
ate properly. If repeated attempts to
record tire inflation pressure settings are unsuccessful, have the vehicle
inspected by any authorized Toyota
retailer or Toyota authorized repairer, or any reliable repairer.
●When operating the tire pressure warning reset switch, the tire pressure
warning light does not blink 3 times.
●After driving for a certain period of
time since the initialization has been
completed, the wa rning light comes on after blinking for 1 minute.
The tire pressure warning valve
and transmitter is equipped with a
unique ID code. When replacing a
tire pressure warning valve and
transmitter, it is necessary to regis-
ter the ID code. Have the ID code
registered by any authorized Toyota
retailer or Toyota authorized
repairer, or any reliable repairer.
■Registering ID codes
The ID codes of the tire pressure warn- ing valve and transmitters for two sets of
wheels can be registered.
It is not necessary to register the ID codes when replacing normal tires with
snow tires, if the ID codes for the wheels
of both normal tires and snow tires are registered beforehand.
For information about changing ID
codes, ask any authorized Toyota retailer or Toyota authorized repairer, or
any reliable repairer.
WA R N I N G
■When initializing the tire pres-
sure warning system
Do not operate the tire pressure warn- ing reset switch without first adjusting
the tire inflation pressure to the speci-
fied level. Otherwise, the tire pressure warning light may not come on even if
the tire inflation pressure is low, or it
may come on when the tire inflation pressure is actually normal.
Registering ID codes
Page 449 of 678
447
7
7-3. Do-it-yourself maintenance
Maintenance and care
use with your aluminum wheels.
When rotating, repairing or
changing your tires, check that
the wheel nuts ar e still tight after
driving 1600 km (1000 miles).
Be careful not to damage the
aluminum wheels when using
tire chains.
Use only Toyota genuine balance
weights or equivalent and a plas-
tic or rubber hammer when bal-
ancing your wheels.
1 Turn the engine switch off.
2 Open the glove box. Slide off
the damper.
3 Push in the glove box on the
vehicle’s outer side to discon-
nect the claws. Then pull out the
glove box and disconnect the
lower claws.
4 Unlock the filter cover ( ), pull
the filter cover out of the claws
Air conditioning filter
The air conditioning filter must
be changed regularly to main-
tain air conditioning efficiency.
Removing the air condition-
ing filter
Page 454 of 678
4527-3. Do-it-yourself maintenance
1Turn the engine switch off.
2 Open the fuse box cover.
Engine compartment: type A
fuse box
Push the tabs in and lift the lid off.
Engine compartment: type B
fuse box
Push the tabs in and lift the lid off.
NOTICE
■When removing the battery cover
(vehicles without a smart entry &
start system)
Do not forcibly remove the battery
cover, otherwise it may be damaged.
If the battery cover is difficult to remove, lift the edge to remove it.
Checking and replacing
fuses
If any of the electrical compo-
nents do not operate, a fuse
may have blown. If this hap-
pens, check and replace the
fuses as necessary.
Checking and replacing
fuses
Page 463 of 678
8
461
When trouble arises
8
When trouble arises
.8-1. Essential information
Emergency flashers .......... 462
If your vehicle has to be
stopped in an emergency
....................................... 462
If the vehicle is submerged or
water on the road is rising
....................................... 464
8-2. Steps to take in an emer-
gency
If your vehicle needs to be
towed .............................. 465
If you think something is wrong
....................................... 469
Fuel pump shut off system
....................................... 470
If a warning light turns on or a
warning buzzer sounds... 471
If a warning message is dis-
played ............................. 480
If you have a flat tire (vehicles
with an emergency tire punc-
ture repair kit) ................. 482
If you have a flat tire (vehicles
with a spare tire) ............. 498
If the engine will not start .. 509
If you lose your keys ......... 511
If the electronic key does not
operate properly ............. 511
If the vehicle battery is dis-
charged .......................... 513
If your vehicle overheats ... 518
If the vehicle becomes stuck
....................................... 520
Page 464 of 678
4628-1. Essential information
8-1.Essential information
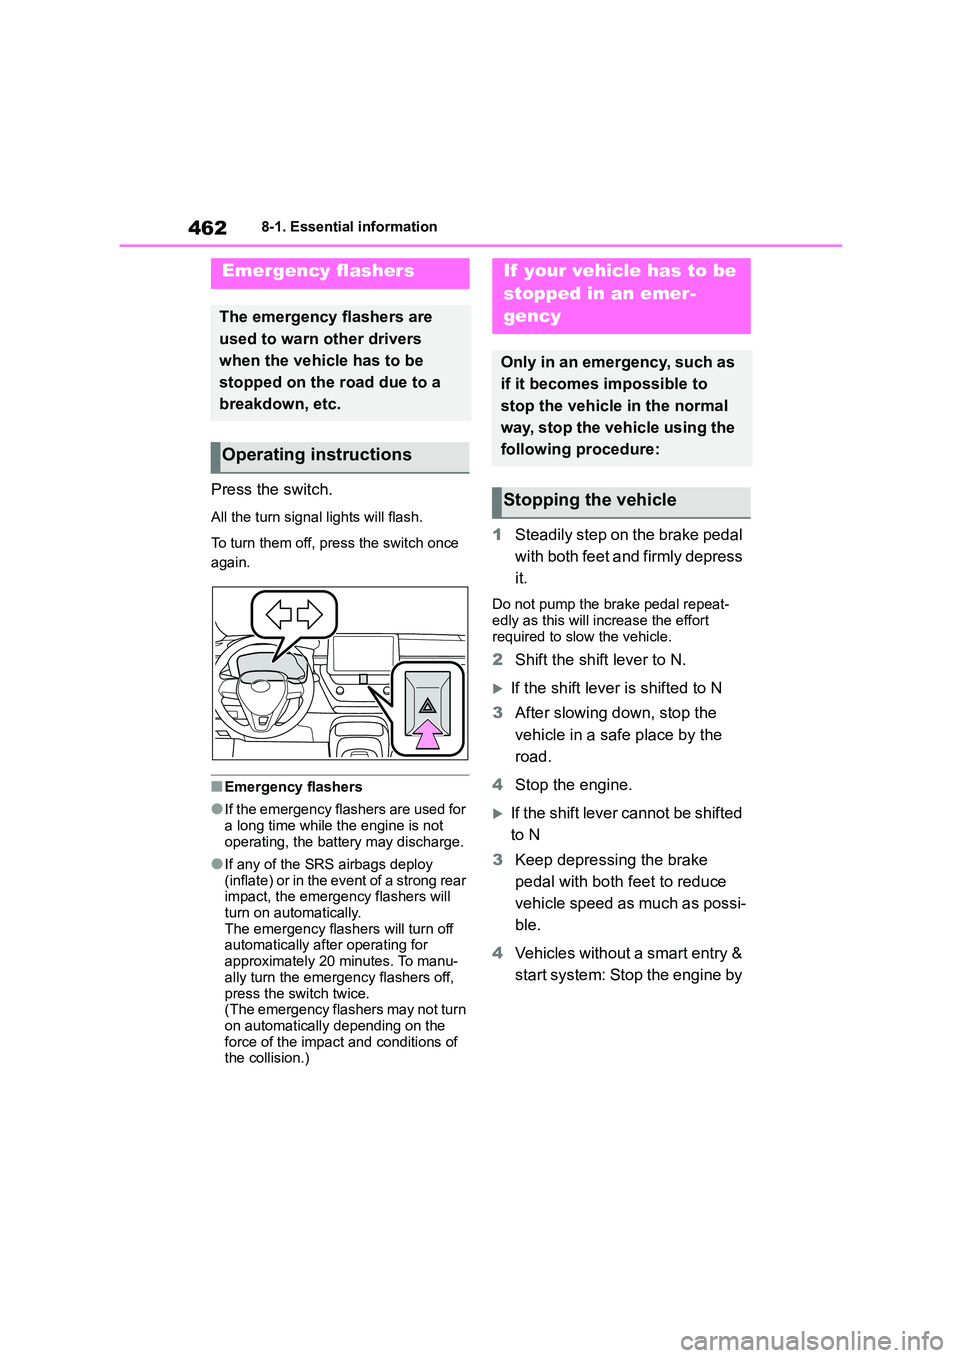
Press the switch.
All the turn signal lights will flash.
To turn them off, press the switch once
again.
■Emergency flashers
●If the emergency flashers are used for
a long time while the engine is not
operating, the battery may discharge.
●If any of the SRS airbags deploy
(inflate) or in the event of a strong rear impact, the emergency flashers will
turn on automatically.
The emergency flashers will turn off automatically after operating for
approximately 20 minutes. To manu-
ally turn the emergency flashers off,
press the switch twice. (The emergency flashers may not turn
on automatically depending on the
force of the impact and conditions of the collision.)
1 Steadily step on the brake pedal
with both feet and firmly depress
it.
Do not pump the brake pedal repeat-
edly as this will increase the effort required to slow the vehicle.
2 Shift the shift lever to N.
If the shift lever is shifted to N
3 After slowing down, stop the
vehicle in a safe place by the
road.
4 Stop the engine.
If the shift lever cannot be shifted
to N
3 Keep depressing the brake
pedal with both feet to reduce
vehicle speed as much as possi-
ble.
4 Vehicles without a smart entry &
start system: Stop the engine by
Emergency flashers
The emergency flashers are
used to warn other drivers
when the vehicle has to be
stopped on the road due to a
breakdown, etc.
Operating instructions
If your vehicle has to be
stopped in an emer-
gency
Only in an emergency, such as
if it becomes impossible to
stop the vehicle in the normal
way, stop the vehicle using the
following procedure:
Stopping the vehicle
Page 465 of 678
463
8
8-1. Essential information
When trouble arises
turning the engine switch to
ACC.
4 Vehicles with a smart entry &
start system: To stop the engine,
press and hold the engine
switch for 2 consecutive sec-
onds or more, or press it briefly
3 times or more in succession.
5 Stop the vehicle in a safe place
by the road.
WA R N I N G
■If the engine has to be turned off while driving
●Power assist for the brakes and
steering wheel will be lost, making the brake pedal harder to depress
and the steering wheel heavier to
turn. Decelerate as much as possi- ble before turning off the engine.
●Vehicles without a smart entry & start system: Never attempt to
remove the key, as doing so will
lock the steering wheel.