Page 161 of 212

Charging Status
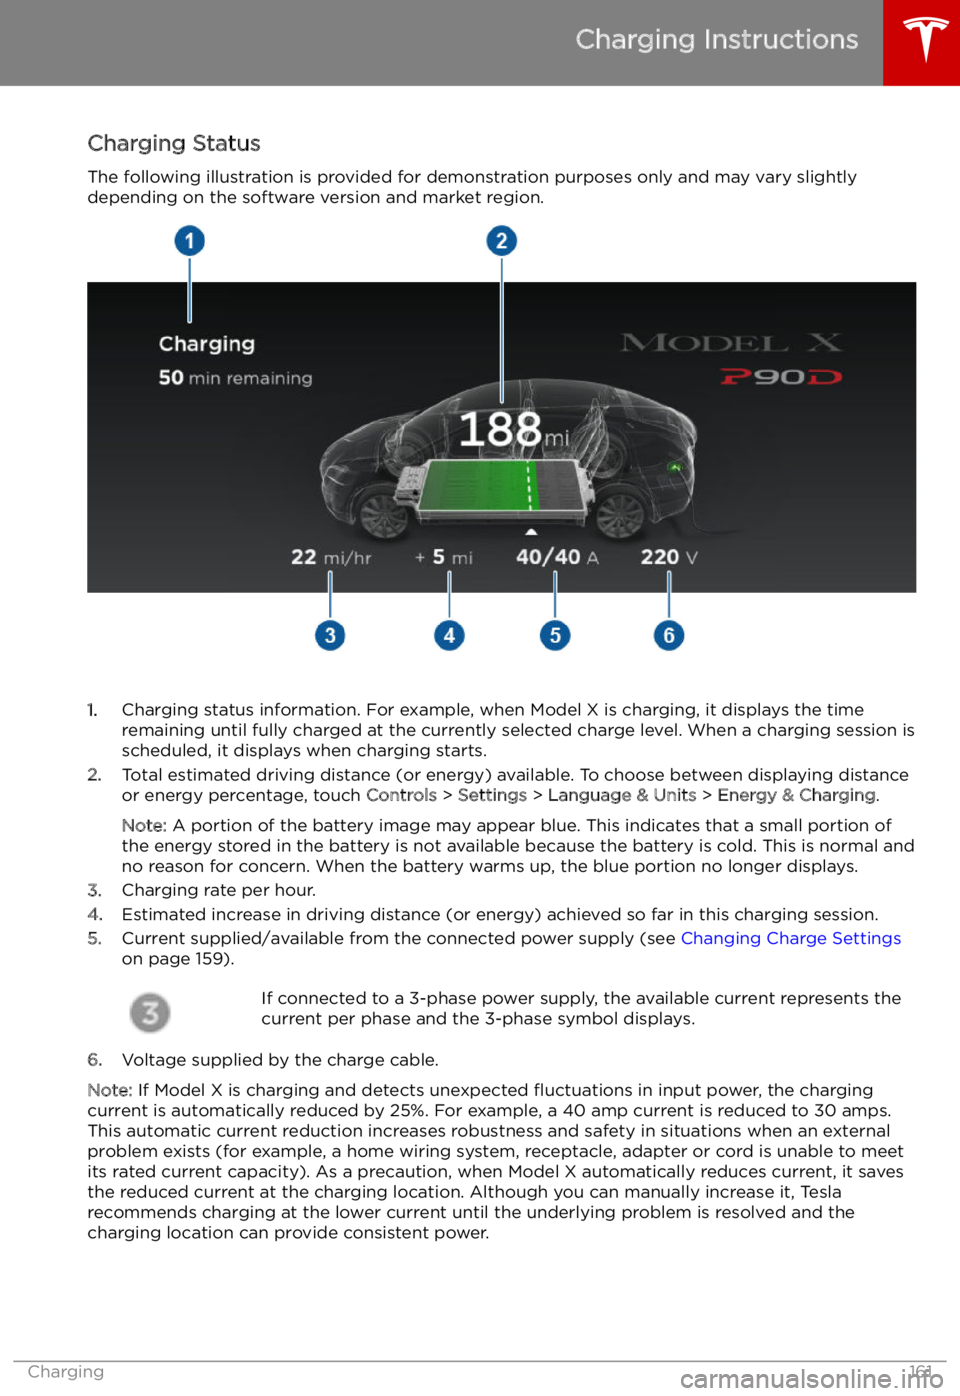
The following illustration is provided for demonstration purposes only and may vary slightly
depending on the software version and market region.
1. Charging status information. For example, when Model X is charging, it displays the time
remaining until fully charged at the currently selected charge level. When a charging session is
scheduled, it displays when charging starts.
2. Total estimated driving distance (or energy) available. To choose between displaying distance
or energy percentage, touch Controls > Settings > Language & Units > Energy & Charging .
Note: A portion of the battery image may appear blue. This indicates that a small portion of
the energy stored in the battery is not available because the battery is cold. This is normal and
no reason for concern. When the battery warms up, the blue portion no longer displays.
3. Charging rate per hour.
4. Estimated increase in driving distance (or energy) achieved so far in this charging session.
5. Current supplied/available from the connected power supply (see Changing Charge Settings
on page 159).
If connected to a 3-phase power supply, the available current represents the
current per phase and the 3-phase symbol displays.
6. Voltage supplied by the charge cable.
Note: If Model X is charging and detects unexpected
Page 162 of 212

Supercharger Usage Fees and Idle
Fees
When charging using a Tesla supercharger,
PAID SUPERCHARGING information displays at the bottom of the charging screen. This
information includes the location, the time
that charging started, and an estimate of how
much the session will cost. When you stop
charging, the final cost displays until a new
Supercharging session begins. If free charging
is applicable, the cost displays as zero.
When charging at a Tesla supercharger, you
are subject to idle fees. Idle fees are designed
to encourage drivers to move their vehiclefrom the Supercharger when charging iscomplete and are in effect whenever at least
half of the Superchargers at a site are
occupied. The Tesla mobile app notifies you
when charging nears completion, and again
when charging is complete. Additional
notifications are sent if idle fees are incurred.
Idle fees are waived if you move your vehicle
within five minutes of charging completion.
Log into your Tesla Account to view fees and
details about Supercharger sessions, track the
remaining balance of free credits, set up a payment method, and make payments. Once a
payment method is saved, fees are
automatically paid from your account.
Charging Instructions
162Model X Owner
Page 163 of 212
Maintenance
Maintenance Schedule
Service Intervals
Regular maintenance is the key to ensuring
the continued reliability and efficiency of your
Model X.
Maintain the correct tire pressures, and take
Model X to Tesla at the regularly scheduled
maintenance intervals of every 12 months, or
every 20,000 km, whichever comes first. It is
also important to perform the daily and
monthly checks described below.
Model X should be serviced by Tesla-certified
technicians. Damages or failures caused by
maintenance or repairs performed by non-
Tesla certified technicians are not covered by
the warranty.
Daily Checks
Page 164 of 212
Tire Care and Maintenance
Maintaining Tire Pressures
If you are not towing a trailer, keep tires
in
Page 165 of 212
Inspecting and Maintaining TiresRegularly inspect the tread and side walls for
any sign of distortion (bulges), foreign objects,
cuts or wear.Warning: Do not drive Model X if a tire is
damaged, excessively worn, or in
Page 166 of 212
Replacing Tires and Wheels
Tires degrade over time due to the effects of
ultraviolet light, extreme temperatures, high
loads, and environmental conditions. It is
recommended that tires are replaced every six
years, or sooner if required.
Wheel and tires are matched to suit thehandling characteristics of the vehicle.
Replacement tires must comply with the
original specification. If tires other than those
specified are used, ensure that the load and
speed ratings marked on the tire (see Understanding Tire Markings on page 188)
equal or exceed those of the original
specification.
Ideally, you should replace all four tires at the same time. If this is not possible, replace the
tires in pairs, placing the new tires on the rear.
Always balance the wheel after replacing a
tire.
If you replace a wheel, the TPMS (Tire Pressure
Monitoring System) sensors need to be reset to ensure they provide accurate warnings
when tires are under- or over-in
Page 167 of 212

Removing and Installing Lug Nut Covers
If your Model X is equipped with lug nut
covers, you must remove them to access the
lug nuts.
To remove a lug nut cover:
1. Insert the curved part of the lug nut cover
tool (located in your glovebox) into the hole at the base of the Tesla "T".
2. Maneuver the lug nut cover tool so that it
is fully inserted into the hole in the lug nut
cover.
3. Twist the lug nut cover tool so that the
curved part is touching the middle of the
lug nut cover.
4. Firmly pull the lug nut tool away from the
wheel until the lug nut cover is released.
To install the lug nut cover, align it into
position and push firmly until it fully snaps into
place.
Seasonal Tire Types
Summer Tires
Your Model X may be originally equipped with high performance summer tires, all season
tires, or winter tires. Summer tires and all
season tires are designed for maximum dry
and wet road performance but are not
designed to perform well in winter conditions.
Tesla recommends using winter tires if driving
in cold temperatures or on roads where snow
or ice may be present. If not equipped with winter tires, contact Tesla for winter tire
recommendations.Warning: In cold temperatures or on snow
or ice, summer tires do not provide
adequate traction. Selecting and installing the appropriate tires for winter conditions
is important to ensure the safety and
optimum performance of your Model X.
All-Season Tires
Your Model X may be originally equipped with
all-season tires. These tires are designed to
provide adequate traction in most conditions
year-round, but may not provide the same level of traction as winter tires in snowy or icy
conditions. All-season tires can be identified
by “ALL SEASON" and/or "M+S” (mud and
snow) on the tire sidewall.
Winter Tires
Use winter tires to increase traction in snowy
or icy conditions. When installing winter tires,
always install a complete set of four tires at
the same time. Winter tires must be the same
size, brand, construction and tread pattern on all four wheels. Contact Tesla for winter tire
recommendations.
When equipped with winter tires, refer to the
tire warning label on the door pillar.
Winter tires can be identified by a
mountain/snow
Page 168 of 212
Driving in Low Temperatures
Tire performance is reduced in low ambient
temperatures, resulting in reduced grip and an
increased susceptibility to damage from
impacts. Performance tires can temporarily
harden when cold, causing you to hear rotational noise for the first few kilometers
until the tires warm up.
Using Tire Chains Tesla has tested and approved Maggie Group
Trak Special LT51 tire chains to increase traction in snowy conditions. These chains
should only be installed on rear 19 or 20" tires.
Do not use chains on 22" tires or on front tires. The approved tire chains can be purchased
from Tesla.
When installing tire chains, follow the instructions provided by the tire chain
manufacturer. Mount them as tightly as possible.
When using tire chains: