Page 65 of 172
TIRE PRESSURE MONITORING SYSTEM (TPMS)
Your Subaru has a Tire Pressure Monitoring System (TPMS) that
tracks the pressure of each individual tire. You can learn more by
scanning the QR code to see a video with tips and more information
about your Subaru’s TPMS.
The TPMS screen shows individual tire pressure
in the Combination Meter Display. Use the “i/Set”
and arrow switches to display the TPMS screen.
TPMS Screen
ADDITIONAL SPECIFICATIONS
63
Page 66 of 172
Tire pressure specification is listed on the tire pressure inflation label located on the
driver’s side door pillar and in the table below. For complete tire pressure specifications
and information, please refer to the tire specifications in your Owner’s Manual.
Tire Inflation Pressure
Front
WheelRear WheelTemporary
Spare Tire
35 psi 33 psi 60 psi
NOTE: The temporary spare tire, if
equipped, must be used only on a rear
wheel. If a front wheel tire gets punctured,
replace the wheel with a rear wheel and
install the temporary spare tire in place of
the removed rear wheel. Outback Onyx and
Wilderness are equipped with a full size
spare tire.
The default tire pressure measurement units can be changed from
kPa to PSi by using the Touchscreen. You can learn more about
changing the reading from the how-to video linked in the QR code
and the following steps.
Tire Inflation Pressure Label
ADDITIONAL SPECIFICATIONS
64
Page 67 of 172
1Start by selecting the “Home” button
2Select “Settings”
3Select “General”
4Find and select “Tire Pressure Units”
5Select your desired setting, either “PSi”
or “kPa”, then select the “X” to exit
ADDITIONAL SPECIFICATIONS
65
Page 68 of 172

OVERVIEW OF YOUR MULTIMEDIA SYSTEM
SUBARU STARLINK®Multimedia combines the radio along with the ability to connect your
phone* through Bluetooth®to the multimedia system for making calls, sending text
messages and listening to your favorite songs on your phone.
As part of routine maintenance and continuous improvement, Subaru releases updates to
the firmware and software in your vehicle. Following the installation of these updates, the
screens and menus in your vehicle may differ from what appears in this guide.
For the most current information, please visitwww.subaru.com/owners,
www.subaru.com/customer-support, or contact your Subaru Retailer. Refer to page 4
for details on these resources.
* Compatible smartphone and application required. For applications to operate, latest version of each
application required. Data provided by smartphone is displayed on the Touchscreen. Some state laws
prohibit the operation of handheld electronic devices while operating a vehicle. Smartphone apps
should only be launched when vehicle is safely parked. Your wireless carrier’s rates may apply.
Various Systems
Depending on your model and trim level there are several types of SUBARU STARLINK®
Multimedia systems. Some of the functions described in this guide will vary by system.
• Dual 7.0-inch Multimedia
• 11.6-inch Multimedia Plus
• 11.6-inch Multimedia Navigation
STARLINK OVERVIEW
66
Page 69 of 172

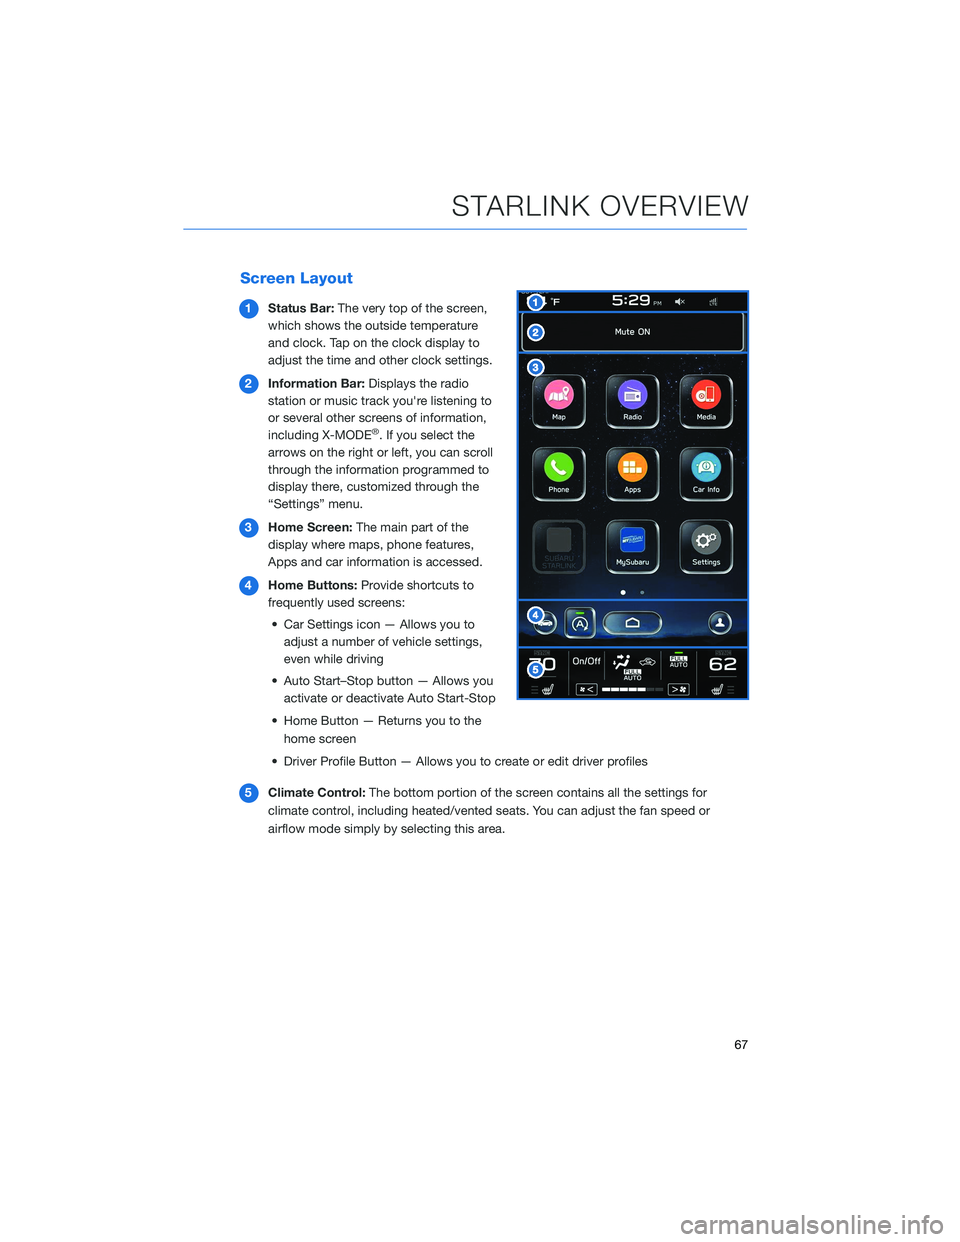
Screen Layout
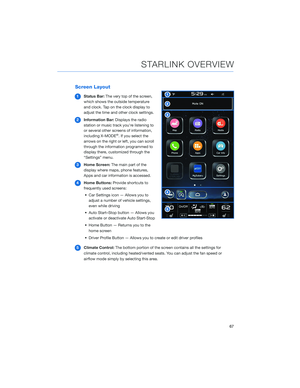
1Status Bar:The very top of the screen,
which shows the outside temperature
and clock. Tap on the clock display to
adjust the time and other clock settings.
2Information Bar:Displays the radio
station or music track you're listening to
or several other screens of information,
including X-MODE
®. If you select the
arrows on the right or left, you can scroll
through the information programmed to
display there, customized through the
“Settings” menu.
3Home Screen:The main part of the
display where maps, phone features,
Apps and car information is accessed.
4Home Buttons:Provide shortcuts to
frequently used screens:
• Car Settings icon — Allows you to
adjust a number of vehicle settings,
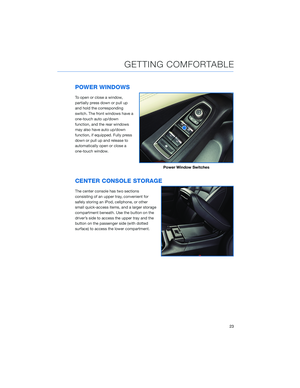
even while driving
• Auto Start–Stop button — Allows you
activate or deactivate Auto Start-Stop
• Home Button — Returns you to the
home screen
• Driver Profile Button — Allows you to create or edit driver profiles
5Climate Control:The bottom portion of the screen contains all the settings for
climate control, including heated/vented seats. You can adjust the fan speed or
airflow mode simply by selecting this area.
STARLINK OVERVIEW
67
Page 70 of 172

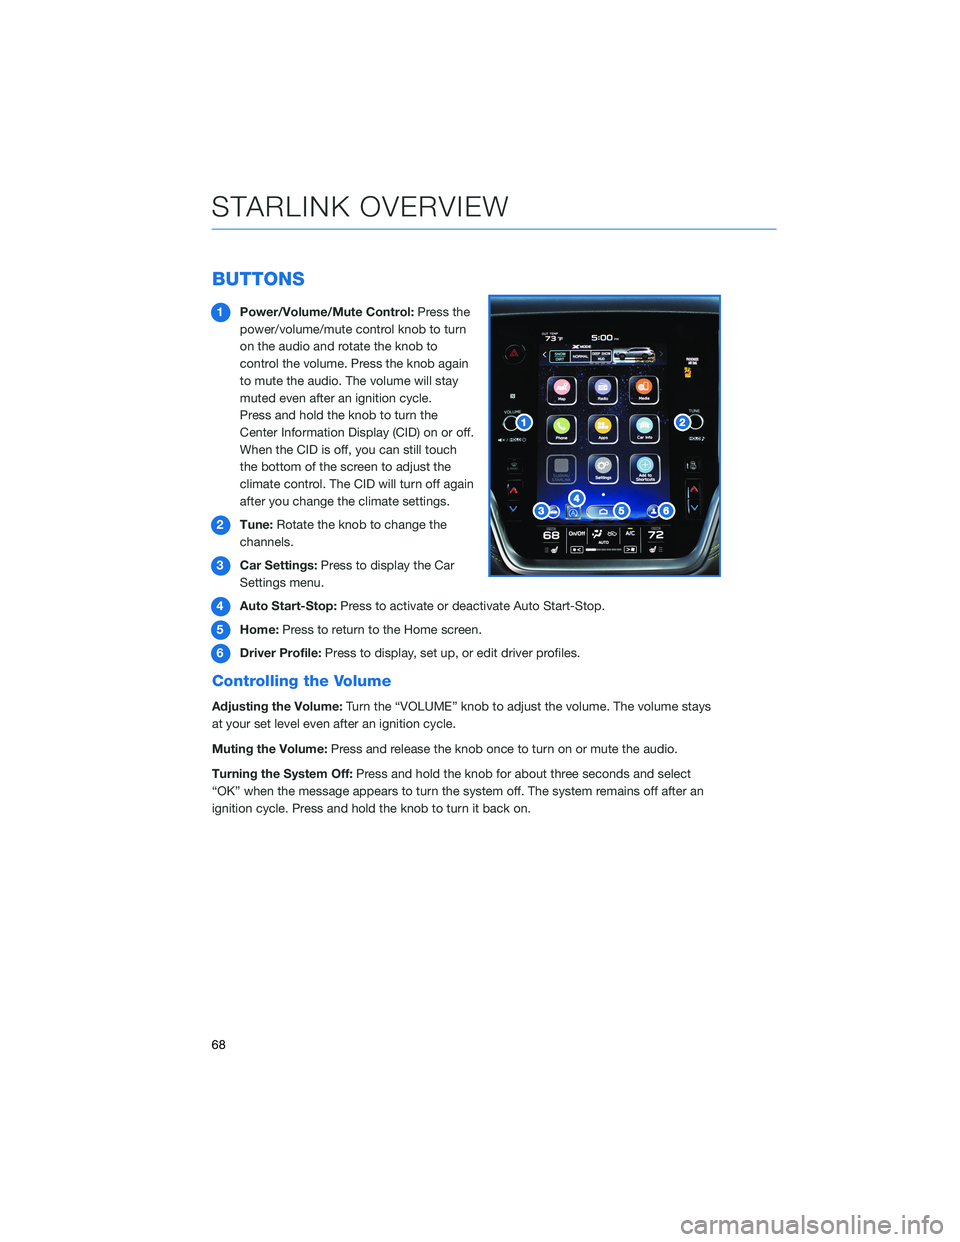
BUTTONS
1Power/Volume/Mute Control:Press the
power/volume/mute control knob to turn
on the audio and rotate the knob to
control the volume. Press the knob again
to mute the audio. The volume will stay
muted even after an ignition cycle.
Press and hold the knob to turn the
Center Information Display (CID) on or off.
When the CID is off, you can still touch
the bottom of the screen to adjust the
climate control. The CID will turn off again
after you change the climate settings.
2Tune:Rotate the knob to change the
channels.
3Car Settings:Press to display the Car
Settings menu.
4Auto Start-Stop:Press to activate or deactivate Auto Start-Stop.
5Home:Press to return to the Home screen.
6Driver Profile:Press to display, set up, or edit driver profiles.
Controlling the Volume
Adjusting the Volume:Turn the “VOLUME” knob to adjust the volume. The volume stays
at your set level even after an ignition cycle.
Muting the Volume:Press and release the knob once to turn on or mute the audio.
Turning the System Off:Press and hold the knob for about three seconds and select
“OK” when the message appears to turn the system off. The system remains off after an
ignition cycle. Press and hold the knob to turn it back on.
STARLINK OVERVIEW
68
Page 71 of 172
TOUCHSCREEN
Operations are performed by touching the screen directly with your finger.
MOTION ACTION USE
Touch
Quickly touch and release
once.Changing and selecting various
settings
Double Touch with one
finger*
Quickly touch and release
twice with one finger.Enlarging the scale of the map
screen
Double Touch with two
fingers*
Quickly touch and release
twice with two fingers.Reducing the scale of the map
screen
Drag**
Touch and drag your
finger on the screen to
move the screen to the
desired position.•
Scrolling lists
• Scrolling the map screen*
Swipe**
Quickly move the screen
by swiping with your
finger.•
Scrolling lists
• Scrolling the map screen*
Pinch*
Move your two fingers
further apart (pinch-out)
to zoom in on the map.
Move your two fingers
closer together (pinch-in)
to zoom out on the map.Changing the scale of the map
screen
* 11.6-inch with Navi system only
** The operations may not be performed on all screens.
STARLINK OVERVIEW
69
Page 72 of 172
STEERING WHEEL CONTROLS
1Presets/Skip:Press to toggle through
your presets or change a track or media
file. Press and hold to fast-forward or
rewind.
2Volume:Press the volume switch up or
down to increase or decrease the
volume.
3Source:Press the source button to
change the audio sources between radio
modes and media modes.
4Voice Recognition:Press to initiate the
built-in voice recognition system. If you
have an Android or Apple device paired,
press and hold to start the Apple
CarPlay
®/Android Auto™ voice recognition function.
5Call/End:Press to receive or end a call without taking your hands off of the steering
wheel.
Starlink Audio Controls
STARLINK OVERVIEW
70