Page 33 of 172
Remote Engine Start with Climate Control
You can remotely start your Subaru and adjust the temperature using the STARLINK®
Safety and Security features through theMySubaruApp (subscription required). Please
refer to “SUBARU STARLINK Features” in your STARLINK®Safety and Security Owner's
Manual for a list of required vehicle conditions for this feature.
Heated Seats(if equipped)
There are separate controls for the driver and
passenger heated seats. Select the driver or
passenger climate button, then select the heated
seat button located on the climate control screen.
Each time you press the button, the mode will
change as follows: High, Mid, Low, Off. Yellow
indicators illuminate indicating the level.
Heated Seat Button
GETTING COMFORTABLE
31
Page 34 of 172
Ventilated Seats(if equipped)
There are separate controls for the driver and
passenger ventilated seats. Select the driver or
passenger climate button, then select the ventilated
seat button located on the climate control screen.
Each time you press the button, the mode will
change as follows: High, Mid, Low, Off. Blue
indicators illuminate indicating the level.
Rear Heated Seats(if equipped)
There are separate heated seat
switches for each side on the rear
center console. Press the switch
to activate the heated seat.
The heating mode changes to
High, Low, and Off each time you
press the switch, and yellow
indictors illuminate indicating the
level.
Heated Steering Wheel(if equipped)
To activate, pull the heated steering wheel switch with
the ignition in “ON” or “ACC”. The indicator light on the
switch illuminates. To deactivate, pull the switch again.
The heater will stay on for approximately 30 minutes.
Ventilated Seat Button
GETTING COMFORTABLE
32
Page 35 of 172

ACCESSORY CONNECTIONS
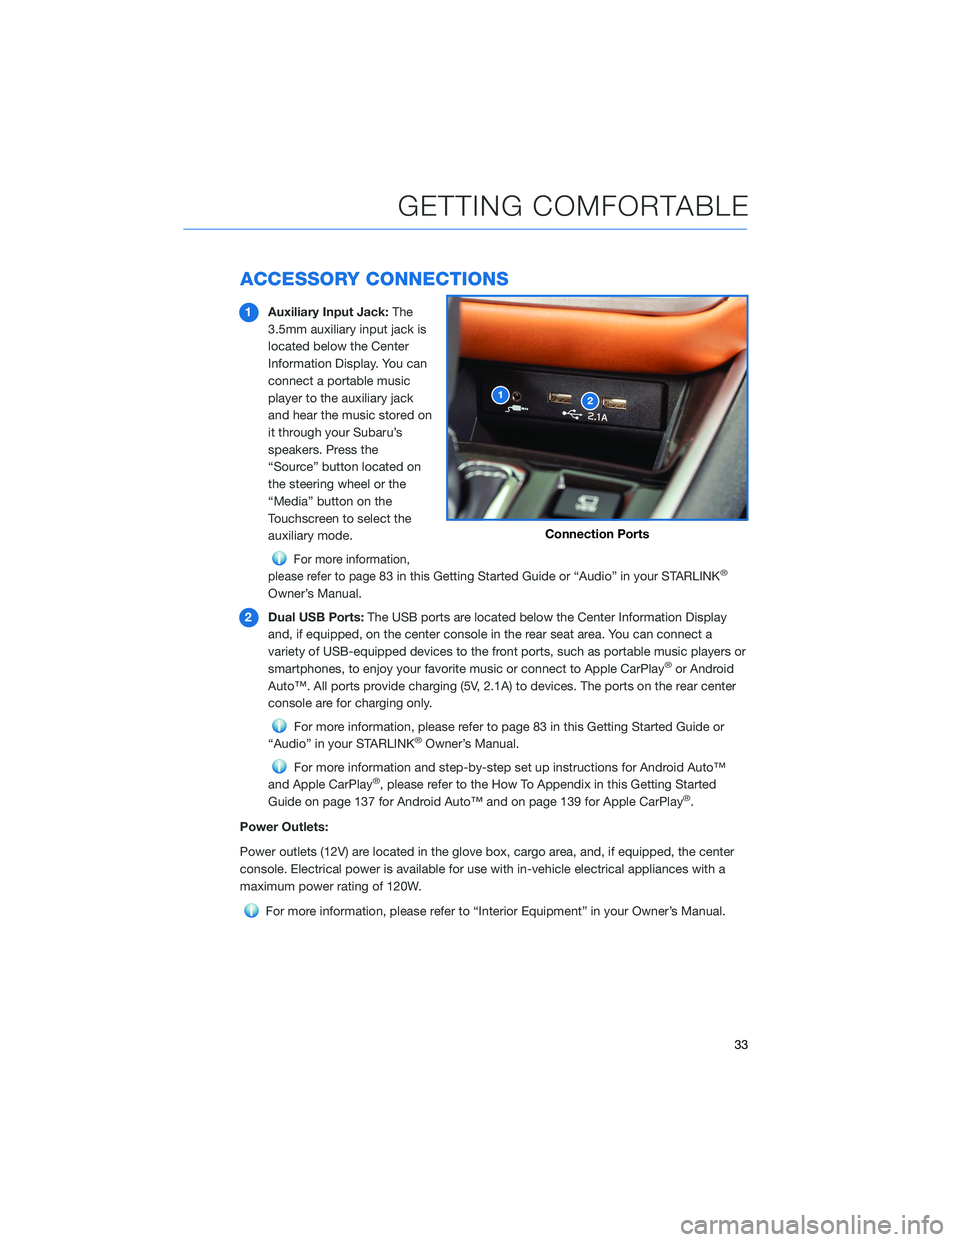
1Auxiliary Input Jack:The
3.5mm auxiliary input jack is
located below the Center
Information Display. You can
connect a portable music
player to the auxiliary jack
and hear the music stored on
it through your Subaru’s
speakers. Press the
“Source” button located on
the steering wheel or the
“Media” button on the
Touchscreen to select the
auxiliary mode.
For more information,
please refer to page
83 in this Getting Started Guide or “Audio” in your STARLINK®
Owner’s Manual.
2Dual USB Ports:The USB ports are located below the Center Information Display
and, if equipped, on the center console in the rear seat area. You can connect a
variety of USB-equipped devices to the front ports, such as portable music players or
smartphones, to enjoy your favorite music or connect to Apple CarPlay
®or Android
Auto™. All ports provide charging (5V, 2.1A) to devices. The ports on the rear center
console are for charging only.
For more information, please refer to page 83 in this Getting Started Guide or
“Audio” in your STARLINK®Owner’s Manual.
For more information and step-by-step set up instructions for Android Auto™
and Apple CarPlay®, please refer to the How To Appendix in this Getting Started
Guide on page 137 for Android Auto™ and on page 139 for Apple CarPlay®.
Power Outlets:
Power outlets (12V) are located in the glove box, cargo area, and, if equipped, the center
console. Electrical power is available for use with in-vehicle electrical appliances with a
maximum power rating of 120W.
For more information, please refer to “Interior Equipment” in your Owner’s Manual.
12
Connection Ports
GETTING COMFORTABLE
33
Page 36 of 172
INSTRUMENT PANEL SWITCHES (LOWER LEFT)
The switches in the lower left of the instrument panel allow you to control convenient
features. The switches include:
1Power Rear Gate (p. 10)
2
Illumination Brightness (p.36)
3
Hands-free Power Rear Gate
OFF (p.
12)
For more information, please
refer to “Keys and Doors” and
“Instruments and Controls” in
your Owner’s Manual.
AUDIO CONTROLS
1Presets/Skip
2Volume
3Source
4Voice Recognition
5Call/End
For more information about your audio
system and controls, please refer to page 70
in this Getting Started Guide or “Quick Guide”
in your STARLINK
®Owner’s Manual.
123
CONTROLS
34
Page 37 of 172
ADVANCED ADAPTIVE CRUISE CONTROL
1Adaptive Cruise Control On/Off
2Lane Centering
3Increase Distance
4Decrease Distance
5Resume (RES)/Increase Speed and Set
(SET)/Decrease Speed
For more information on the Advanced
Adaptive Cruise Control switches, please refer
to page 107 in this Getting Started Guide or
“Advanced Adaptive Cruise Control” in your
EyeSight
®Owner’s Manual.
I SWITCH
The “i” switch and arrows allow you to cycle
through useful driving information in the
Combination Meter Display (CMD) such as fuel
consumption, driving time, speed, and tire
pressure, among others. You can change the
information displayed by pulling the up and
down arrows.
Important vehicle information or warning
screens can be displayed when the "i"
appears in the CMD. Pull and hold the “i”
switch to access the important messages. Use
the arrows to cycle through multiple messages.
For more information, please refer to “Combination Meter Display (Color LCD)” in your
Owner’s Manual.
CONTROLS
35
Page 38 of 172

LIGHT CONTROLS
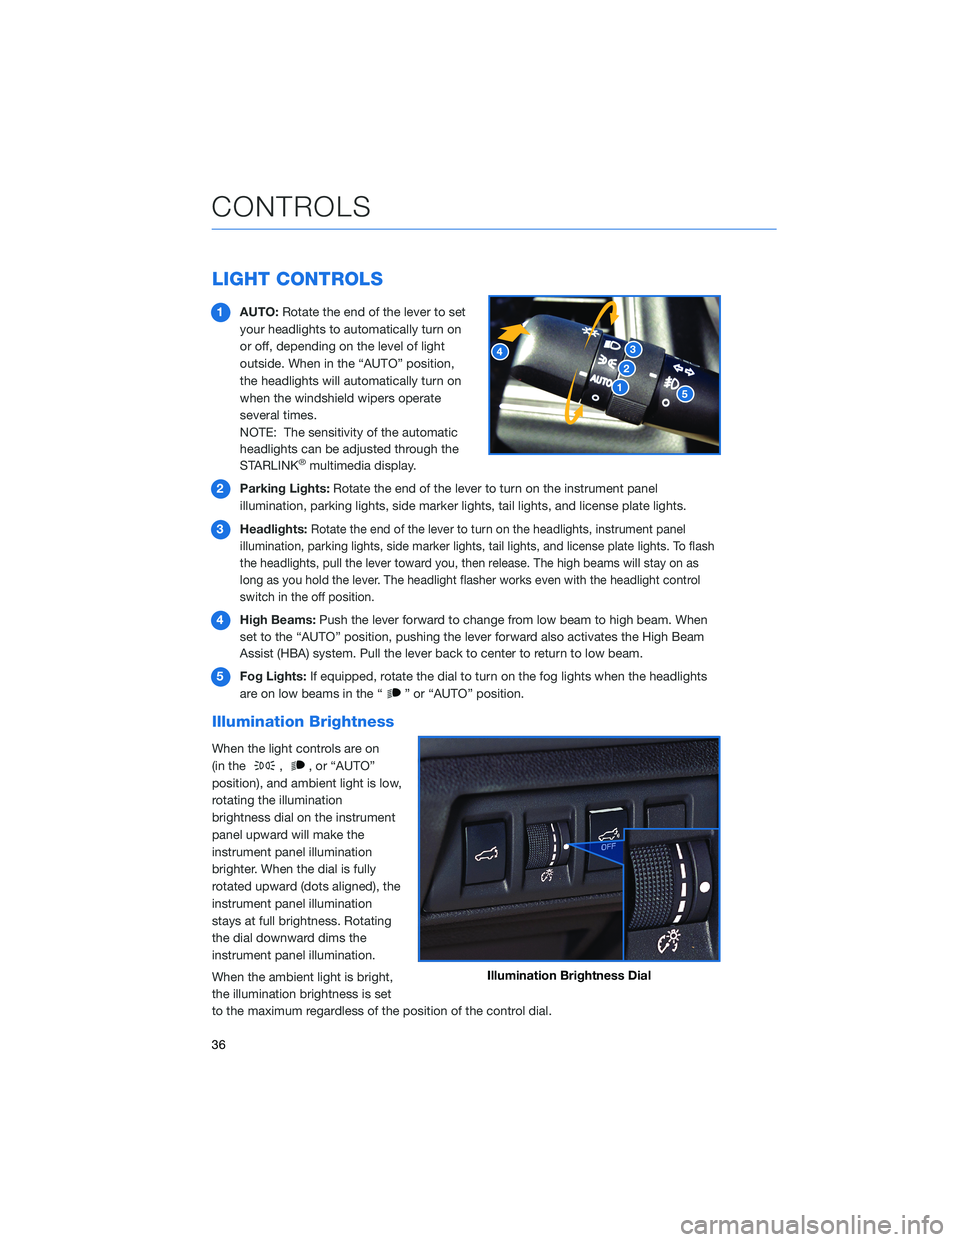
1AUTO:Rotate the end of the lever to set
your headlights to automatically turn on
or off, depending on the level of light
outside. When in the “AUTO” position,
the headlights will automatically turn on
when the windshield wipers operate
several times.
NOTE: The sensitivity of the automatic
headlights can be adjusted through the
STARLINK
®multimedia display.
2Parking Lights:Rotate the end of the lever to turn on the instrument panel
illumination, parking lights, side marker lights, tail lights, and license plate lights.
3Headlights:
Rotate the end of the lever to turn on the headlights, instrument panel
illumination, parking lights, side marker lights, tail lights, and license plate lights. To flash
the headlights, pull the lever toward you, then release. The high beams will stay on as
long as you hold the lever. The headlight flasher works even with the headlight control
switch in the off position.
4High Beams:Push the lever forward to change from low beam to high beam. When
set to the “AUTO” position, pushing the lever forward also activates the High Beam
Assist (HBA) system. Pull the lever back to center to return to low beam.
5Fog Lights:If equipped, rotate the dial to turn on the fog lights when the headlights
are on low beams in the “
” or “AUTO” position.
Illumination Brightness
When the light controls are on
(in the
,, or “AUTO”
position), and ambient light is low,
rotating the illumination
brightness dial on the instrument
panel upward will make the
instrument panel illumination
brighter. When the dial is fully
rotated upward (dots aligned), the
instrument panel illumination
stays at full brightness. Rotating
the dial downward dims the
instrument panel illumination.
When the ambient light is bright,
the illumination brightness is set
to the maximum regardless of the position of the control dial.
Illumination Brightness Dial
CONTROLS
36
Page 39 of 172

Daytime Running Lights
The daytime running lights automatically turn on when the engine is running, the parking
brake is fully released, the select lever is out of the “P” position, and the light switch is set
to Off, “AUTO”, or “
”. Always turn on the headlights when it’s dark outside by rotating
the dial to the “
” or “AUTO” position.
TURN SIGNALS
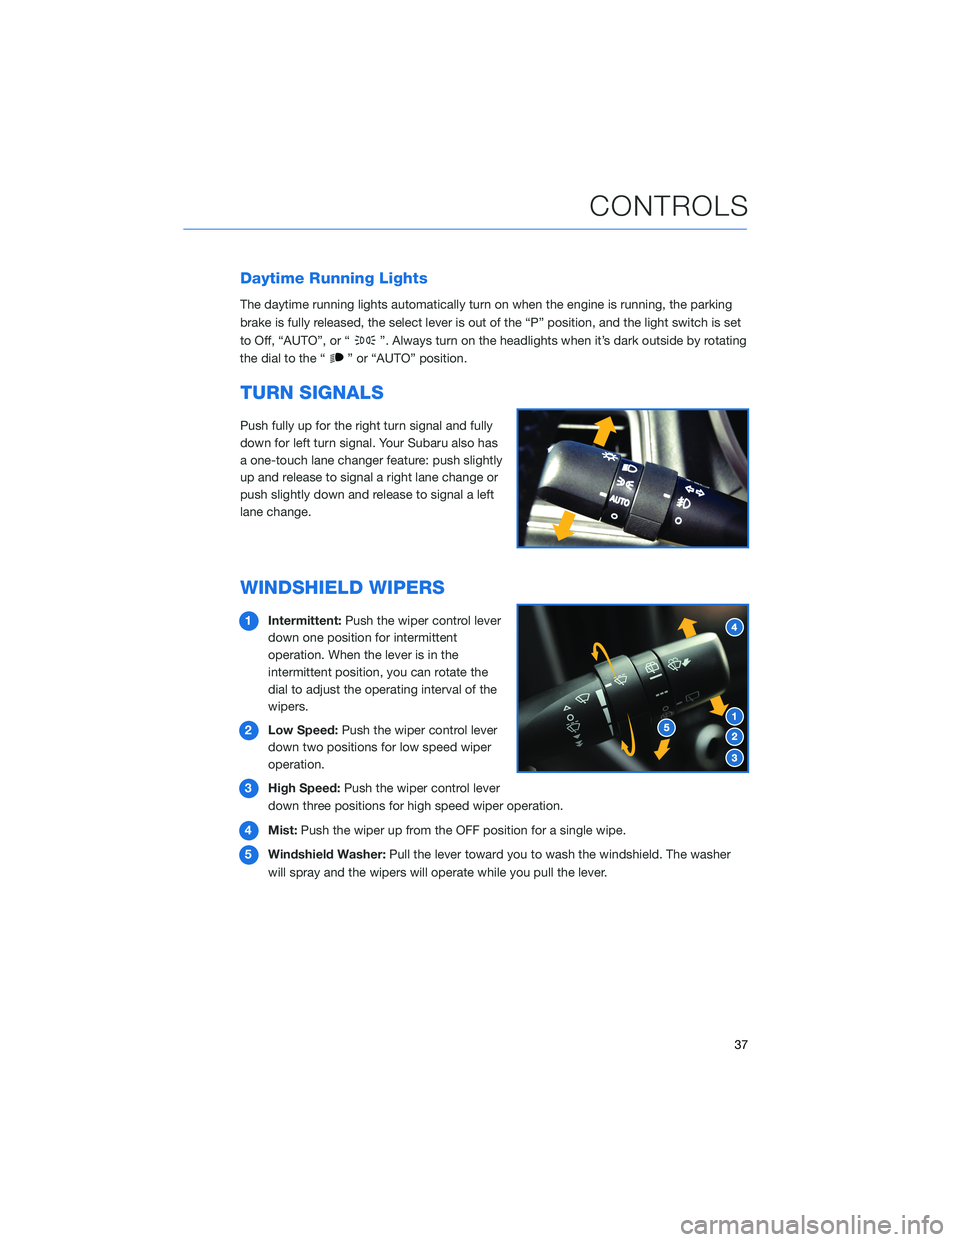
Push fully up for the right turn signal and fully
down for left turn signal. Your Subaru also has
a one-touch lane changer feature: push slightly
up and release to signal a right lane change or
push slightly down and release to signal a left
lane change.
WINDSHIELD WIPERS
1Intermittent:Push the wiper control lever
down one position for intermittent
operation. When the lever is in the
intermittent position, you can rotate the
dial to adjust the operating interval of the
wipers.
2Low Speed:Push the wiper control lever
down two positions for low speed wiper
operation.
3High Speed:Push the wiper control lever
down three positions for high speed wiper operation.
4Mist:Push the wiper up from the OFF position for a single wipe.
5Windshield Washer:Pull the lever toward you to wash the windshield. The washer
will spray and the wipers will operate while you pull the lever.
CONTROLS
37
Page 40 of 172

REAR WINDOW WIPER
Rotate the end of the lever up one position for
intermittent, or two positions for continuous
operation.
When the lever in is the intermittent position,
the wiper operates at intervals corresponding
with vehicle speed. When you move the select
lever to the “R” position, the wiper will switch
to continuous operation. It will return to
intermittent when you move the select lever
out of “R”.
Rotate the dial up from the continuous operation position or down from the “OFF” position
to spray washer fluid. The washer will spray until you release the dial, then return to the
previous position and resume operation.
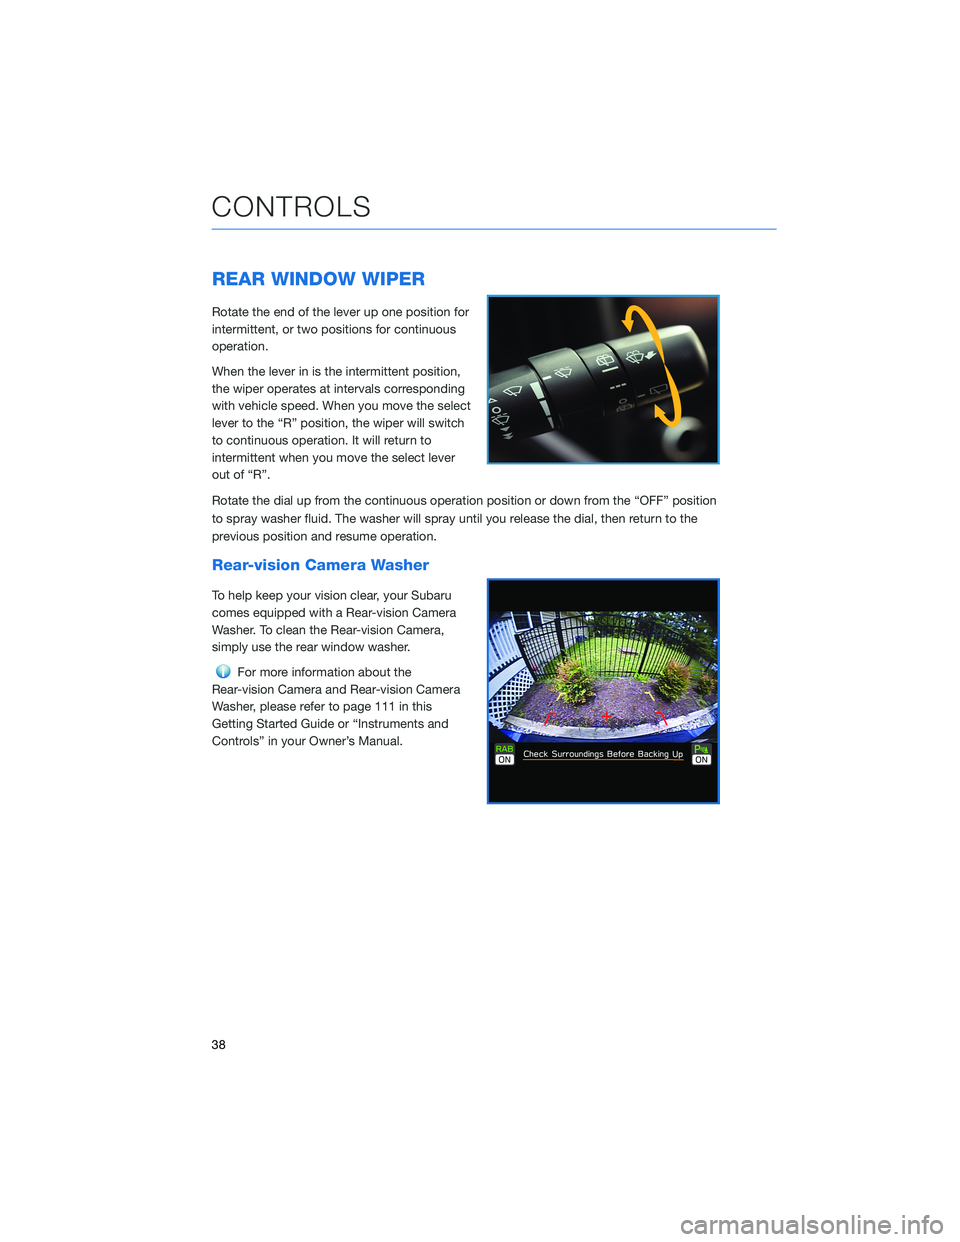
Rear-vision Camera Washer
To help keep your vision clear, your Subaru
comes equipped with a Rear-vision Camera
Washer. To clean the Rear-vision Camera,
simply use the rear window washer.
For more information about the
Rear-vision Camera and Rear-vision Camera
Washer, please refer to page 111 in this
Getting Started Guide or “Instruments and
Controls” in your Owner’s Manual.
CONTROLS
38