Page 129 of 172

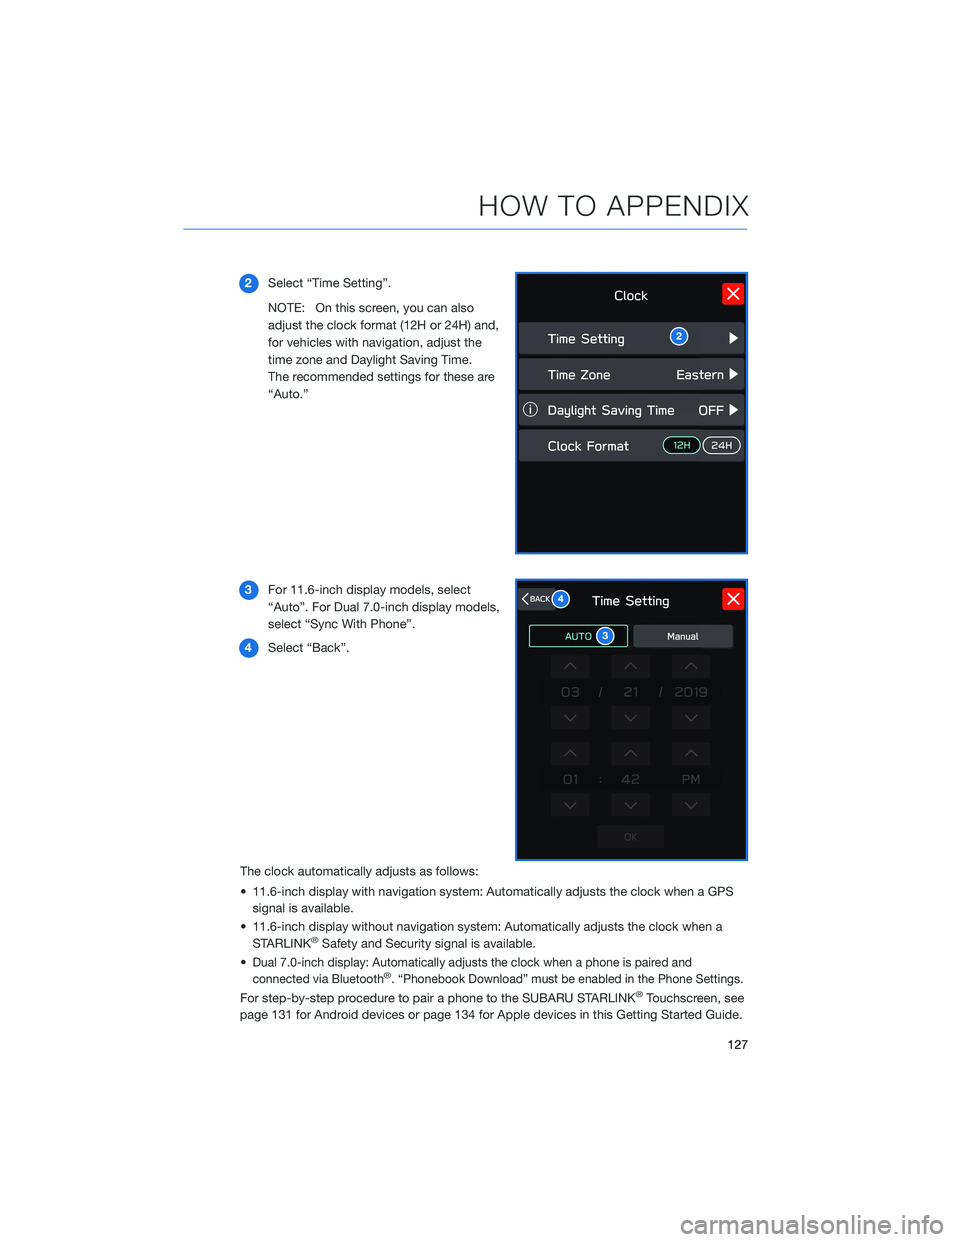
2Select “Time Setting”.
NOTE: On this screen, you can also
adjust the clock format (12H or 24H) and,
for vehicles with navigation, adjust the
time zone and Daylight Saving Time.
The recommended settings for these are
“Auto.”
3For 11.6-inch display models, select
“Auto”. For Dual 7.0-inch display models,
select “Sync With Phone”.
4Select “Back”.
The clock automatically adjusts as follows:
• 11.6-inch display with navigation system: Automatically adjusts the clock when a GPS
signal is available.
• 11.6-inch display without navigation system: Automatically adjusts the clock when a
STARLINK
®Safety and Security signal is available.
•
Dual 7.0-inch display: Automatically adjusts the clock when a phone is paired and
connected via Bluetooth®. “Phonebook Download” must be enabled in the Phone Settings.
For step-by-step procedure to pair a phone to the SUBARU STARLINK®Touchscreen, see
page 131 for Android devices or page 134 for Apple devices in this Getting Started Guide.
2
3
4
HOW TO APPENDIX
127
Page 130 of 172
MEMORY HEIGHT(if equipped)
With the Memory Height function, you can set where the Power
Rear Gate gate stops when it opens. This is a great feature to limit
the upward travel of the rear gate to ensure you can reach it or to
prevent the rear gate from contacting a garage ceiling. You can
learn more about setting the Power Rear Gate Memory Height from
the how-to video linked in the QR code and the steps below.
To set the height:
1On the Center Information Display (CID),
press the “Home” Button.
2Select “Settings”.
3Navigate to the “Car” tab.
4Find and select “Power Rear Gate”.
5Turn off “Power Rear Gate Memory”.
HOW TO APPENDIX
128
Page 131 of 172
6Open the rear gate using the
Power Rear Gate Button.
Pause the rear gate when it
reaches the desired height by
pressing the Power Rear
Gate Button on the
instrument panel, rear gate,
or access key fob.
7You can make gentle
adjustments to the gate
position by hand. With the
rear gate at the desired
height, press and hold the
Power Rear Gate Close
Button on the inside edge of
the rear gate. A chirp sounds
and the hazard warning
lights flash to confirm the
height is set. The Power
Rear Gate memory is
automatically saved and
enabled in the Center
Information Display (CID).
When “Power Rear Gate Memory” is enabled in the Center Information Display (CID), the
rear gate will stop at the set memory height when you use any of the Power Rear Gate
buttons.
NOTE: To adjust the memory height, perform the procedure again.
6
7
HOW TO APPENDIX
129
Page 132 of 172

MEMORY DRIVER’S SEAT(if equipped)
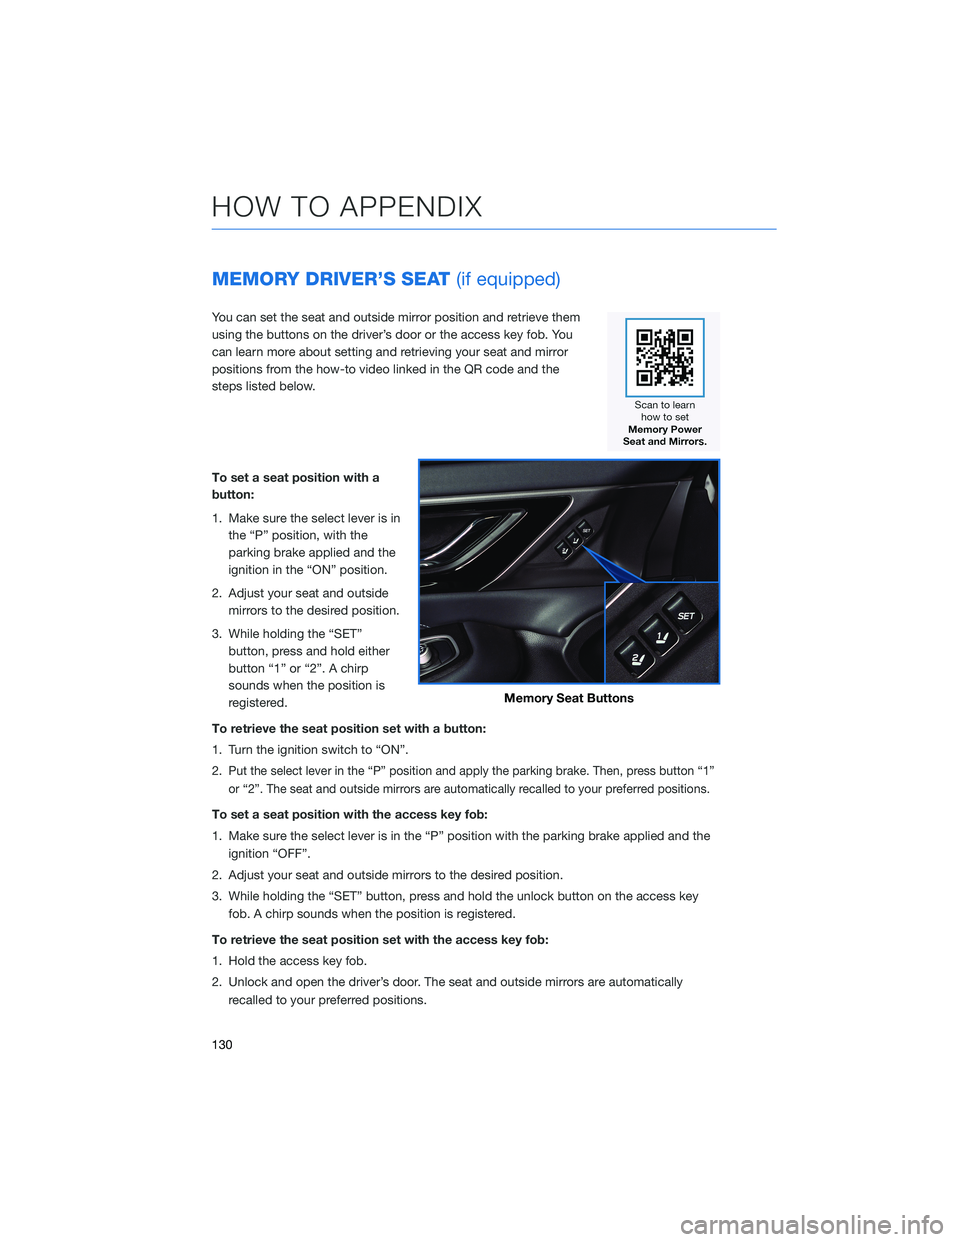
You can set the seat and outside mirror position and retrieve them
using the buttons on the driver’s door or the access key fob. You
can learn more about setting and retrieving your seat and mirror
positions from the how-to video linked in the QR code and the
steps listed below.
To set a seat position with a
button:
1. Make sure the select lever is in
the “P” position, with the
parking brake applied and the
ignition in the “ON” position.
2. Adjust your seat and outside
mirrors to the desired position.
3. While holding the “SET”
button, press and hold either
button “1” or “2”. A chirp
sounds when the position is
registered.
To retrieve the seat position set with a button:
1. Turn the ignition switch to “ON”.
2.
Put the select lever in the “P” position and apply the parking brake. Then, press button “1”
or “2”. The seat and outside mirrors are automatically recalled to your preferred positions.
To set a seat position with the access key fob:
1. Make sure the select lever is in the “P” position with the parking brake applied and the
ignition “OFF”.
2. Adjust your seat and outside mirrors to the desired position.
3. While holding the “SET” button, press and hold the unlock button on the access key
fob. A chirp sounds when the position is registered.
To retrieve the seat position set with the access key fob:
1. Hold the access key fob.
2. Unlock and open the driver’s door. The seat and outside mirrors are automatically
recalled to your preferred positions.
Memory Seat Buttons
HOW TO APPENDIX
130
Page 133 of 172
BLUETOOTH®PAIRING
Pairing an Android Device
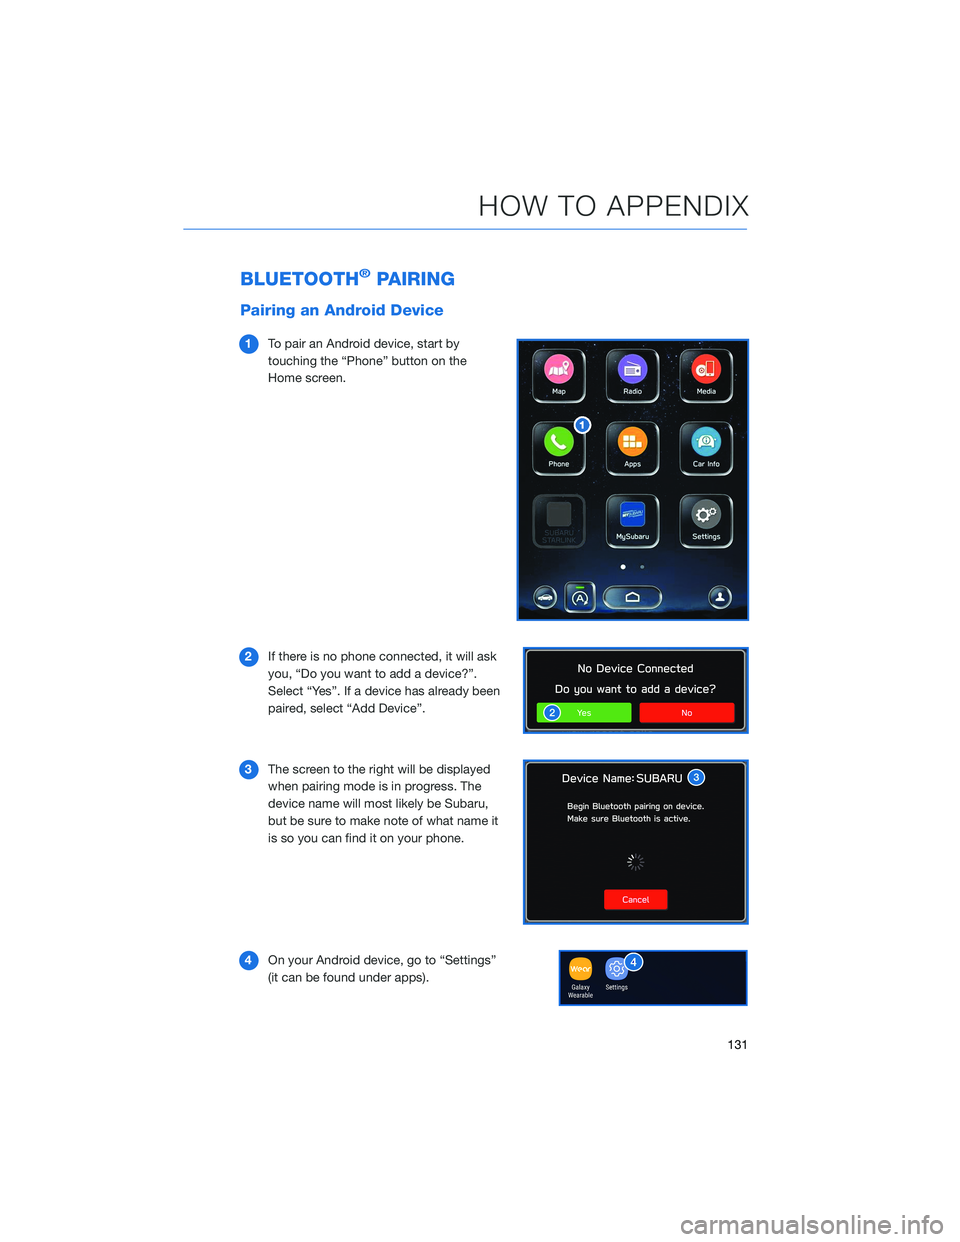
1To pair an Android device, start by
touching the “Phone” button on the
Home screen.
2If there is no phone connected, it will ask
you, “Do you want to add a device?”.
Select “Yes”. If a device has already been
paired, select “Add Device”.
3The screen to the right will be displayed
when pairing mode is in progress. The
device name will most likely be Subaru,
but be sure to make note of what name it
is so you can find it on your phone.
4On your Android device, go to “Settings”
(it can be found under apps).
HOW TO APPENDIX
131
Page 134 of 172
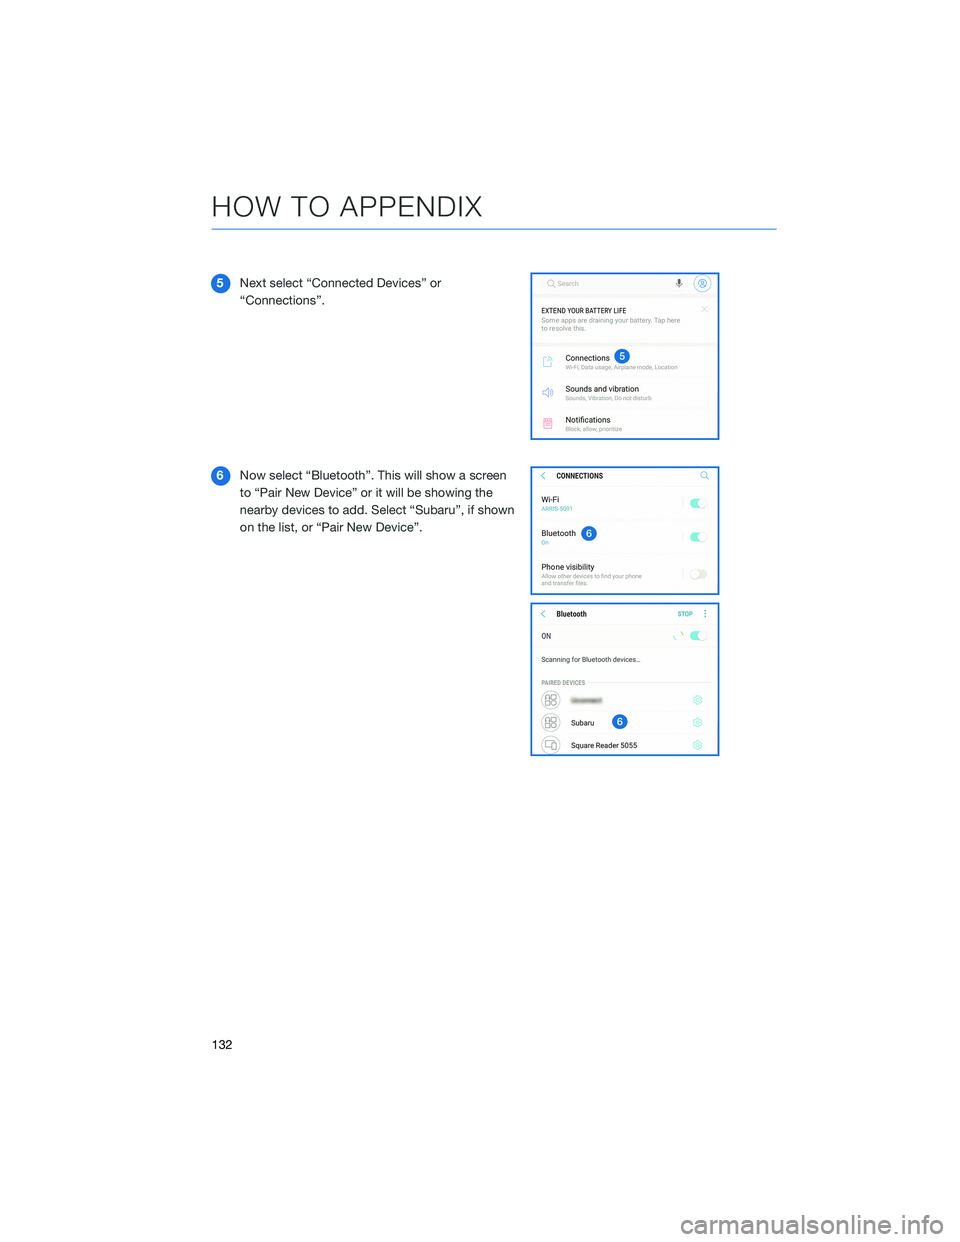
5Next select “Connected Devices” or
“Connections”.
6Now select “Bluetooth”. This will show a screen
to “Pair New Device” or it will be showing the
nearby devices to add. Select “Subaru”, if shown
on the list, or “Pair New Device”.
HOW TO APPENDIX
132
Page 135 of 172
7Now select “OK” to pair the devices.
Make sure to allow access to your
messages and call history in the “Allow
Access to Messages” popup box.
8Select “Yes” to transfer your contacts.
9If you cannot access your phonebook or
messages, go back to your phone’s
Bluetooth
®settings and select the gear
icon next to your vehicle’s device name
and ensure all settings are enabled.
HOW TO APPENDIX
133
Page 136 of 172
Pairing an iOS/Apple Device
1To pair an Apple device, start by touching
the “Phone” button on the Home screen.
2If there is no phone connected, it will ask
you, “Do you want to add a device?”.
Select “Yes”. If a device has already been
paired, select “Add Device”.
3When this screen is displayed, it is in
pairing mode. Note the “Device Name”;
it will most likely be “Subaru”.
4On your iOS/Apple device, select “Settings”.
The location on the Home screen will vary.
HOW TO APPENDIX
134