Page 17 of 172
8Advanced Adaptive Cruise Control (p. 35)
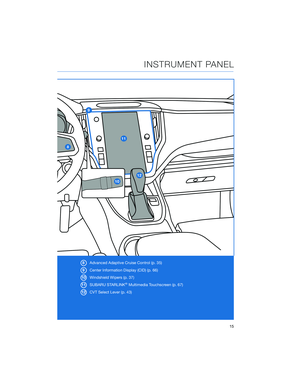
9Center Information Display (CID) (p. 66)
10Windshield Wipers (p. 37)
11SUBARU STARLINK
®Multimedia Touchscreen (p. 67)
12CVT Select Lever (p. 43)
INSTRUMENT PANEL
15
Page 18 of 172
SEATING
Manual Seats
1Forward/Backward:Pull
the lever below the seat up
and slide the seat forward or
backward. Release the lever
and make sure the seat is
locked into place.
2Seat Height (Driver’s Seat):
Pulling up or pushing down
on the lever will raise or
lower the seat cushion.
3
Recline Seatback:Pull the
lever up to adjust the
seatback. Release the lever
and make sure the seatback
is locked into place.
Manual Seat Levers
GETTING COMFORTABLE
16
Page 19 of 172
Power Driver’s Seat(if equipped)
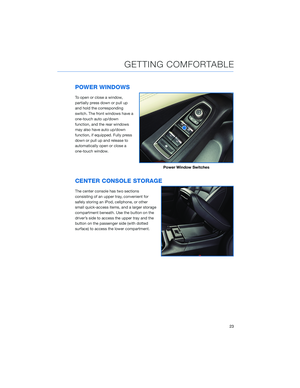
1Seat Position:Moving the
switch forward or backward will
adjust the seat in that direction.
Pulling up or pushing down on
the back of the switch will
adjust the seat height up or
down. Pulling up or pushing
down on the front of the switch
will adjust the angle of the seat
cushion.
2Recline Seatback:Moving the
top of the switch forward or
backward will adjust the angle
of the seatback.
3Lumbar Support:Pressing the
front of the switch will increase
support. Pressing the rear of
the switch will decrease
support.
4Thigh Extension (if equipped):
Pull up on the lever below the
seat cushion to adjust the
length.
If equipped, your Subaru can be
programmed to automatically recall
your preferred Power Driver’s Seat
and side mirror positions each time
you enter your vehicle. For step by
step instructions on setting the
Power Memory Seat, please refer to
page 130.
Power Seat Controls
Thigh Extension
Memory Seat Buttons
GETTING COMFORTABLE
17
Page 20 of 172
Head Restraint Adjustment
Pull the head restraint up to raise
it. To lower the head restraint,
push it down while pressing the
release button on the top of the
seatback. Each head restraint
should be adjusted so that the
center of the head restraint is
closest to the top of the
occupant’s ears.
The angle of the front head
restraints can be adjusted by
tilting them forward. You will hear
a click when the restraint locks in
place. Pulling the head restraint
as far forward as it will go allows it
to return to the fully upright position.
Seatbelt Adjuster
To keep yourself comfortable and
safe, always position the seatbelt
adjuster so the shoulder belt
passes over the middle of your
shoulder without touching your
neck. Press and hold the top of
the adjuster and slide it up or
down. Release the adjuster and
make sure it is locked in place.
Release Button and Head Restraint Adjustment
Seatbelt Adjustment Tab
GETTING COMFORTABLE
18
Page 21 of 172
TILT AND TELESCOPIC STEERING COLUMN
You can adjust both the height
and lengthwise position of the
steering wheel. Pull the lever on
the side of the steering column
down firmly to unlock, then adjust
the position of the steering wheel.
Push the lever firmly back up to
lock the steering column in place.
Steering Column Unlock
GETTING COMFORTABLE
19
Page 22 of 172
POWER EXTERIOR MIRRORS
The power mirror knob works with
the ignition in the “ON” or “ACC”
position. Turn the knob to “L” (left
side) or “R” (right side) to select a
mirror. Push the knob in the
direction you want to move the
mirror. Turn the knob back to the
center position when finished.
Power Folding Mirrors(if equipped)
The Power Folding Mirrors make
it easy to protect your exterior
mirrors when your Subaru is
parked or being washed in an
automated car wash. Press the
switch to fold the exterior mirrors
and press again to unfold. The
switch works with the ignition in
the “ON” or “ACC” positions.
NOTE: Always ensure the mirrors
are unfolded before driving.
Power Mirror Knob
Power Folding Mirror Switch
GETTING COMFORTABLE
20
Page 23 of 172
If equipped, the power folding mirrors can also
be set to automatically fold in and out. On the
Center Information Display, select "Settings",
then "Car". Select "Door Mirror Setting" to
turn on or off the Auto Electric Folding
function.
Reverse Tilt Mirror(if equipped)
The passenger side mirror can be set to
automatically tilt down when you move the
select lever to the "R" position, giving better
visibility when backing up. The mirror returns
to its normal position a few seconds after you
move the select lever out of the "R" position.
This setting can also be turned on or off in
“Door Mirror Setting” in the Center Information
Display.
GETTING COMFORTABLE
21
Page 24 of 172
REAR VIEW MIRROR
Auto-dimming Mirror(if equipped)
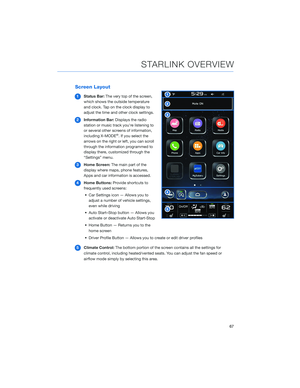
The auto-dimming function senses distracting glare
during nighttime driving and automatically dims to
eliminate the glare and preserve your vision. Press the
switch to turn auto-dimming on or off. A green LED
indicator on the switch illuminates when the function
is on.
HomeLink®5 Accessory Mirror(if equipped)
The HomeLink®5 accessory mirror provides three
buttons to replace devices such as garage door
openers, gate openers, entry door locks, security
systems, and home lighting. “Instruments and
Controls” in your Owner’s Manual provides
programming instructions, and
www.subaru.com/homelinkhas a helpful “how to”
video.
NOTE: HomeLink
®5 may not be compatible with some older door
openers or additional equipment may be required.
GETTING COMFORTABLE
22