Page 17 of 108
HomeLink®5 Accessory Mirror(if equipped)
The HomeLink®5 accessory mirror provides three
buttons to replace devices such as garage door
openers, gate openers, entry door locks, security
systems, and home lighting. “Instruments and
Controls” in your Owner’s Manual provides
programming instructions, and
www.subaru.com/homelinkhas a helpful “how to”
video.
NOTE: HomeLink
®5 may not be compatible with some older door
openers or additional equipment may be required.
POWER WINDOWS
To open or close a window, partially press
down or pull up and hold the corresponding
switch. The windows also have a one-touch
auto up/down function. Fully press down or
pull up and release to automatically open or
close a window.
Power Window Switches
GETTING COMFORTABLE
15
Page 18 of 108

CLIMATE CONTROL
Dual-zone Automatic Climate Control
You can set separate temperatures for the driver and passenger seats. Set your desired
temperature and let the system automatically make the adjustments for you. At any time,
you can manually take control of the climate settings.
1ON/OFF Button:
Press this button to activate or deactivate the climate control system.
Operation in Automatic Mode
2Automatic Control Button:This system automatically controls all of the climate
systems except defogging. Press “AUTO” to activate.
3Temperature Control Dial:
Turn the dial clockwise to increase the temperature or
counterclockwise to decrease the temperature. The temperature will appear on the screen.
You can adjust separate temperature settings for the driver’s side and passenger’s side.
4SYNC Button:Press the button to synchronize the driver's and front passenger's
temperatures to the driver’s temperature control dial. The SYNC button indicator
illuminates. Press the SYNC button again or turn the passenger’s side temperature control
dial to cancel SYNC mode and set separate driver and passenger side temperatures.
When using automatic mode, the fan speed, airflow distribution, air-inlet control and air
conditioning compressor are controlled automatically. To activate:
1. Press the “AUTO” button. The “FULL AUTO” indicator light illuminates on the indicator
in the fan speed control dial.
2. Set the preferred temperature using the temperature control dial.
If you operate any of the buttons other than “ON/OFF”, rear window defogger, “SYNC” or
the temperature control dial, the “FULL” indicator light will turn off. The “AUTO” light will
remain illuminated. You can then manually control the system as desired. Press the
“AUTO” button to change back to “FULL AUTO” mode.
GETTING COMFORTABLE
16
Page 19 of 108

Operation in Manual Mode
5Air Inlet Selection Button:Select this button to activate recirculation mode and
recirculate the interior air inside the vehicle. Recirculation mode is helpful when
driving on a dusty road or when you want cooling performance to increase. Select the
button again to return to outside air circulation mode and allow outside air to be
drawn into your Subaru.
NOTE: To prevent windshield fogging, do not remain in the recirculated mode for an
extended period of time.
6Fan Speed Control Dial:Turn the fan speed control dial to increase or decrease fan
speed.
7Airflow Mode Selection Button:Press the button to select the desired airflow mode.
The selected mode – ventilation, ventilation 2, bi-level, feet or feet-defrost – is shown
by the indicator on the fan speed control dial.
ICON MODE FUNCTION
Ventilation
Instrument panel outlets
Ventilation 2Instrument panel outlets and less foot outlets than
bi-level
Bi-Level
Instrument panel outlets and foot outlets
FeetFoot outlets, both side outlets of the instrument panel
and some through windshield defroster outlets
Feet-DefrostWindshield defroster outlets, foot outlets and both
side outlets of the instrument panel
DefrostWindshield defroster outlets and both side outlets of
the instrument panel
NOTE: The defroster button is used to activate the defrost airflow mode.
8Air Conditioner Button:Press this button to activate or deactivate the air
conditioning.
GETTING COMFORTABLE
17
Page 20 of 108

9MAX A/C Button:Press this button for quickest cooling.
10Defroster Button:Press this button to defrost or dehumidify the windshield and door
windows.
NOTE: When defrost or feet-defrost is selected, the air conditioning compressor
operates automatically defrost the windshield more quickly. However, the indicator on
the air conditioner button may not illuminate.
11Rear Window Defogger Button:Press this button to turn on the rear window
defogger. It will automatically turn off after about 15 minutes. If the window clears
before then, press the button again to turn it off. If equipped, the outside mirror
defogger will also activate. You can customize this function for continuous operation
through the SUBARU STARLINK
®Touchscreen by selecting “Settings” and then
“Car.”
Remote Engine Start with Climate Control(if equipped)
You can remotely start your Subaru and adjust the temperature using the STARLINK®
Safety and Security features through theMySubaruApp (subscription required). Please
refer to “SUBARU STARLINK Features” in your STARLINK®Safety and Security Owner's
Manual for a list of required vehicle conditions for this feature.
Heated Seats(if equipped)
The heated seat switches are
located between the driver and
passenger seats. There is a
separate switch for the driver and
passenger. Press the “HI” button
for more rapid heating or press
the “LO” button for normal
heating. Return the switch to the
center position to turn off the
heated seat.
Heated Seat Switches
GETTING COMFORTABLE
18
Page 21 of 108

ACCESSORY CONNECTIONS
1Auxiliary Input Jack:
The 3.5mm auxiliary input jack is located
in the center console. You can connect a
portable music player to the auxiliary jack
and hear the music stored on it through
your Subaru’s speakers. Press the
“Source” button located on the steering
wheel or the “Media” button on the
STARLINK
®Touchscreen to select the
auxiliary mode.
For more information, please refer to
page 57 in this Getting Started Guide or
“Audio” in your SUBARU STARLINK
®
Owner’s Manual.
2Dual USB Ports:
The USB ports are located in the center console. You can connect a variety of
USB-equipped devices, such as portable music players or smartphones, to enjoy
your favorite music or connect to Apple CarPlay
®or Android Auto™. These ports also
provide charging (5V, 2.1A) to devices.
For more information on connecting to the USB ports, please refer to page 57 in
this Getting Started Guide or “Audio” in your SUBARU STARLINK®Owner’s Manual.
For more information and set up instructions, please refer to page 93 for Android
Auto™ and page 96 for Apple CarPlay®in the How To Appendix in this Getting
Started Guide.
3Power Outlets:
A power outlet (12V) is provided in the glove box. Electrical power is available for use
with in-vehicle electrical appliances with a maximum power rating of 120W. This
outlets cannot be used to connect to the SUBARU STARLINK
®Multimedia System.
For more information, please refer to “Interior Equipment” in your Owner’s
Manual.
GETTING COMFORTABLE
19
Page 22 of 108
INSTRUMENT PANEL SWITCHES (LOWER LEFT)
1Illumination brightness (see
p. 23)
2Trunk Release (see p. 37)
For more information, please
refer to “Instruments and
Controls” and “Keys and Doors”
in your Owner’s Manual.
AUDIO CONTROLS
1Source
2Volume Up/Volume Down
3Presets/Skip
4Call
5End
6Voice Recognition
For more information about your audio
system and controls, please refer to page 47 in
this Getting Started Guide or “Quick Guide” in
your SUBARU STARLINK
®Owner’s Manual.
CONTROLS
20
Page 23 of 108
CRUISE CONTROL
1Cruise Control On/Off
2Resume (RES)/Increase Speed
3Set (SET)/Decrease Speed
4CANCEL
For more information, please refer to
“Starting and Operating” in your Owner’s
Manual.
ADAPTIVE CRUISE CONTROL(if equipped)
1Adaptive Cruise Control On/Off
2CANCEL
3Following Distance
4Resume (RES)/Increase Speed and Set
(SET)/Decrease Speed
For more information on Adaptive Cruise
Control, please refer to page 75 in this Getting
Started Guide or “Adaptive Cruise Control” in
your EyeSight
®Owner’s Manual.
CONTROLS
21
Page 24 of 108

COMBINATION METER DISPLAY CONTROLS
1Return
2Scroll Up/Down
3Scroll Left/Right
4Enter
For more information, please refer to
“Instruments and Controls” in your Owner’s
Manual.
LIGHT CONTROLS
1AUTO:Rotate the end of the lever to set
your headlights to automatically turn on
or off, depending on the level of light
outside. When in the “AUTO” position,
the headlights will automatically turn on
when the windshield wipers operate
several times.
NOTE: The sensitivity of the automatic
headlights can be adjusted through the
STARLINK
®multimedia display.
2Parking Lights:Rotate the end of the lever to turn on the instrument panel
illumination, parking lights, side marker lights, tail lights, and license plate lights.
3Headlights:Rotate the end of the lever to turn on the headlights, instrument panel
illumination, parking lights, side marker lights, tail lights, and license plate lights. To
flash the headlights, pull the lever toward you, then release. The high beams will stay
on as long as you hold the lever. The headlight flasher works even with the headlight
control switch in the off position.
4High Beams:Push the lever forward and release to change from low beam to high
beam. Pull the lever rearward and release to return to low beam. When set to the
“AUTO” position, pushing the lever forward also activates the High Beam Assist
(HBA) system, if equipped.
CONTROLS
22
 1
1 2
2 3
3 4
4 5
5 6
6 7
7 8
8 9
9 10
10 11
11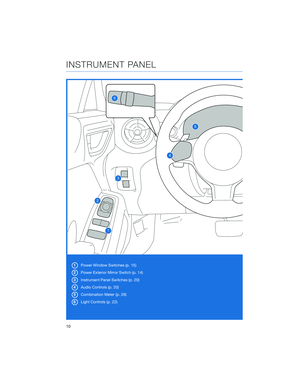 12
12 13
13 14
14 15
15 16
16 17
17 18
18 19
19 20
20 21
21 22
22 23
23 24
24 25
25 26
26 27
27 28
28 29
29 30
30 31
31 32
32 33
33 34
34 35
35 36
36 37
37 38
38 39
39 40
40 41
41 42
42 43
43 44
44 45
45 46
46 47
47 48
48 49
49 50
50 51
51 52
52 53
53 54
54 55
55 56
56 57
57 58
58 59
59 60
60 61
61 62
62 63
63 64
64 65
65 66
66 67
67 68
68 69
69 70
70 71
71 72
72 73
73 74
74 75
75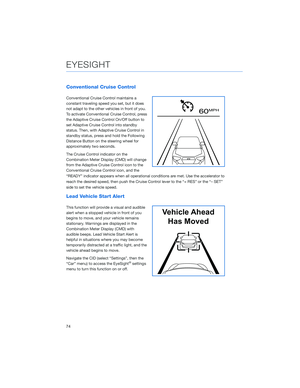 76
76 77
77 78
78 79
79 80
80 81
81 82
82 83
83 84
84 85
85 86
86 87
87 88
88 89
89 90
90 91
91 92
92 93
93 94
94 95
95 96
96 97
97 98
98 99
99 100
100 101
101 102
102 103
103 104
104 105
105 106
106 107
107
The HomeLink®5 accessory mirror provides three
buttons to replace devices such as garage door
openers, gate openers, entry door locks, security
systems, and")

1Illumination brightness (see
p. 23)
2Trunk Release (see p. 37)
For more information, please
refer to “Instruments and
Controls” and “Keys and Doors”
in")
/Increase Speed
3Set (SET)/Decrease Speed
4CANCEL
For more information, please refer to
“Starting and Operating” in your Owner’s
Manual.
ADAPTI")