Page 81 of 108
(if equipped)
This function uses the EyeSight®cameras to automatically switch
the headlights between high and low beam settings, enhancing
safety for both you and other drivers")
HIGH BEAM ASSIST (HBA)(if equipped)
This function uses the EyeSight®cameras to automatically switch
the headlights between high and low beam settings, enhancing
safety for both you and other drivers on the road. To activate High
Beam Assist, set the headlight control switch to the “AUTO”
position and push the headlight lever forward to the high beam
position and release. The green HBA indicator illuminates on the
Combination Meter.
HBA automatically activates the high beams when the forward area is dark, there are no
preceding/oncoming vehicles or sharp curves in the road, and your speed is approximately
20 mph or greater. When an preceding/oncoming vehicle is detected, the forward area is
bright, your speed decreases to 10 mph or less, or the EyeSight
®system is malfunctioning
or is temporarily stopped, HBA automatically switches to low beams.
STEERING RESPONSIVE HEADLIGHTS (SRH)
(if equipped)
The Steering Responsive Headlights (SRH) system aims the headlight beams in the
direction you are steering, improving visibility at corners and intersections when driving at
night. You can turn the SRH system on or off in the Center Information Display by selecting
“Settings”, then selecting “Car”.
REVERSE AUTOMATIC BRAKING (RAB)(if equipped)
This system uses four rear bumper mounted
sonar sensors to detect objects when moving
between 1 and 9 mph in reverse. RAB uses the
Rear-Vision Camera image to display colored
proximity alerts when an object is detected. As
an object becomes closer to the rear of your
vehicle, audible beeps provide additional
awareness in progressive levels. If RAB
determines that a collision with an object is
possible, the system can automatically apply the brakes to help prevent or minimize the
impact.
DRIVER ASSIST TECHNOLOGIES
79
Page 82 of 108
Reverse Automatic Braking (RAB) OFF
In some cases, it may be helpful to temporarily turn the system off. RAB can be turned off
using the touchscreen buttons on the lower corners when the select lever is in the “R”
position.
Select and hold the “RAB ON” button in the lower part of the
touchscreen until it changes to “RAB OFF” to disable the automatic
braking functions of the RAB system.
Select and hold the “P))) ON” button in the lower part of the
touchscreen until it changes to “P))) OFF” to disable the object
detection warning function of the RAB system.
DRIVER ASSIST TECHNOLOGIES
80
Page 83 of 108

STEREO CAMERA PRECAUTIONS
Your EyeSight®stereo cameras are precision components that must be kept free from
obstruction and contamination, such as fingerprints or cleaning solutions. When the
system detects that the stereo camera lenses are impaired, a malfunction indicator will be
displayed and EyeSight
®functions will not be available.
When you are in the vicinity of the EyeSight
®stereo cameras, always observe the following
precautions:
• Do not touch or attempt to clean the EyeSight
®camera lenses inside the vehicle. Extra
caution should be used when cleaning the inside of the windshield. Over-spray from
cleaning solutions may impair or even damage the camera lenses. Please inform others
who may attempt to clean the windshield, such as car wash staff, of this precaution.
• Electronic Toll Collection devices, such as EZPass
TM, must be installed in an area that
does not obstruct the stereo cameras' field of vision. See "Prohibited Area" on page 82
in this Getting Started Guide.
• Adjust the rearview mirror so it does not obstruct the stereo cameras' field of vision.
• Do not install any interior rearview mirror accessories, such as a wide-type mirror or
hanging objects. Only approved Genuine SUBARU accessories may be installed.
For more detailed information, please refer to your EyeSight
®Owner’s Manual.
WINDSHIELD GLASS AND DASHBOARD
Since the characteristics and limitations of the EyeSight®stereo cameras are similar to
human eyes, it is important that the area in front of the cameras be kept free from dirt,
scratches, cracks, fogging, or accessories mounted to the windshield, hood or dashboard.
Visual impairments or reflections can affect EyeSight
®system performance. Extra caution
should be taken when cleaning the windshield to prevent over-spray from cleaning
solutions.
The image in the following section outlines those areas that must be kept clean and free
from obstruction. Please refer to the Owner’s Manual for a complete listing of limitations.
CARE AND LIMITATIONS
81
Page 84 of 108
BRZ
(A)13.78 in (350 mm)(B)11.02 in (280 mm)(C)Prohibited area (in gray)
FRONT VIEW
82
Page 85 of 108

EYESIGHT®DISCLAIMER
EyeSight®is a driver assist technology which may not operate optimally under all driving
conditions. The driver is always responsible for safe and attentive driving. System
effectiveness depends on many factors such as vehicle maintenance, weather and road
conditions. See Owner’s Manual for complete details on system operations and limitations.
The Pre-Collision Braking system is designed to provide automatic braking that either
prevents a collision or reduces the severity of a frontal impact.
The Pre-Collision Throttle Management system is designed to reduce acceleration and
minimize the severity of certain frontal impacts.
Adaptive Cruise Control and Brake Light Recognition are designed to assist the driver and
are not substitutes for safe and attentive driving.
Blind-Spot Detection, Lane Change Assist and Rear Cross Traffic Alert are systems
designed to assist the driver by monitoring the rear and side areas of the vehicle during a
lane change or reversing and are not a substitute for safe and attentive driving.
The Reverse Automatic Braking System is not a substitute for safe and attentive driving.
System effectiveness depends on many factors, such as vehicle maintenance, weather
and road conditions. Always exercise caution and use vehicle mirrors and the Rear-Vision
Camera when backing up. See Owner’s Manual for complete details on system operation
and limitations.
EYESIGHT DISCLAIMER
83
Page 86 of 108
HOW TO OVERVIEW
This “How To” appendix provides detailed, step-by-step instructions to easily connect with
features of your BRZ.
If you need some help with these features or want to
learn more, we are here to assist you:
Your Subaru Owner’s Manuals:
Located in the glovebox
Online Subaru Owner’s Resources:
www.subaru.com/owners
Subaru Customer Support:
www.subaru.com/customer-support
1-800-782-2783 (1-800-SUBARU3 )
SETTING THE CLOCK
Clock settings can be adjusted when the ignition is in the “ON” position. You can adjust
the clock manually or set the clock to adjust automatically in the clock setting screen. To
directly access the clock setting screen, you can select the clock on the status bar at the
top of the Center Information Display. Full directions for accessing the clock settings and
adjusting the clock manually or automatically are given below.
For more information, please refer to “Quick Guide” in your STARLINK®Owner’s
Manual.
HOW TO APPENDIX
84
Page 87 of 108
Manually
To set the clock manually:
1Select the Clock Display in the Status
Bar.
2Select “Time Setting”.
3Select “Manual”.
4Adjust the time and date using the
“Arrow Up” and “Arrow Down” buttons.
5Once you are finished, select “OK”.
HOW TO APPENDIX
85
Page 88 of 108
Automatically
To set the clock automatically:
1Select the Clock Display in the Status
Bar.
2Select “Time Setting”.
3For vehicles with STARLINK
®Safety and
Security, select “Auto”. For vehicles
without STARLINK
®Safety and Security,
select “Sync With Phone”.
4Select “Back”.
The clock automatically adjusts as follows:
• Vehicles with STARLINK
®Safety and Security: Automatically adjusts the clock when a
STARLINK®Safety and Security signal is available.
• Vehicles without STARLINK
®Safety and Security: Automatically adjusts the clock when
a phone is paired and connected via Bluetooth®. “Phonebook Download” must be
enabled in the Phone Settings.
For step-by-step procedure to pair a phone to the SUBARU STARLINK
®Touchscreen, see
page 87 for Android devices or page 90 for Apple devices in this Getting Started Guide.
HOW TO APPENDIX
86
 1
1 2
2 3
3 4
4 5
5 6
6 7
7 8
8 9
9 10
10 11
11 12
12 13
13 14
14 15
15 16
16 17
17 18
18 19
19 20
20 21
21 22
22 23
23 24
24 25
25 26
26 27
27 28
28 29
29 30
30 31
31 32
32 33
33 34
34 35
35 36
36 37
37 38
38 39
39 40
40 41
41 42
42 43
43 44
44 45
45 46
46 47
47 48
48 49
49 50
50 51
51 52
52 53
53 54
54 55
55 56
56 57
57 58
58 59
59 60
60 61
61 62
62 63
63 64
64 65
65 66
66 67
67 68
68 69
69 70
70 71
71 72
72 73
73 74
74 75
75 76
76 77
77 78
78 79
79 80
80 81
81 82
82 83
83 84
84 85
85 86
86 87
87 88
88 89
89 90
90 91
91 92
92 93
93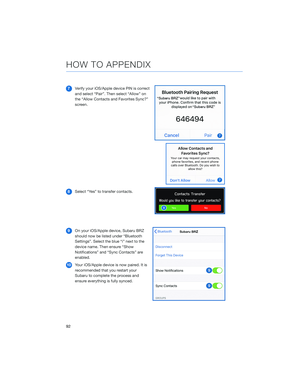 94
94 95
95 96
96 97
97 98
98 99
99 100
100 101
101 102
102 103
103 104
104 105
105 106
106 107
107 OFF
In some cases, it may be helpful to temporarily turn the system off. RAB can be turned off
using the touchscreen buttons on the lower corners when the select lever")
13.78 in (350 mm)(B)11.02 in (280 mm)(C)Prohibited area (in gray)
FRONT VIEW
82")


