Page 9 of 108

KEYLESS ENTRY
1Lock/Arm
• Press the lock/arm button to lock the doors, trunk, and fuel
filler lid and to activate the security alarm. A chirp sounds
and the hazard warning lights flash once.
• If either of the doors are not fully closed, a chirp sounds for
5 seconds to alert you.
• Press the lock/arm button three times to activate the vehicle
finder function. If you are within 30 feet of your Subaru, the
horn sounds once, and the hazard warning lights flash three
times.
2Unlock/Disarm
• Press the unlock/disarm button once to unlock the driver’s
door. Two chirps sound and the hazard warning lights flash twice. To unlock all the
doors and the trunk, briefly press the button twice.
• The interior lights will illuminate when you press the unlock/disarm button if they
are set to the “DOOR” position on the overhead console.
3Trunk
• Press and hold the trunk button to open the trunk. A chirp sounds once.
4Panic Alarm
• Press the panic alarm button to sound the horn and flash the hazard warning
lights.
• Press any button on the access key fob to deactivate the panic alarm.
KEYLESS ACCESS WITH PUSH BUTTON START
The Keyless Access with Push-Button Start system features the following touch-activated
door locking or unlocking functions without the key ever leaving your pocket or purse. You
can customize the touch-activated door locking or unlocking settings using the
STARLINK
®Touchscreen by selecting “Settings” then selecting the “Car” menu in the top
bar.
Access Key Fob
ENTRY AND EXIT
7
Page 10 of 108
Unlocking Using Door Handles
Grip the driver’s door handle to
unlock the driver’s door. Grip the
passenger’s door handle to
unlock both doors and the trunk.
Two chirps sound and the hazard
warning lights flash twice.
Locking Using Door Handles
Close both doors and touch the
door lock sensor (two lines) on
either door handle. Both doors
and the fuel filler lid lock. One
chirp sounds and the hazard
warning lights flash once.
Door Unlock Sensor
Door Lock Sensor
ENTRY AND EXIT
8
Page 11 of 108
Unlocking the Trunk
Press the trunk opener button to
unlock and open the trunk.
Trunk Opener Button
ENTRY AND EXIT
9
Page 12 of 108
1Power Window Switches (p. 15)
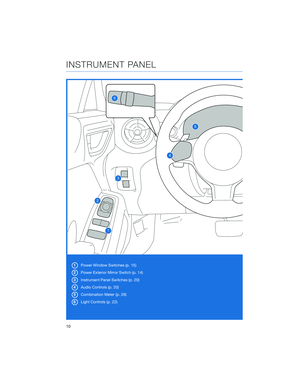
2Power Exterior Mirror Switch (p. 14)
3Instrument Panel Switches (p. 20)
4Audio Controls (p. 20)
5Combination Meter (p. 26)
6Light Controls (p. 22)
INSTRUMENT PANEL
10
Page 13 of 108
7Combination Meter Display Control Switches (p. 22)
8Cruise Control or Adaptive Cruise Control (p. 21)
9Climate Control System (p. 16)
10Windshield wipers (p. 24)
11SUBARU STARLINK
®Multimedia Touchscreen (p. 44)
12Shifter (MT) or Select Lever (AT) (p. 29)
13Parking Brake
INSTRUMENT PANEL
11
Page 14 of 108
SEATING
Manual Seats
1Forward/Backward:Pull the
lever below the seat up and
slide the seat forward or
backward. Release the lever
and make sure the seat is
locked into place.
2Seat Height (Driver’s Seat):
Pulling up or pushing down
on the lever will raise or
lower the seat cushion.
3Recline Seatback:Pull the
lever up to adjust the
seatback. Release the lever
and make sure the seatback
is locked into place.
4Seatback Fold Lever:To get
in and out of the back seats,
pull the seatback fold lever
to fold the desired seat.
When finished, return the
seatback to the upright
position until it locks in
place.
Manual Seat Levers
Seatback Fold Lever
GETTING COMFORTABLE
12
Page 15 of 108
Head Restraint Adjustment
Pull the head restraint up to raise it. To lower
the head restraint, push it down while pressing
the release button on the top of the seatback.
Each head restraint should be adjusted so that
the center of the head restraint is closest to
the top of the occupant’s ears.
TILT AND TELESCOPIC STEERING COLUMN
You can adjust both the height
and lengthwise position of the
steering wheel. Pull the lever on
the side of the steering column
down firmly to unlock, then adjust
the position of the steering wheel.
Push the lever firmly back up to
lock the steering column in place.
Steering Column Unlock
GETTING COMFORTABLE
13
Page 16 of 108
POWER EXTERIOR MIRRORS
The power mirror knob works with the ignition
in the “ON” or “ACC” position. Turn the knob
to “L” (left side) or “R” (right side) to select a
mirror. Push the knob in the direction you want
to move the mirror. Turn the knob back to the
center position when finished.
REAR VIEW MIRROR
Auto-dimming Mirror(if equipped)
The auto-dimming function senses distracting glare during
nighttime driving and automatically dims to eliminate the
glare and preserve your vision. Press the switch to turn
auto-dimming on or off. A green LED indicator on the
switch illuminates when the function is on.
Power Mirror Knob
GETTING COMFORTABLE
14