Page 57 of 148
HOOD PROP
The hood prop is located in the
left front of the engine
compartment. Unfold it and insert
the end into the slot marked with
an arrow.
ENGINE COMPARTMENT
55
Page 58 of 148
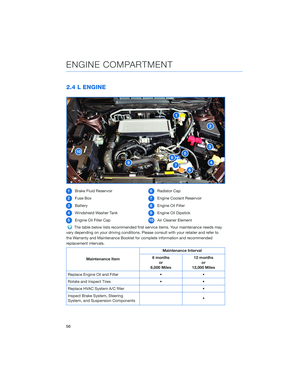
2.4 L ENGINE
1Brake Fluid Reservoir
2Fuse Box
3Battery
4Windshield Washer Tank
5Engine Oil Filler Cap6Radiator Cap
7Engine Coolant Reservoir
8Engine Oil Filter
9Engine Oil Dipstick
10Air Cleaner Element
The table below lists recommended first service items. Your maintenance needs may
vary depending on your driving conditions. Please consult with your retailer and refer to
the Warranty and Maintenance Booklet for complete information and recommended
replacement intervals.
Maintenance ItemMaintenance Interval
6 months
or
6,000 Miles12 months
or
12,000 Miles
Replace Engine Oil and Filter • •
Rotate and Inspect Tires • •
Replace HVAC System A/C filter •
Inspect Brake System, Steering
System, and Suspension Components•
ENGINE COMPARTMENT
56
Page 59 of 148

NEW VEHICLE BREAK-IN
The performance and long life of your Subaru are dependent on how you handle and care
for your Subaru while it is new.
Follow these instructions during the first 1,000 miles:
• Do not race the engine.
• Do not allow the engine speed to exceed 4,000 rpm except in an emergency.
• Do not drive at one consistent engine or vehicle speed for a long time, either fast or
slow.
• Avoid starting suddenly and rapid acceleration, except in an emergency.
• Avoid hard braking, except in an emergency.
ENGINE OIL
Use 0W-20 synthetic, with one of the following specifications:
• API classification SN with the words “RESOURCE CONSERVING”, SN PLUS with the
words “RESOURCE CONSERVING”, or SP with the words “RESOURCE CONSERVING”.
• ILSAC GF-5 or GF-6A, which can be identified with the ILSAC certification mark
(Starburst mark).
ENGINE OIL CAPACITY
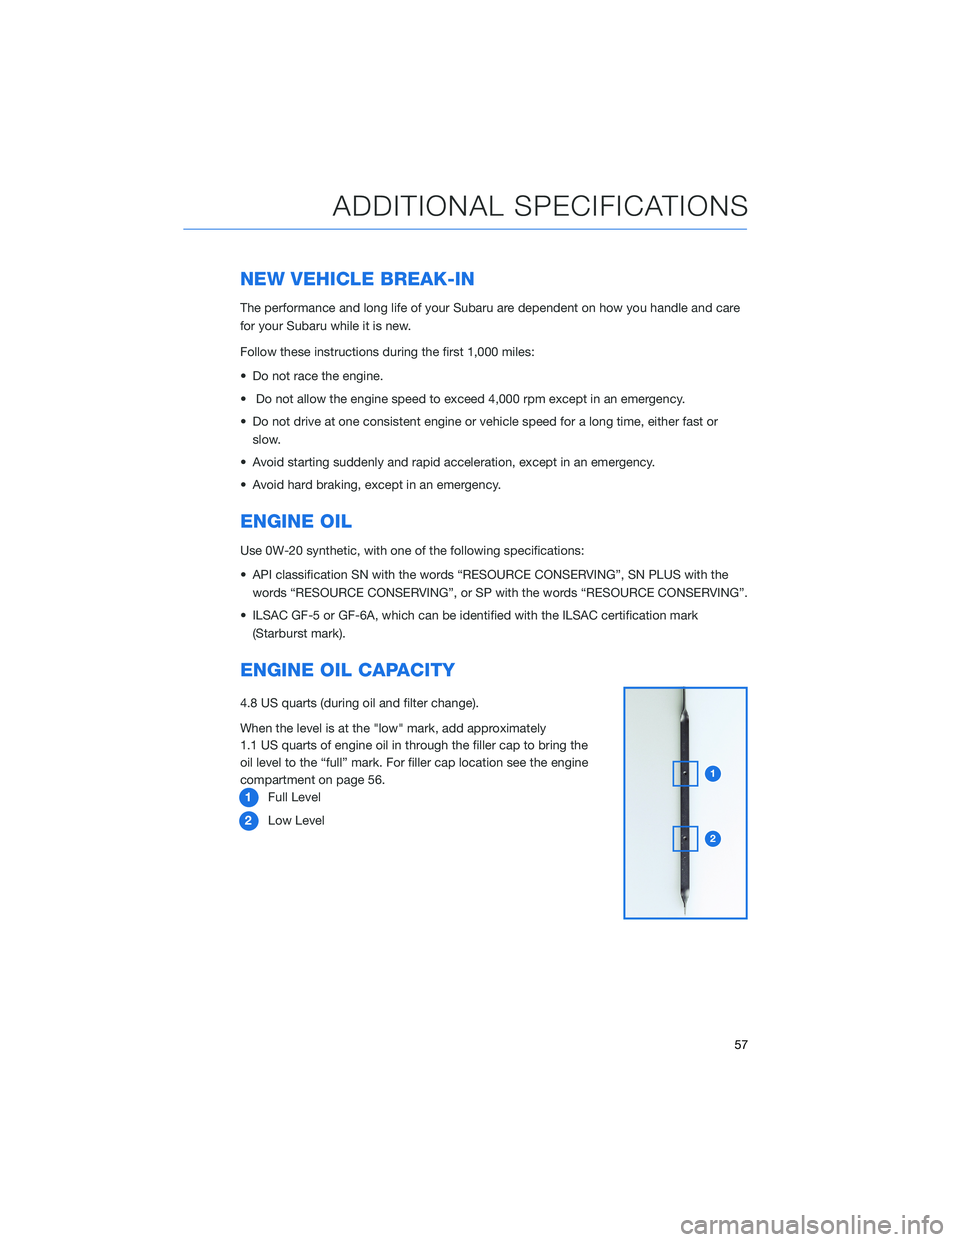
4.8 US quarts (during oil and filter change).
When the level is at the "low" mark, add approximately
1.1 US quarts of engine oil in through the filler cap to bring the
oil level to the “full” mark. For filler cap location see the engine
compartment on page 56.
1Full Level
2Low Level
ADDITIONAL SPECIFICATIONS
57
Page 60 of 148

ROOF RAIL CAPACITY
CROSS BARS DYNAMIC ROOF RAILS DYNAMIC ROOF RAILS STATIC
150 Pounds 176 Pounds 700 Pounds
For more information, please refer to “Driving Tips” in your Owner’s Manual.
TRAILER TOWING CAPACITY
Ascent (Base) Models
Maximum total trailer weight* Maximum tongue weight*
2,000 pounds 200 pounds
Premium/Onyx/Limited/Touring Models
Maximum total trailer weight* Maximum tongue weight*
5,000 pounds 500 pounds
*Towing a trailer with brakes.
NOTE:
• For models equipped with the BSD (Blind Spot Detection) and RCTA (Rear Cross Traffic
Alert) driving support systems, when towing a trailer, it may be necessary to press the
BSD/RCTA OFF switch to deactivate the system. The system may not operate as
expected due to obstruction of the radar waves. For details about the BSD/RCTA OFF
switch, refer to page 102 and/or “Starting and Operating” in your Owner’s Manual.
• For models equipped with the RAB (Reverse Automatic Braking) driving support system,
when towing a trailer, it may be necessary to press the RAB button to deactivate the
system. The system may not operate as expected due to obstruction of the sonar
waves. For details about the RAB button, refer to page 103 and/or “Starting and
Operating” in your Owner’s Manual.
Please refer to “Driving Tips” in your Owner’s Manual for complete details, especially if
you plan to use this vehicle for regular towing.
ADDITIONAL SPECIFICATIONS
58
Page 61 of 148
TIRE PRESSURE MONITORING SYSTEM (TPMS)
Your Subaru has a Tire Pressure Monitoring System (TPMS) that
tracks the pressure of each individual tire. You can learn more by
scanning the QR code to see a video with tips and more information
about your Subaru’s TPMS.
The TPMS screen shows individual tire pressure in the
Combination Meter Display. Use the “i/Set” switch to
display the TPMS screen.
Units for the TPMS can be customized to psi or kPa in the
Combination Meter Display. Pull and hold the “i/Set” switch on the
Menu Entering Screen, select “Screen Settings,” and then select
“Tire Pressure Units.” Scan the QR code for a helpful “how to”
video on adjusting the settings.
TPMS Screen
ADDITIONAL SPECIFICATIONS
59
Page 62 of 148
Tire pressure specification is listed on the tire
inflation pressure label located on the driver’s
side door pillar and in the table below. For
complete tire pressure specifications and
information, please refer to the tire
specifications in your Owner’s Manual.
Ascent (Base), Premium
Tire Inflation Pressure
Front Wheel Rear Wheel Temporary Spare Tire
35 psi 35 psi 60 psi
Onyx, Limited, Touring
Tire Inflation Pressure
Front Wheel Rear Wheel Temporary Spare Tire
33 psi 33 psi 60 psi
NOTE: The temporary spare tire must be used only on a rear wheel. If a front wheel tire
gets punctured, replace the wheel with a rear wheel and install the temporary spare tire in
place of the removed rear wheel.
Tire Inflation Pressure Label
ADDITIONAL SPECIFICATIONS
60
Page 63 of 148

OVERVIEW OF YOUR MULTIMEDIA SYSTEM
SUBARU STARLINK®Multimedia combines the radio along with the ability to connect your
phone* through Bluetooth®to the multimedia system for making calls, sending text
messages and listening to your favorite songs on your phone.
* Compatible smartphone and application required. For applications to operate, latest version of each
application required. Data provided by smartphone is displayed on the Touchscreen. Some state laws
prohibit the operation of handheld electronic devices while operating a vehicle. Smartphone apps
should only be launched when vehicle is safely parked. Your wireless carrier’s rates may apply.
Various Systems
Depending on your model and trim level there are several types of SUBARU STARLINK®
Multimedia systems. Some of the functions described in this guide will vary by system.
• 6.5-inch Multimedia Plus
• 8.0-inch Multimedia Plus
• 8.0-inch Multimedia Navigation
BUTTONS
Radio Functions
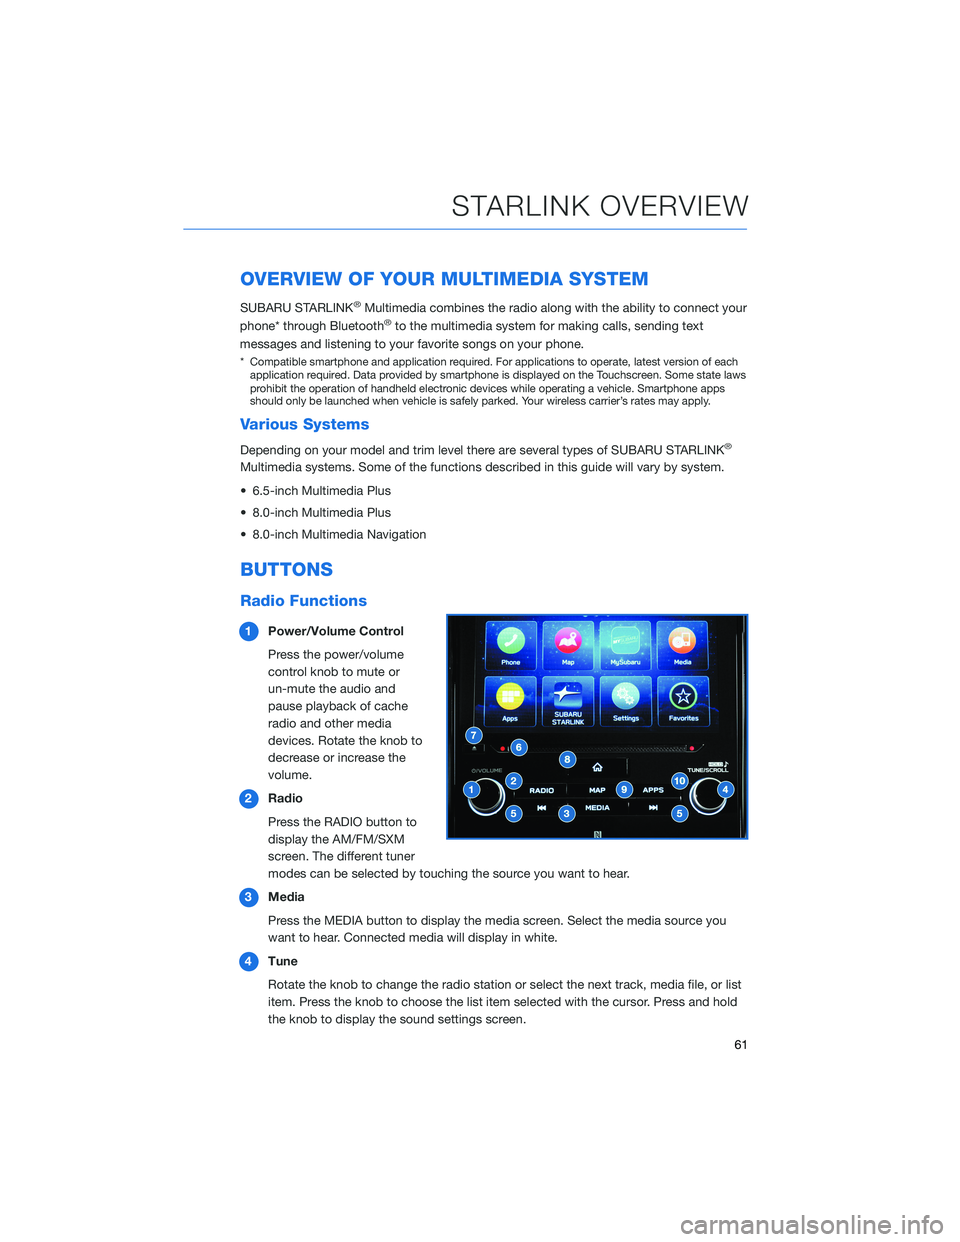
1Power/Volume Control
Press the power/volume
control knob to mute or
un-mute the audio and
pause playback of cache
radio and other media
devices. Rotate the knob to
decrease or increase the
volume.
2Radio
Press the RADIO button to
display the AM/FM/SXM
screen. The different tuner
modes can be selected by touching the source you want to hear.
3Media
Press the MEDIA button to display the media screen. Select the media source you
want to hear. Connected media will display in white.
4Tune
Rotate the knob to change the radio station or select the next track, media file, or list
item. Press the knob to choose the list item selected with the cursor. Press and hold
the knob to display the sound settings screen.
STARLINK OVERVIEW
61
Page 64 of 148

5Seek
Press the seek up or seek down button to seek the next or previous radio frequency.
You can also use the seek up or down buttons to select different audio tracks from
media sources. Press and hold to fast-forward or rewind.
CD Player Functions
6Load
Insert the disc into the loading slot. The CD will automatically be drawn in and begin
playing the first track.
7Eject
Press the Eject button on the left side of the loading slot to remove the CD from the
player.
Other Functions
8Home
Displays the Home screen apps. The Home screen allows you to customize which
apps appear and rearrange the icons in a personalized order.
9Map(if equipped)
Displays the map and navigation features available on the screen.
10Apps
Displays the installed apps that are available on your vehicle.
Controlling the Volume
Adjusting the Volume:Turn the volume knob to adjust the volume. The volume stays at
the level you set after an ignition cycle.
Muting the Volume:You can mute the audio system by pressing the volume knob once,
and un-mute the audio by pressing the knob again. It will un-mute automatically after an
ignition cycle.
Turning the System Off:To turn the system off, press and hold the volume knob for about
three seconds. The system remains off after an ignition cycle. Press the volume knob again
to turn the system back on.
STARLINK OVERVIEW
62