2022 RAM PROMASTER fuse
[x] Cancel search: fusePage 7 of 268

5
SAFETY TIPS ........................................................ 172 Transporting Passengers .............................. 172Transporting Pets ......................................... 173
Connected Vehicles....................................... 173
Safety Checks You Should Make Inside
The Vehicle ................................................... 173Periodic Safety Checks You Should Make
Outside The Vehicle ...................................... 174Exhaust Gas ................................................... 175Carbon Monoxide Warnings ......................... 175
IN CASE OF EMERGENCY
HAZARD WARNING FLASHERS ......................... 176
SOS AND ASSIST SYSTEM ................................. 176
JACKING AND TIRE CHANGING.......................... 180
Preparations For Jacking .............................. 180Jack Location — If Equipped ......................... 181Spare Tire Removal ....................................... 182
Jacking Instructions ...................................... 184Wheel Covers ................................................. 187
TIRE SERVICE KIT — IF EQUIPPED ..................... 187
Tire Service Kit Storage ................................ 187
Tire Service Kit Components And
Operation ....................................................... 187
Tire Service Kit Usage Precautions .............. 188
Sealing A Tire With Tire Service Kit .............. 189
JUMP STARTING................................................... 192
Preparations For Jump Start......................... 192Jump Starting Procedure .............................. 193Battery Location ............................................ 194 IF YOUR ENGINE OVERHEATS .......................... 194
GEAR SELECTOR OVERRIDE ............................. 195
FREEING A STUCK VEHICLE .............................. 196
TOWING A DISABLED VEHICLE ......................... 196 Automatic Transmission ............................... 197
ENHANCED ACCIDENT RESPONSE
SYSTEM (EARS) ................................................... 197
EVENT DATA RECORDER (EDR) ........................ 197
SERVICING AND MAINTENANCE
SCHEDULED SERVICING ................................... 198
Maintenance Plan ......................................... 199
ENGINE COMPARTMENT .................................... 202
3.6L Engine .................................................. 202
Checking Oil Level ......................................... 203
Adding Washer Fluid ..................................... 203
Maintenance-Free Battery ........................... 204Pressure Washing ......................................... 204
VEHICLE MAINTENANCE..................................... 204
Engine Oil ....................................................... 205
Engine Oil Filter ............................................. 205Engine Air Cleaner Filter .............................. 205Air Conditioner Maintenance ....................... 206
Body Lubrication ........................................... 207Windshield Wiper Blades ............................. 207
Exhaust System ............................................ 208
Cooling System .............................................. 209
Brake System ............................................... 211
Automatic Transmission ............................... 212 Fuses.............................................................. 213
Bulb Replacement ....................................... 220
TIRES .................................................................... 225
Tire Safety Information ................................ 225Tires — General Information ......................... 233
Tire Types....................................................... 236Spare Tires — If Equipped ............................ 237
Wheel And Wheel Trim Care ........................ 239Snow Traction Devices ................................. 240
Tire Rotation Recommendations ................. 241
DEPARTMENT OF TRANSPORTATION UNIFORM
TIRE QUALITY GRADES ...................................... 242
Treadwear...................................................... 242
Traction Grades ............................................. 242Temperature Grades..................................... 242
STORING THE VEHICLE ...................................... 243
BODYWORK .......................................................... 243
Protection From Atmospheric Agents .......... 243
Body And Underbody Maintenance ............. 243
Preserving The Bodywork ............................. 244
INTERIORS ........................................................... 244
Seats And Fabric Parts ................................. 244
Plastic And Coated Parts .............................. 245
Leather Surfaces........................................... 245
Glass Surfaces ............................................. 246Cleaning The Instrument Panel
Cupholders .................................................... 246
22_VF_OM_EN_USC_t.book Page 5
Page 48 of 268

46GETTING TO KNOW YOUR VEHICLE
(Continued)
NOTE:Do not connect devices with power higher than
180 W to the socket. Do not damage the socket by
using unsuitable adapters.
Power Outlet Fuses — Under Hood
POWER INVERTER — IF EQUIPPED
There is a 115 Volt, 150 Watt inverter outlet
located on the instrument panel, to the right of
the radio, to convert DC current to AC current.
This outlet can power cellular phones, electronics
and other low power devices requiring power up to
150 Watts. Certain game consoles will exceed this
power limit, as will most power tools.
Power Inverter Location
To turn on the power inverter outlet, simply plug in
the device. The outlet automatically turns off when
the device is unplugged.
1 — F14 Fuse 20 Amp Yellow Front Power Outlet
2 — F09 Fuse 15 Amp Blue Rear Power Outlet
WARNING!
To avoid serious injury or death:
Only devices designed for use in this type of
outlet should be inserted into any 12 Volt
outlet.
Do not touch with wet hands.
Close the lid when not in use and while driving
the vehicle.
If this outlet is mishandled, it may cause an
electric shock and failure.
CAUTION!
Many accessories that can be plugged in draw
power from the vehicle's battery, even when not in
use (i.e., cellular phones, etc.). Eventually, if
plugged in long enough, the vehicle's battery will
discharge sufficiently to degrade battery life
and/or prevent the engine from starting.
Accessories that draw higher power (i.e., coolers,
vacuum cleaners, lights, etc.) will degrade the
battery even more quickly. Only use these intermit
-
tently and with greater caution.
After the use of high power draw accessories,
or long periods of the vehicle not being started
(with accessories still plugged in), the vehicle
must be driven a sufficient length of time to
allow the generator to recharge the vehicle's
battery.
WARNING!
22_VF_OM_EN_USC_t.book Page 46
Page 49 of 268

GETTING TO KNOW YOUR VEHICLE47
The power inverter is designed with built-in
overload protection. If the power rating of
150 Watts is exceeded, the power inverter will
automatically shut down. Once the electrical
device has been removed from the outlet the
inverter should automatically reset. To avoid
overloading the circuit, check the power ratings on
electrical devices prior to using the inverter.
AUXILIARY SWITCHES — IF EQUIPPED
Your vehicle may be equipped with two auxiliary
switches located on the instrument panel to the
left of the steering column which can be used to
power various electronic devices. Connections to
the switches are found in the right central pillar
fuse panel at the base of the passenger side
B-pillar.
Auxiliary Switches
Auxiliary Switch 1 is configured to constant battery
feed, while Auxiliary Switch 2 is configured to
ignition feed.
For further information on using the auxiliary
switches, please refer to the Ram Body Builder’s
Guide by accessing
www.rambodybuilder.com
and choosing the appropriate links.
WIRELESS CHARGING PAD —
I
F EQUIPPED
Wireless Charging Pad
Your vehicle may be equipped with a 15W 3A Qi
wireless charging pad located below the center
stack. This charging pad is designed to wirelessly
charge your Qi enabled mobile phone. Qi is a
standard that allows wireless charging of your
mobile phone.
Your mobile phone must be designed for Qi wireless
charging. If the phone is not equipped with Qi wireless
charging functionality, an aftermarket sleeve or a
specialized back plate can be purchased from your
mobile phone provider or a local electronics retailer.
Please see your phone’s owner’s manual for further
information.
WARNING!
To avoid serious injury or death:
Do not insert any objects into the receptacles.
Do not touch with wet hands.
Close the lid when not in use.
If this outlet is mishandled, it may cause an
electric shock and failure.
2
22_VF_OM_EN_USC_t.book Page 47
Page 67 of 268

GETTING TO KNOW YOUR INSTRUMENT PANEL65
Transmission Temperature Warning Light
This warning light will illuminate to warn
of a high transmission fluid temperature.
This may occur with strenuous usage
such as trailer towing. If this light turns
on, stop the vehicle and run the engine at idle or
slightly faster, with the transmission in PARK (P) or
NEUTRAL (N), until the light turns off. Once the light
turns off, you may continue to drive normally.
YELLOW INDICATOR LIGHTS
Forward Collision Warning (FCW) OFF
Indicator Light — If Equipped
This indicator light will illuminate when
you switch FCW off or when driving
conditions obscure the sensor with snow,
heavy rain, or sun.
TOW/HAUL Indicator Light
This indicator light will illuminate when
TOW/HAUL mode is selected
Ú
page 110.
Keyless System Failure Light
The telltale will illuminate in the event of
keyless system failure.
Contact an authorized dealer as soon as possible.
Rain Sensor Failure Light
The telltale will illuminate in the case of
failure of the automatic windshield wiper.
Contact an authorized dealer as soon as
possible.
Exterior Lights Failure Light
The telltale will illuminate to indicate a
failure on the following lights: Daytime
Running Lights (DRLs) / parking lights /
trailer turn signal indicators (if present) /
trailer lights (if present) / side lights / turn signal
indicators / rear fog light / reversing light / brake
lights / license plate lights.
The failure may be caused by a blown bulb, a blown
protection fuse, or an interruption of the electrical
connection. Replace the bulb or the relevant fuse.
Contact an authorized dealer.
Fuel Cutoff Failure Light — If Equipped
This light will illuminate if there is a fuel
cutoff failure. If this light illuminates, take
it to an authorized dealer and have them
inspect it.
GREEN INDICATOR LIGHTS
Active Lane Management Indicator Light —
If Equipped
The Active Lane Management indicator light
illuminates solid green when both lane
markings have been detected and the
system is “armed” and ready to provide
visual and torque warnings if an unintentional lane
departure occurs
Ú
page 102.
WARNING!
If you continue operating the vehicle when the
Transmission Temperature Warning Light is
illuminated you could cause the fluid to boil over,
come in contact with hot engine or exhaust
components and cause a fire.
CAUTION!
Continuous driving with the Transmission
Temperature Warning Light illuminated will
eventually cause severe transmission damage
or transmission failure.
3
22_VF_OM_EN_USC_t.book Page 65
Page 204 of 268

202SERVICING AND MAINTENANCE
ENGINE COMPARTMENT
3.6L ENGINE
1 — Washer Fluid Reservoir Cap 5 — Engine Oil Dipstick
2 — Brake Fluid Reservoir Cap 6 — Coolant Reservoir Cap
3 — Engine Air Cleaner Filter 7 — Power Distribution Center (Fuses)
4 — Engine Oil Fill
22_VF_OM_EN_USC_t.book Page 202
Page 205 of 268

SERVICING AND MAINTENANCE203
(Continued)
CHECKING OIL LEVEL
To ensure proper engine lubrication, the engine oil
must be maintained at the correct level. Check the
oil level at regular intervals, such as every fuel
stop. The best time to check the engine oil level is
about five minutes after a fully warmed up engine
is shut off.
Checking the oil while the vehicle is on level ground
will improve the accuracy of the oil level readings.
There are four possible dipstick types:
Crosshatched zone.
Crosshatched zone marked SAFE.
Crosshatched zone marked with MIN at the low
end of the range and MAX at the high end of the
range.
Crosshatched zone marked with dimples at the
MIN and the MAX ends of the range.
NOTE:Always maintain the oil level within the crosshatch
markings on the dipstick. Adding 1 quart (1 liter) of oil when the reading is at
the low end of the dipstick range will raise the oil
level to the high end of the range marking.
ADDING WASHER FLUID
The fluid reservoir is located in the engine
compartment and should be checked at regular
intervals. Fill the reservoir with windshield washer
solvent (not radiator antifreeze) and operate the
system for a few seconds to flush out any residual
water.
The washer fluid reservoir will hold a full gallon of
fluid when the Low Washer Fluid Light illuminates.
WARNING!
Never smoke while working in the engine
compartment: gas and inflammable vapors
may be present, with the risk of fire.
Be very careful when working in the engine
compartment when the engine is hot: you may
get burned. Do not get too close to the radiator
cooling fan: the electric fan may start; danger
of injury. Scarves, ties and other loose clothing
might be pulled by moving parts.
CAUTION!
Be careful not to confuse the various types of
fluids while topping up: they are not compatible
with each other! Topping up with an unsuitable
fluid could severely damage your car.
The oil level must never exceed the MAX mark.
Always top up using engine oil of the same
specifications as that already in the engine.
If the engine oil is being topped up, wait for the
engine to cool down before loosening the filler
cap, particularly for vehicles with aluminum
caps (if equipped). WARNING: risk of burns!
Overfilling or underfilling the crankcase
will cause aeration or loss of oil pressure.
This could damage your engine.
CAUTION!
CAUTION!
Overfilling or underfilling the crankcase will
cause aeration or loss of oil pressure. This could
damage your engine.
WARNING!
Commercially available windshield washer
solvents are flammable. They could ignite and
burn you. Care must be exercised when filling or
working around the washer solution.
8
22_VF_OM_EN_USC_t.book Page 203
Page 215 of 268

SERVICING AND MAINTENANCE213
(Continued)
Fluid And Filter Changes
Under normal operating conditions, the fluid
installed at the factory will provide satisfactory
lubrication for the life of the vehicle.
Routine fluid and filter changes are not required.
However, change the fluid and filter if the fluid
becomes contaminated (with water, etc.), or if the
transmission is disassembled for any reason.
FUSES
General Information
The fuses protect electrical systems against
excessive current.
When a device does not work, you must check the fuse
element inside the blade fuse for a break/melt.
Also, please be aware that using power outlets for
extended periods of time with the engine off may
result in vehicle battery discharge.
Blade Fuses
CAUTION!
If a transmission fluid leak occurs, visit an
authorized dealer immediately. Severe
transmission damage may occur. An authorized
dealer has the proper tools to adjust the fluid
level accurately.
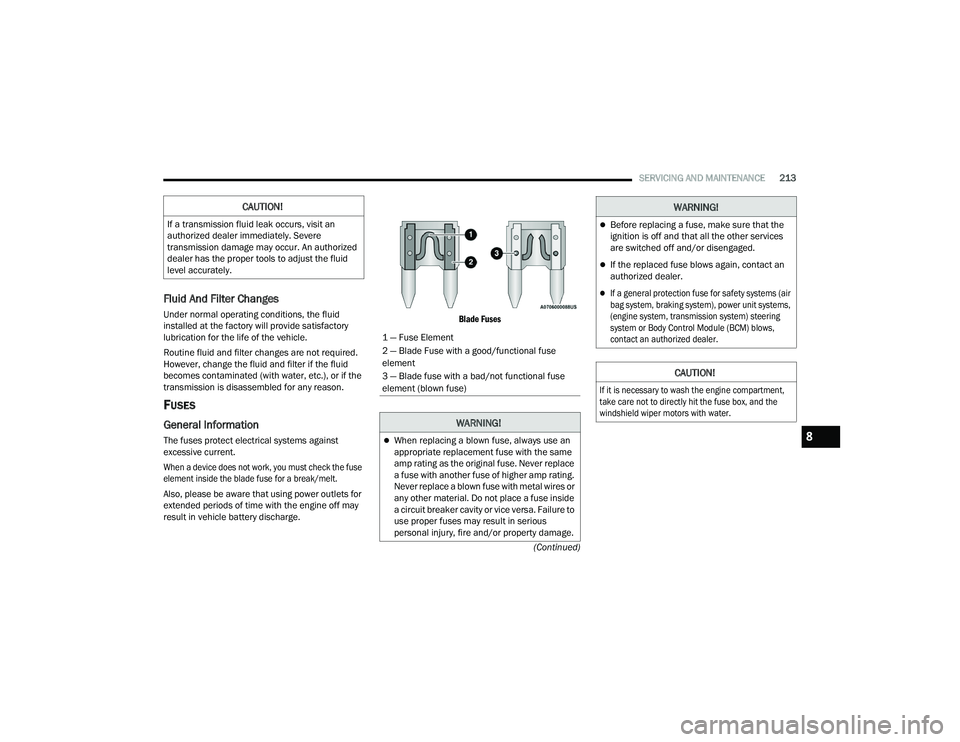
1 — Fuse Element
2 — Blade Fuse with a good/functional fuse
element
3 — Blade fuse with a bad/not functional fuse
element (blown fuse)
WARNING!
When replacing a blown fuse, always use an
appropriate replacement fuse with the same
amp rating as the original fuse. Never replace
a fuse with another fuse of higher amp rating.
Never replace a blown fuse with metal wires or
any other material. Do not place a fuse inside
a circuit breaker cavity or vice versa. Failure to
use proper fuses may result in serious
personal injury, fire and/or property damage.
Before replacing a fuse, make sure that the
ignition is off and that all the other services
are switched off and/or disengaged.
If the replaced fuse blows again, contact an
authorized dealer.
If a general protection fuse for safety systems (air
bag system, braking system), power unit systems,
(engine system, transmission system) steering
system or Body Control Module (BCM) blows,
contact an authorized dealer.
CAUTION!
If it is necessary to wash the engine compartment,
take care not to directly hit the fuse box, and the
windshield wiper motors with water.
WARNING!
8
22_VF_OM_EN_USC_t.book Page 213
Page 216 of 268

214SERVICING AND MAINTENANCE
Underhood Fuses
The Front Power Distribution Center is located on the driver’s side of the engine compartment. To access the fuses, remove the cover.
Front Power Distribution Center
22_VF_OM_EN_USC_t.book Page 214