2022 RAM PROMASTER CITY wheel
[x] Cancel search: wheelPage 151 of 260

SAFETY149
NOTE:Air bag covers may not be obvious in the interior
trim, but they will open during air bag deployment.
Rollover Events
Side Air Bags and seat belt pretensioners are
designed to activate in certain rollover events. The
Occupant Restraint Controller (ORC) determines
whether deployment in a particular rollover event
is appropriate, based on the severity and type of
collision. Vehicle damage by itself is not a good
indicator of whether or not Side Air Bags and seat
belt pretensioners should have deployed.
The Side Air Bags and seat belt pretensioners will
not deploy in all rollover events. The rollover
sensing system determines if a rollover event may
be in progress and whether deployment is
appropriate. In the event the vehicle experiences a
rollover or near rollover event, and deployment is
appropriate, the rollover sensing system will deploy
the side air bags and seat belt pretensioners on
both sides of the vehicle.
The SABICs may help reduce the risk of partial or
complete ejection of vehicle occupants through
side windows in certain rollover or side impact
events.Air Bag System Components
NOTE:The Occupant Restraint Controller (ORC) monitors
the internal circuits and interconnecting wiring
associated with electrical Air Bag System Compo -
nents listed below:
Occupant Restraint Controller (ORC)
Air Bag Warning Light
Steering Wheel and Column
Instrument Panel
Knee Impact Bolsters
Driver and Front Passenger Air Bags
Seat Belt Buckle Switch
Supplemental Side Air Bags
Supplemental Knee Air Bags
Front and Side Impact Sensors
Seat Belt Pretensioners
If A Deployment Occurs
The front air bags are designed to deflate
immediately after deployment.
NOTE:Front and/or side air bags will not deploy in all colli -
sions. This does not mean something is wrong with
the air bag system. If you do have a collision which deploys the air
bags, any or all of the following may occur:
The air bag material may sometimes cause
abrasions and/or skin reddening to the occu
-
pants as the air bags deploy and unfold. The
abrasions are similar to friction rope burns or
those you might get sliding along a carpet or
gymnasium floor. They are not caused by
contact with chemicals. They are not perma-
nent and normally heal quickly. However, if you
haven’t healed significantly within a few days,
or if you have any blistering, see your doctor
immediately.
As the air bags deflate, you may see some
smoke-like particles. The particles are a normal
by-product of the process that generates the
non-toxic gas used for air bag inflation. These
airborne particles may irritate the skin, eyes,
nose, or throat. If you have skin or eye irritation,
rinse the area with cool water. For nose or throat
irritation, move to fresh air. If the irritation
continues, see your doctor. If these particles
settle on your clothing, follow the garment
manufacturer’s instructions for cleaning.
Do not drive your vehicle after the air bags have
deployed. If you are involved in another collision,
the air bags will not be in place to protect you.
6
22_VM_OM_EN_USC_t.book Page 149
Page 153 of 260

SAFETY151
Maintaining Your Air Bag System Event Data Recorder (EDR)
This vehicle is equipped with an event data
recorder (EDR). The main purpose of an EDR is to
record, in certain crash or near crash-like
situations, such as an air bag deployment or hitting
a road obstacle, data that will assist in
understanding how a vehicle’s systems performed.
The EDR is designed to record data related to
vehicle dynamics and safety systems for a short
period of time, typically 30 seconds or less. The
EDR in this vehicle is designed to record such data
as:
How various systems in your vehicle were oper -
ating;
Whether or not the driver and passenger safety
belts were buckled/fastened;
How far (if at all) the driver was depressing the
accelerator and/or brake pedal; and,
How fast the vehicle was traveling.
This data can help provide a better understanding
of the circumstances in which crashes and injuries
occur.
NOTE:EDR data are recorded by your vehicle only if a
non-trivial crash situation occurs; no data are
recorded by the EDR under normal driving condi -
tions and no personal data (e.g., name, gender,
age, and crash location) are recorded. However,
other parties, such as law enforcement, could
combine the EDR data with the type of personally
identifying data routinely acquired during a crash
investigation.
To read data recorded by an EDR, special
equipment is required, and access to the vehicle or
the EDR is needed. In addition to the vehicle
manufacturer, other parties, such as law
enforcement, that have the special equipment,
can read the information if they have access to the
vehicle or the EDR.WARNING!
Modifications to any part of the air bag system
could cause it to fail when you need it. You
could be injured if the air bag system is not
there to protect you. Do not modify the compo -
nents or wiring, including adding any kind of
badges or stickers to the steering wheel hub
trim cover or the upper passenger side of the
instrument panel. Do not modify the front
fascia/bumper, vehicle body structure, or add
aftermarket side steps or running boards.
It is dangerous to try to repair any part of the air
bag system yourself. Be sure to tell anyone who
works on your vehicle that it has an air bag system.
Do not attempt to modify any part of your air
bag system. The air bag may inflate accidentally
or may not function properly if modifications are
made. Take your vehicle to an authorized dealer
for any air bag system service. If your seat,
including your trim cover and cushion, needs to
be serviced in any way (including removal or
loosening/tightening of seat attachment bolts),
take the vehicle to an authorized dealer. Only
manufacturer approved seat accessories may
be used. If it is necessary to modify the air bag
system for persons with disabilities, contact an
authorized dealer.
6
22_VM_OM_EN_USC_t.book Page 151
Page 173 of 260
171
(Continued)
IN CASE OF EMERGENCY
HAZARD WARNING FLASHERS
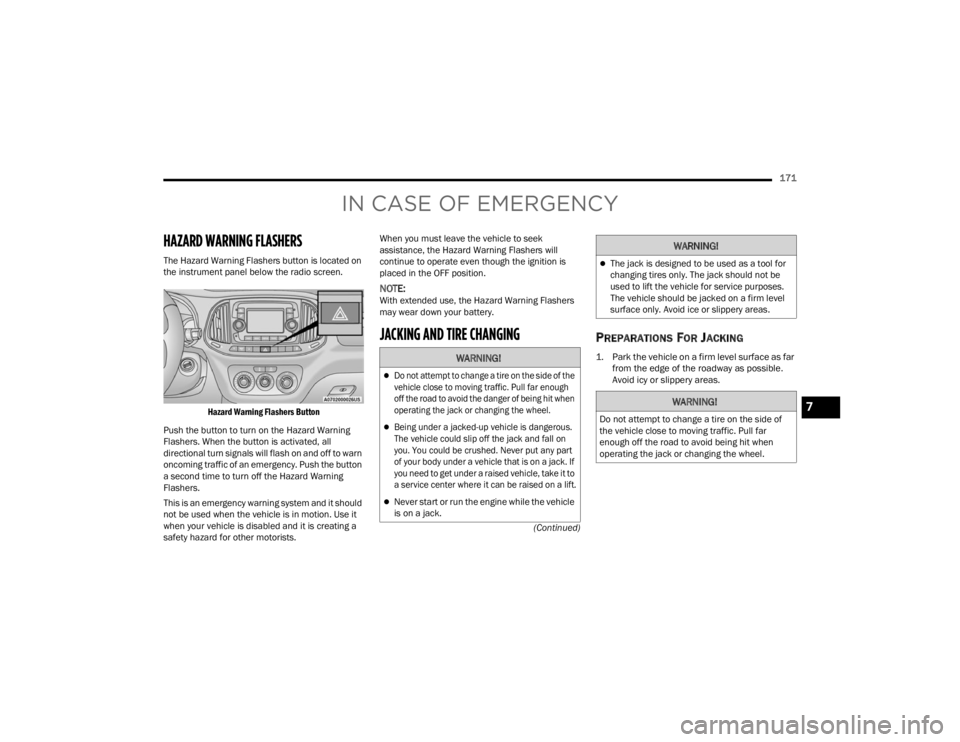
The Hazard Warning Flashers button is located on
the instrument panel below the radio screen.
Hazard Warning Flashers Button
Push the button to turn on the Hazard Warning
Flashers. When the button is activated, all
directional turn signals will flash on and off to warn
oncoming traffic of an emergency. Push the button
a second time to turn off the Hazard Warning
Flashers.
This is an emergency warning system and it should
not be used when the vehicle is in motion. Use it
when your vehicle is disabled and it is creating a
safety hazard for other motorists. When you must leave the vehicle to seek
assistance, the Hazard Warning Flashers will
continue to operate even though the ignition is
placed in the OFF position.
NOTE:With extended use, the Hazard Warning Flashers
may wear down your battery.
JACKING AND TIRE CHANGING PREPARATIONS FOR JACKING
1. Park the vehicle on a firm level surface as far
from the edge of the roadway as possible.
Avoid icy or slippery areas.
WARNING!
Do not attempt to change a tire on the side of the
vehicle close to moving traffic. Pull far enough
off the road to avoid the danger of being hit when
operating the jack or changing the wheel.
Being under a jacked-up vehicle is dangerous.
The vehicle could slip off the jack and fall on
you. You could be crushed. Never put any part
of your body under a vehicle that is on a jack. If
you need to get under a raised vehicle, take it to
a service center where it can be raised on a lift.
Never start or run the engine while the vehicle
is on a jack.
The jack is designed to be used as a tool for
changing tires only. The jack should not be
used to lift the vehicle for service purposes.
The vehicle should be jacked on a firm level
surface only. Avoid ice or slippery areas.
WARNING!
Do not attempt to change a tire on the side of
the vehicle close to moving traffic. Pull far
enough off the road to avoid being hit when
operating the jack or changing the wheel.
WARNING!
7
22_VM_OM_EN_USC_t.book Page 171
Page 174 of 260
172IN CASE OF EMERGENCY
2. Turn on the Hazard Warning Flashers.
3. Apply the parking brake.
4. Place the gear selector into PARK (P).
5. Turn the ignition to the STOP (OFF/LOCK) position.
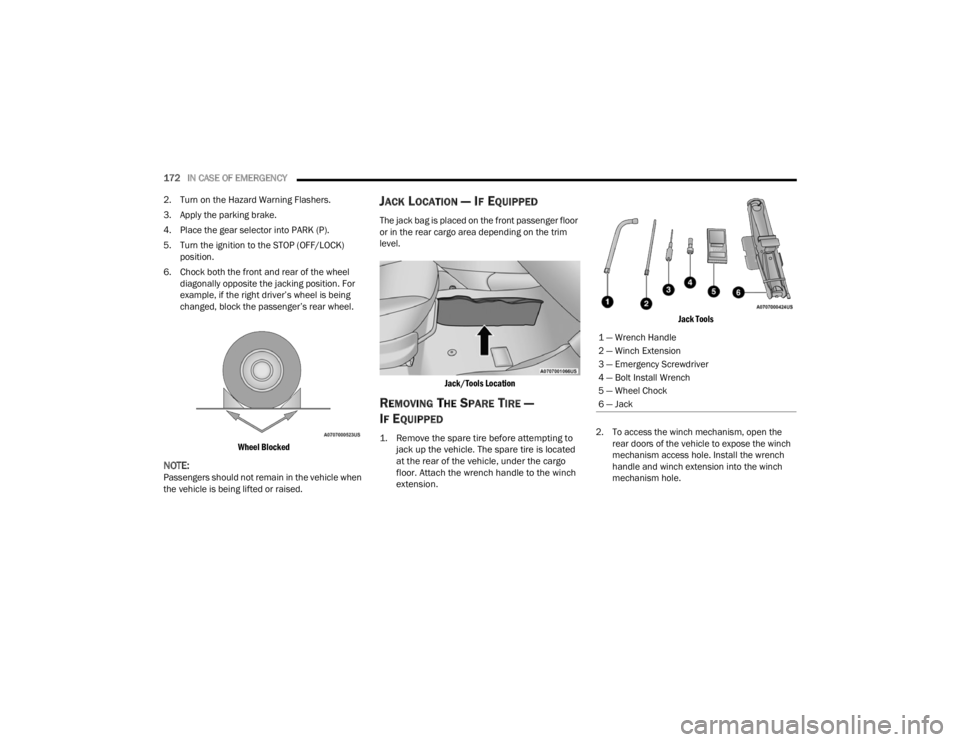
6. Chock both the front and rear of the wheel diagonally opposite the jacking position. For
example, if the right driver’s wheel is being
changed, block the passenger’s rear wheel.
Wheel Blocked
NOTE:Passengers should not remain in the vehicle when
the vehicle is being lifted or raised.
JACK LOCATION — IF EQUIPPED
The jack bag is placed on the front passenger floor
or in the rear cargo area depending on the trim
level.
Jack/Tools Location
REMOVING THE SPARE TIRE —
I
F EQUIPPED
1. Remove the spare tire before attempting to
jack up the vehicle. The spare tire is located
at the rear of the vehicle, under the cargo
floor. Attach the wrench handle to the winch
extension.
Jack Tools
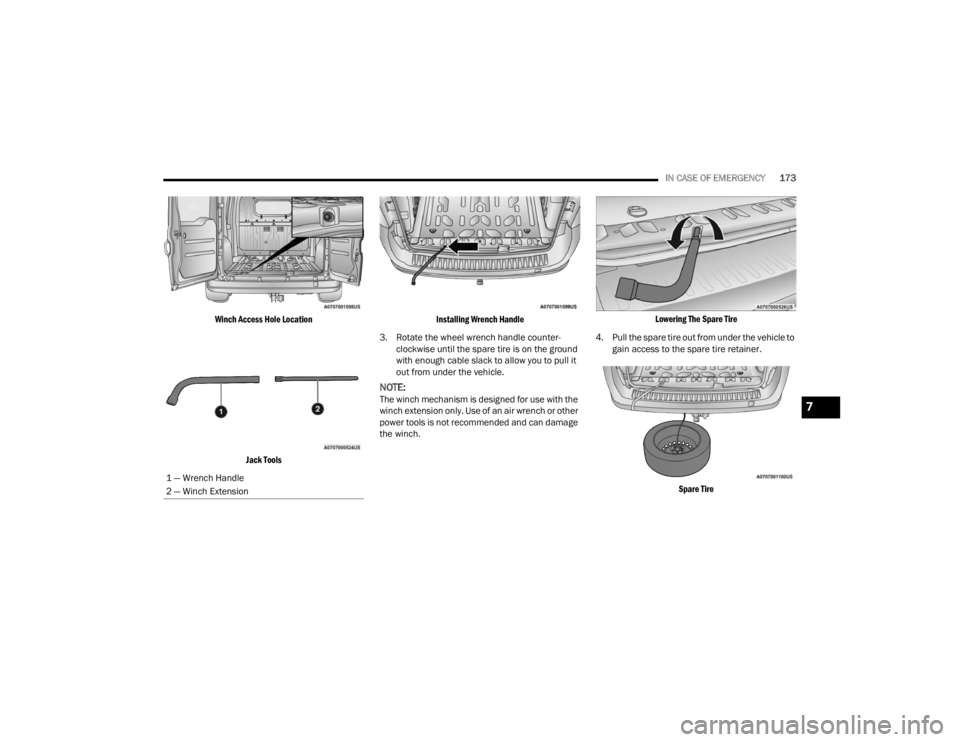
2. To access the winch mechanism, open the rear doors of the vehicle to expose the winch
mechanism access hole. Install the wrench
handle and winch extension into the winch
mechanism hole.
1 — Wrench Handle
2 — Winch Extension
3 — Emergency Screwdriver
4 — Bolt Install Wrench
5 — Wheel Chock
6 — Jack
22_VM_OM_EN_USC_t.book Page 172
Page 175 of 260
IN CASE OF EMERGENCY173
Winch Access Hole Location Jack Tools Installing Wrench Handle
3. Rotate the wheel wrench handle counter -
clockwise until the spare tire is on the ground
with enough cable slack to allow you to pull it
out from under the vehicle.
NOTE:The winch mechanism is designed for use with the
winch extension only. Use of an air wrench or other
power tools is not recommended and can damage
the winch.
Lowering The Spare Tire
4. Pull the spare tire out from under the vehicle to gain access to the spare tire retainer.
Spare Tire
1 — Wrench Handle
2 — Winch Extension7
22_VM_OM_EN_USC_t.book Page 173
Page 176 of 260
174IN CASE OF EMERGENCY
(Continued)
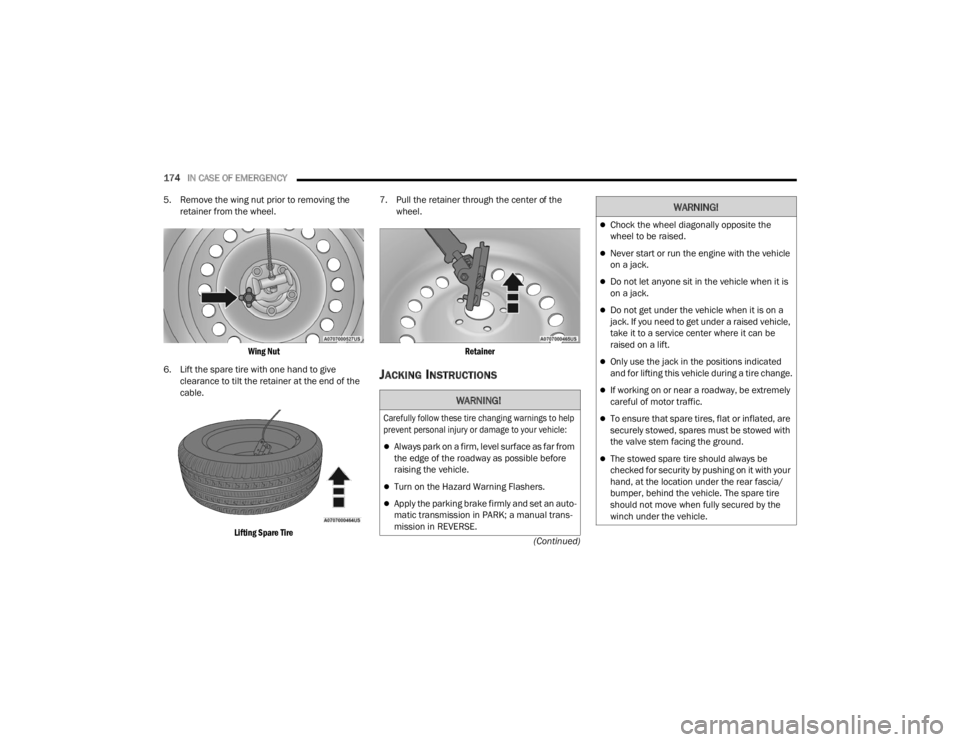
5. Remove the wing nut prior to removing the
retainer from the wheel.
Wing Nut
6. Lift the spare tire with one hand to give clearance to tilt the retainer at the end of the
cable.
Lifting Spare Tire
7. Pull the retainer through the center of the
wheel.
Retainer
JACKING INSTRUCTIONS
WARNING!
Carefully follow these tire changing warnings to help
prevent personal injury or damage to your vehicle:
Always park on a firm, level surface as far from
the edge of the roadway as possible before
raising the vehicle.
Turn on the Hazard Warning Flashers.
Apply the parking brake firmly and set an auto -
matic transmission in PARK; a manual trans -
mission in REVERSE.
Chock the wheel diagonally opposite the
wheel to be raised.
Never start or run the engine with the vehicle
on a jack.
Do not let anyone sit in the vehicle when it is
on a jack.
Do not get under the vehicle when it is on a
jack. If you need to get under a raised vehicle,
take it to a service center where it can be
raised on a lift.
Only use the jack in the positions indicated
and for lifting this vehicle during a tire change.
If working on or near a roadway, be extremely
careful of motor traffic.
To ensure that spare tires, flat or inflated, are
securely stowed, spares must be stowed with
the valve stem facing the ground.
The stowed spare tire should always be
checked for security by pushing on it with your
hand, at the location under the rear fascia/
bumper, behind the vehicle. The spare tire
should not move when fully secured by the
winch under the vehicle.
WARNING!
22_VM_OM_EN_USC_t.book Page 174
Page 177 of 260
IN CASE OF EMERGENCY175
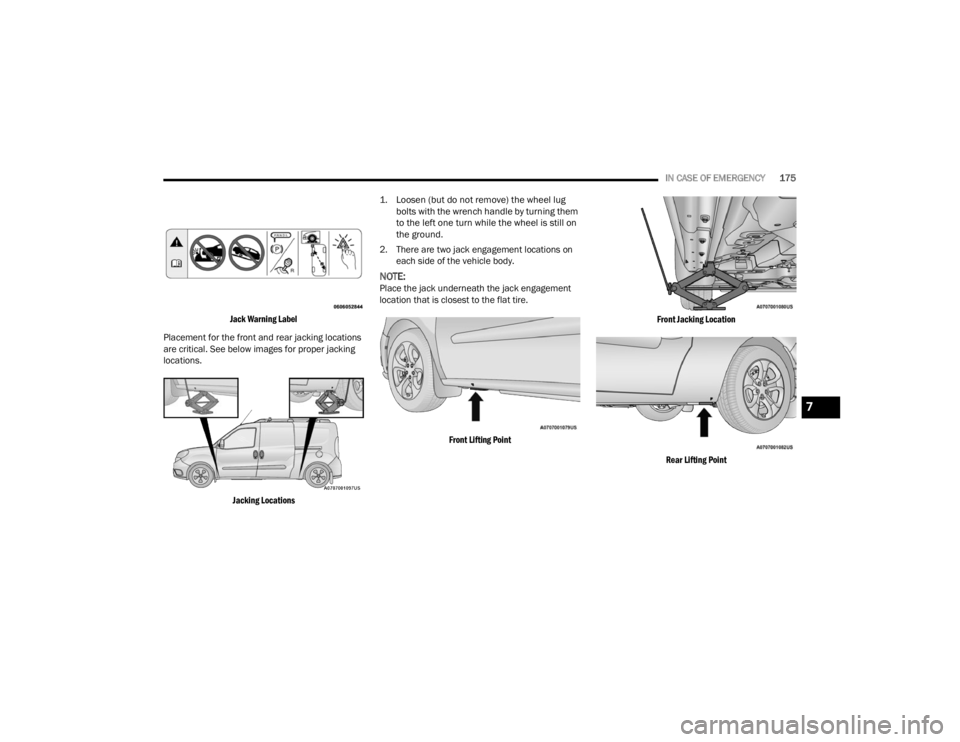
Jack Warning Label
Placement for the front and rear jacking locations
are critical. See below images for proper jacking
locations.
Jacking Locations
1. Loosen (but do not remove) the wheel lug
bolts with the wrench handle by turning them
to the left one turn while the wheel is still on
the ground.
2. There are two jack engagement locations on each side of the vehicle body.
NOTE:Place the jack underneath the jack engagement
location that is closest to the flat tire.
Front Lifting Point Front Jacking Location
Rear Lifting Point
7
22_VM_OM_EN_USC_t.book Page 175
Page 178 of 260
176IN CASE OF EMERGENCY
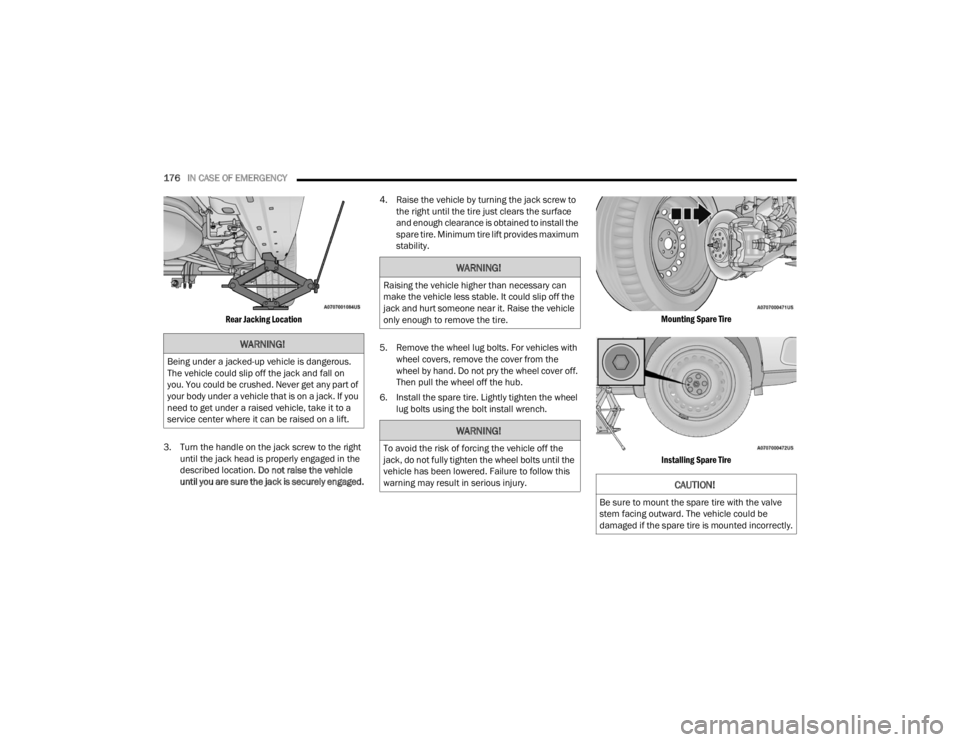
Rear Jacking Location
3. Turn the handle on the jack screw to the right until the jack head is properly engaged in the
described location. Do not raise the vehicle
until you are sure the jack is securely engaged. 4. Raise the vehicle by turning the jack screw to
the right until the tire just clears the surface
and enough clearance is obtained to install the
spare tire. Minimum tire lift provides maximum
stability.
5. Remove the wheel lug bolts. For vehicles with wheel covers, remove the cover from the
wheel by hand. Do not pry the wheel cover off.
Then pull the wheel off the hub.
6. Install the spare tire. Lightly tighten the wheel lug bolts using the bolt install wrench.
Mounting Spare Tire
Installing Spare Tire
WARNING!
Being under a jacked-up vehicle is dangerous.
The vehicle could slip off the jack and fall on
you. You could be crushed. Never get any part of
your body under a vehicle that is on a jack. If you
need to get under a raised vehicle, take it to a
service center where it can be raised on a lift.
WARNING!
Raising the vehicle higher than necessary can
make the vehicle less stable. It could slip off the
jack and hurt someone near it. Raise the vehicle
only enough to remove the tire.
WARNING!
To avoid the risk of forcing the vehicle off the
jack, do not fully tighten the wheel bolts until the
vehicle has been lowered. Failure to follow this
warning may result in serious injury.
CAUTION!
Be sure to mount the spare tire with the valve
stem facing outward. The vehicle could be
damaged if the spare tire is mounted incorrectly.
22_VM_OM_EN_USC_t.book Page 176