2022 RAM PROMASTER CITY door lock
[x] Cancel search: door lockPage 4 of 260
2
INTRODUCTION
SYMBOLS KEY ...........................................................7
VAN CONVERSIONS/CAMPERS ..............................7
VEHICLE MODIFICATIONS/ALTERATIONS .............7
SYMBOL GLOSSARY.................................................8
GETTING TO KNOW YOUR VEHICLE
KEYS ....................................................................... 10 Key Fob .............................................................10
SENTRY KEY ........................................................... 12
IGNITION SWITCH .................................................. 12
DOORS ................................................................... 13
Power Door Locks ............................................13
Auto Unlock Doors ............................................13
Sliding Side Door ..............................................13
Double Rear Swing Doors ................................15
Child-Protection Door Lock System.................15
STEERING WHEEL.................................................. 16
Tilt/Telescoping Steering Column ...................16
SEATS ...................................................................... 16
Manual Adjustment (Front Seats) ...................16
Folding Rear Seat — If Equipped .....................17
Heated Seats — If Equipped ............................18
Head Restraints ...............................................19 UCONNECT VOICE RECOGNITION ........................21
Introducing Voice Recognition.........................21
Basic Voice Commands ...................................21
Get Started .......................................................21
Additional Information .....................................21
MIRRORS ...............................................................22
Inside Rearview Mirror .....................................22
Vanity Mirror .....................................................22
Outside Mirrors ................................................22
EXTERIOR LIGHTS ..................................................24
Multifunction Lever ..........................................24
Headlights ........................................................24
Daytime Running Lights (DRLs) —
If Equipped .......................................................24
High/Low Beam Switch....................................24
Flash-To-Pass ..................................................24
Parking Lights ..................................................24
Follow Me Home/Headlight Delay ..................24
Fog Lights — If Equipped .................................25
Turn Signals ......................................................25
Lane Change Assist..........................................25
INTERIOR LIGHTS ..................................................25
Courtesy/Interior Lights ...................................25
WIPERS AND WASHERS ......................................26
Front Wiper Operation......................................27
Rear Wiper And Washer —If Equipped ............28 CLIMATE CONTROLS ............................................ 28
Manual Climate Control Descriptions And
Functions .......................................................... 28
Operating Tips .................................................. 30
INTERIOR STORAGE AND EQUIPMENT ............... 31
Storage ............................................................. 31
USB Control — If Equipped .............................. 32
Power Outlets .................................................. 32
WINDOWS ............................................................. 34
Power Window Controls —If Equipped ........... 34
Window Bar Grates — If Equipped .................. 35
Wind Buffeting .................................................35
HOOD....................................................................... 36
Opening............................................................. 36
Closing ..............................................................36
CARGO AREA FEATURES ...................................... 37
Rear Cargo Tie-Downs ..................................... 37
ROOF RACK — IF EQUIPPED................................. 37
GETTING TO KNOW YOUR
INSTRUMENT PANEL
INSTRUMENT CLUSTER......................................... 39
Instrument Cluster Descriptions ..................... 40
INSTRUMENT CLUSTER DISPLAY ....................... 40
Location And Controls...................................... 40
Change Engine Oil — If Equipped ................... 41
Instrument Cluster Display Menu Items ......... 42
22_VM_OM_EN_USC_t.book Page 2
Page 12 of 260

10
GETTING TO KNOW YOUR VEHICLE
KEYS
KEY FOB
Your vehicle uses a key start ignition system which
supports Remote Keyless Entry (RKE). The key fob
allows you to lock or unlock the doors from
distances up to approximately 66 ft (20 m). The
key fob does not need to be pointed at the vehicle
to activate the system. The key fob also contains
an integrated mechanical key, which can be
accessed by pushing the mechanical key release
button.
NOTE:The key fob may not be able to be detected by the
vehicle if it is located next to a mobile phone,
laptop or other electronic device; these devices
may block the key fob’s wireless signal
Úpage 245.
Key Fob With Integrated Mechanical Key
To Lock/Unlock The Doors
Push and release the unlock button to unlock all
doors (on passenger vehicles and U.S. cargo
vehicles) or unlock the front two doors (Canada
cargo vehicles). To lock the doors, push and
release the lock button once. The doors can also
be locked and unlocked manually by using the
mechanical key.
When the doors are unlocked, the turn signals will
flash. When the doors are locked, the turn signals
will flash and the horn will chirp (if activated
through the Uconnect Settings Ú
page 79). If a
door is open when the lock button is pushed, the
turn signal lights will flash at an increased rate to
indicate that a door is still open.
Replacing The Battery In The Key Fob
The recommended replacement battery is
CR2032.
1 — Mechanical Key Release Button
2 — Driver/Passenger Unlock Button
3 — Lock Button
4 — Cargo Lock/Unlock Button
22_VM_OM_EN_USC_t.book Page 10
Page 13 of 260

GETTING TO KNOW YOUR VEHICLE11
NOTE:
Customers are recommended to use a battery
obtained from Mopar®. Aftermarket coin
battery dimensions may not meet the original
OEM coin battery dimensions.
Perchlorate Material – special handling may
apply. See www.dtsc.ca.gov/hazard-
ouswaste/perchlorate.
1. Push the mechanical key release button and release the mechanical key to access the
battery case screw located on the side of the
key fob.
2. Rotate the screw located on the side of the key fob using a small screwdriver.
Key Fob Screw Location
3. Take out the battery case. Remove and
replace the battery observing its polarity.
4. Refit the battery case inside the key fob and turn the screw to lock it into place.
Programming And Requesting Additional
Key Fobs
Programming the key fob may be performed by an
authorized dealer.
NOTE:
Once a key fob is programmed to a vehicle, it
cannot be repurposed and reprogrammed to
another vehicle.
Only key fobs that are programmed to the
vehicle electronics can be used to start and
operate the vehicle. Once a key fob is
programmed to a vehicle, it cannot be
programmed to any other vehicle.
Duplication of keys may be performed at an
authorized dealer. The VIN is required for
authorized dealer replacement of keys.
NOTE:
When having the Sentry Key Immobilizer system
serviced, bring all vehicle keys with you to an
authorized dealer.
Keys must be ordered to the correct key cut to
match the vehicle locks.
WARNING!
The integrated key fob contains a coin cell
battery. Do not ingest the battery; there is a
chemical burn hazard. If the coin cell battery is
swallowed, it can cause severe internal burns
in just two hours and can lead to death.
If you think a battery may have been swal-
lowed or placed inside any part of the body,
seek immediate medical attention.
Keep new and used batteries away from chil -
dren. If the battery compartment does not
close securely, stop using the product and
keep it away from children.
WARNING!
Always remove the key fobs from the vehicle
and lock all doors when leaving the vehicle
unattended.
Always remember to place the ignition in the
OFF position.
2
22_VM_OM_EN_USC_t.book Page 11
Page 15 of 260
GETTING TO KNOW YOUR VEHICLE13
NOTE:When opening the driver’s door with the key in the
ignition and the ignition placed in the STOP (OFF/
LOCK) position, a chime will sound to remind you to
remove the key.
DOORS
POWER DOOR LOCKS
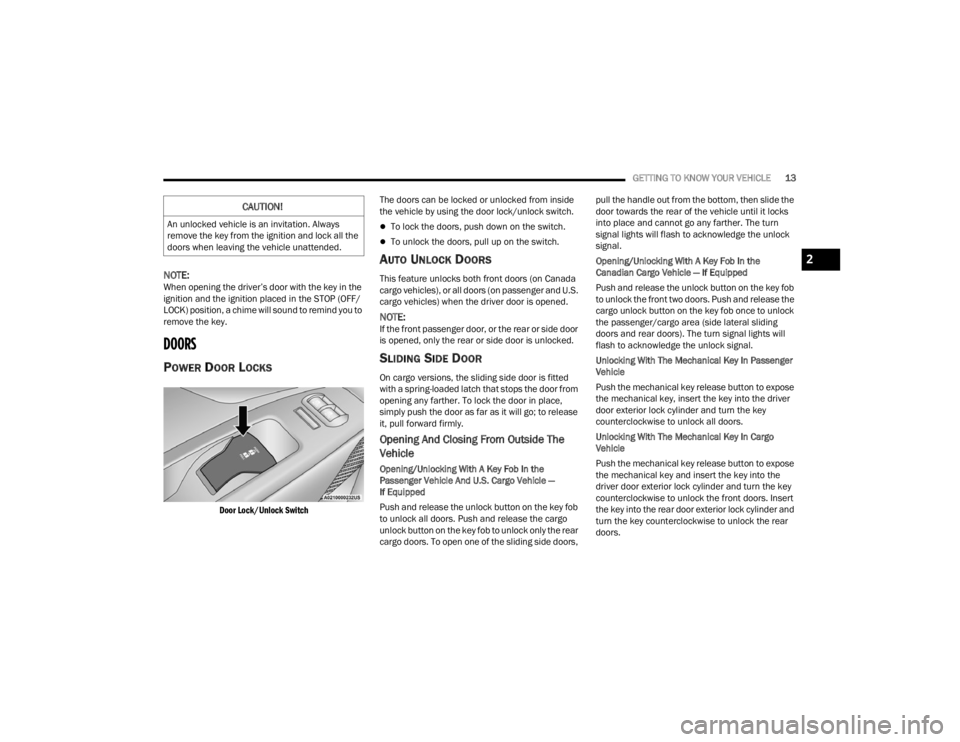
Door Lock/Unlock Switch
The doors can be locked or unlocked from inside
the vehicle by using the door lock/unlock switch.
To lock the doors, push down on the switch.
To unlock the doors, pull up on the switch.
AUTO UNLOCK DOORS
This feature unlocks both front doors (on Canada
cargo vehicles), or all doors (on passenger and U.S.
cargo vehicles) when the driver door is opened.
NOTE:If the front passenger door, or the rear or side door
is opened, only the rear or side door is unlocked.
SLIDING SIDE DOOR
On cargo versions, the sliding side door is fitted
with a spring-loaded latch that stops the door from
opening any farther. To lock the door in place,
simply push the door as far as it will go; to release
it, pull forward firmly.
Opening And Closing From Outside The
Vehicle
Opening/Unlocking With A Key Fob In the
Passenger Vehicle And U.S. Cargo Vehicle —
If Equipped
Push and release the unlock button on the key fob
to unlock all doors. Push and release the cargo
unlock button on the key fob to unlock only the rear
cargo doors. To open one of the sliding side doors, pull the handle out from the bottom, then slide the
door towards the rear of the vehicle until it locks
into place and cannot go any farther. The turn
signal lights will flash to acknowledge the unlock
signal.
Opening/Unlocking With A Key Fob In the
Canadian Cargo Vehicle — If Equipped
Push and release the unlock button on the key fob
to unlock the front two doors. Push and release the
cargo unlock button on the key fob once to unlock
the passenger/cargo area (side lateral sliding
doors and rear doors). The turn signal lights will
flash to acknowledge the unlock signal.
Unlocking With The Mechanical Key In Passenger
Vehicle
Push the mechanical key release button to expose
the mechanical key, insert the key into the driver
door exterior lock cylinder and turn the key
counterclockwise to unlock all doors.
Unlocking With The Mechanical Key In Cargo
Vehicle
Push the mechanical key release button to expose
the mechanical key and insert the key into the
driver door exterior lock cylinder and turn the key
counterclockwise to unlock the front doors. Insert
the key into the rear door exterior lock cylinder and
turn the key counterclockwise to unlock the rear
doors.
CAUTION!
An unlocked vehicle is an invitation. Always
remove the key from the ignition and lock all the
doors when leaving the vehicle unattended.
2
22_VM_OM_EN_USC_t.book Page 13
Page 16 of 260
14GETTING TO KNOW YOUR VEHICLE
Closing/Locking With A Key Fob
Push and release the lock button on the key fob to
lock all doors, including the cargo area (side lateral
sliding doors and rear doors). The turn signal lights
will flash to acknowledge the lock signal.
Horn activation settings after a key fob lock
command can be adjusted manually through the
Uconnect system Ú page 79.
Locking With The Mechanical Key In Passenger
Vehicle
Push the mechanical key release button to expose
the mechanical key, insert the key into the driver
door exterior lock cylinder and turn the key
clockwise to lock all doors.
Locking With The Mechanical Key In Cargo Vehicle
Push the mechanical key release button to expose
the mechanical key, insert the key into the driver
door exterior lock cylinder and turn the key
clockwise to lock the front doors. Insert the key into
the rear door exterior lock cylinder and turn the key
clockwise to lock the rear doors.
Closing And Locking From Outside
Grab the side door handle and push towards the
front of the vehicle. Once the side door is secured
in the full closed position, use one of the prior
locking methods to lock the sliding side doors.
Opening And Closing From The Inside
Opening:
Pull the interior door handle to unlock the door,
then pull the handle and slide the door towards the
rear of the vehicle until it can go no farther.
Closing:
Pull the interior door handle to release the door
and then push it towards the front of the vehicle.
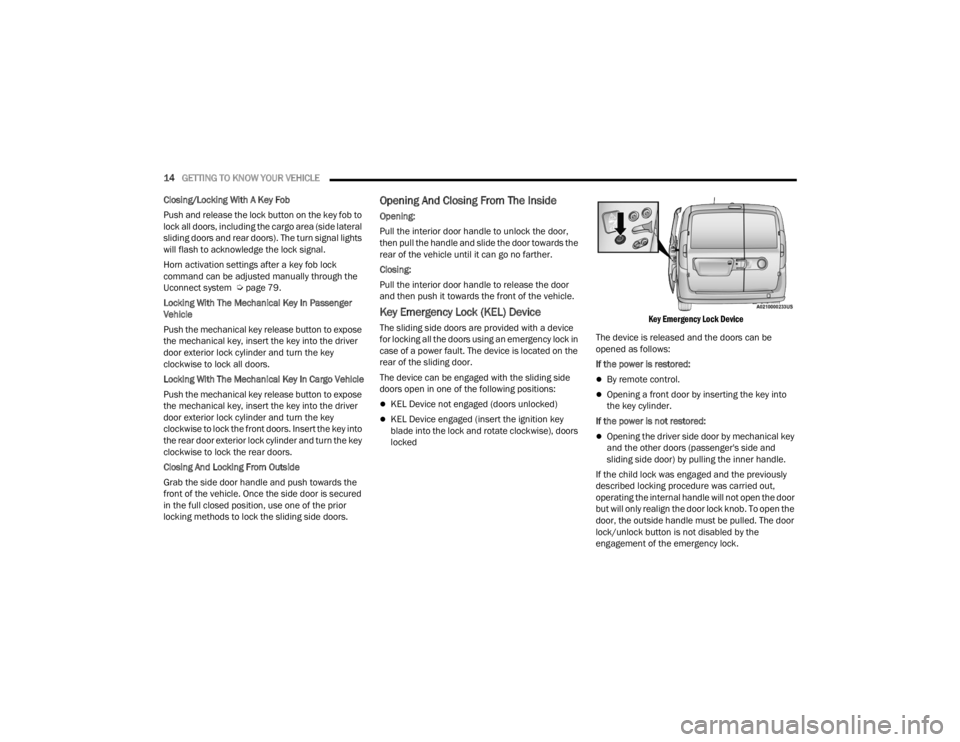
Key Emergency Lock (KEL) Device
The sliding side doors are provided with a device
for locking all the doors using an emergency lock in
case of a power fault. The device is located on the
rear of the sliding door.
The device can be engaged with the sliding side
doors open in one of the following positions:
KEL Device not engaged (doors unlocked)
KEL Device engaged (insert the ignition key
blade into the lock and rotate clockwise), doors
locked
Key Emergency Lock Device
The device is released and the doors can be
opened as follows:
If the power is restored:
By remote control.
Opening a front door by inserting the key into
the key cylinder.
If the power is not restored:
Opening the driver side door by mechanical key
and the other doors (passenger's side and
sliding side door) by pulling the inner handle.
If the child lock was engaged and the previously
described locking procedure was carried out,
operating the internal handle will not open the door
but will only realign the door lock knob. To open the
door, the outside handle must be pulled. The door
lock/unlock button is not disabled by the
engagement of the emergency lock.
22_VM_OM_EN_USC_t.book Page 14
Page 17 of 260
GETTING TO KNOW YOUR VEHICLE15
DOUBLE REAR SWING DOORS
The rear double swing doors are fitted through a
fastening system which stops them when they
reach an opening angle of approximately 90
degrees.
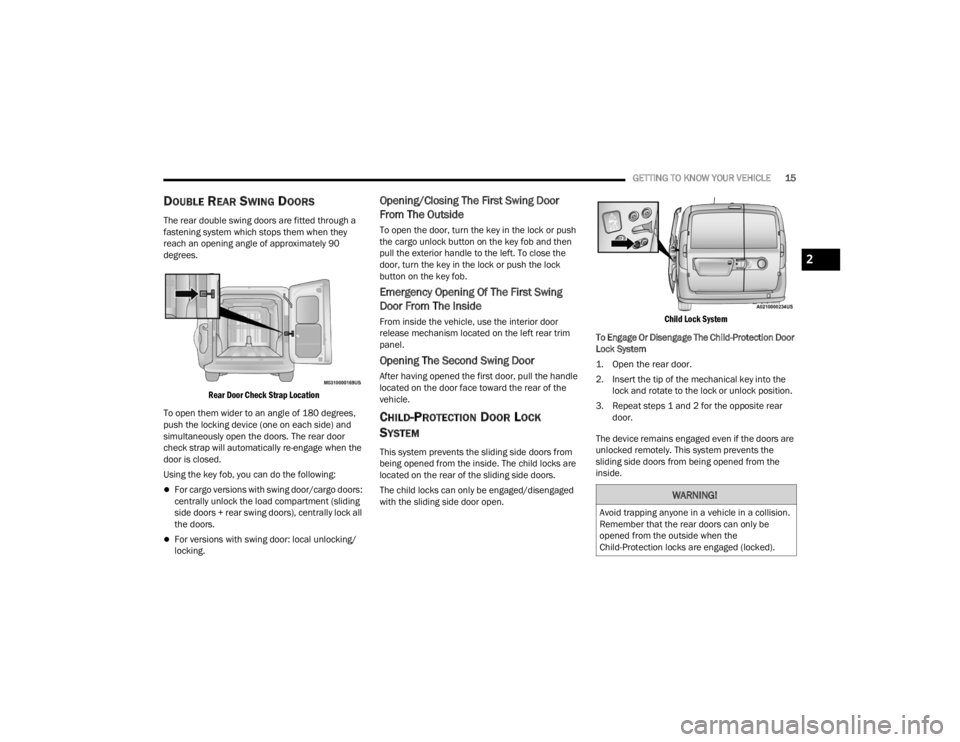
Rear Door Check Strap Location
To open them wider to an angle of 180 degrees,
push the locking device (one on each side) and
simultaneously open the doors. The rear door
check strap will automatically re-engage when the
door is closed.
Using the key fob, you can do the following:
For cargo versions with swing door/cargo doors:
centrally unlock the load compartment (sliding
side doors + rear swing doors), centrally lock all
the doors.
For versions with swing door: local unlocking/
locking.
Opening/Closing The First Swing Door
From The Outside
To open the door, turn the key in the lock or push
the cargo unlock button on the key fob and then
pull the exterior handle to the left. To close the
door, turn the key in the lock or push the lock
button on the key fob.
Emergency Opening Of The First Swing
Door From The Inside
From inside the vehicle, use the interior door
release mechanism located on the left rear trim
panel.
Opening The Second Swing Door
After having opened the first door, pull the handle
located on the door face toward the rear of the
vehicle.
CHILD-PROTECTION DOOR LOCK
S
YSTEM
This system prevents the sliding side doors from
being opened from the inside. The child locks are
located on the rear of the sliding side doors.
The child locks can only be engaged/disengaged
with the sliding side door open.
Child Lock System
To Engage Or Disengage The Child-Protection Door
Lock System
1. Open the rear door.
2. Insert the tip of the mechanical key into the lock and rotate to the lock or unlock position.
3. Repeat steps 1 and 2 for the opposite rear door.
The device remains engaged even if the doors are
unlocked remotely. This system prevents the
sliding side doors from being opened from the
inside.
WARNING!
Avoid trapping anyone in a vehicle in a collision.
Remember that the rear doors can only be
opened from the outside when the
Child-Protection locks are engaged (locked).
2
22_VM_OM_EN_USC_t.book Page 15
Page 18 of 260
16GETTING TO KNOW YOUR VEHICLE
NOTE:For emergency exit from the rear seats when the
Child-Protection Door Lock system is engaged,
manually raise the door lock knob to the unlocked
position, roll down the window, and open the door
using the outside door handle.
STEERING WHEEL
TILT/TELESCOPING STEERING COLUMN
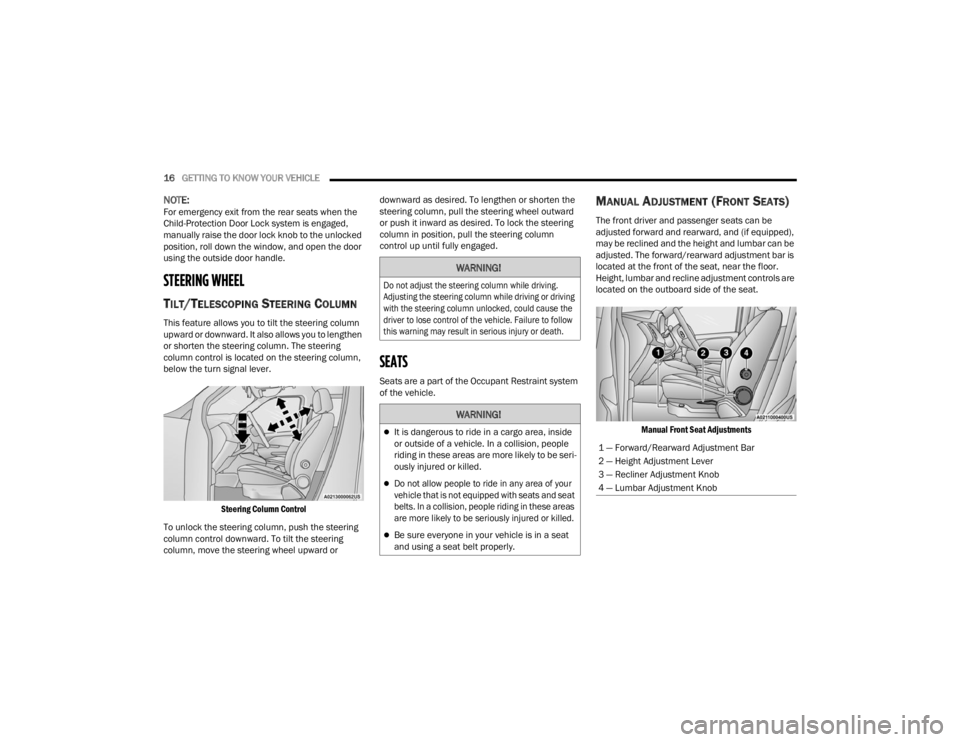
This feature allows you to tilt the steering column
upward or downward. It also allows you to lengthen
or shorten the steering column. The steering
column control is located on the steering column,
below the turn signal lever.
Steering Column Control
To unlock the steering column, push the steering
column control downward. To tilt the steering
column, move the steering wheel upward or downward as desired. To lengthen or shorten the
steering column, pull the steering wheel outward
or push it inward as desired. To lock the steering
column in position, pull the steering column
control up until fully engaged.
SEATS
Seats are a part of the Occupant Restraint system
of the vehicle.
MANUAL ADJUSTMENT (FRONT SEATS)
The front driver and passenger seats can be
adjusted forward and rearward, and (if equipped),
may be reclined and the height and lumbar can be
adjusted. The forward/rearward adjustment bar is
located at the front of the seat, near the floor.
Height, lumbar and recline adjustment controls are
located on the outboard side of the seat.
Manual Front Seat Adjustments
WARNING!
Do not adjust the steering column while driving.
Adjusting the steering column while driving or driving
with the steering column unlocked, could cause the
driver to lose control of the vehicle. Failure to follow
this warning may result in serious injury or death.
WARNING!
It is dangerous to ride in a cargo area, inside
or outside of a vehicle. In a collision, people
riding in these areas are more likely to be seri -
ously injured or killed.
Do not allow people to ride in any area of your
vehicle that is not equipped with seats and seat
belts. In a collision, people riding in these areas
are more likely to be seriously injured or killed.
Be sure everyone in your vehicle is in a seat
and using a seat belt properly.
1 — Forward/Rearward Adjustment Bar
2 — Height Adjustment Lever
3 — Recliner Adjustment Knob
4 — Lumbar Adjustment Knob
22_VM_OM_EN_USC_t.book Page 16
Page 24 of 260
22GETTING TO KNOW YOUR VEHICLE
MIRRORS
INSIDE REARVIEW MIRROR
Manual Mirror — If Equipped
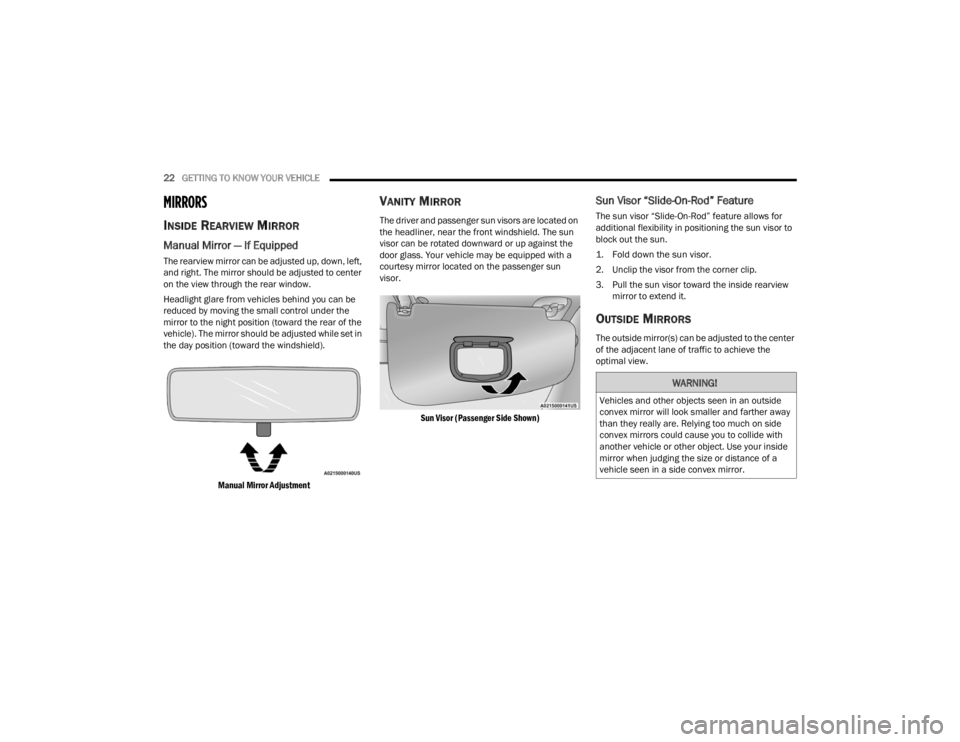
The rearview mirror can be adjusted up, down, left,
and right. The mirror should be adjusted to center
on the view through the rear window.
Headlight glare from vehicles behind you can be
reduced by moving the small control under the
mirror to the night position (toward the rear of the
vehicle). The mirror should be adjusted while set in
the day position (toward the windshield).
Manual Mirror Adjustment
VANITY MIRROR
The driver and passenger sun visors are located on
the headliner, near the front windshield. The sun
visor can be rotated downward or up against the
door glass. Your vehicle may be equipped with a
courtesy mirror located on the passenger sun
visor.
Sun Visor (Passenger Side Shown)
Sun Visor “Slide-On-Rod” Feature
The sun visor “Slide-On-Rod” feature allows for
additional flexibility in positioning the sun visor to
block out the sun.
1. Fold down the sun visor.
2. Unclip the visor from the corner clip.
3. Pull the sun visor toward the inside rearview mirror to extend it.
OUTSIDE MIRRORS
The outside mirror(s) can be adjusted to the center
of the adjacent lane of traffic to achieve the
optimal view.
WARNING!
Vehicles and other objects seen in an outside
convex mirror will look smaller and farther away
than they really are. Relying too much on side
convex mirrors could cause you to collide with
another vehicle or other object. Use your inside
mirror when judging the size or distance of a
vehicle seen in a side convex mirror.
22_VM_OM_EN_USC_t.book Page 22