2022 RAM PROMASTER CITY steering
[x] Cancel search: steeringPage 186 of 260

184IN CASE OF EMERGENCY
IGNITION KEY REMOVAL OVERRIDE
This vehicle is equipped with a Key Ignition Park
Interlock which requires the transmission to be in
PARK (P) before the ignition switch can be turned
to the STOP (key removal) position.
To remove the key manually, proceed as follows:
1. Firmly apply the parking brake.
2. Remove the Allen Key located in the rear cargo
area, in the tool bag (if equipped) or on the left
side in the cargo box.
3. Unlock the steering column, pull the tilt/ telescoping control handle down.
4. Pull the steering wheel outward until it is in the end of the travel position, then lock the
steering column in position, push the control
handle up until fully engaged.
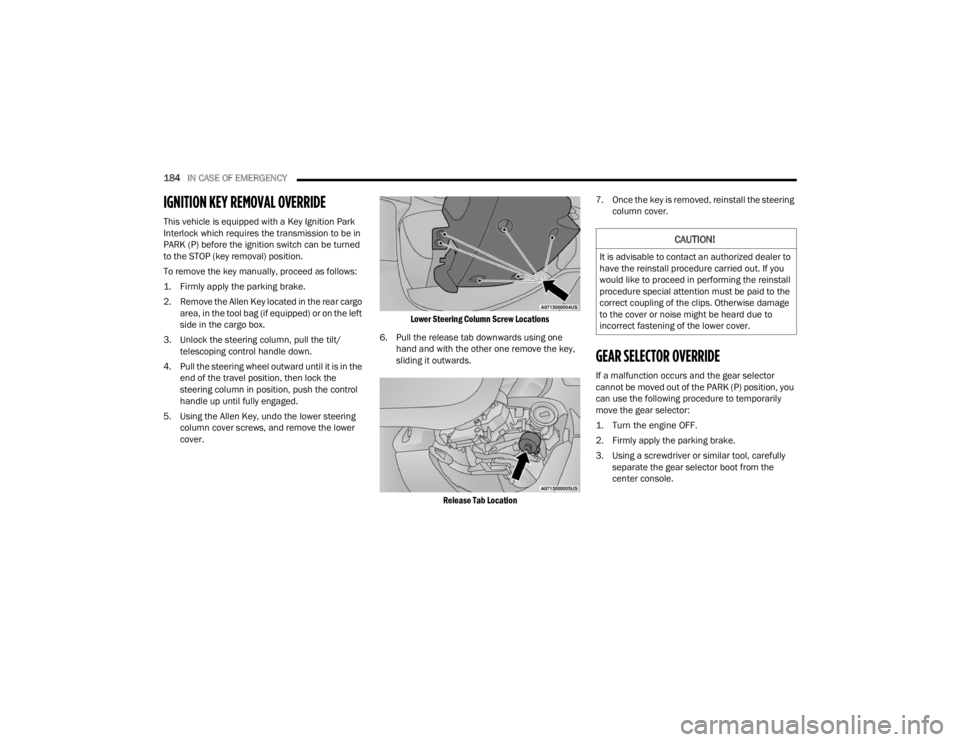
5. Using the Allen Key, undo the lower steering column cover screws, and remove the lower
cover.
Lower Steering Column Screw Locations
6. Pull the release tab downwards using one hand and with the other one remove the key,
sliding it outwards.
Release Tab Location
7. Once the key is removed, reinstall the steering
column cover.
GEAR SELECTOR OVERRIDE
If a malfunction occurs and the gear selector
cannot be moved out of the PARK (P) position, you
can use the following procedure to temporarily
move the gear selector:
1. Turn the engine OFF.
2. Firmly apply the parking brake.
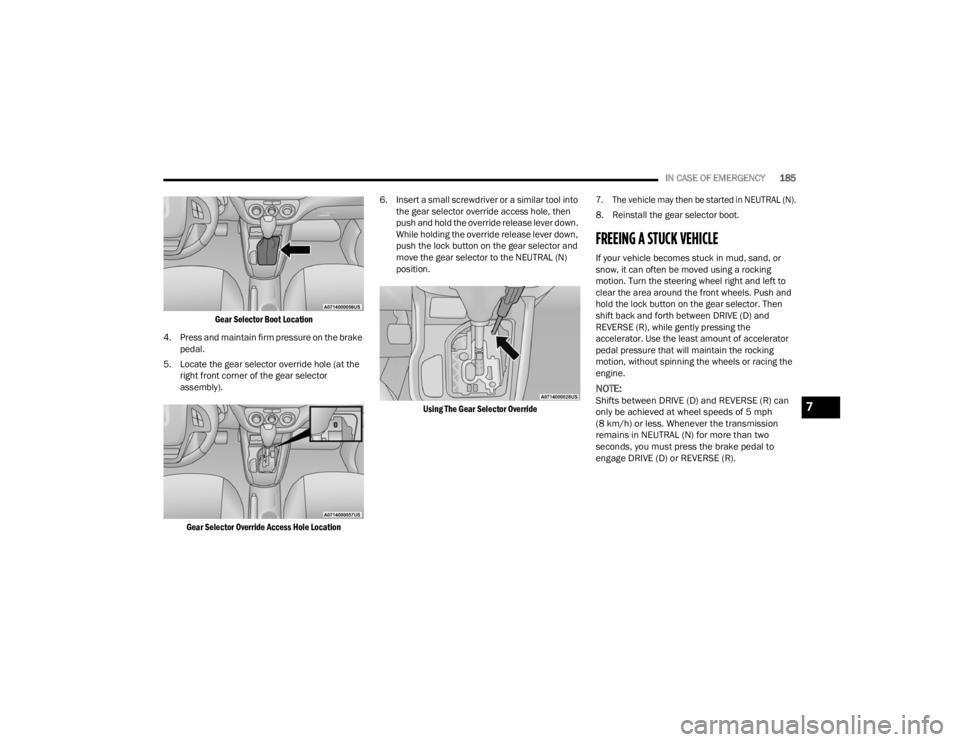
3. Using a screwdriver or similar tool, carefully separate the gear selector boot from the
center console.
CAUTION!
It is advisable to contact an authorized dealer to
have the reinstall procedure carried out. If you
would like to proceed in performing the reinstall
procedure special attention must be paid to the
correct coupling of the clips. Otherwise damage
to the cover or noise might be heard due to
incorrect fastening of the lower cover.
22_VM_OM_EN_USC_t.book Page 184
Page 187 of 260

IN CASE OF EMERGENCY185
Gear Selector Boot Location
4. Press and maintain firm pressure on the brake pedal.
5. Locate the gear selector override hole (at the right front corner of the gear selector
assembly).
Gear Selector Override Access Hole Location
6. Insert a small screwdriver or a similar tool into
the gear selector override access hole, then
push and hold the override release lever down.
While holding the override release lever down,
push the lock button on the gear selector and
move the gear selector to the NEUTRAL (N)
position.
Using The Gear Selector Override 7. The vehicle may then be started in NEUTRAL (N).
8. Reinstall the gear selector boot.
FREEING A STUCK VEHICLE
If your vehicle becomes stuck in mud, sand, or
snow, it can often be moved using a rocking
motion. Turn the steering wheel right and left to
clear the area around the front wheels. Push and
hold the lock button on the gear selector. Then
shift back and forth between DRIVE (D) and
REVERSE (R), while gently pressing the
accelerator. Use the least amount of accelerator
pedal pressure that will maintain the rocking
motion, without spinning the wheels or racing the
engine.
NOTE:
Shifts between DRIVE (D) and REVERSE (R) can
only be achieved at wheel speeds of 5 mph
(8 km/h) or less. Whenever the transmission
remains in NEUTRAL (N) for more than two
seconds, you must press the brake pedal to
engage DRIVE (D) or REVERSE (R).
7
22_VM_OM_EN_USC_t.book Page 185
Page 195 of 260

SERVICING AND MAINTENANCE193
ENGINE COMPARTMENT
ENGINE COMPARTMENT — 2.4L
1 — Air Cleaner Filter Cover 5 — Power Distribution Center (Fuses)
2 — Power Steering Fluid Reservoir Cap 6 — Engine Oil Dipstick
3 — Oil Fill Cap 7 — Engine Coolant Pressure Cap
4 — Brake Fluid Reservoir Cap 8 — Washer Fluid Reservoir Cap
8
22_VM_OM_EN_USC_t.book Page 193
Page 209 of 260

SERVICING AND MAINTENANCE207
FUSES
General Information
The fuses protect electrical systems against
excessive current.
When a device does not work, you must check the
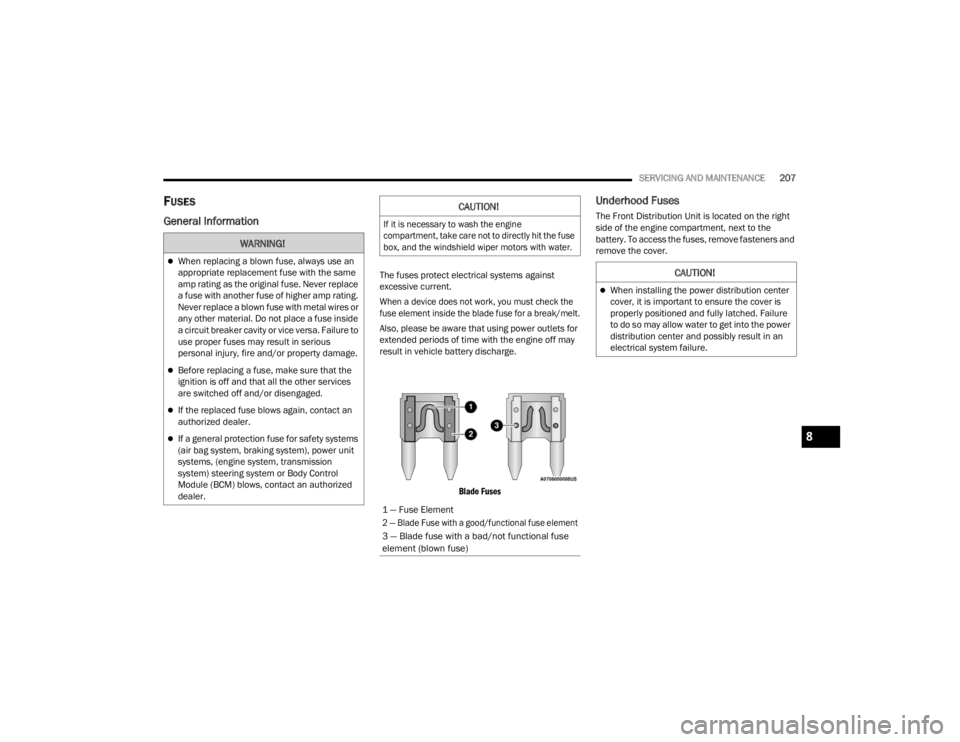
fuse element inside the blade fuse for a break/melt.
Also, please be aware that using power outlets for
extended periods of time with the engine off may
result in vehicle battery discharge.
Blade Fuses
Underhood Fuses
The Front Distribution Unit is located on the right
side of the engine compartment, next to the
battery. To access the fuses, remove fasteners and
remove the cover.
WARNING!
When replacing a blown fuse, always use an
appropriate replacement fuse with the same
amp rating as the original fuse. Never replace
a fuse with another fuse of higher amp rating.
Never replace a blown fuse with metal wires or
any other material. Do not place a fuse inside
a circuit breaker cavity or vice versa. Failure to
use proper fuses may result in serious
personal injury, fire and/or property damage.
Before replacing a fuse, make sure that the
ignition is off and that all the other services
are switched off and/or disengaged.
If the replaced fuse blows again, contact an
authorized dealer.
If a general protection fuse for safety systems
(air bag system, braking system), power unit
systems, (engine system, transmission
system) steering system or Body Control
Module (BCM) blows, contact an authorized
dealer.
CAUTION!
If it is necessary to wash the engine
compartment, take care not to directly hit the fuse
box, and the windshield wiper motors with water.
1 — Fuse Element
2 — Blade Fuse with a good/functional fuse element
3 — Blade fuse with a bad/not functional fuse
element (blown fuse)
CAUTION!
When installing the power distribution center
cover, it is important to ensure the cover is
properly positioned and fully latched. Failure
to do so may allow water to get into the power
distribution center and possibly result in an
electrical system failure.
8
22_VM_OM_EN_USC_t.book Page 207
Page 211 of 260

SERVICING AND MAINTENANCE209
F07 50 Amp Red –Radiator Fan - High Speed
F08 40 Amp Orange –Blower Motor
F10 –15 Amp BlueHorn
F11 –10 Amp RedSecondary Loads ECM
F14 –15 Amp BlueHigh Beam
F15 –––
F16 –5 Amp TanECM and Transmission Shifter
F17 –25 Amp ClearECM Power Loads
F18 –5 Amp TanECM Load, Main Relay
F19 –7.5 Amp BrownAir Conditioning
F20 –30 Amp GreenRear Defroster *
F21 –5 Amp TanKey Unlock
F22 –10 Amp RedPrimary ECM Loads
F23 –20 Amp YellowBSM System
F24 –5 Amp TanBSM System, Positive Key and
Steering Angle Sensor
F30 –15 Amp Blue2nd Instrument Panel Power Outlet
(Battery)
F83 20 Amp Yellow –Fuel Pump
F84 –15 Amp BlueAT Module
Cavity Maxi Fuse Mini FuseDescription
* If Equipped
8
22_VM_OM_EN_USC_t.book Page 209
Page 227 of 260

SERVICING AND MAINTENANCE225
(Continued)
TIRES — GENERAL INFORMATION
Tire Pressure
Proper tire inflation pressure is essential to the
safe and satisfactory operation of your vehicle.
Four primary areas are affected by improper tire
pressure:
Safety
Fuel Economy
Tread Wear
Ride Comfort and Vehicle Stability
Safety Both underinflation and overinflation affect the
stability of the vehicle and can produce a feeling of
sluggish response or over responsiveness in the
steering.
NOTE:
Unequal tire pressures from side to side may
cause erratic and unpredictable steering
response.
Unequal tire pressure from side to side may
cause the vehicle to drift left or right.
Fuel Economy
Underinflated tires will increase tire rolling
resistance resulting in higher fuel consumption. Tread Wear
Improper cold tire inflation pressures can cause
abnormal wear patterns and reduced tread life,
resulting in the need for earlier tire replacement.
Ride Comfort And Vehicle Stability
Proper tire inflation contributes to a comfortable
ride. Overinflation produces a jarring and
uncomfortable ride.
Tire Inflation Pressures
The proper cold tire inflation pressure is listed on
the driver's side B-pillar or rear edge of the driver's
side door.
At least once a month:
Check and adjust tire pressure with a good
quality pocket-type pressure gauge. Do not
make a visual judgment when determining
proper inflation. Tires may look properly inflated
even when they are under inflated.
Inspect tires for signs of tire wear or visible
damage.
WARNING!
Improperly inflated tires are dangerous and
can cause collisions.
Underinflation increases tire flexing and can
result in overheating and tire failure.
Overinflation reduces a tire's ability to cushion
shock. Objects on the road and chuckholes
can cause damage that result in tire failure.
Overinflated or underinflated tires can affect
vehicle handling and can fail suddenly,
resulting in loss of vehicle control.
Unequal tire pressures can cause steering
problems. You could lose control of your
vehicle.
Unequal tire pressures from one side of the
vehicle to the other can cause the vehicle to
drift to the right or left.
Always drive with each tire inflated to the
recommended cold tire inflation pressure.
WARNING!
CAUTION!
After inspecting or adjusting the tire pressure,
always reinstall the valve stem cap. This will
prevent moisture and dirt from entering the
valve stem, which could damage the valve stem.
8
22_VM_OM_EN_USC_t.book Page 225
Page 230 of 260

228SERVICING AND MAINTENANCE
NOTE:Wheel valve stem must be replaced as well when
installing new tires due to wear and tear in existing
tires.
Keep dismounted tires in a cool, dry place with as
little exposure to light as possible. Protect tires
from contact with oil, grease, and gasoline.
Replacement Tires
The tires on your new vehicle provide a balance of
many characteristics. They should be inspected
regularly for wear and correct cold tire inflation
pressures. The manufacturer strongly
recommends that you use tires equivalent to the
originals in size, quality and performance when
replacement is needed Úpage 227. Refer to the
Tire and Loading Information placard or the
Vehicle Certification Label for the size designation
of your tire. The Load Index and Speed Symbol for
your tire will be found on the original equipment
tire sidewall.
For more information relating to the Load Index
and Speed Symbol of a tire Ú page 218.
It is recommended to replace the two front tires or
two rear tires as a pair. Replacing just one tire can
seriously affect your vehicle’s handling. If you ever
replace a wheel, make sure that the wheel’s
specifications match those of the original wheels.
It is recommended you contact an authorized tire
dealer or original equipment dealer with any questions you may have on tire specifications or
capability. Failure to use equivalent replacement
tires may adversely affect the safety, handling, and
ride of your vehicle.
TIRE TYPES
All Season Tires — If Equipped
All Season tires provide traction for all seasons
(Spring, Summer, Autumn, and Winter). Traction
levels may vary between different all season tires.
All season tires can be identified by the M+S, M&S,
M/S or MS designation on the tire sidewall. Use all
season tires only in sets of four; failure to do so
may adversely affect the safety and handling of
your vehicle.
Summer Or Three Season Tires —
If Equipped
Summer tires provide traction in both wet and dry
conditions, and are not intended to be driven in
snow or on ice. If your vehicle is equipped with
Summer tires, be aware these tires are not
designed for Winter or cold driving conditions.
Install Winter tires on your vehicle when ambient
temperatures are less than 40°F (5°C) or if roads
are covered with ice or snow. For more
information, contact an authorized dealer.
WARNING!
Do not use a tire, wheel size, load rating, or
speed rating other than that specified for your
vehicle. Some combinations of unapproved
tires and wheels may change suspension
dimensions and performance characteristics,
resulting in changes to steering, handling, and
braking of your vehicle. This can cause unpre
-
dictable handling and stress to steering and
suspension components. You could lose
control and have a collision resulting in
serious injury or death. Use only the tire and
wheel sizes with load ratings approved for
your vehicle.
Never use a tire with a smaller load index or
capacity, other than what was originally
equipped on your vehicle. Using a tire with a
smaller load index could result in tire over -
loading and failure. You could lose control and
have a collision.
Failure to equip your vehicle with tires having
adequate speed capability can result in
sudden tire failure and loss of vehicle control.
CAUTION!
Replacing original tires with tires of a different
size may result in false speedometer and
odometer readings.
22_VM_OM_EN_USC_t.book Page 228
Page 234 of 260

232SERVICING AND MAINTENANCE
Dark Vapor Chrome, Black Satin Chrome, or Low
Gloss Clear Coat Wheels
TIRE CHAINS AND TRACTION DEVICES
Due to limited clearance, tire chains or traction
devices are not recommended.
TIRE ROTATION RECOMMENDATIONS
The tires on the front and rear of your vehicle
operate at different loads and perform different
steering, driving, and braking functions. For these
reasons, they wear at unequal rates. These effects can be reduced by timely rotation of
tires. The benefits of rotation are especially
worthwhile with aggressive tread designs such as
those on all season type tires. Rotation will
increase tread life, help to maintain mud, snow
and wet traction levels, and contribute to a
smooth, quiet ride.
For the proper maintenance intervals
Úpage 190.
The reasons for any rapid or unusual wear should
be corrected prior to rotation being performed.
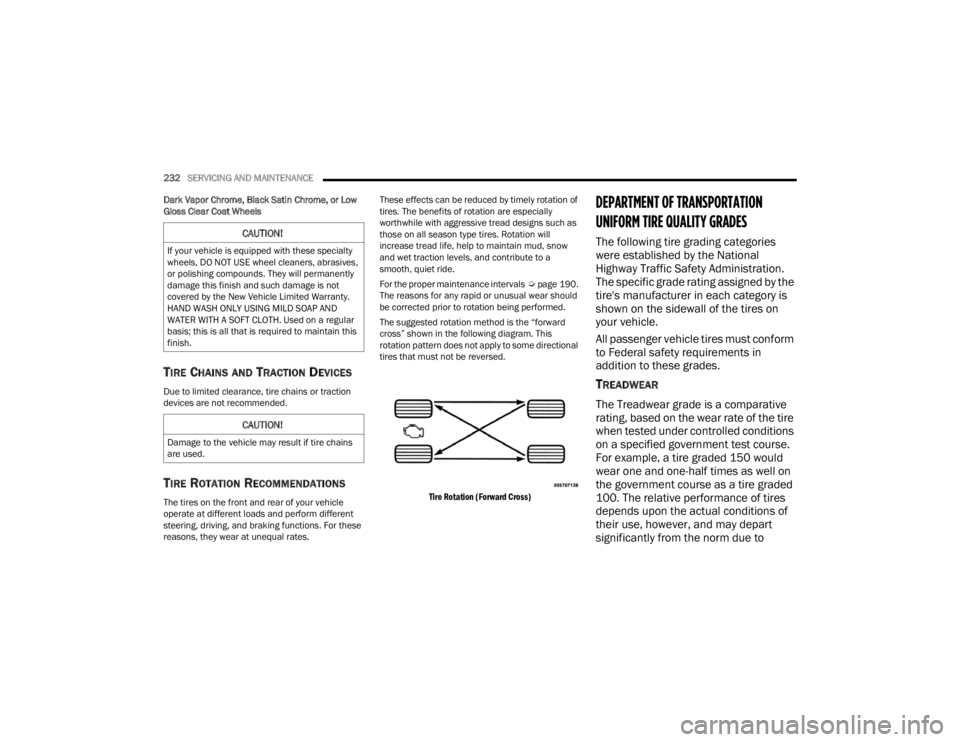
The suggested rotation method is the “forward
cross” shown in the following diagram. This
rotation pattern does not apply to some directional
tires that must not be reversed.
Tire Rotation (Forward Cross)
DEPARTMENT OF TRANSPORTATION
UNIFORM TIRE QUALITY GRADES
The following tire grading categories
were established by the National
Highway Traffic Safety Administration.
The specific grade rating assigned by the
tire's manufacturer in each category is
shown on the sidewall of the tires on
your vehicle.
All passenger vehicle tires must conform
to Federal safety requirements in
addition to these grades.
TREADWEAR
The Treadwear grade is a comparative
rating, based on the wear rate of the tire
when tested under controlled conditions
on a specified government test course.
For example, a tire graded 150 would
wear one and one-half times as well on
the government course as a tire graded
100. The relative performance of tires
depends upon the actual conditions of
their use, however, and may depart
significantly from the norm due to
CAUTION!
If your vehicle is equipped with these specialty
wheels, DO NOT USE wheel cleaners, abrasives,
or polishing compounds. They will permanently
damage this finish and such damage is not
covered by the New Vehicle Limited Warranty.
HAND WASH ONLY USING MILD SOAP AND
WATER WITH A SOFT CLOTH. Used on a regular
basis; this is all that is required to maintain this
finish.
CAUTION!
Damage to the vehicle may result if tire chains
are used.
22_VM_OM_EN_USC_t.book Page 232