2022 RAM PROMASTER CITY change time
[x] Cancel search: change timePage 127 of 260

MULTIMEDIA125
Safety Warnings: You can change settings for
whether you want to be warned, never warned,
or warned only if you are speeding. The following
options are available:
When speeding: This warning is given when
you exceed the speed limit by more than
3 mph (5 km/h). When you are speeding,
the speed panel also turns red in the Guid -
ance View.
Driver Safety: Select this setting to make
some features locked while the vehicle is in
motion.
NOTE:This feature increases safety by minimizing driver
distraction. When driver safety is on, a message
tells you when the lock is enabled.
SYSTEM
Select this setting to reset all other settings.
Selecting “Reset” will delete all saved places and
settings and restore the standard settings. This
includes the language, voice settings, warning
settings, and theme.
NOTE:This is not a software update and will not affect the
version of the software application installed on
your Uconnect system.
Points Of Interest
ABOUT POINTS OF INTEREST
Points Of Interest (POI) are useful places on the
map.
Here are some examples:
Restaurants
Hotels
Museums
Parking lots
Gas stations
Emergency Services
USING POIS TO PLAN A ROUTE
When you plan a route, you can use a POI for the
destination or as a stop along the route. Using Search
1. Select “Search” on the Main Menu to begin a
search. The search screen will open,
displaying the keyboard. Enter the name of
your desired destination. Your search results
will be displayed in two lists. Addresses and
city matches are shown in the list called
“Addresses.” POIs, types of POIs, and Places
are shown in the list called “Points of
Interest.” You can also select a POI category
to only see POI search results from that
category.
2. Select the desired POI. The location will appear on the map. From here, you can save the POI
to “My Places,” use this POI as a starting point,
begin navigation to this destination, or view
more details about this POI. By pressing “More
Information,” you can view the phone number
and full address of the POI.
3. If a route is already planned, you can add the location to your current route. To plan a route
to this destination, press the Drive button on
the touchscreen.
NOTE:Your Navigation system will calculate a route, and
guidance to your destination will begin. Guidance
View will begin as soon as you start driving.
5
22_VM_OM_EN_USC_t.book Page 125
Page 129 of 260
MULTIMEDIA127
Adding A Location Using Search
1. In the Main Menu, press “Search”.
2. Enter the name or address of a location using the touchscreen keyboard.
3. Select the desired location, and then press “Show In Map”.
4. The Map View will show the location. Press the pop-up menu button.
5. Press “Add to My Places”.
6. The name of the location will appear in the edit screen. You can edit the name of the location
for easy recognition.
7. Press “Done” to save your location in the My Places list.
Setting Your Home Location
1. In the Main Menu, press “My Places”.
2. Press “Home” .
3. To select a location for home, do one of the following:
Zoom in on the map at the location you want
to select. Press and hold to select the loca -
tion, then press the home icon next to the
name of the location.
You can also search for a location using the
search function. Select “Set Home Loca -
tion.”
DELETING A LOCATION FROM MY PLACES
Deleting A Recent Destination From My Places
1. In the main menu, select “My Places”.
2. Press “Recent Destinations”.
3. Press “Edit List”.
4. Select the destination(s) you want to delete.
5. Press the Delete button.
Deleting A Location From My Places
1. In the main menu, select “My Places”.
2. Press “Edit List”.
3. Select the destination(s) you want to delete.
4. Press the Delete button.
Getting Help
Press the Help button in the Main menu or from
the Settings menu to see the following information:
About : Press this button to view information about
your Uconnect system. This information includes:
Serial number
Application version
Installed maps
Legal information, such as Copyright and
Licenses for EULA and Open Source
Important Safety Notices And Warnings
GLOBAL POSITIONING SYSTEM
The Global Positioning System (GPS) is a
satellite-based system that provides location and
timing information around the globe. GPS is
operated and controlled under the sole
responsibility of the Government of the United
States of America, which is responsible for its
availability and accuracy. Any changes in GPS
availability and accuracy, or in environmental
conditions, may impact the operation of this
Navigation system. TomTom® does not accept any
liability for the availability and accuracy of GPS.
USE WITH CARE
Use of TomTom® navigation while driving still
means that you need to drive with due care and
attention.
SAFETY SETTINGS
We recommend using the safety settings to make
your driving as safe as possible. These are some of
the options included in the safety settings:
Show safety reminders
Warn when driving faster than allowed
You can also drive more safely by using voice
commands to control navigation Ú page 123.
5
22_VM_OM_EN_USC_t.book Page 127
Page 131 of 260
MULTIMEDIA129
MEDIA MODE
Pushing the top of the switch once goes to the next
track on the selected media (USB/Bluetooth®).
Pushing the bottom of the switch once goes to the
beginning of the current track, or to the beginning
of the previous track if it is within eight seconds
after the current track begins to play.
RAM TELEMATICS - IF EQUIPPED
Ram Telematics is designed to help improve
safety, efficiency, and productivity. It gives you
complete visibility of your fleet options, whether
from behind a desk or on a mobile device while you
are on the go. You can log-in to view near real-time
and historical activity, including location, vehicle
health, and driver performance. Activating Ram Telematics In Your Vehicles
Before you get started you will need:
The Vehicle Identification Number (VIN) of each
vehicle you want to activate.
Your main user’s username and password; new
customers will be asked to register.
If you are a new customer, you will need
company credit card information or invoice
number as further proof of customer identifica
-
tion. Don’t worry, you will not be charged.
Go to activate.verizonconnect.com/ram/
#login. If you are an existing Verizon Connect
customer, enter your company’s log in creden -
tials. New customers will need to register to
create a new account.
Manually enter the VIN or upload a CSV file with
your VIN. A vehicle name is optional and can be
added later. Follow online instructions to
complete your vehicle entry.
Create a password and enter billing information.
An email will be sent to you to complete the final
step. After that, you will be ready to log-in and
access Verizon Connect Fleet!
You are good to go! You will receive an email
confirming your vehicles are now online.
For more information, or to learn more, visit
www.verizonconnect.com/ram/.
RAM TELEMATICS GENERAL
I
NFORMATION
Modification Statement
Marelli has not approved any changes or
modifications to this device by the user. Any
changes or modifications could void the user’s
authority to operate the equipment.
Marelli n'approuve aucune modification apportée
à l'appareil par l'utilisateur, quelle qu'en soit la
nature. Tout changement ou modification peuvent
annuler le droit d'utilisation de l'appareil par
l'utilisateur.5
22_VM_OM_EN_USC_t.book Page 129
Page 135 of 260
SAFETY133
ESC Activation/Malfunction Indicator Light
And ESC OFF Indicator Light
The ESC Activation/Malfunction
Indicator Light in the instrument cluster
will come on when the ignition switch is
turned to the MAR (ON/RUN) position for
four seconds. If the ESC Activation/Malfunction
Indicator Light comes on continuously with the
engine running, a malfunction has been detected
in the ESC system. If this light remains on after
several ignition cycles, and the vehicle has been driven several miles (km) at speeds greater than
30 mph (48 km/h), see an authorized dealer as
soon as possible to have the problem diagnosed
and corrected.
The ESC Activation/Malfunction Indicator Light
(located in the instrument cluster) starts to flash as
soon as the tires lose traction and the ESC system
becomes active. The ESC Activation/Malfunction
Indicator Light also flashes when TCS is active. If
the ESC Activation/Malfunction Indicator Light
begins to flash during acceleration, ease up on the
accelerator and apply as little throttle as possible.
Be sure to adapt your speed and driving to the
prevailing road conditions.
The ESC OFF Indicator Light indicates
the Electronic Stability Control (ESC) is
in a reduced mode.
NOTE:
The ESC Activation/Malfunction Indicator Light
and the ESC OFF Indicator Light come on
momentarily each time the ignition switch
placed in the ON position.
Each time the ignition is placed in the ON posi -
tion, the ESC system will be on even if it was
turned off previously.
Electronic Roll Mitigation (ERM)
ERM anticipates the potential for wheel lift by
monitoring the driver’s steering wheel input and
the speed of the vehicle. When ERM determines
that the rate of change of the steering wheel angle
and vehicle’s speed are sufficient to potentially
cause wheel lift, it then applies the appropriate
brake and may also reduce engine power to lessen
the chance that wheel lift will occur.
ERM can only reduce the chance of wheel lift
occurring during severe or evasive driving
maneuvers; it cannot prevent wheel lift due to
other factors, such as road conditions, leaving the
roadway, or striking objects or other vehicles.Vehicle modifications, or failure to properly
maintain your vehicle, may change the
handling characteristics of your vehicle, and
may negatively affect the performance of the
ESC system. Changes to the steering system,
suspension, braking system, tire type and size
or wheel size may adversely affect ESC perfor -
mance. Improperly inflated and unevenly worn
tires may also degrade ESC performance. Any
vehicle modification or poor vehicle mainte -
nance that reduces the effectiveness of the
ESC system can increase the risk of loss of
vehicle control, vehicle rollover, personal
injury and death.
WARNING!
WARNING!
Many factors, such as vehicle loading, road
conditions and driving conditions, influence the
chance that wheel lift or rollover may occur. ERM
cannot prevent all wheel lift or rollovers,
especially those that involve leaving the roadway
or striking objects or other vehicles. The
capabilities of an ERM-equipped vehicle must
never be exploited in a reckless or dangerous
manner which could jeopardize the user's safety
or the safety of others.
6
22_VM_OM_EN_USC_t.book Page 133
Page 140 of 260
138SAFETY
8. Do not lean against the door or window. If your vehicle has side air bags, and deployment
occurs, the side air bags will inflate forcefully
into the space between occupants and the
door and occupants could be injured.
9. If the air bag system in this vehicle needs to be modified to accommodate a disabled person,
see Úpage 242 for customer service contact
information.
SEAT BELT SYSTEMS
Buckle up even though you are an excellent driver,
even on short trips. Someone on the road may be
a poor driver and could cause a collision that
includes you. This can happen far away from home
or on your own street.
Research has shown that seat belts save lives, and
they can reduce the seriousness of injuries in a
collision. Some of the worst injuries happen when
people are thrown from the vehicle. Seat belts reduce
the possibility of ejection and the risk of injury caused
by striking the inside of the vehicle. Everyone in a
motor vehicle should be belted at all times.
Enhanced Seat Belt Use Reminder System
(BeltAlert)
Driver And Passenger BeltAlert — If Equipped
BeltAlert is a feature intended to remind
the driver and outboard front seat
passenger (if equipped with outboard
front passenger seat BeltAlert) to buckle
their seat belts. The BeltAlert feature is active
whenever the ignition switch is in the AVV/START
or MAR/RUN position.
Initial Indication
If the driver is unbuckled when the ignition switch is
first in the AVV/START or MAR/RUN position, a
chime will signal for a few seconds. If the driver or
outboard front seat passenger (if equipped with
outboard front passenger seat BeltAlert) is
unbuckled when the ignition switch is first in the
AVV/START or MAR/RUN position the Seat Belt
Reminder Light will turn on and remain on until both
outboard front seat belts are buckled. The outboard
front passenger seat BeltAlert is not active when an
outboard front passenger seat is unoccupied.
BeltAlert Warning Sequence
The BeltAlert warning sequence is activated when
the vehicle is moving above a specified vehicle
speed range and the driver or outboard front seat
passenger is unbuckled (if equipped with outboard
front passenger seat BeltAlert) (the outboard front
passenger seat BeltAlert is not active when the
outboard front passenger seat is unoccupied). The
BeltAlert warning sequence starts by blinking the
Seat Belt Reminder Light and sounding an
intermittent chime. Once the BeltAlert warning
sequence has completed, the Seat Belt Reminder
Light will remain on until the seat belts are
buckled. The BeltAlert warning sequence may
repeat based on vehicle speed until the driver and
occupied outboard front seat passenger seat belts
are buckled. The driver should instruct all
occupants to buckle their seat belts.
Change Of Status
If the driver or outboard front seat passenger (if
equipped with outboard front passenger seat
BeltAlert) unbuckles their seat belt while the
vehicle is traveling, the BeltAlert warning sequence
will begin until the seat belts are buckled again.WARNING!
Never place a rear-facing child restraint in
front of an air bag. A deploying passenger
front air bag can cause death or serious injury
to a child 12 years or younger, including a
child in a rear-facing child restraint.
Never install a rear-facing child restraint in the
front seat of a vehicle. Only use a rear-facing
child restraint in the rear seat. If the vehicle
does not have a rear seat, do not transport a
rear-facing child restraint in that vehicle.
22_VM_OM_EN_USC_t.book Page 138
Page 172 of 260

170SAFETY
(Continued)
Lights
Have someone observe the operation of brake
lights and exterior lights while you work the
controls. Check turn signal and high beam
indicator lights on the instrument panel.
Door Latches
Check for proper closing, latching, and locking.
Fluid Leaks
Check area under the vehicle after overnight
parking for fuel, coolant, oil, or other fluid leaks.
Also, if gasoline fumes are detected or if fuel or
brake fluid leaks are suspected, the cause should
be located and corrected immediately.
EXHAUST GAS
The best protection against carbon monoxide entry
into the vehicle body is a properly maintained
engine exhaust system.
Whenever a change is noticed in the sound of the
exhaust system, when exhaust fumes can be
detected inside the vehicle, or when the underside
or rear of the vehicle is damaged, have an
authorized dealer inspect the complete exhaust
system and adjacent body areas for broken,
damaged, deteriorated, or mispositioned parts.
Open seams or loose connections could permit
exhaust fumes to seep into the passenger
compartment. In addition, inspect the exhaust
system each time the vehicle is raised for
lubrication or oil change. Replace as required.
CARBON MONOXIDE WARNINGS
WARNING!
Exhaust gases can injure or kill. They contain
carbon monoxide (CO), which is colorless and
odorless. Breathing it can make you
unconscious and can eventually poison you. To
avoid breathing (CO), follow these safety tips:
Do not run the engine in a closed garage or in
confined areas any longer than needed to
move your vehicle in or out of the area.
If you are required to drive with the trunk/lift -
gate/rear doors open, make sure that all
windows are closed and the climate control
BLOWER switch is set at high speed. DO NOT
use the recirculation mode.
If it is necessary to sit in a parked vehicle with
the engine running, adjust your heating or
cooling controls to force outside air into the
vehicle. Set the blower at high speed.
WARNING!
WARNING!
Carbon monoxide (CO) in exhaust gases is
deadly. Follow the precautions below to prevent
carbon monoxide poisoning:
Do not inhale exhaust gases. They contain
carbon monoxide, a colorless and odorless
gas, which can kill. Never run the engine in a
closed area, such as a garage, and never sit in
a parked vehicle with the engine running for
an extended period. If the vehicle is stopped in
an open area with the engine running for more
than a short period, adjust the ventilation
system to force fresh, outside air into the
vehicle.
Guard against carbon monoxide with proper
maintenance. Have the exhaust system
inspected every time the vehicle is raised.
Have any abnormal conditions repaired
promptly. Until repaired, drive with all side
windows fully open.
22_VM_OM_EN_USC_t.book Page 170
Page 173 of 260
171
(Continued)
IN CASE OF EMERGENCY
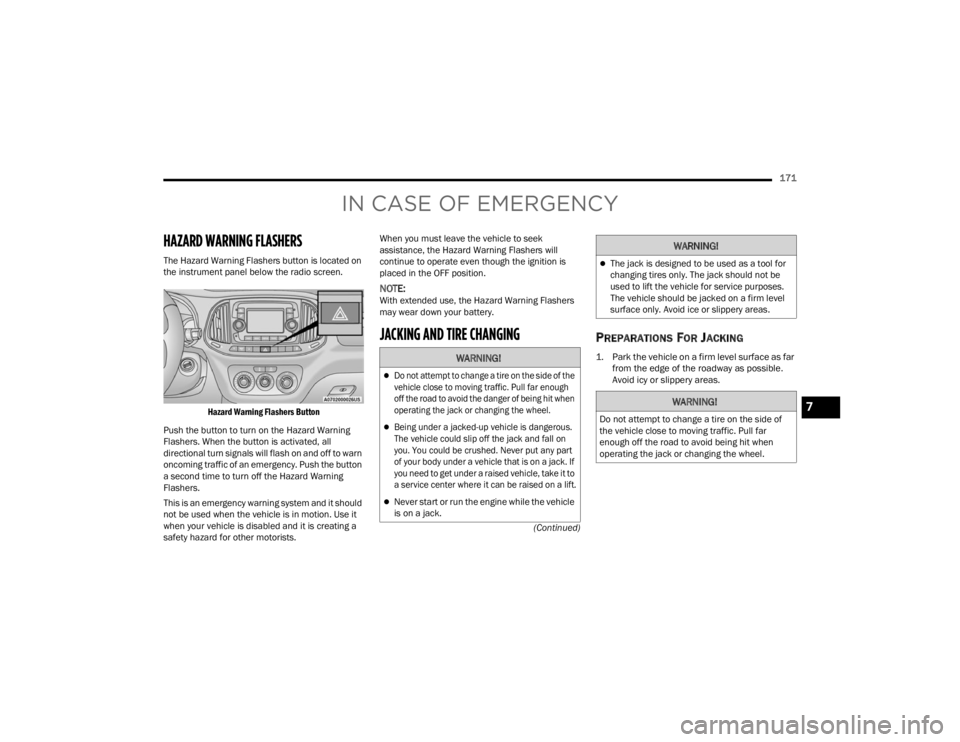
HAZARD WARNING FLASHERS
The Hazard Warning Flashers button is located on
the instrument panel below the radio screen.
Hazard Warning Flashers Button
Push the button to turn on the Hazard Warning
Flashers. When the button is activated, all
directional turn signals will flash on and off to warn
oncoming traffic of an emergency. Push the button
a second time to turn off the Hazard Warning
Flashers.
This is an emergency warning system and it should
not be used when the vehicle is in motion. Use it
when your vehicle is disabled and it is creating a
safety hazard for other motorists. When you must leave the vehicle to seek
assistance, the Hazard Warning Flashers will
continue to operate even though the ignition is
placed in the OFF position.
NOTE:With extended use, the Hazard Warning Flashers
may wear down your battery.
JACKING AND TIRE CHANGING PREPARATIONS FOR JACKING
1. Park the vehicle on a firm level surface as far
from the edge of the roadway as possible.
Avoid icy or slippery areas.
WARNING!
Do not attempt to change a tire on the side of the
vehicle close to moving traffic. Pull far enough
off the road to avoid the danger of being hit when
operating the jack or changing the wheel.
Being under a jacked-up vehicle is dangerous.
The vehicle could slip off the jack and fall on
you. You could be crushed. Never put any part
of your body under a vehicle that is on a jack. If
you need to get under a raised vehicle, take it to
a service center where it can be raised on a lift.
Never start or run the engine while the vehicle
is on a jack.
The jack is designed to be used as a tool for
changing tires only. The jack should not be
used to lift the vehicle for service purposes.
The vehicle should be jacked on a firm level
surface only. Avoid ice or slippery areas.
WARNING!
Do not attempt to change a tire on the side of
the vehicle close to moving traffic. Pull far
enough off the road to avoid being hit when
operating the jack or changing the wheel.
WARNING!
7
22_VM_OM_EN_USC_t.book Page 171
Page 191 of 260

189
SERVICING AND MAINTENANCE
SCHEDULED SERVICING
Your vehicle is equipped with an automatic oil
change indicator system. The oil change indicator
system will remind you that it is time to take your
vehicle in for scheduled maintenance.
Based on engine operation conditions, the oil
change indicator message will illuminate. This
means that service is required for your vehicle.
Operating conditions such as frequent short-trips,
trailer tow, extended engine idle time, extremely
hot or cold ambient temperatures will influence
when the “Oil Change Required” message is
displayed. Have your vehicle serviced as soon as
possible, within the next 500 miles (805 km).An authorized dealer will reset the oil change
indicator message after completing the scheduled
oil change. If a scheduled oil change is performed
by someone other than an authorized dealer, to
reset the message Ú
page 41.
NOTE:Under no circumstances should oil change
intervals exceed 10,000 miles (16,000 km), 350
hours of engine run time or 12 months, whichever
comes first. The 350 hours of engine run or idle
time is generally only a concern for fleet
customers. Once A Month Or Before A Long Trip:
Check engine oil level.
Check windshield washer fluid level.
Check tire pressure and look for unusual wear
or damage. Rotate tires at the first sign of irreg
-
ular wear, even if it occurs before the oil indi -
cator system turns on.
Check the fluid levels of the coolant reservoir
and brake master cylinder, fill as needed.
Check function of all interior and exterior lights.
8
22_VM_OM_EN_USC_t.book Page 189