2022 PEUGEOT LANDTREK driver seat adjustment
[x] Cancel search: driver seat adjustmentPage 28 of 164

26
Ease of use and comfort
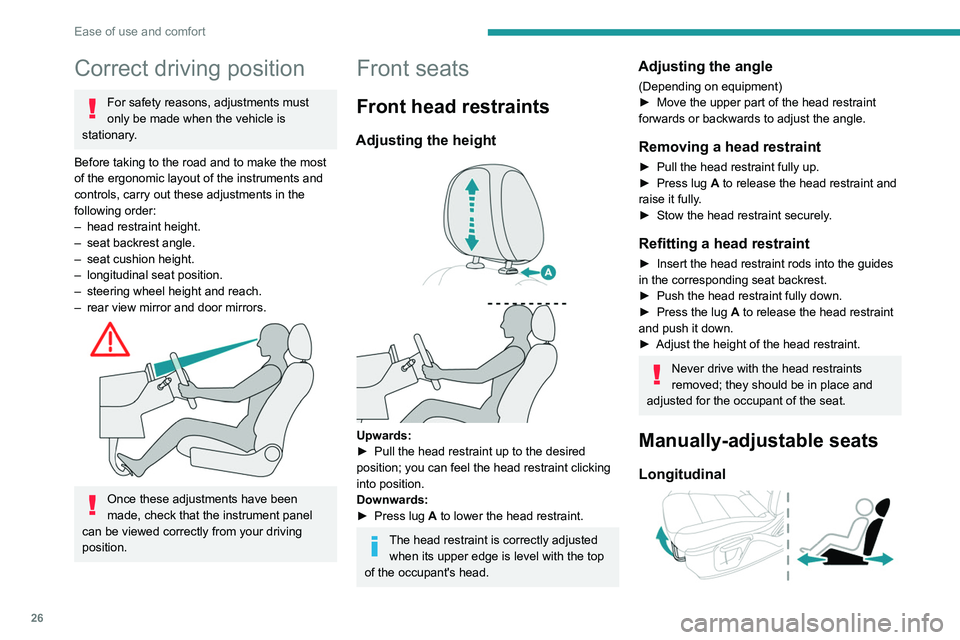
Correct driving position
For safety reasons, adjustments must
only be made when the vehicle is
stationary.
Before taking to the road and to make the most
of the ergonomic layout of the instruments and
controls, carry out these adjustments in the
following order:
–
head restraint height.
–
seat backrest angle.
–
seat cushion height.
–
longitudinal seat position.
–
steering wheel height and reach.
–
rear view mirror and door mirrors.
Once these adjustments have been
made, check that the instrument panel
can be viewed correctly from your driving
position.
Front seats
Front head restraints
Adjusting the height
Upwards:
► Pull the head restraint up to the desired
position; you can feel the head restraint clicking
into position.
Downwards:
►
Press lug
A to lower the head restraint.
The head restraint is correctly adjusted when its upper edge is level with the top
of the occupant's head.
Adjusting the angle
(Depending on equipment)
► Move the upper part of the head restraint
forwards or backwards to adjust the angle.
Removing a head restraint
► Pull the head restraint fully up.
► Press lug A to release the head restraint and
raise it fully.
►
Stow the head restraint securely
.
Refitting a head restraint
► Insert the head restraint rods into the guides
in the corresponding seat backrest.
►
Push the head restraint fully down.
►
Press the lug
A to release the head restraint
and push it down.
►
Adjust the height of the head restraint.
Never drive with the head restraints
removed; they should be in place and
adjusted for the occupant of the seat.
Manually-adjustable seats
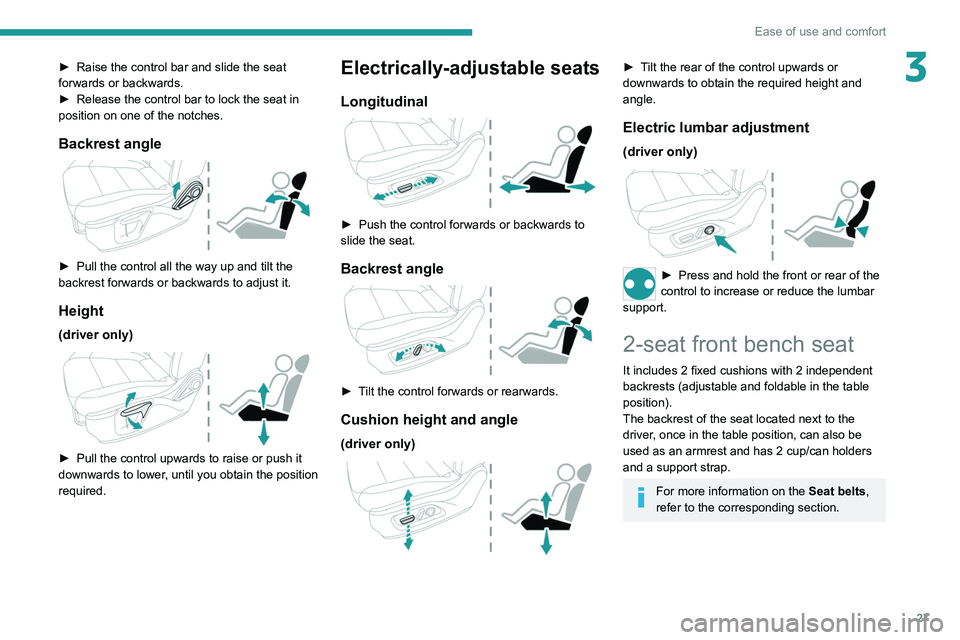
Longitudinal
► Raise the control bar and slide the seat
forwards or backwards.
► Release the control bar to lock the seat in
position on one of the notches.
Backrest angle
► Pull the control all the way up and tilt the
backrest forwards or backwards to adjust it.
Height
(driver only)
► Pull the control upwards to raise or push it
downwards to lower, until you obtain the position
required.
Page 29 of 164

27
Ease of use and comfort
3► Raise the control bar and slide the seat
forwards or backwards.
►
Release the control bar to lock the seat in
position on one of the notches.
Backrest angle
► Pull the control all the way up and tilt the
backrest forwards or backwards to adjust it.
Height
(driver only)
► Pull the control upwards to raise or push it
downwards to lower , until you obtain the position
required.
Electrically-adjustable seats
Longitudinal
► Push the control forwards or backwards to
slide the seat.
Backrest angle
► Tilt the control forwards or rearwards.
Cushion height and angle
(driver only)
► Tilt the rear of the control upwards or
downwards to obtain the required height and
angle.
Electric lumbar adjustment
(driver only)
► Press and hold the front or rear of the
control to increase or reduce the lumbar
support.
2-seat front bench seat
It includes 2 fixed cushions with 2 independent
backrests (adjustable and foldable in the table
position).
The backrest of the seat located next to the
driver, once in the table position, can also be
used as an armrest and has 2 cup/can holders
and a support strap.
For more information on the Seat belts,
refer to the corresponding section.
Page 56 of 164

54
Safety
1 minute, the warning lamp(s) remain(s) on
until the driver or passenger(s) (depending on
version) fasten(s) their seat belt(s).
Advice
The driver must ensure that passengers use the seat belts correctly and that they
are all fastened before setting off.
Wherever seated in the vehicle, you must
always fasten the seat belt, even for short
journeys.
Do not invert the seat belt buckles, as they
will not fulfil their role properly.
To ensure the proper functioning of the belt
buckles, make sure that there are no foreign
bodies present (e.g. a coin) before fastening.
Before and after use, ensure that the seat belt
is reeled in correctly.
After folding or moving a seat or rear bench
seat, ensure that the seat belt is positioned
and reeled in correctly.
Installation
The lower part of the strap must be
positioned as low as possible over the pelvis.
The upper part must be positioned in the
hollow of the shoulder.
At the front, adjusting the position of the
seat belt may require the seat height to be
adjusted.
In order to be effective, a seat belt must:
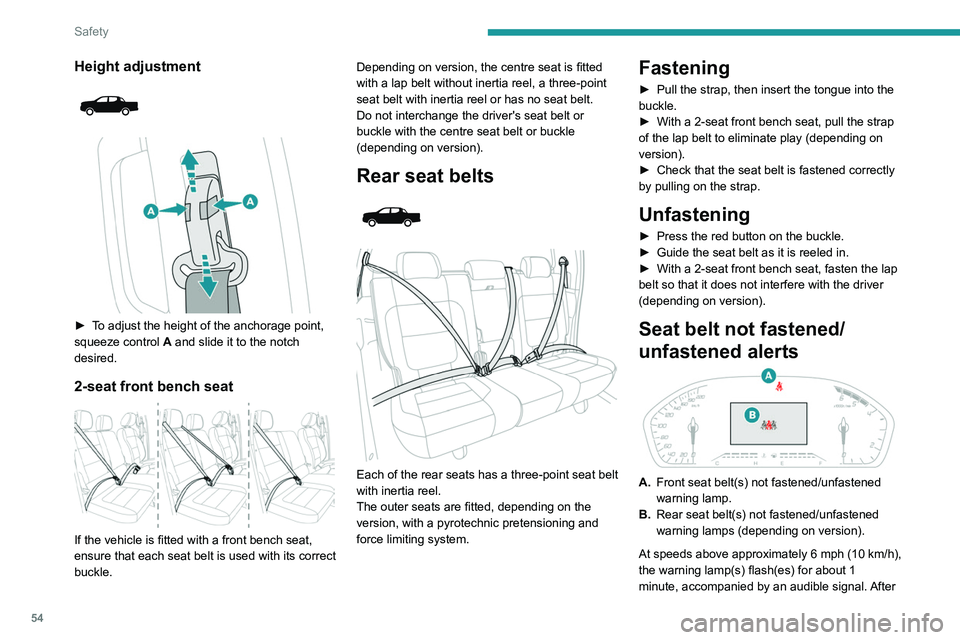
Height adjustment
► To adjust the height of the anchorage point,
squeeze control A and slide it to the notch
desired.
2-seat front bench seat
If the vehicle is fitted with a front bench seat,
ensure that each seat belt is used with its correct
buckle. Depending on version, the centre seat is fitted
with a lap belt without inertia reel, a three-point
seat belt with inertia reel or has no seat belt.
Do not interchange the driver's seat belt or
buckle with the centre seat belt or buckle
(depending on version).
Rear seat belts
Each of the rear seats has a three-point seat belt
with inertia reel.
The outer seats are fitted, depending on the
version, with a pyrotechnic pretensioning and
force limiting system.
Fastening
► Pull the strap, then insert the tongue into the
buckle.
►
With a 2-seat front bench seat, pull the strap
of the lap belt to eliminate play (depending on
version).
►
Check that the seat belt is fastened correctly
by pulling on the strap.
Unfastening
► Press the red button on the buckle.
► Guide the seat belt as it is reeled in.
►
With a 2-seat front bench seat, fasten the lap
belt so that it does not interfere with the driver
(depending on version).
Seat belt not fastened/
unfastened alerts
A. Front seat belt(s) not fastened/unfastened
warning lamp.
B. Rear seat belt(s) not fastened/unfastened
warning lamps (depending on version).
At speeds above approximately 6 mph (10
km/h),
the warning lamp(s) flash(es) for about 1
minute, accompanied by an audible signal. After
Page 147 of 164

145
Alphabetical index
Settings, equipment 13–15
Sidelamps
44–45, 112, 115
Snow chains
90
Socket, 12 V accessory
37, 41
Speed limiter
77–78
Speedometer
7, 77
Sport mode
73
Stability control (ESC)
50–51
Starting a Diesel engine
89
Starting the engine
64
Starting the vehicle
64–66
Starting using another battery
67, 117
Station, radio
128, 133
Stay, bonnet
91–92
Steering mounted controls, audio
128, 131
Steering wheel
96
Steering wheel, adjustment
28
Stickers, customising ~ Stickers,
expressive
104
Stopping the vehicle
64–66
Storage
37–41
Storage boxes
40
Storage compartments
37
Stowing rings
40
Sunshine sensor
32
Suspension
97
Switching off the engine
64
Synchronising the remote control
21T
Tables of engines 123–124
Tailgate
22
Tank, fuel
89
Technical data
123–124
Telephone
129–130, 135
Temperature, coolant
11
Ticket holder
37
Time (setting)
13, 137
Tipper truck fittings
40
Tipper truck lighting
42
Tools
107–108, 108–109
Top Tether (fixing)
60
Total distance recorder
12
Touch screen
14
Towbar
51, 90
Towed loads
122
Towing another vehicle
120–121
Traction control (ASR)
50–51
Trailer
51, 90
Trailer stability assist (TSA)
51
Trajectory control systems
50
Triangle, warning
106
Trip computer
12–13
Trip distance recorder
12
Tyres
96, 126
Tyre under-inflation detection
74
U
Under-inflation (detection) 74
Unlocking
16–18
Unlocking from the inside
19
Unlocking the doors
19
Updating the time
137
USB
129, 133–135
V
Vehicle data recording and privacy 138
Ventilation
32–34
Visibility
36
W
Warning and indicator lamps 8
Warning lamp, driver's
seat belt not fastened
54
Warning lamps
8
Warning lamp, seat belts
54
Warnings and indicators
8
Washing
77
Washing (advice)
103–104
Weights
122
Wheel, spare
96, 107–109
Windscreen wipers
46, 48
Wiper blades (changing)
47
Wipers
46, 48