2022 PEUGEOT LANDTREK sensor
[x] Cancel search: sensorPage 87 of 164
85
Driving
6displayed on the front and rear contextual views
and the view from above.
The parking sensors supplement the information
on the view from above the vehicle.
Different contextual views can be displayed in
the left-hand part:
–
front view
,
–
rear view
,
–
right-hand mirror view
,
–
left-hand mirror view
,
–
"Split" front view
,
–
auto zoom view
,
–
3-dimensional view
.
When the cameras are activated, a
symbol appears at the top of the
contextual view to indicate their positions on
the vehicle and the displayed area.
Opening the front doors or the tailgate, or
folding the mirrors may disturb the
display.
By default, 2D views mode is activated.
In this mode, the system chooses the best view
to display (standard or zoom) according to the
information transmitted by the parking sensors.
You can change the display mode at any time
during the manoeuvre:
–
"2D views",
–
"3D views".
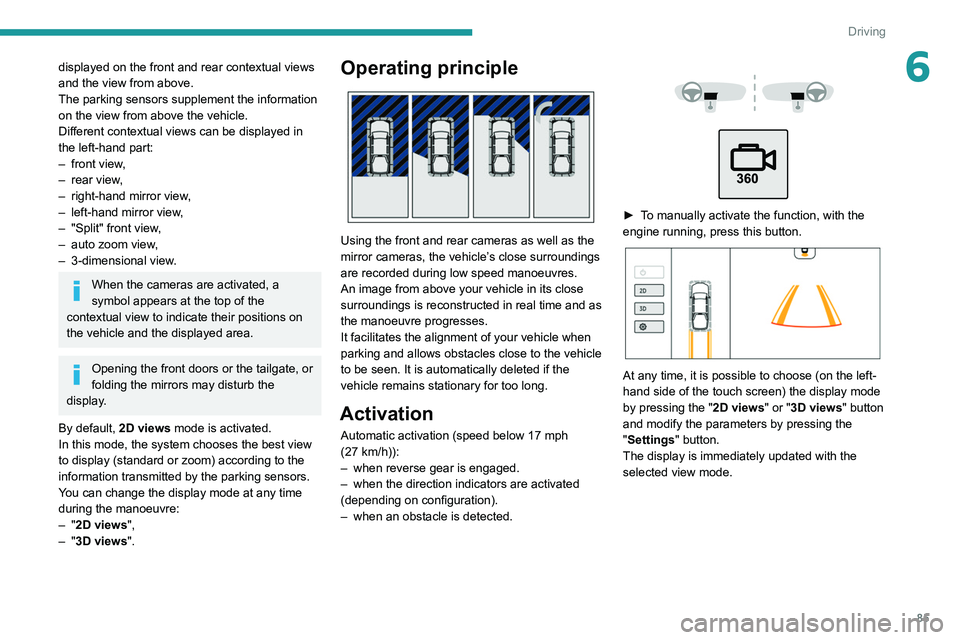
Operating principle
Using the front and rear cameras as well as the
mirror cameras, the vehicle’s close surroundings
are recorded during low speed manoeuvres.
An image from above your vehicle in its close
surroundings is reconstructed in real time and as
the manoeuvre progresses.
It facilitates the alignment of your vehicle when
parking and allows obstacles close to the vehicle
to be seen. It is automatically deleted if the
vehicle remains stationary for too long.
Activation
Automatic activation (speed below 17 mph
(27 km/h)):
–
when reverse gear is engaged.
–
when the direction indicators are activated
(depending on configuration).
–
when an obstacle is detected.
► To manually activate the function, with the
engine running, press this button.
At any time, it is possible to choose (on the left-
hand side of the touch screen) the display mode
by pressing the " 2D views" or "3D views" button
and modify the parameters by pressing the
"Settings" button.
The display is immediately updated with the
selected view mode.
Page 88 of 164
86
Driving
You can switch to panoramic view for 2D mode
by pressing on the main view or on the symbol at
the top of the main view (the view from above on
the left will disappear).
Press again on the main view or on the symbol
to return to the current display.
Settings
For each mode (2D or 3D), it is possible to
deactivate/activate the following functions:
–
T
rajectory and guiding lines (outline).
–
Automatic views via detection by the parking
sensors.
–
Door mirror views by activating the direction
indicators.
The system status is not saved when the ignition
is switched off.
The function will be deactivated: – Above about 19 mph (30 km/h).
–
When changing out of reverse gear
.
–
By pressing the function activation button
again.
–
Without any action from the driver for
approximately 1 minute.
– By pressing the " Switch off" button in the
upper-left corner of the touch screen.
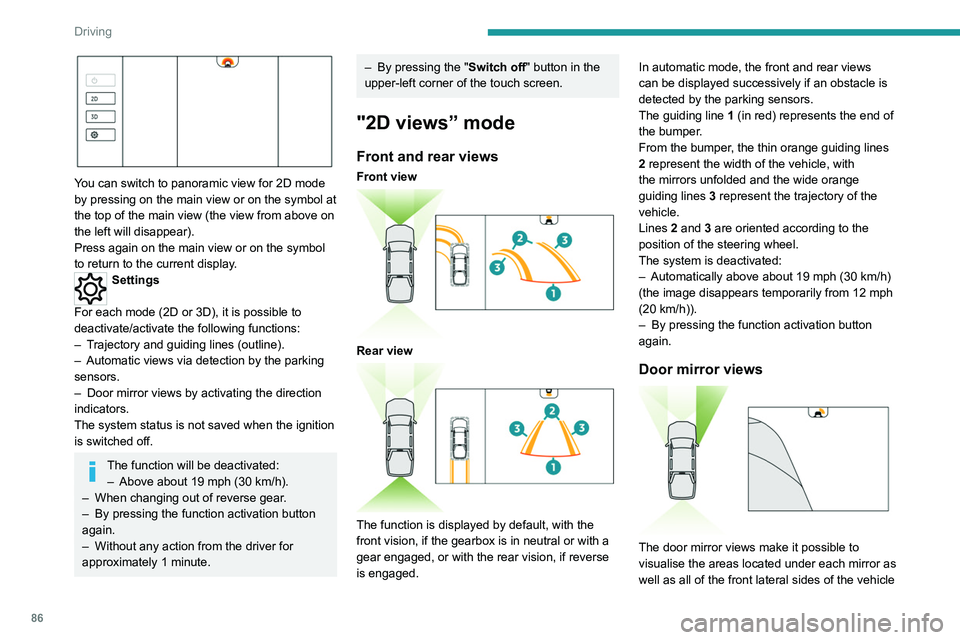
"2D views” mode
Front and rear views
Front view
Rear view
The function is displayed by default, with the
front vision, if the gearbox is in neutral or with a
gear engaged, or with the rear vision, if reverse
is engaged. In automatic mode, the front and rear views
can be displayed successively if an obstacle is
detected by the parking sensors.
The guiding line
1 (in red) represents the end of
the bumper.
From the bumper, the thin orange guiding lines
2 represent the width of the vehicle, with
the mirrors unfolded and the wide orange
guiding lines
3 represent the trajectory of the
vehicle.
Lines 2 and 3 are oriented according to the
position of the steering wheel.
The system is deactivated:
–
Automatically above about 19 mph (30
km/h)
(the image disappears temporarily from 12 mph
(20 km/h)).
–
By pressing the function activation button
again.
Door mirror views
The door mirror views make it possible to
visualise the areas located under each mirror as
well as all of the front lateral sides of the vehicle
in order to manoeuvre the vehicle with the
surrounding obstacles.
This view is not recommended for carrying out a
complete manoeuvre.
This view is automatically available via detection
by the parking sensors or by selecting the
direction indicators (the view of the side
concerned is displayed).
“Split” front view
The "Split" front view allows the two views of the
door mirrors to be displayed simultaneously. For
more information on the Door mirror view, refer
to the corresponding section.
The views appear in the touch screen on the left-
hand side and right-hand side respectively.
This view is particularly suitable for driving
situations in narrow or rough passages.
This view is available by pressing the button for
the view from above the vehicle (located on the
left-hand side).
Page 89 of 164
87
Driving
6in order to manoeuvre the vehicle with the
surrounding obstacles.
This view is not recommended for carrying out a
complete manoeuvre.
This view is automatically available via detection
by the parking sensors or by selecting the
direction indicators (the view of the side
concerned is displayed).
“Split” front view
The "Split" front view allows the two views of the
door mirrors to be displayed simultaneously. For
more information on the Door mirror view, refer
to the corresponding section.
The views appear in the touch screen on the left-
hand side and right-hand side respectively.
This view is particularly suitable for driving
situations in narrow or rough passages.
This view is available by pressing the button for
the view from above the vehicle (located on the
left-hand side).
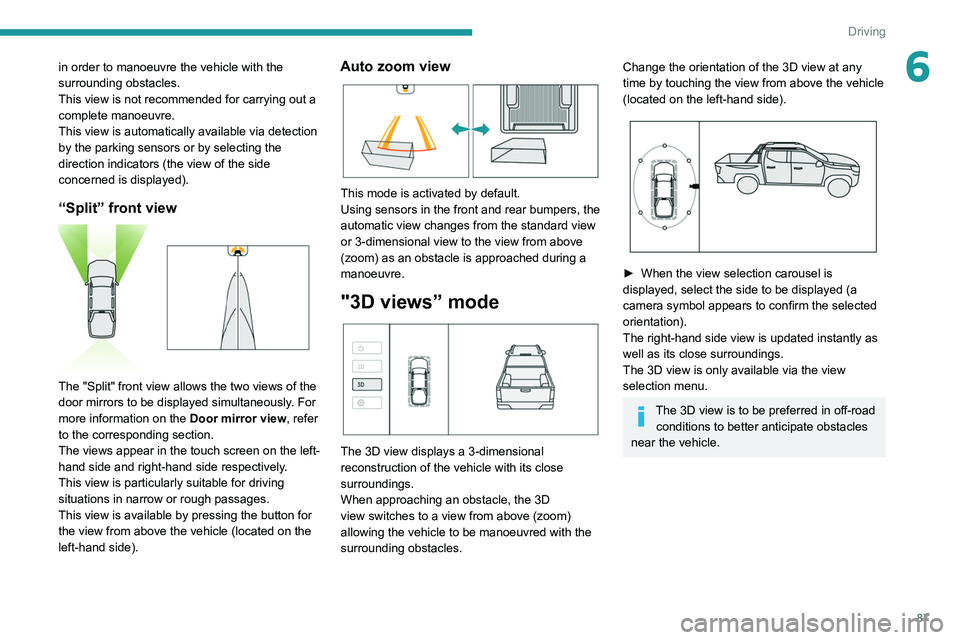
Auto zoom view
This mode is activated by default.
Using sensors in the front and rear bumpers, the
automatic view changes from the standard view
or 3-dimensional view to the view from above
(zoom) as an obstacle is approached during a
manoeuvre.
"3D views” mode
The 3D view displays a 3-dimensional
reconstruction of the vehicle with its close
surroundings.
When approaching an obstacle, the 3D
view switches to a view from above (zoom)
allowing the vehicle to be manoeuvred with the
surrounding obstacles.
Change the orientation of the 3D view at any
time by touching the view from above the vehicle
(located on the left-hand side).
► When the view selection carousel is
displayed, select the side to be displayed (a
camera symbol appears to confirm the selected
orientation).
The right-hand side view is updated instantly as
well as its close surroundings.
The 3D view is only available via the view
selection menu.
The 3D view is to be preferred in off-road conditions to better anticipate obstacles
near the vehicle.
Page 105 of 164
103
Practical information
7of the throttle body against any projection of
liquid (oil, water, detergent or solvent).
►
Remove grease and carbon deposits from
the surface of the main duct with a specific
"carburettor" type cleaner
.
►
Rotate the throttle valve inside the duct to
clean the seats on each side.
►
Wipe and dry the throttle body with a soft,
lint-free cloth.
If no cleaning has been done for a long
time, deposits may be difficult to remove.
Clean and wipe the throttle body
several
times with a soft, lint-free cloth.
Never immerse the throttle body in a
cleaning liquid or in an ultrasonic tank.
Never use:
–
detergents containing methyl ketone or
other highly corrosive substances as well as
household cleaning detergent;
–
cleaning products directly on the throttle
bearings as well as on the body's connector;
–
hard, sharp or abrasive tools to remove
difficult deposits. Use a soft cloth with a
suitable detergent.
Refitting the throttle body
Before refitting the throttle body, check
the condition of the seal. If it is damaged,
replace it with a new one. ►
Install the seal on the intake manifold and fit
the throttle body
B, making sure that the seal
does not fall.
For reassembly, carry out the operations in the
reverse order to those for removal. Tighten the
screws to the correct tightening torque.
Free-wheeling
In certain situations, you must allow the vehicle
to free-wheel (while being towed, on a rolling
road, in an automatic car wash, or being
transported by rail or sea freight, etc.).
The procedure differs depending on the type of
gearbox and transmission.
/
To release them
► With the vehicle stationary and the engine
running, depress the brake pedal and release
the parking brake.
►
With a manual gearbox, move the gear lever
into neutral.
►
With an automatic gearbox, select position N
.
►
For 4-wheel drive vehicles (4x4), put the
transmission selector in 2H
mode.
►
Switch the ignition off.
Advice on care and maintenance
General recommendations
Observe the following recommendations to avoid
damaging the vehicle.
Exterior
Never use a high-pressure jet wash in
the engine compartment - risk of
damaging the electrical components!
Do not wash the vehicle in bright sunshine or
extremely cold conditions.
When washing the vehicle in an
automatic roller-brush car wash, be sure
to lock the doors and, depending on version,
move the electronic key away.
When using a high-pressure washer, keep
the jet nozzle at a minimum distance of 30
cm from the vehicle (particularly on any stone
chip impacts, sensors or seals).
Promptly clean up any stains containing
chemicals liable to damage the vehicle's
paintwork (including tree resin, bird
droppings, insect secretions, pollen and tar).
Depending on the environment, clean the
vehicle frequently to remove salty deposits
(in coastal areas), soot (in industrial areas)
and mud/salts (in wet or cold areas). These
substances can be highly corrosive.
Page 140 of 164
138
Event data recorders
Event data recorders
Electronic control units are installed in your
vehicle. Control units process data which is
received by vehicle sensors, for example, or
which they generate themselves or exchange
amongst themselves. Some control units are
necessary for the safe functioning of your
vehicle, others assist you while you drive (driver
assistance systems), while others provide
comfort or infotainment functions.
The following contains general information about
data processing in the vehicle. You will find
additional information as to which specific data is
uploaded, stored and passed on to third parties
and for what purpose in your vehicle under
the key word Data Protection closely linked
to the references for the affected functional
characteristics in the relevant owner's manual
or in the general terms of sale. These are also
available online.
Operating data in the
vehicle
Control units process data for operation of the
vehicle.
This data includes, for example:
–
vehicle status information (e.g. speed,
movement delay
, lateral acceleration, wheel
rotation rate, "seat belts fastened" display)
–
ambient conditions (e.g. temperature, rain
sensor
, distance sensor)
As a rule such data is transient and is not stored
for longer than an operational cycle, and only
processed on board the vehicle itself. Often
control units include data storage (including the
vehicle key). This is used to allow information
to be documented temporarily or permanently
on vehicle condition, component stress,
maintenance requirements and technical events
and errors.
Depending on technical equipment levels, the
data stored is as follows:
–
system component operating states (e.g. fill
level, tyre pressure, battery status)
–
faults and defects in important system
components (e.g. lights, brakes)
–
system reactions in special driving situations
(e.g. triggering of an airbag, actuation of the
stability control systems)
–
information on events damaging the vehicle
–
for electric vehicles the amount of charge in
the high-voltage battery
, estimated range In special cases (e.g. if the vehicle has detected
a malfunction), it may be necessary to save data
that would otherwise just be volatile.
When you use services (e.g. repairs,
maintenance), the operating data saved can
be read together with the vehicle identification
number and used where necessary. Staff
working for the service network (e.g. garages,
manufacturers) or third parties (e.g. breakdown
services) can read the data from the vehicle.
The same applies to warranty work and quality
assurance measures.
Data is generally read via the OBD (On-Board
Diagnostics) port prescribed by law in the
vehicle. The operating data read documents the
technical condition of the vehicle or individual
components and assists with fault diagnosis,
compliance with warranty obligations and quality
improvement. This data, in particular information
on component stress, technical events, operator
errors and other faults, is transmitted to the
manufacturer where appropriate, together
with the vehicle identification number. The
manufacturer is also subject to product liability.
The manufacturer potentially also uses operating
data from vehicles for product recalls. This data
can also be used to check customer warranty
and guarantee claims.
Fault memories in the vehicle can be reset by a
service company when carrying out servicing or
repairs or at your request.
Comfort and infotainment
functions
Comfort settings and custom settings can be
stored in the vehicle and changed or reset at any
time.
Depending on the equipment level in question,
these include
–
seat and steering wheel position settings
– chassis and air conditioning settings
– custom settings such as interior lighting
You can input your own data in the infotainment
functions for your vehicle as part of the selected
features.
Depending on the equipment level in question,
these include
– multimedia data such as music, videos or
photos for playback in an integrated multimedia
system
– address book data for use with an integrated
hands-free system or an integrated navigation
system
– input destinations
– data on the use of online services
This data for comfort and infotainment functions
can be stored locally in the vehicle or be kept on
a device that you have connected to the vehicle
(e.g. a smartphone, USB stick or MP3 player).
Data that you have input yourself can be deleted
at any time.
This data can only be transmitted out of the
vehicle at your request, particularly when using
Page 146 of 164
144
Alphabetical index
N
Normal mode 73
O
Obstacle detection 81
Off-road camera
83
Oil change
93, 101
Oil consumption
93
OIl, engine
93, 101
On-board tools
107–108
Opening the bonnet
91
Opening the boot
18
Opening the doors
18, 22
Opening the windows
16
Over-speed buzzer
78
P
Pads, brake 96
Paint
104, 125
Paint colour code
125
Parking brake
68, 96
Parking sensors, audible and visual
81
Parking sensors, front
82
Parking sensors, rear
82
Plates, identification
125
Player, Apple®
129
Player, USB
129, 133–134
Port, USB 37, 129, 133–135
Pressures, tyres
96, 126
Pre-tensioning seat belts
55
Priming pump
107
Priming the fuel system
107
Protecting children
56, 58–60
Puncture
108
R
Radio 128, 133
Reading lamps
39
Rear differential locking
68
Rear screen, demisting
36
Recharging the battery
118–119
Recirculation, air
35
Recovery
119–121
Recovery of the vehicle
119
Regeneration of the particle filter
95
Reinitialisation of the under-inflation
detection system
75
Reinitialising the remote control
21
Reminder, key in ignition
66
Reminder, lighting on
44
Remote control
16–20
Removing a wheel
109, 111
Removing the mat
38
Replacing bulbs
112, 115
Replacing fuses
11 6
Replacing the air filter
95, 100
Replacing the battery
99
Replacing the Diesel filter 102
Replacing the oil filter
95, 101
Replacing the passenger
compartment filter
95, 99
Reservoir, screenwash
95
Reset trip
12
Rev counter
7
Reversing camera
76, 83
Reversing lamps
11 5
Roof bars
91
Running out of fuel (Diesel)
107
S
Safety, children 56, 58–60
Saturation of the particle filter (Diesel)
95
Screen, monochrome
13
Screenwash
47
Screenwash, front
47
Seat angle
27
Seat belts
53–55
Seat belts, rear
54
Seat, bench front, 2-seat
27–28, 54
Seat, rear bench
30–31
Seats, electric
27
Seats, front
26–27
Seats, rear
30, 58
Selector, gear
71
Sensors (warnings)
76
Serial number, vehicle
125
Servicing
95, 97
Page 147 of 164
145
Alphabetical index
Settings, equipment 13–15
Sidelamps
44–45, 112, 115
Snow chains
90
Socket, 12 V accessory
37, 41
Speed limiter
77–78
Speedometer
7, 77
Sport mode
73
Stability control (ESC)
50–51
Starting a Diesel engine
89
Starting the engine
64
Starting the vehicle
64–66
Starting using another battery
67, 117
Station, radio
128, 133
Stay, bonnet
91–92
Steering mounted controls, audio
128, 131
Steering wheel
96
Steering wheel, adjustment
28
Stickers, customising ~ Stickers,
expressive
104
Stopping the vehicle
64–66
Storage
37–41
Storage boxes
40
Storage compartments
37
Stowing rings
40
Sunshine sensor
32
Suspension
97
Switching off the engine
64
Synchronising the remote control
21T
Tables of engines 123–124
Tailgate
22
Tank, fuel
89
Technical data
123–124
Telephone
129–130, 135
Temperature, coolant
11
Ticket holder
37
Time (setting)
13, 137
Tipper truck fittings
40
Tipper truck lighting
42
Tools
107–108, 108–109
Top Tether (fixing)
60
Total distance recorder
12
Touch screen
14
Towbar
51, 90
Towed loads
122
Towing another vehicle
120–121
Traction control (ASR)
50–51
Trailer
51, 90
Trailer stability assist (TSA)
51
Trajectory control systems
50
Triangle, warning
106
Trip computer
12–13
Trip distance recorder
12
Tyres
96, 126
Tyre under-inflation detection
74
U
Under-inflation (detection) 74
Unlocking
16–18
Unlocking from the inside
19
Unlocking the doors
19
Updating the time
137
USB
129, 133–135
V
Vehicle data recording and privacy 138
Ventilation
32–34
Visibility
36
W
Warning and indicator lamps 8
Warning lamp, driver's
seat belt not fastened
54
Warning lamps
8
Warning lamp, seat belts
54
Warnings and indicators
8
Washing
77
Washing (advice)
103–104
Weights
122
Wheel, spare
96, 107–109
Windscreen wipers
46, 48
Wiper blades (changing)
47
Wipers
46, 48