2022 PEUGEOT LANDTREK sensor
[x] Cancel search: sensorPage 4 of 164

2
Contents
■
Overview
■
Eco-driving
1InstrumentsInstrument panels 7
Warning and indicator lamps 8
Total distance recorder 12
Lighting dimmer 12
Trip computer 12
Monochrome screen 13
Touch screen 14
2AccessElectronic key with remote control function and
built-in key, 16
Keyless Entry and Starting 18
Central locking 19
Back-up procedures 20
Doors 22
Tailgate 22
Alarm 23
Electric windows 24
3Ease of use and comfortFront seats 26
2-seat front bench seat 27
Steering wheel adjustment 28
Mirrors 29
Rear bench seat 30
Heating and Ventilation 32
Heating 33
Manual air conditioning 33
Dual-zone automatic air conditioning 34
Front demisting - defrosting 36
Rear screen demisting/defrosting 36
Front fittings 36
Courtesy lamps 38
Rear fittings 39
Tipper body fittings 40
4Lighting and visibilityLighting control stalk 43
Cornering lighting 44
Direction indicators 45
Headlamp beam height adjustment 45
Automatic illumination of headlamps 45
Guide-me-home and welcome lighting 46
Wiper control stalk 46
Changing a wiper blade 47
Automatic wipers 48
5SafetyGeneral safety recommendations 49
Hazard warning lamps 49
Horn 50
Electronic stability control (ESC) 50
Hill Assist Descent Control 52
Seat belts 53
Airbags 55
Child seats 58
Deactivating the front passenger airbag 59
ISOFIX child seats 60
Child lock 61
6DrivingDriving recommendations 62
Starting / Switching off the engine with the key 64
Starting/Switching off the engine with
Keyless Entry and Starting
66
Manual parking brake 68
Locking the rear differential 68
4-wheel drive transmission selector 69
6-speed manual gearbox 70
6-speed automatic gearbox 71
Driving mode 73
Hill start assist 73
Gear shift indicator 74
Tyre under-inflation detection 74
Driving and manoeuvring aids - General
recommendations
76
Speed limiter 77
Overspeed alert at 75 mph (120
km/h) 78
Cruise control - Specific recommendations 78
Cruise control 78
Lane departure warning system 79
Parking sensors 81
Reversing camera 83
"Off Road" camera 83
360° camera 84
7Practical informationRecommended fuel 89
Refuelling 89
Towing device 90
Snow chains 90
Roof bars 91
Bonnet 91
Engine compartment 92
Checking levels 93
Page 7 of 164

5
Overview
B.Activate Cruise control
C. Decrease/Increase Speed limiter/Cruise
control speed setting
Memorising speeds function (SET) or
reactivation of the programmed speed
function (RES)
D. Voice recognition/Media
E. Activate Speed limiter
F. Select menus on the instrument panel and
validate
G. Decrease/Increase volume
H. Select the instrument panel display mode
and navigate in the menus
I. Access the Telephone menu
/Answer a call
Select next media
J. Access the Telephone menu/End a call
Select previous media
Side control bar
1.Door mirror controls 2.
Deactivate the Lane departure warning
system function
3. Headlamp beam height adjustment
4. Activate loading zone external lighting
(available only when stationary)
5. Deactivate parking sensors
Central control bar (lower and upper)
1.Rear differential locking
2. Hill Assist Descent Control
3. Deactivate the DSC/ASR system
4. Central locking
5. Central unlocking
6. Hazard warning lamps
7. Passenger airbag deactivation/activation
indicator lamp
8. Activate camera functions (360° Camera or
Off Road Camera)
9. Audio system on/off (long press)
Volume adjustment/Mute (short press)
Page 34 of 164
32
Ease of use and comfort
For more information on the Tool kit,
refer to the corresponding section.
Repositioning the seat
cushions
Before lowering the seat cushion to the
normal position, make sure that you take
the seat belt buckle and hold it during the
operation.
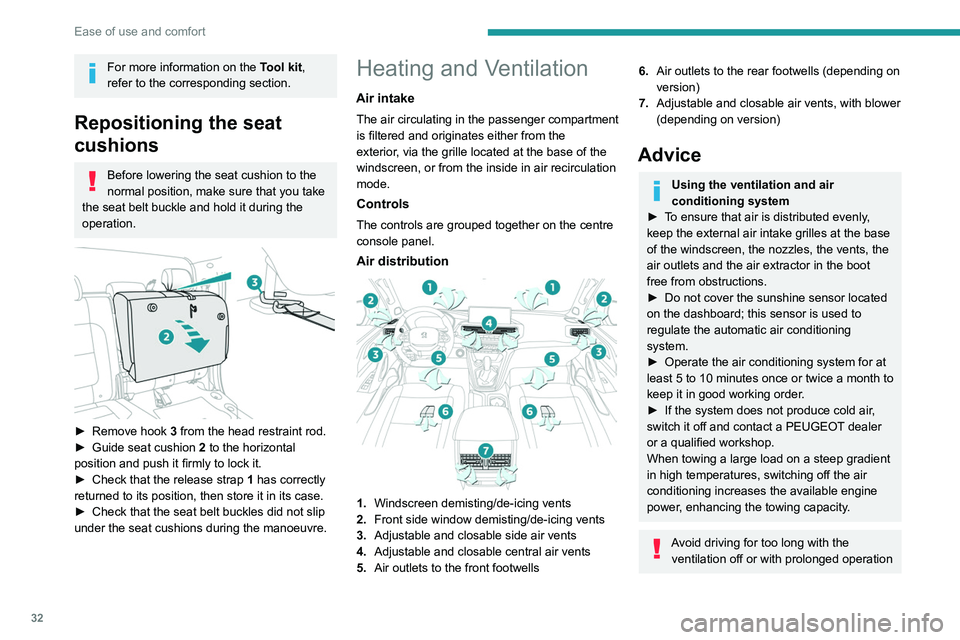
► Remove hook 3 from the head restraint rod.
► Guide seat cushion 2
to the horizontal
position and push it firmly to lock it.
►
Check that the release strap 1
has correctly
returned to its position, then store it in its case.
►
Check that the seat belt buckles did not slip
under the seat cushions during the manoeuvre.
Heating and Ventilation
Air intake
The air circulating in the passenger compartment
is filtered and originates either from the
exterior, via the grille located at the base of the
windscreen, or from the inside in air recirculation
mode.
Controls
The controls are grouped together on the centre
console panel.
Air distribution
1. Windscreen demisting/de-icing vents
2. Front side window demisting/de-icing vents
3. Adjustable and closable side air vents
4. Adjustable and closable central air vents
5. Air outlets to the front footwells
6.Air outlets to the rear footwells (depending on
version)
7. Adjustable and closable air vents, with blower
(depending on version)
Advice
Using the ventilation and air
conditioning system
►
T
o ensure that air is distributed evenly,
keep the external air intake grilles at the base
of the windscreen, the nozzles, the vents, the
air outlets and the air extractor in the boot
free from obstructions.
►
Do not cover the sunshine sensor located
on the dashboard; this sensor is used to
regulate the automatic air conditioning
system.
►
Operate the air conditioning system for at
least 5 to 10 minutes once or twice a month to
keep it in good working order
.
►
If the system does not produce cold air
,
switch it off and contact a PEUGEOT dealer
or a qualified workshop.
When towing a large load on a steep gradient
in high temperatures, switching off the air
conditioning increases the available engine
power, enhancing the towing capacity.
Avoid driving for too long with the ventilation off or with prolonged operation
Page 38 of 164
36
Ease of use and comfort
Front demisting
- defrosting
With heating or manual air
conditioning
► Adjust the temperature to maximum (red).
► Adjust the air flow to maximum.
► Press this button to activate the air
distribution to the "Windscreen" position;
its indicator lamp comes on.
►
Check that the recirculation of interior air is
deactivated; its indicator lamp must be off.
►
Depending on version, switch on the air
conditioning by pressing the " A/C
" button; its
indicator lamp comes on.
With automatic dual-zone
air conditioning
Automatic Visibility programme
This mode allows the windscreen and side
windows to be demisted or defrosted as quickly
as possible.
► Press this button to activate/deactivate
the mode (confirmed by the illumination/
extinction of the
indicator lamp).
The programme automatically manages the air
conditioning (depending on version), air flow
and air intake, and provides optimum distribution
towards the windscreen and side windows.
It is possible to manually change the air flow
without deactivating the automatic Visibility
programme.
In wintry conditions, before moving off, it
is essential to remove any snow or ice
from the windscreen around the sensor.
Otherwise, the operation of equipment which
uses the sensor may be affected.
Rear screen demisting/
defrosting
This demisting/de-icing only works with the engine running.
Depending on version, it also demists/de-ices
the door mirrors.
► Press this button to activate/deactivate
the function (confirmed by the indicator
lamp coming on/switching off).
Demisting/defrosting switches off automatically
to prevent an excessive consumption of
electrical current.
Switch off demisting/defrosting when
you no longer need it; reducing
electrical consumption in turn decreases
energy consumption.
Front fittings
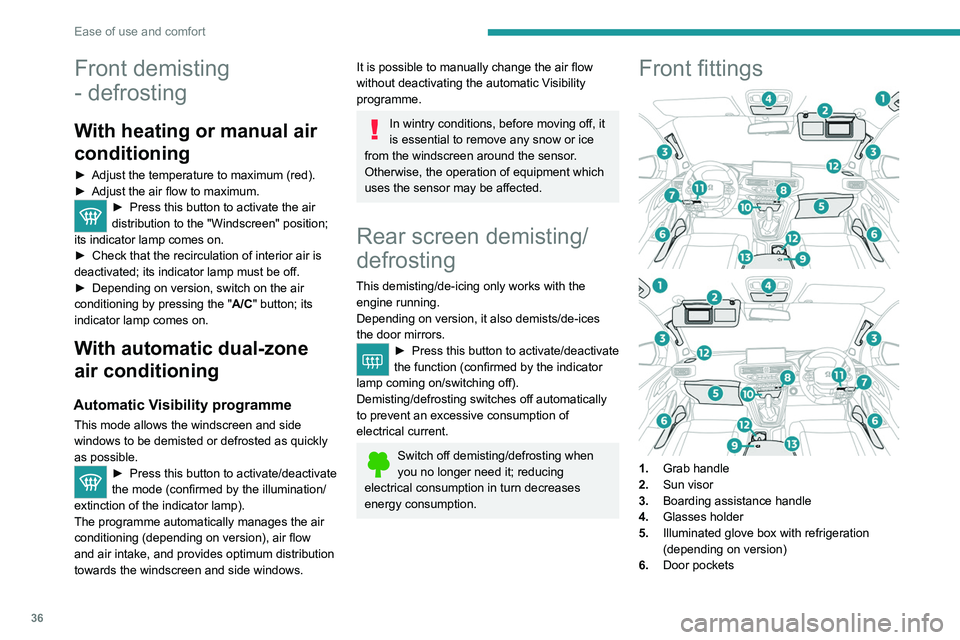
1. Grab handle
2. Sun visor
3. Boarding assistance handle
4. Glasses holder
5. Illuminated glove box with refrigeration
(depending on version)
6. Door pockets
7.Retractable cup holder (press on it to
release)
8. USB socket and USB charger socket
9. Cigarette lighter/12 V (120 W) accessory
socket
10. Storage compartment
11 . Card holder
12. Cup holder and storage compartment
13. Front armrest with storage (depending on
version)
Ensure the retractable cup holder 7 is
clean before putting it back in its housing
- risk of jamming the mechanism.
Make sure you do not leave any item in
the passenger compartment which could
act like a magnifying glass under the effect of
the sun's rays and cause a fire - risk of fire or
damage to interior surfaces!
Glove box
► To open the glove box, lift the handle.
With the ignition on, the glove box is lit when
open.
Depending on version, it contains an adjustable
ventilation nozzle, distributing the same
conditioned air as the vents in the passenger
compartment.
Page 47 of 164
45
Lighting and visibility
4Direction indicators
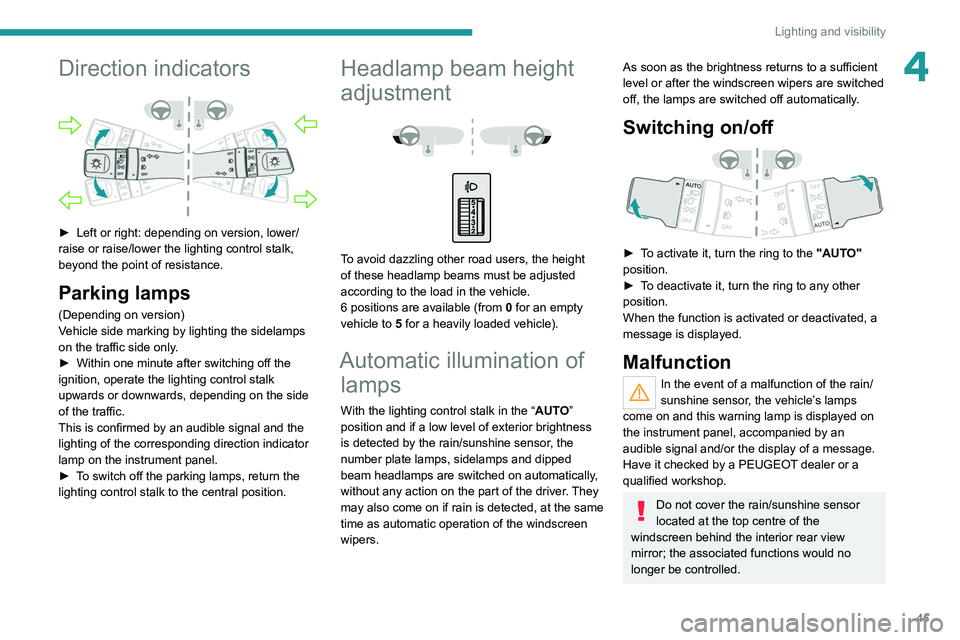
► Left or right: depending on version, lower/
raise or raise/lower the lighting control stalk,
beyond the point of resistance.
Parking lamps
(Depending on version)
Vehicle side marking by lighting the sidelamps
on the traffic side only.
►
Within one minute after switching off the
ignition, operate the lighting control stalk
upwards or downwards, depending on the side
of the traffic.
This is confirmed by an audible signal and the
lighting of the corresponding direction indicator
lamp on the instrument panel.
►
T
o switch off the parking lamps, return the
lighting control stalk to the central position.
Headlamp beam height
adjustment
To avoid dazzling other road users, the height
of these headlamp beams must be adjusted
according to the load in the vehicle.
6 positions are available (from 0 for an empty
vehicle to 5 for a heavily loaded vehicle).
Automatic illumination of lamps
With the lighting control stalk in the “ AUTO”
position and if a low level of exterior brightness
is detected by the rain/sunshine sensor, the
number plate lamps, sidelamps and dipped
beam headlamps are switched on automatically,
without any action on the part of the driver. They
may also come on if rain is detected, at the same
time as automatic operation of the windscreen
wipers.
As soon as the brightness returns to a sufficient
level or after the windscreen wipers are switched
off, the lamps are switched off automatically.
Switching on/off
► To activate it, turn the ring to the "AUTO"
position.
►
T
o deactivate it, turn the ring to any other
position.
When the function is activated or deactivated, a
message is displayed.
Malfunction
In the event of a malfunction of the rain/
sunshine sensor, the vehicle’s lamps
come on and this warning lamp is displayed on
the instrument panel, accompanied by an
audible signal and/or the display of a message.
Have it checked by a PEUGEOT dealer or a
qualified workshop.
Do not cover the rain/sunshine sensor
located at the top centre of the
windscreen behind the interior rear view
mirror; the associated functions would no
longer be controlled.
Page 48 of 164
46
Lighting and visibility
Fast wiping.
If the ignition has been switched off with
the windscreen wipers active, you must
operate the control stalk again to reactivate
wiping when the ignition is switched on again
(unless the ignition was off for less than
a minute).
Decreasing or increasing the wiping
frequency
► Rotate the ring to increase/decrease
the wiping frequency (with " INT" or
"AUTO" wiping position).
Windscreen wash
► Pull the wiper control stalk towards you and
hold.
A final wiping cycle is performed when
screenwashing ends.
In fog or snow, the rain/sunshine sensor
may detect sufficient light. For this
reason, the lighting will not come on
automatically.
The inner surface of the windscreen may become misted up and affect the proper
operation of the rain/sunshine sensor.
In humid and cold weather, demist the
windscreen regularly.
Guide-me-home and
welcome lighting
Guide-me-home lighting
Depending on version, when the light is poor, the
dipped beam headlamps come on automatically
when the ignition is switched off.
Guide-me-home lighting goes off automatically
after a period of time.
You can activate/deactivate this function and adjust the guide-me-home lighting
duration in the Vehicle settings
touch screen
menu.
Welcome lighting
When unlocking the vehicle, this system
automatically switches on the dipped beam
headlamps and certain lights in the passenger
compartment.
DOORWhen the front courtesy lamp control is
activated, the front courtesy lamp comes
on automatically when a door is opened.
Depending on version, the front doors have sill
lighting. Each sill light automatically switches on
when a front door is opened to facilitate entry
into the vehicle at night.
You can activate/deactivate this function and adjust the welcome lighting duration
in the Vehicle settings touch screen menu.
Wiper control stalk
Before operating the wipers in wintry
conditions, clear any snow, ice or frost
from the windscreen and around the wiper
arms and blades.
Do not operate the wipers on a dry
windscreen. In extremely hot or cold
weather, check that the wiper blades are not
stuck to the windscreen before operating the
wipers.
After using an automatic car wash, you may temporarily notice abnormal noises
and poorer wiping performance.
You do not
need to replace the wiper blades.
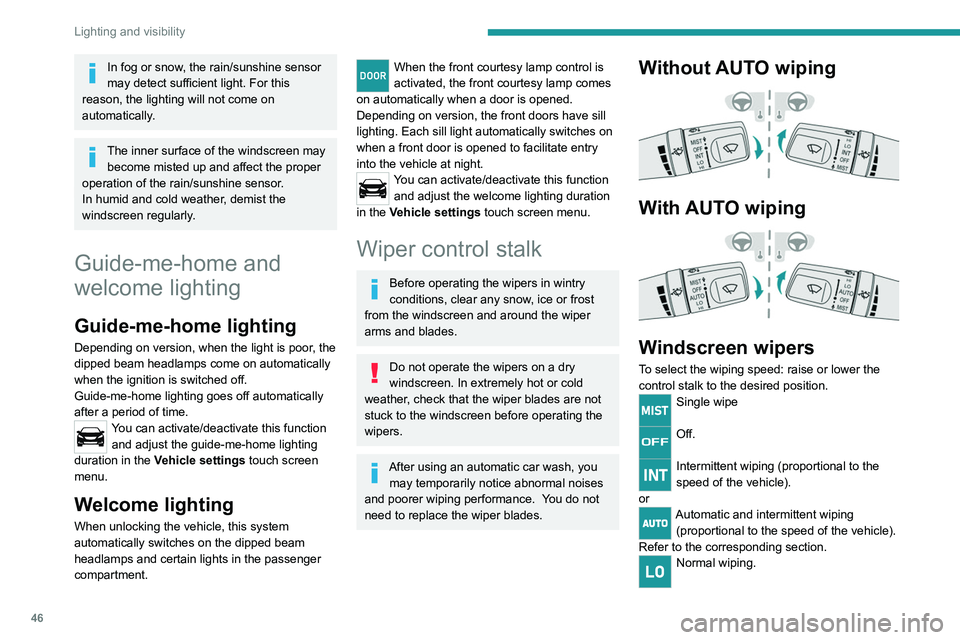
Without AUTO wiping
With AUTO wiping
Windscreen wipers
To select the wiping speed: raise or lower the
control stalk to the desired position.
Single wipe
Off.
Intermittent wiping (proportional to the
speed of the vehicle).
or
Automatic and intermittent wiping (proportional to the speed of the vehicle).
Refer to the corresponding section.
Normal wiping.
Page 50 of 164
48
Lighting and visibility
► Unclip the worn wiper blade closest to you
and remove it.
►
Install the new wiper blade and clip it to the
arm.
►
Repeat the procedure for the other wiper
blade.
►
Starting with the wiper blade closest to you,
once again hold each arm by the rigid section,
then guide it carefully onto the windscreen.
Automatic windscreen wipers
In AUTO mode, the windscreen wipers work
automatically and adapt to the intensity of the
rain.
The rainfall detection function uses a rain/
sunshine sensor located at the top centre of the
windscreen, behind the rear view mirror.
Do not cover the rain/sunshine sensor.
When using an automatic car wash,
switch off the automatic wipers and the
ignition.
In winter, wait until the windscreen is
completely clear of ice before activating the
automatic wipers.
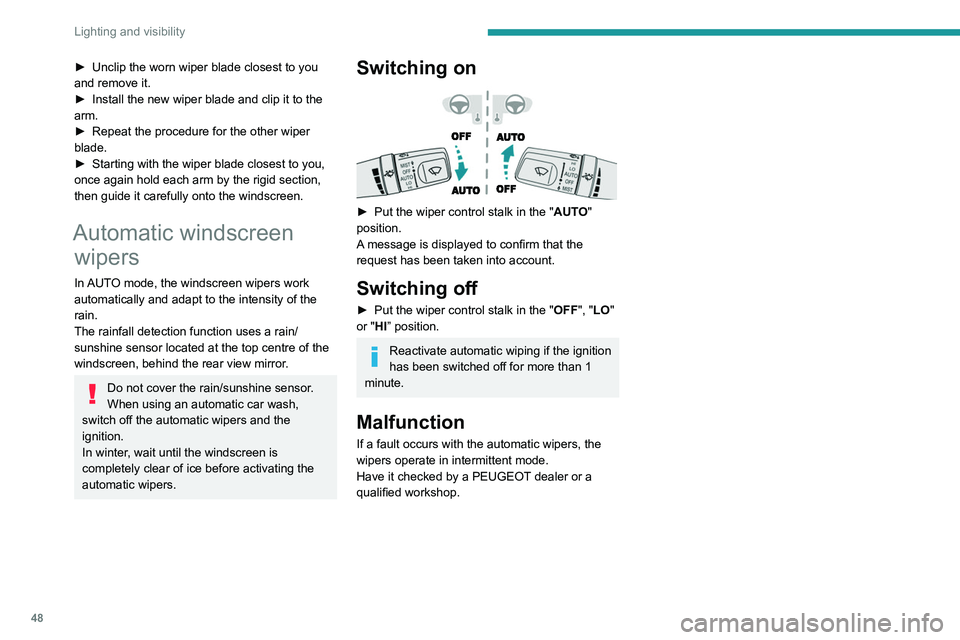
Switching on
► Put the wiper control stalk in the " AUT O"
position.
A message is displayed to confirm that the
request has been taken into account.
Switching off
► Put the wiper control stalk in the " OFF", " LO"
or "HI” position.
Reactivate automatic wiping if the ignition
has been switched off for more than 1
minute.
Malfunction
If a fault occurs with the automatic wipers, the
wipers operate in intermittent mode.
Have it checked by a PEUGEOT dealer or a
qualified workshop.
Page 59 of 164
57
Safety
5Deployment
It deploys simultaneously with the corresponding
lateral airbag in the event of a serious side
impact applied to all or part of the side impact
zone B.
The curtain airbag inflates between the front
and rear occupants of the vehicle and the
corresponding windows.
Malfunction
In the event of a malfunction, this warning
lamp lights up on the instrument panel.
Contact a PEUGEOT dealer or a qualified
workshop to have the system checked.
The airbags may not be deployed in the event of
a serious impact.
In the event of a minor impact or bump at
the side of the vehicle or if the vehicle
rolls over, the airbags may not be deployed.
In the event of a rear or front collision, none of
the lateral airbags are deployed.
Advice
For the airbags to be fully effective,
observe the safety recommendations
below.
Adopt a normal and upright sitting position.
Fasten your seat belt and position it correctly.
Do not place anything between the occupants
and the airbags (e.g.
child, animal, object), do
not fix or attach anything near or in the path of
the airbags, as this could cause injuries when
they are deployed.
Never modify the original definition of the
vehicle, particularly in the area directly around
the airbags.
Even if all of the precautions mentioned are
observed, a risk of injury or of minor burns to
the head, chest or arms cannot be ruled out
when an airbag is deployed. The bag inflates
almost instantly (within a few milliseconds)
then deflates within the same time,
discharging the hot gas via openings provided
for this purpose.
After an accident or if the vehicle has been
stolen, have the airbag systems checked.
All work must be carried out only by a
PEUGEOT dealer or a qualified workshop
Front airbags
Do not drive holding the steering wheel
by its spokes or resting your hands on the
centre part of the wheel.
Passengers must not place their feet on the
dashboard.
Do not smoke as deployment of the airbags
can cause burns or the risk of injury from a
cigarette or pipe.
Never remove or pierce the steering wheel or
hit it violently.
Do not fix or attach anything to the steering
wheel or dashboard, as this could cause
injuries when the airbags are deployed.
Lateral airbags
Use only approved seat covers
compatible with the deployment of these
airbags. For information on the range of seat
covers suitable for your vehicle, contact a
PEUGEOT dealer.
Do not fix or attach anything to the seat
backrests (e.g.
clothing) as this could cause
injuries to the chest or arm when the airbag is
deployed.
Do not sit with the upper part of the body any
nearer to the door than necessary.
The vehicle's front door panels include side
impact sensors.
A damaged door or any unauthorised or
incorrectly executed work (modification or
repair) on the front doors or their interior trim
could compromise the operation of these
sensors - risk of malfunction of the lateral
airbags!
All work must be carried out only by a
PEUGEOT dealer or a qualified workshop
Curtain airbags
Do not fix or attach anything to the roof,
as this could cause head injuries when the
curtain airbag is deployed.
Do not remove the grab handles installed on
the roof, as these help to secure the curtain
airbags.