2022 PEUGEOT 308 boot
[x] Cancel search: bootPage 53 of 260
51
Ease of use and comfort
3The backrests should only be manoeuvred when the vehicle is
stationary.
First steps:
►
Lower the head restraints, or remove them
when carrying heavy loads.
►
Lift up the rear armrest.
►
If necessary
, move the front seats forward.
►
Check
that no person or object might interfere
with the folding of the backrests (e.g.
clothing,
luggage).
►
Check that the outer seat belts are lying flat
on the backrests.
The folding of the backrest is accompanied by a slight lowering of the
corresponding cushion.
To obtain a flat surface, it is necessary to
place the adjustable boot floor in the high
position.
When the backrest is released, the red
indicator in the release grip is visible.
From the passenger compartment
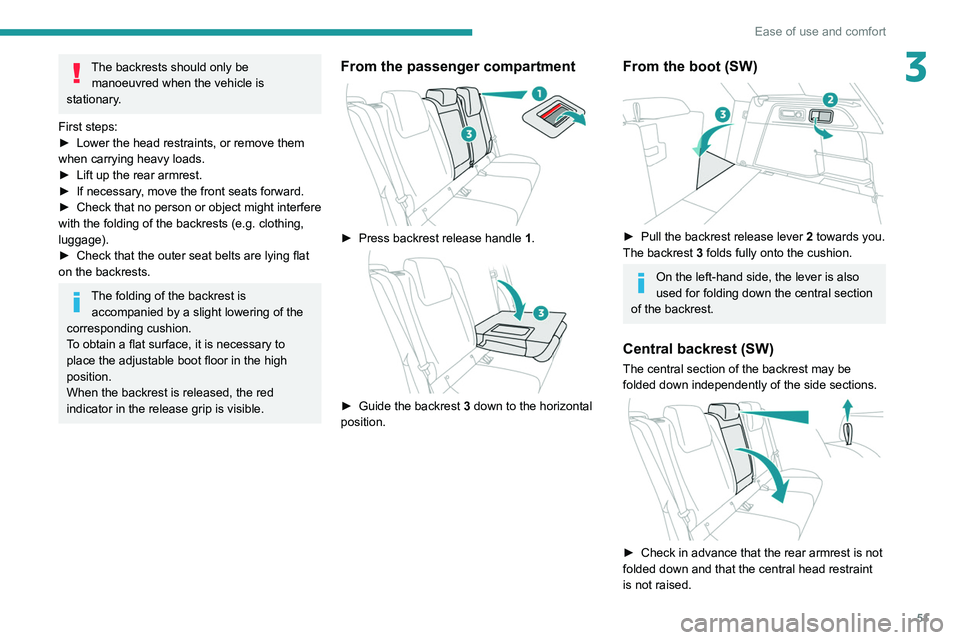
► Press backrest release handle 1 .
► Guide the backrest 3 down to the horizontal
position.
From the boot (SW)
► Pull the backrest release lever 2 towards you.
The backrest 3 folds fully onto the cushion.
On the left-hand side, the lever is also
used for folding down the central section
of the backrest.
Central backrest (SW)
The central section of the backrest may be
folded down independently of the side sections.
► Check in advance that the rear armrest is not
folded down and that the central head restraint
is not raised.
Page 54 of 260

52
Ease of use and comfort
► From inside the passenger compartment or
from the boot, pull on the strap to release.
►
Fold the backrest onto the seat cushion.
►
When repositioning, lift up the backrest fully
until it locks.
Repositioning the backrests
First check that the outer seat belts are
lying vertically flat alongside the backrest
latching rings.
► Put the backrest 3 in the upright position and
push it firmly to latch it home.
►
Check that the red indicator is no longer
visible in the release grip 1
.
►
Ensure that the outer seat belts were not
trapped during the operation.
Please note: an incorrectly latched
backrest compromises the safety of
passengers in the event of sudden braking or
an accident.
The contents of the boot may be thrown
forwards - risk of serious injury!
Heating and Ventilation
Air intake
The air circulating in the passenger compartment
is filtered and originates either from the
exterior, via the grille located at the base of the
windscreen, or from the inside in air recirculation
mode.
Controls
Depending on version, certain controls
are accessible in the Climate touch
screen application and/via the control panel on
the centre console.
Air distribution
1. Windscreen demisting/de-icing vents
2. Front side window demisting/de-icing vents
3.Adjustable and closable side air vents
4. Adjustable and closable central air vents
5. Air outlets to the front footwells
6. Air outlets to the rear footwells
7. Adjustable and closable air vents
Advice
Using the ventilation and air
conditioning system
►
T
o ensure that air is distributed evenly,
keep the external air intake grilles at the base
of the windscreen, the nozzles, the vents, the
air outlets and the air extractor in the boot
free from obstructions.
►
Do not cover the sunshine sensor located
on the dashboard; this sensor is used to
regulate the automatic air conditioning
system.
►
Operate the air conditioning system for at
least 5 to 10 minutes once or twice a month to
keep it in good working order
.
►
If the system does not produce cold air
,
switch it off and contact a PEUGEOT dealer
or a qualified workshop.
When towing a large load on a steep gradient
in high temperatures, switching off the air
conditioning increases the available engine
power, enhancing the towing capacity.
Avoid driving for too long with the ventilation off or with prolonged operation
Page 64 of 260
62
Ease of use and comfort
– when the ignition is switched on.
– 30 seconds after the last door is closed.
The front and rear touch-sensitive reading lamps
come on and go off at the same time as the
courtesy lamp.
A long press on the front touch-sensitive courtesy lamp completely deactivates it
(confirmed by the "OFF" symbol).
The front and rear touch-sensitive reading
lamps still remain operational.
Interior ambient lighting
The interior ambient lighting casts soft, coloured
lighting in the passenger compartment, when low
lighting conditions are detected.
By default, the colour of the interior ambient
lighting is linked to that of the screens,
depending on the driving mode selected.
Activation/deactivation and adjustment of the brightness are set via the Settings >
Brightness
touch screen application.
The colour is selected via the Settings >
Customisation touch screen application.
Rear fittings
USB sockets
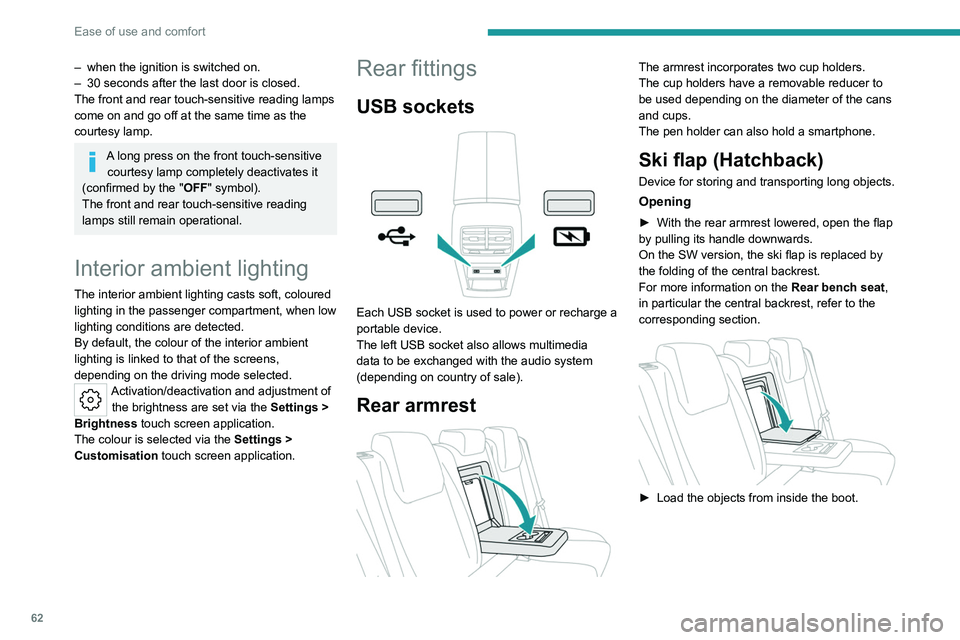
Each USB socket is used to power or recharge a
portable device.
The left USB socket also allows multimedia
data to be exchanged with the audio system
(depending on country of sale).
Rear armrest
The armrest incorporates two cup holders.
The cup holders have a removable reducer to
be used depending on the diameter of the cans
and cups.
The pen holder can also hold a smartphone.
Ski flap (Hatchback)
Device for storing and transporting long objects.
Opening
► With the rear armrest lowered, open the flap
by pulling its handle downwards.
On the SW version, the ski flap is replaced by
the folding of the central backrest.
For more information on the Rear bench seat,
in particular the central backrest, refer to the
corresponding section.
► Load the objects from inside the boot.
Page 65 of 260
63
Ease of use and comfort
3Shark fin antenna
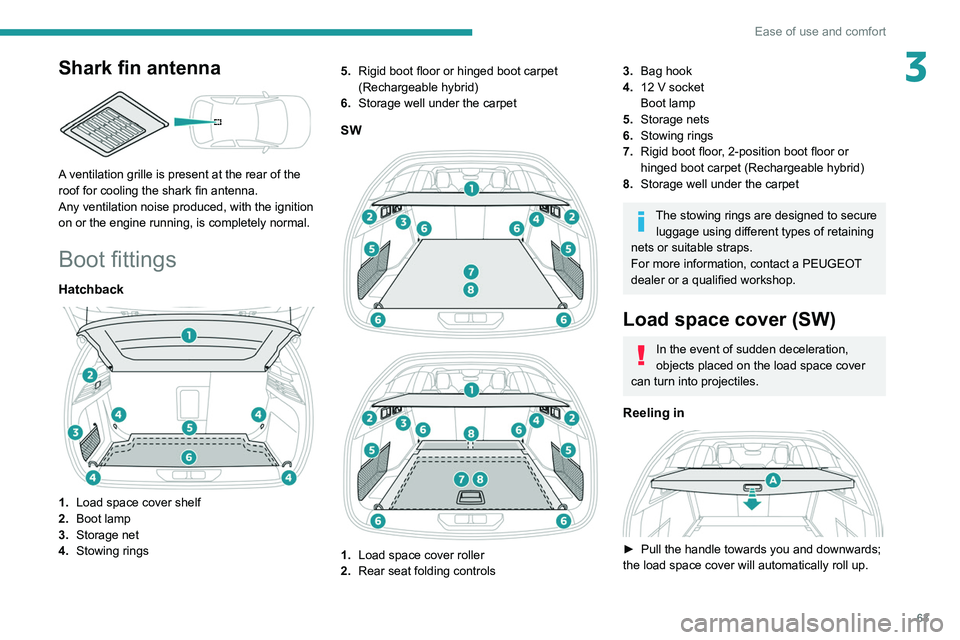
A ventilation grille is present at the rear of the
roof for cooling the shark fin antenna.
Any ventilation noise produced, with the ignition
on or the engine running, is completely normal.
Boot fittings
Hatchback
1.Load space cover shelf
2. Boot lamp
3. Storage net
4. Stowing rings 5.
Rigid boot floor or hinged boot carpet
(Rechargeable hybrid)
6. Storage well under the carpet
SW
1. Load space cover roller
2. Rear seat folding controls
3.Bag hook
4. 12
V socket
Boot lamp
5. Storage nets
6. Stowing rings
7. Rigid boot floor, 2-position boot floor or
hinged boot carpet (Rechargeable hybrid)
8. Storage well under the carpet
The stowing rings are designed to secure
luggage using different types of retaining
nets or suitable straps.
For more information, contact a PEUGEOT
dealer or a qualified workshop.
Load space cover (SW)
In the event of sudden deceleration,
objects placed on the load space cover
can turn into projectiles.
Reeling in
► Pull the handle towards you and downwards;
the load space cover will automatically roll up.
Page 66 of 260
64
Ease of use and comfort
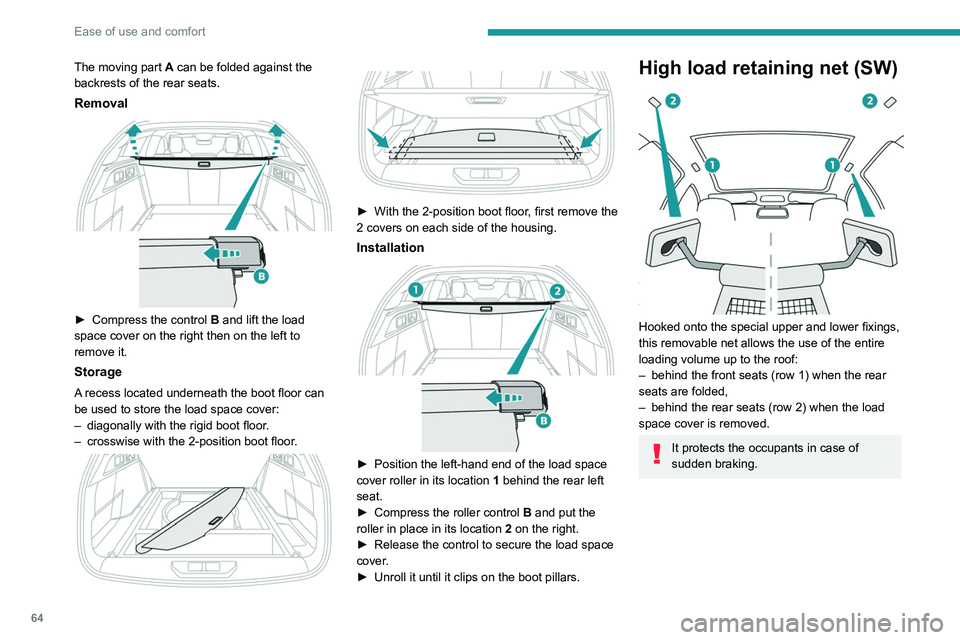
The moving part A can be folded against the
backrests of the rear seats.
Removal
► Compress the control B and lift the load
space cover on the right then on the left to
remove it.
Storage
A recess located underneath the boot floor can
be used to store the load space cover:
–
diagonally with the rigid boot floor
.
–
crosswise with the 2-position boot floor
.
► With the 2-position boot floor
, first remove the
2 covers on each side of the housing.
Installation
► Position the left-hand end of the load space
cover roller in its location 1
behind the rear left
seat.
►
Compress the roller control B
and put the
roller in place in its location 2 on the right.
►
Release the control to secure the load space
cover
.
►
Unroll it until it clips on the boot pillars.
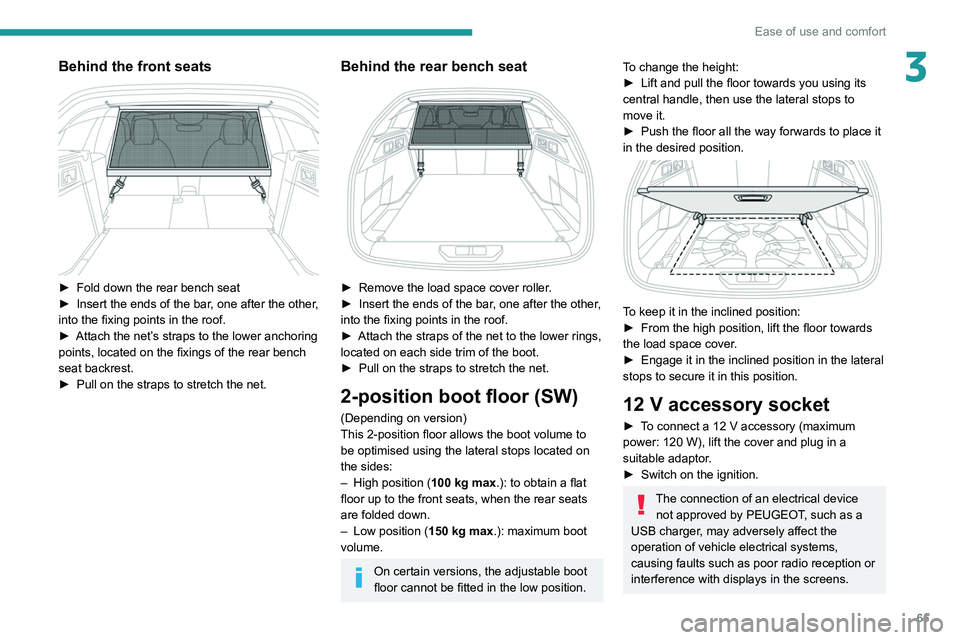
High load retaining net (SW)
Hooked onto the special upper and lower fixings,
this removable net allows the use of the entire
loading volume up to the roof:
–
behind the front seats (row 1) when the rear
seats are folded,
–
behind the rear seats (row 2) when the load
space cover is removed.
It protects the occupants in case of
sudden braking.
Page 67 of 260
65
Ease of use and comfort
3Behind the front seats
► Fold down the rear bench seat
► Insert the ends of the bar , one after the other,
into the fixing points in the roof.
►
Attach the net’
s straps to the lower anchoring
points, located on the fixings of the rear bench
seat backrest.
►
Pull on the straps to stretch the net.
Behind the rear bench seat
► Remove the load space cover roller .
► Insert the ends of the bar , one after the other,
into the fixing points in the roof.
►
Attach the straps of the net to the lower rings,
located on each side trim of the boot.
►
Pull on the straps to stretch the net.
2-position boot floor (SW)
(Depending on version)
This 2-position floor allows the boot volume to
be optimised using the lateral stops located on
the sides:
–
High position ( 100
kg max.): to obtain a flat
floor up to the front seats, when the rear seats
are folded down.
–
Low position ( 150
kg max.): maximum boot
volume.
On certain versions, the adjustable boot
floor cannot be fitted in the low position.
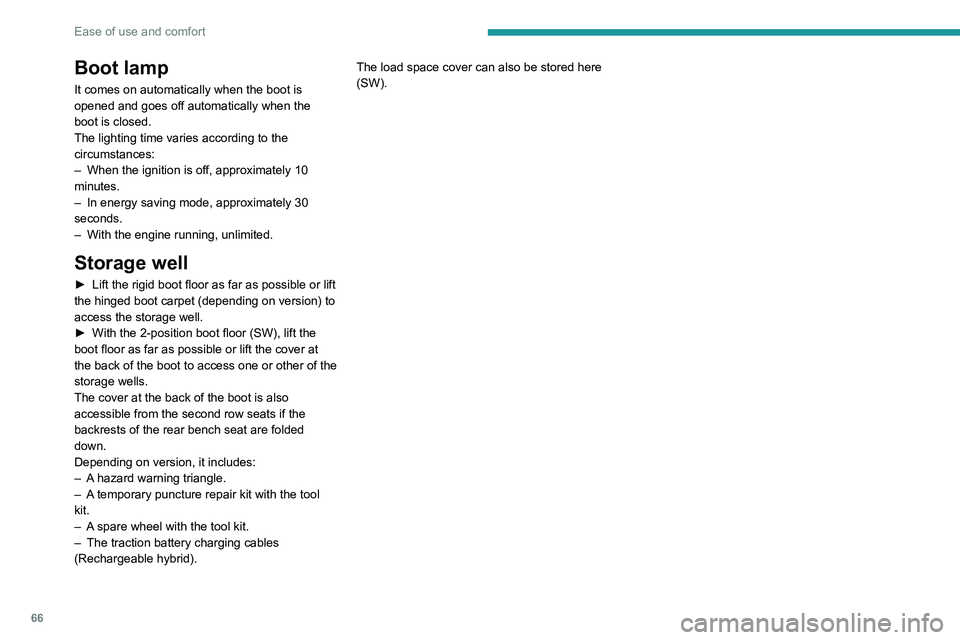
To change the height:
► Lift and pull the floor towards you using its
central handle, then use the lateral stops to
move it.
►
Push the floor all the way forwards to place it
in the desired position.
To keep it in the inclined position:
► From the high position, lift the floor towards
the load space cover
.
►
Engage it in the inclined position in the lateral
stops to secure it in this position.
12 V accessory socket
► To connect a 12 V accessory (maximum
power: 120 W), lift the cover and plug in a
suitable adaptor.
►
Switch on the ignition.
The connection of an electrical device not approved by PEUGEOT, such as a
USB charger, may adversely affect the
operation of vehicle electrical systems,
causing faults such as poor radio reception or
interference with displays in the screens.
Page 68 of 260
66
Ease of use and comfort
Boot lamp
It comes on automatically when the boot is
opened and goes off automatically when the
boot is closed.
The lighting time varies according to the
circumstances:
–
When the ignition is off, approximately 10
minutes.
–
In energy saving mode, approximately 30
seconds.
–
With the engine running, unlimited.
Storage well
► Lift the rigid boot floor as far as possible or lift
the hinged boot carpet (depending on version) to
access the storage well.
►
With the 2-position boot floor (SW), lift the
boot floor as far as possible or lift the cover at
the back of
the boot to access one or other of the
storage wells.
The cover at the back of the boot
is also
accessible from the second row seats if the
backrests of the rear bench seat are folded
down.
Depending on version, it includes:
–
A
hazard warning triangle.
–
A
temporary puncture repair kit with the tool
kit.
–
A
spare wheel with the tool kit.
–
The traction battery charging cables
(Rechargeable hybrid). The load space cover can also be stored here
(SW).
Page 71 of 260

69
Lighting and visibility
40 (Initial setting)Driver only or driver + front passenger
1 5 people
2 5 people + load in the boot
3 Driver only + load in the boot
4 5 6 Not used
Automatic Peugeot Matrix
LED Technology 2.0
headlamp adjustment
This system automatically adjusts the height of
the headlamp beams according to the load in the
vehicle.
In the event of a malfunction, this warning
lamp lights up on the instrument panel,
accompanied by the display of a message and
an audible signal.
The system places the headlamp beams in the
lowest position.
Have it checked by a PEUGEOT dealer or a
qualified workshop.
Do not touch the Peugeot Matrix LED
Technology 2.0 headlamps - risk of
electrocution!
Automatic illumination of lamps
With the lighting control stalk in the “ AUTO”
position and if a low level of exterior brightness
is detected by the rain/sunshine sensor, the
sidelamps and dipped beam headlamps are
switched on automatically, without any action on
the part of the driver. They may also come on if
rain is detected, at the same time as automatic
operation of the windscreen wipers.
As soon as the brightness returns to a sufficient
level or after the windscreen wipers are switched
off, the lamps are switched off automatically.
Malfunction
In the event of a malfunction of the rain/
sunshine sensor, the vehicle’s lamps
come on and this warning lamp is displayed on
the instrument panel, accompanied by an
audible signal and/or the display of a message.
Have it checked by a PEUGEOT dealer or a
qualified workshop.
Do not cover the rain/sunshine sensor
located at the top centre of the
windscreen behind the interior rear view
mirror; the associated functions would no
longer be controlled.
In fog or snow, the rain/sunshine sensor
may detect sufficient light. For this
reason, the lighting will not come on
automatically.
The inner surface of the windscreen may become misted up and affect the proper
operation of the rain/sunshine sensor.
In humid and cold weather, demist the
windscreen regularly.
Guide-me-home and
welcome lighting
Guide-me-home lighting
Automatic
With the ring of the lighting control stalk in the
"AUTO” position and when the light is poor, the
dipped beam headlamps come on automatically
when the ignition is switched off.
You can activate/deactivate and adjust the duration of the guide-me-home
lighting in the Settings
> Vehicle touch screen
application.
Manual