2022 LEXUS ES350 wheel torque
[x] Cancel search: wheel torquePage 145 of 468
1434-1. Before driving
4
Driving
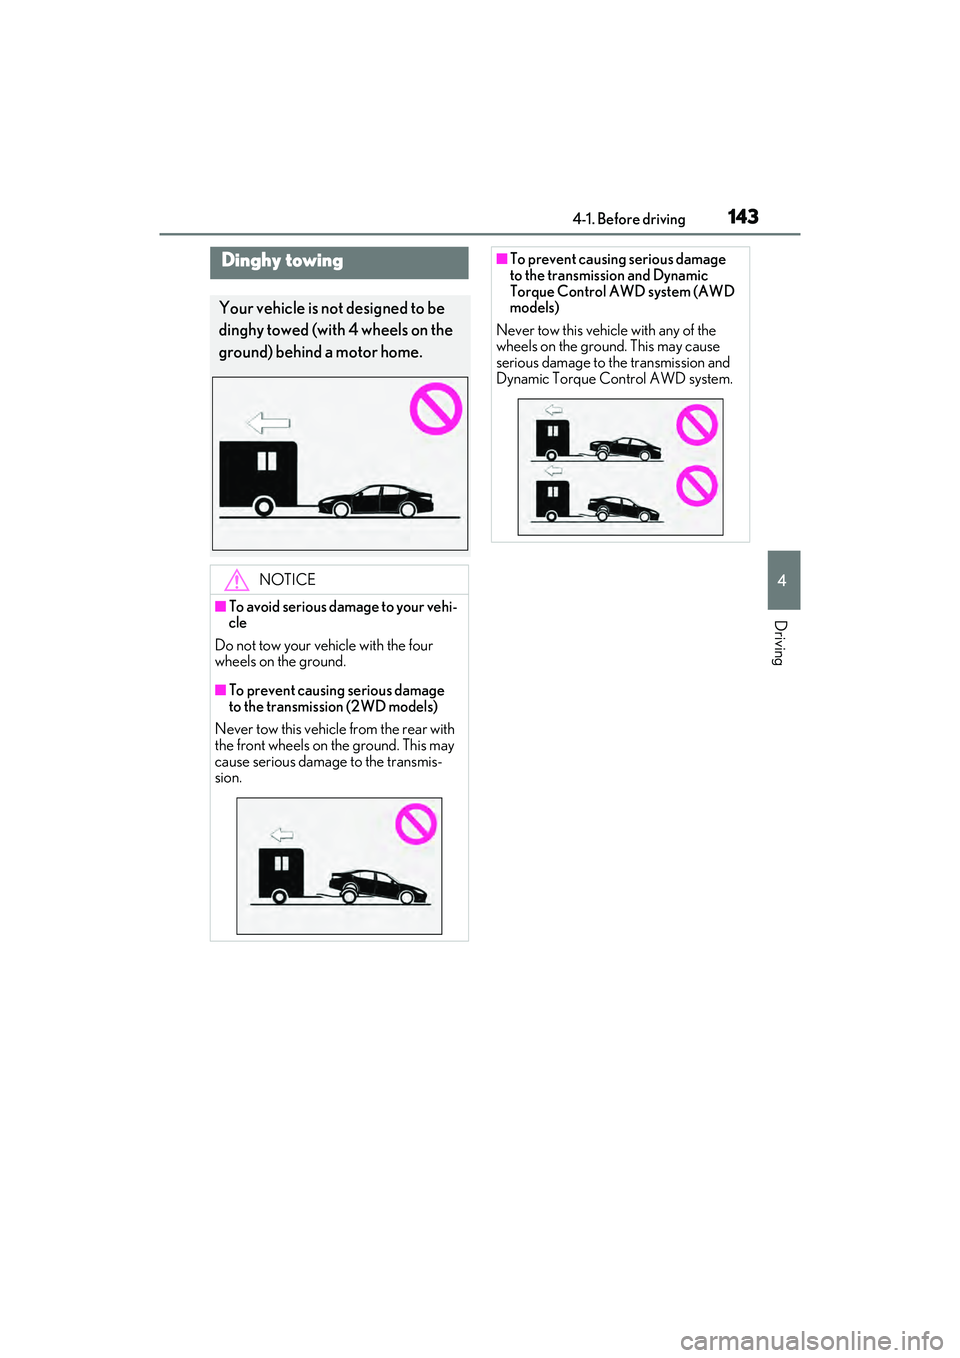
Dinghy towing
Your vehicle is not designed to be
dinghy towed (with 4 wheels on the
ground) behind a motor home.
NOTICE
■To avoid serious damage to your vehi-
cle
Do not tow your vehicle with the four
wheels on the ground.
■To prevent causing serious damage
to the transmission (2WD models)
Never tow this vehicle from the rear with
the front wheels on the ground. This may
cause serious damage to the transmis-
sion.
■To prevent causing serious damage
to the transmission and Dynamic
Torque Control AWD system (AWD
models)
Never tow this vehicle with any of the
wheels on the ground. This may cause
serious damage to the transmission and
Dynamic Torque Control AWD system.
Page 180 of 468
1784-5. Using the driving support systems
WARNING
●Although this system is designed to
help avoid a collision or help reduce
the impact of the collision, its effective-
ness may change according to various
conditions, therefore the system may
not always be able to achieve the same
level of performance.
Read the following conditions care-
fully. Do not overly rely on this system
and always drive carefully.
• Conditions under which the system may operate even if there is no possi-
bility of a collision: P.182
• Conditions under which the system may not operate properly: P.184
●Do not attempt to test the operation of
the pre-collision system yourself.
Depending on the objects used for
testing (dummies, cardboard objects
imitating detectable objects, etc.), the
system may not operate properly, pos-
sibly leading to an accident.
■Pre-collision braking
●When the pre-collision braking func-
tion is operating, a large amount of
braking force will be applied.
●If the vehicle is stopped by the opera-
tion of the pre-collision braking func-
tion, the pre-collision braking function
operation will be canceled after
approximately 2 seconds.
Depress the brake pedal as necessary.
●The pre-collision braking function may
not operate if certain operations are
performed by the driver. If the acceler-
ator pedal is being depressed strongly
or the steering wheel is being turned,
the system may determine that the
driver is taking evasive action and pos-
sibly prevent the pre-collision braking
function from operating.
●In some situations, while the pre-colli-
sion braking function is operating,
operation of the function may be can-
celed if the accelerator pedal is
depressed strongly or the steering
wheel is turned and the system deter-
mines that the driver is taking evasive
action.
●If the brake pedal is being depressed,
the system may determine that the
driver is taking ev asive action and pos-
sibly delay the operation timing of the
pre-collision braking function.
■Emergency steering assist
●As emergency steering assist opera-
tion will be canceled when the system
determines that lane departure pre-
vention function has been completed.
●Emergency steering assist may not
operate or may be cancel in the fol-
lowing cases as the system may deter-
mine the driver is taking actions.
• If the accelerator pedal is being depressed strongly, the steering wheel
is being operated sharply, the brake
pedal is being depressed or the turn
signal lever is bein g operated. In this
case, the system may determine that
the driver is taking evasive action and
the emergency steering assist may not
operate.
• In some situations, while the emer- gency steering assist is operating,
operation of the function may be can-
celed if the accelerator pedal is
depressed strongly, the steering wheel
is operated sharply or the brake pedal
is being depressed and the system
determines that the driver is taking
evasive action.
• When the emergency steering assist is operating, if the steering wheel is held
firmly or is operated in the opposite
direction to that which the system is
generating torque, the function may
be canceled.
Page 248 of 468

2464-5. Using the driving support systems
■ABS (Anti-lock Brake System)
Helps to prevent wheel lock when the
brakes are applied suddenly, or if the
brakes are applied while driving on a
slippery road surface
■Brake assist
Generates an increased level of brak-
ing force after the brake pedal is
depressed when the system detects a
panic stop situation
■VSC (Vehicle Stability Control)
Helps the driver to control skidding
when swerving suddenly or turning on
slippery road surfaces.
■Enhanced VSC (Enhanced Vehi-
cle Stability Control)
Provides cooperative control of the
ABS, TRAC, VSC and EPS.
Helps to maintain directional stability
when swerving on slippery road sur-
faces by controlling steering perfor-
mance.
■Secondary Collision Brake
When the SRS airbag sensor detects a
collision and the system operates, the
brakes and brake lights are automati-
cally controlled to reduce the vehicle
speed and help reduce the possibility
of further damage due to a secondary
collision.
■TRAC (Traction Control)
Helps to maintain drive power and
prevent the drive wheels from spinning
when starting the vehicle or accelerat-
ing on slippery roads
■Active Cornering Assist (ACA)
Helps to prevent the vehicle from drift-
ing to the outer side by performing
inner wheel brake control when
attempting to accelerate while turning
■Hill-start assist control
Helps to reduce the backward move-
ment of the vehicle when starting on an
uphill
■Dynamic Torque Control AWD
system (AWD models)
Automatically switches from front-
wheel drive to all-wheel drive (AWD)
according to the driving conditions,
helping to ensure reliable handling and
stability. Examples of conditions where
the system will switch to AWD are
when cornering, going uphill, starting
off or accelerating, and when the road
surface is slippery due to snow, rain,
etc.
■EPS (Electric Power Steering)
Employs an electric motor to reduce
the amount of effort needed to turn the
Driving assist systems
To keep driving safety and perfor-
mance, the following systems oper-
ate automatically in response to
various driving situations. Be
aware, however, that these systems
are supplementary and should not
be relied upon too heavily when
operating the vehicle.
Summary of the driving assist
systems
Page 370 of 468

3687-2. Steps to take in an emergency
When replacing tires on a vehicle with
wheel lock nuts, use the following pro-
cedures to remove and install the
wheel lock nuts. The wheel lock key is
stored in the tray inside the luggage
compartment. Always return the wheel
lock key to its original position after
use, so that it does not get lost.
■Removal
For ease of removal, the wheel lock nut
should always be the first one loos-
ened.
1 Place the wheel lock key on top of
the wheel lock nut, turning until the
wheel lock key and wheel lock nut
patterns engage.
2 Place the wheel nut wrench on the
wheel lock key, and while applying
pressure on the wheel lock key,
loosen the wheel lock nut.
■Installation
For ease of installation, the wheel lock
nut should always be the last one tight-
ened.
1 By hand, Install a wheel lock nut on
the wheel to be installed.
2 Place the wheel lock key on top of
the wheel lock nut, turning until the
wheel lock key and wheel lock nut
patterns engage.
3 Place the wheel nut wrench on the
wheel lock key, and while applying
pressure on the wheel lock key,
tighten the wheel lock nut to the
recommended torque.
1 Open the trunk.
2 Pull the lever upwards when lifting
the luggage mat up.WARNING
●Do not raise the vehicle to a height
greater than that required to replace
the tire.
●Use a jack stand if it is necessary to get
under the vehicle.
●When lowering the vehicle, make sure
that there is no-one near the vehicle. If
there are people nearby, warn them
vocally before lowering.
Wheel lock nut (if equipped)
NOTICE
Do not use an impact wrench. Using an
impact wrench may cause permanent
damage to wheel lock nut and wheel lock
key. If in doubt about wheel lock applica-
tion, contact your Lexus dealer.
Taking out the jack
Page 373 of 468
3717-2. Steps to take in an emergency
7
When trouble arises
avoid scratching the wheel surface.
1Remove any dirt or foreign matter
from the wheel contact surface.
If foreign matter is on the wheel contact
surface, the wheel nuts may loosen while
the vehicle is in motion, causing the tire to
come off.
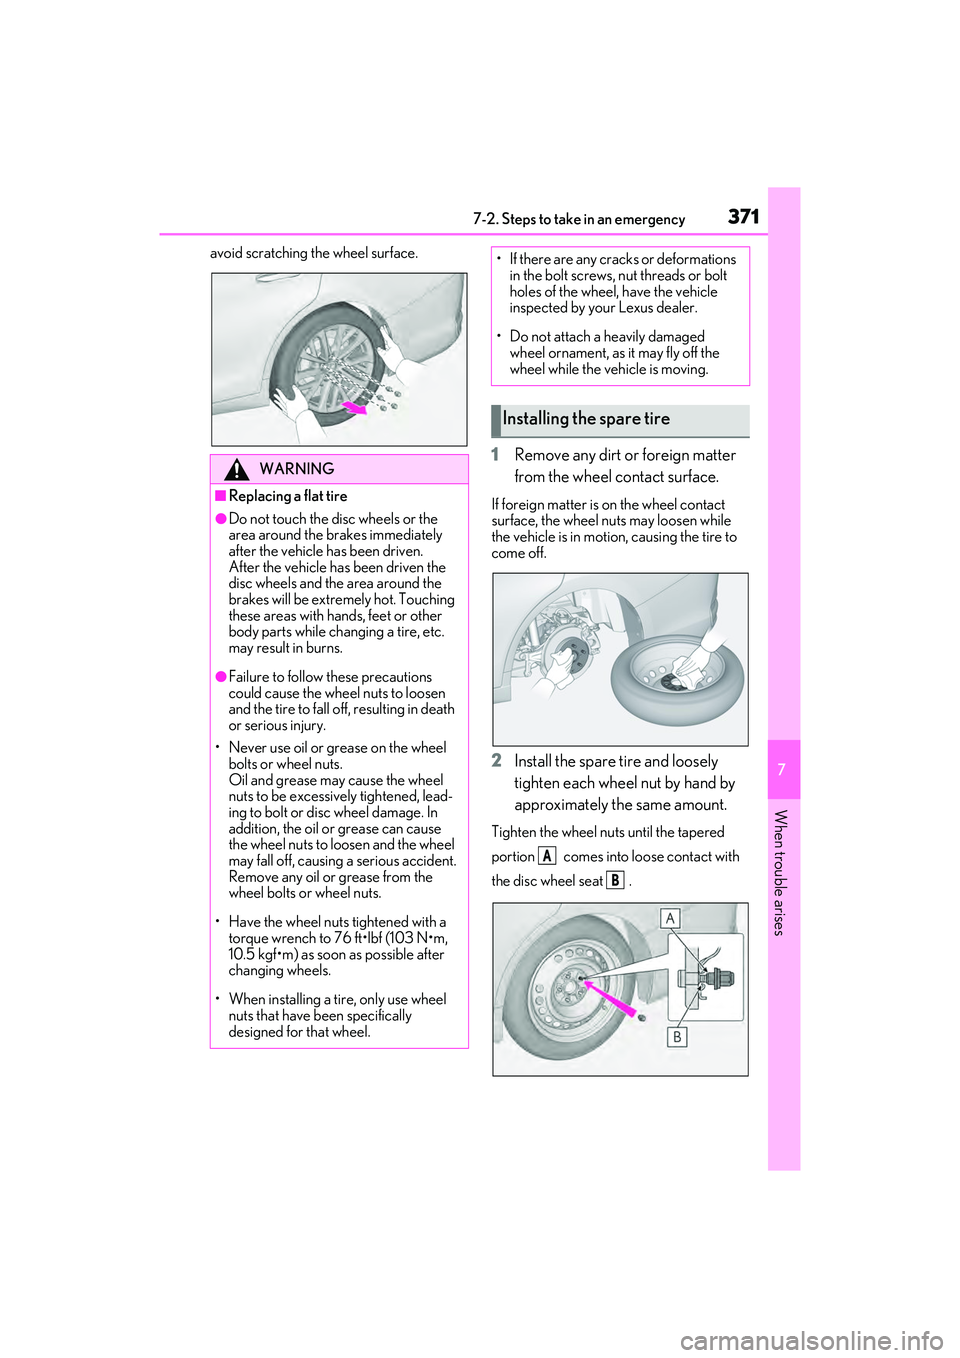
2Install the spare tire and loosely
tighten each wheel nut by hand by
approximately the same amount.
Tighten the wheel nuts until the tapered
portion comes into loose contact with
the disc wheel seat .
WARNING
■Replacing a flat tire
●Do not touch the disc wheels or the
area around the brakes immediately
after the vehicle has been driven.
After the vehicle has been driven the
disc wheels and the area around the
brakes will be extremely hot. Touching
these areas with hands, feet or other
body parts while changing a tire, etc.
may result in burns.
●Failure to follow these precautions
could cause the wheel nuts to loosen
and the tire to fall off, resulting in death
or serious injury.
• Never use oil or grease on the wheel bolts or wheel nuts.
Oil and grease may cause the wheel
nuts to be excessively tightened, lead-
ing to bolt or disc wheel damage. In
addition, the oil or grease can cause
the wheel nuts to loosen and the wheel
may fall off, causing a serious accident.
Remove any oil or grease from the
wheel bolts or wheel nuts.
• Have the wheel nuts tightened with a torque wrench to 76 ft•lbf (103 N•m,
10.5 kgf•m) as soon as possible after
changing wheels.
• When installing a tire, only use wheel nuts that have been specifically
designed for that wheel.
• If there are any cracks or deformations in the bolt screws, nut threads or bolt
holes of the wheel, have the vehicle
inspected by your Lexus dealer.
• Do not attach a heavily damaged wheel ornament, as it may fly off the
wheel while the vehicle is moving.
Installing the spare tire
A
B
Page 374 of 468

3727-2. Steps to take in an emergency
3Lower the vehicle.
4 Firmly tighten each wheel nut two
or three times in the order shown in
the illustration.
Tightening torque:
76 ft•lbf (103 N•m, 10.5 kgf•m)
5Stow the flat tire, tire jack and all
tools.
■The compact spare tire
●The compact spare tire is identified by
the label “TEMPORARY USE ONLY”
on the tire sidewall.
Use the compact spare tire temporarily,
and only in an emergency.
●Make sure to check the tire inflation
pressure of the compact spare tire.
( P.395)
■After completing the tire change
The tire pressure warning system must be
reset. ( P.324)
■When using the compact spare tire
As the compact spare tire is not equipped
with a tire pressure warning valve and
transmitter, low inflation pressure of the spare tire will not be indicated by the tire
pressure warning system. Also, if you
replace the compact spare tire after the tire
pressure warning light comes on, the light
remains on.
■When the compact spare tire is
attached
The vehicle becomes lower when driving
with the compact spare tire compared to
when driving with standard tires.
■If you have a flat front tire on a road cov-
ered with snow or ice (vehicles with 17-
inch tires)
Install the compact spare tire on one of the
rear wheels of the vehicle. Perform the fol-
lowing steps and fit tire chains to the front
tires:
1 Replace a rear tire with the compact
spare tire.
2 Replace the flat front tire with the tire
removed from the rear of the vehicle.
3 Fit tire chains to the front tires.
WARNING
■When using the compact spare tire
●Remember that the compact spare tire
provided is specifically designed for
use with your vehicle. Do not use your
compact spare tire on another vehicle.
●Do not use more than one compact
spare tire simultaneously.
●Replace the compact spare tire with a
standard tire as soon as possible.
●Avoid sudden acceleration, abrupt
steering, sudden braking and shifting
operations that cause sudden engine
braking.
■When the compact spare tire is
attached
The vehicle speed may not be correctly
detected, and the following systems may
not operate correctly:
• ABS & Brake assist
•VSC
Page 397 of 468
3958-1. Specifications
8
Vehicle specifications
Type A
*1: 100 mph (160 km/h) or less
*2:More than 100 mph (160 km/h)
Type B
*1: 100 mph (160 km/h) or less
Tires and wheels
Tire size215/55R17 94V, T155/70D17 110M
(spare)
Tire inflation pressure
(Recommended cold tire inflation pressure)
Front
36 psi (250 kPa, 2.5 kgf/cm
2 or bar)*1
46 psi (320 kPa, 3.2 kgf/cm2 or bar)*2
Rear
36 psi (250 kPa, 2.5 kgf/cm
2 or bar)*1
46 psi (320 kPa, 3.2 kgf/cm2 or bar)*2
Spare
60 psi (420 kPa, 4.2 kgf/cm
2 or bar)
Wheel size17 x 7 1/2J, 17 x 4T (spare)
Wheel nut torque76 ft•lbf (103 N•m, 10.5 kgf•m)
Tire size235/45R18 94V, T155/70D17 110M
(spare)
Tire inflation pressure
(Recommended cold tire inflation pressure)
Front
35 psi (240 kPa, 2.4 kgf/cm
2 or bar)*1
46 psi (320 kPa, 3.2 kgf/cm2 or bar)*2
Rear
35 psi (240 kPa, 2.4 kgf/cm
2 or bar)*1
46 psi (320 kPa, 3.2 kgf/cm2 or bar)*2
Spare
60 psi (420 kPa, 4.2 kgf/cm
2 or bar)
Wheel size18 x 8J, 17 x 4T (spare)
Wheel nut torque76 ft•lbf (103 N•m, 10.5 kgf•m)
Page 398 of 468
3968-1. Specifications
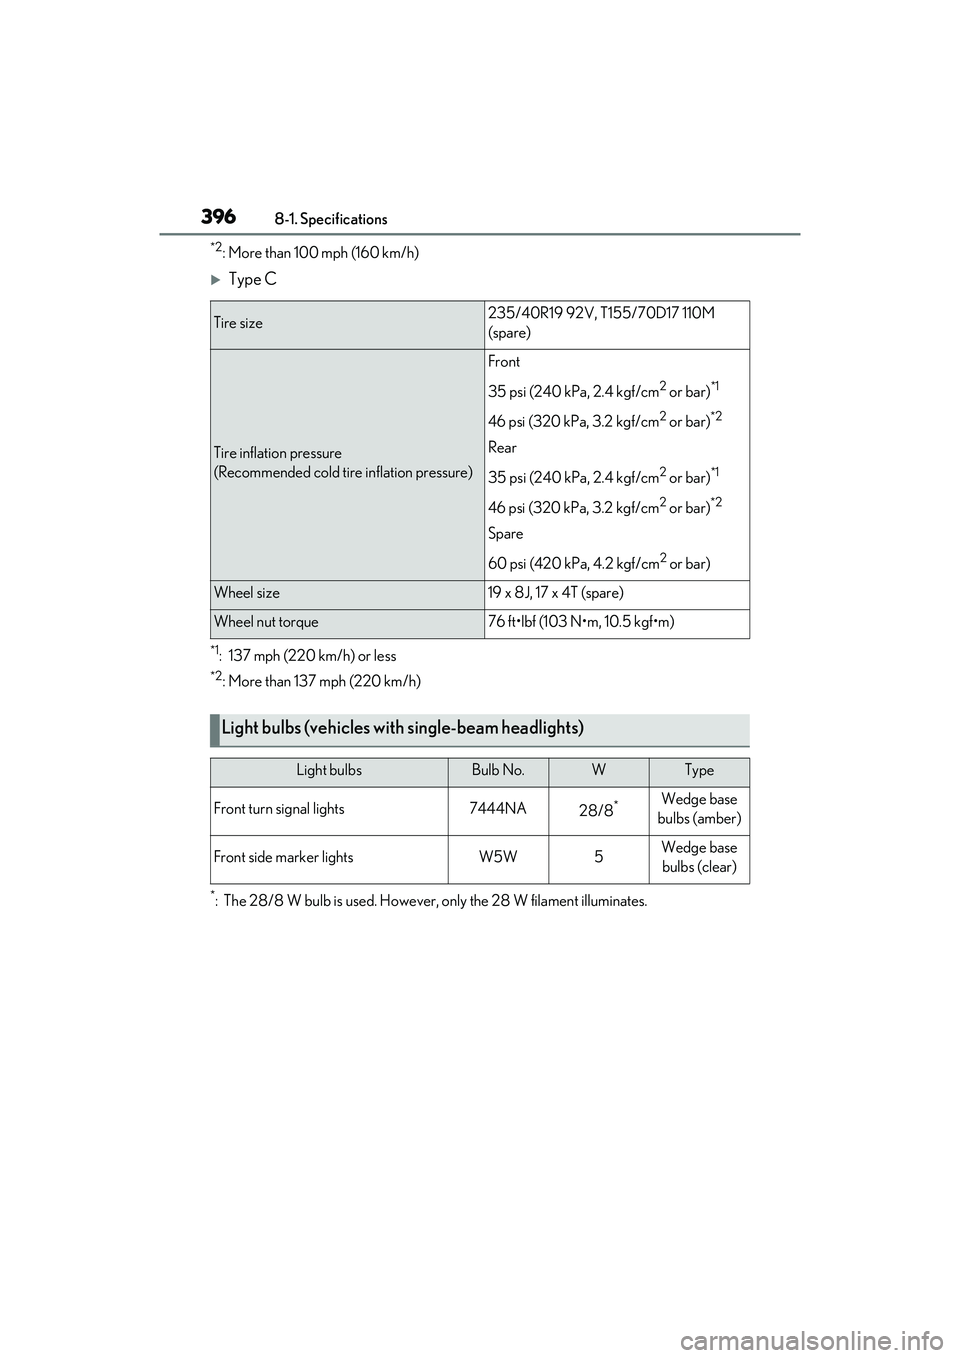
*2:More than 100 mph (160 km/h)
Type C
*1: 137 mph (220 km/h) or less
*2:More than 137 mph (220 km/h)
*: The 28/8 W bulb is used. However, only the 28 W filament illuminates.
Tire size235/40R19 92V, T155/70D17 110M
(spare)
Tire inflation pressure
(Recommended cold tire inflation pressure)
Front
35 psi (240 kPa, 2.4 kgf/cm
2 or bar)*1
46 psi (320 kPa, 3.2 kgf/cm2 or bar)*2
Rear
35 psi (240 kPa, 2.4 kgf/cm
2 or bar)*1
46 psi (320 kPa, 3.2 kgf/cm2 or bar)*2
Spare
60 psi (420 kPa, 4.2 kgf/cm
2 or bar)
Wheel size19 x 8J, 17 x 4T (spare)
Wheel nut torque76 ft•lbf (103 N•m, 10.5 kgf•m)
Light bulbs (vehicles with single-beam headlights)
Light bulbsBulb No.WType
Front turn signal lights7444NA28/8*Wedge base
bulbs (amber)
Front side marker lightsW5W5Wedge base bulbs (clear)