2022 LEXUS ES350 height
[x] Cancel search: heightPage 28 of 468
261-1. For safe use
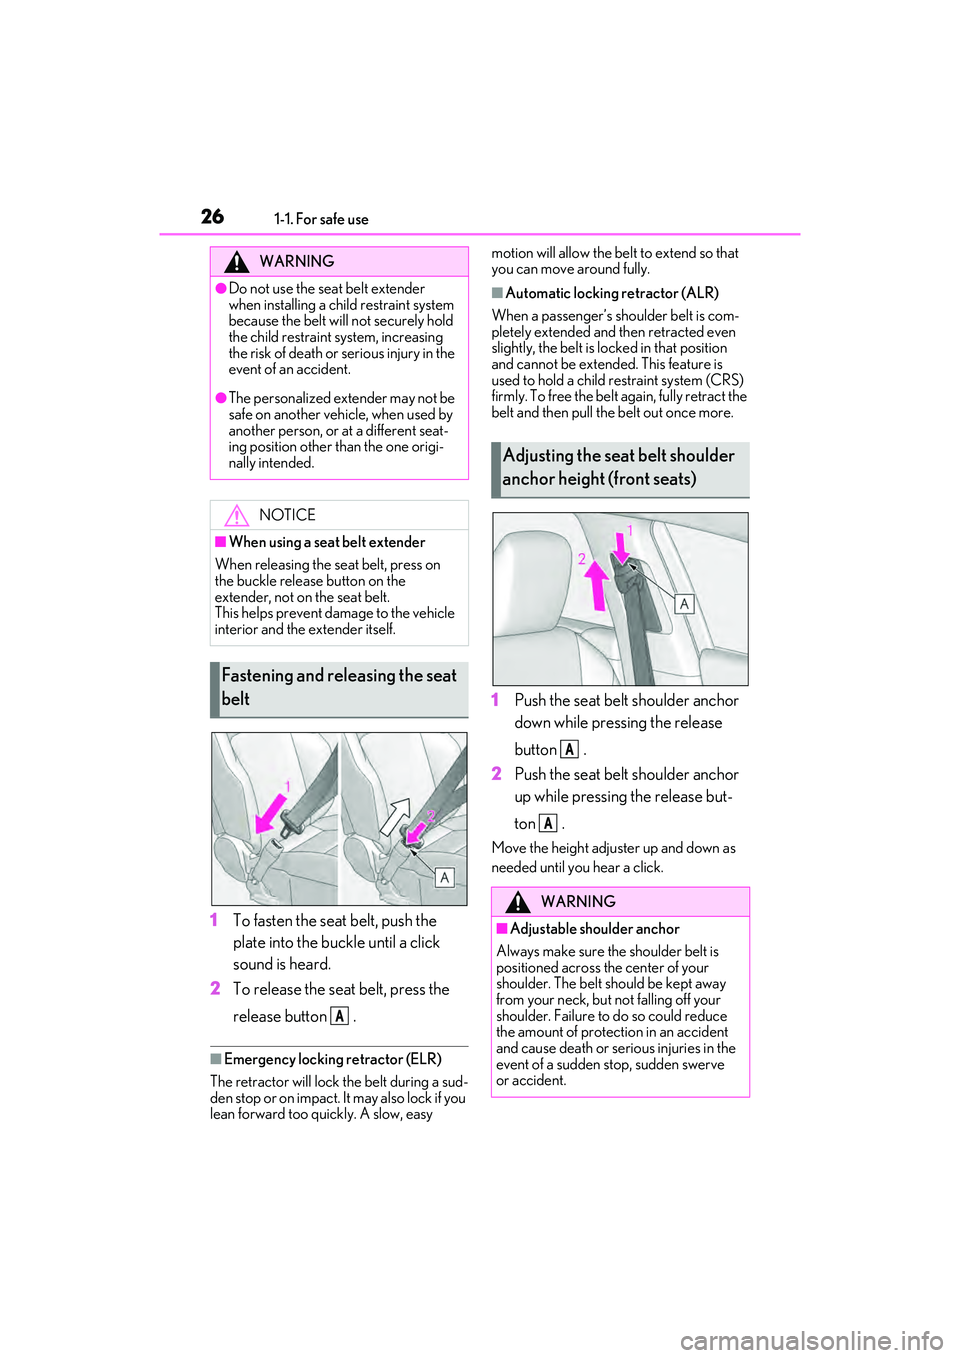
1To fasten the seat belt, push the
plate into the buckle until a click
sound is heard.
2 To release the seat belt, press the
release button .
■Emergency locking retractor (ELR)
The retractor will lock the belt during a sud-
den stop or on impact. It may also lock if you
lean forward too quickly. A slow, easy motion will allow the belt to extend so that
you can move around fully.
■Automatic locking retractor (ALR)
When a passenger’s shoulder belt is com-
pletely extended and then retracted even
slightly, the belt is locked in that position
and cannot be extended. This feature is
used to hold a child restraint system (CRS)
firmly. To free the belt again, fully retract the
belt and then pull the belt out once more.
1 Push the seat belt shoulder anchor
down while pressing the release
button .
2 Push the seat belt shoulder anchor
up while pressing the release but-
ton .
Move the height adjuster up and down as
needed until you hear a click.
WARNING
●Do not use the seat belt extender
when installing a child restraint system
because the belt will not securely hold
the child restraint system, increasing
the risk of death or serious injury in the
event of an accident.
●The personalized extender may not be
safe on another vehicle, when used by
another person, or at a different seat-
ing position other than the one origi-
nally intended.
NOTICE
■When using a seat belt extender
When releasing the se at belt, press on
the buckle release button on the
extender, not on the seat belt.
This helps prevent damage to the vehicle
interior and the extender itself.
Fastening and releasing the seat
belt
A
Adjusting the seat belt shoulder
anchor height (front seats)
WARNING
■Adjustable shoulder anchor
Always make sure the shoulder belt is
positioned across the center of your
shoulder. The belt should be kept away
from your neck, but not falling off your
shoulder. Failure to do so could reduce
the amount of protection in an accident
and cause death or serious injuries in the
event of a sudden stop, sudden swerve
or accident.
A
A
Page 47 of 468
451-2. Child safety
1
For safety and security
■When installing a child restraint
system to a front passenger seat
For the safety of a child, install child
restraint systems to a rear seats. When
installing child restraint system to a
front passenger seat is unavoidable,
adjust the seat as follows and install the
child restraint system.
Move the front seat fully rearward.
Adjust the seatback angle to the
most upright position.When installing a forward-facing child
seat, if there is a gap between the child seat
and the seatback, adjust the seatback
angle until good contact is achieved.
Adjust the front of the seat cushion
to the uppermost position.
Adjust the seat height to the upper-
most position.
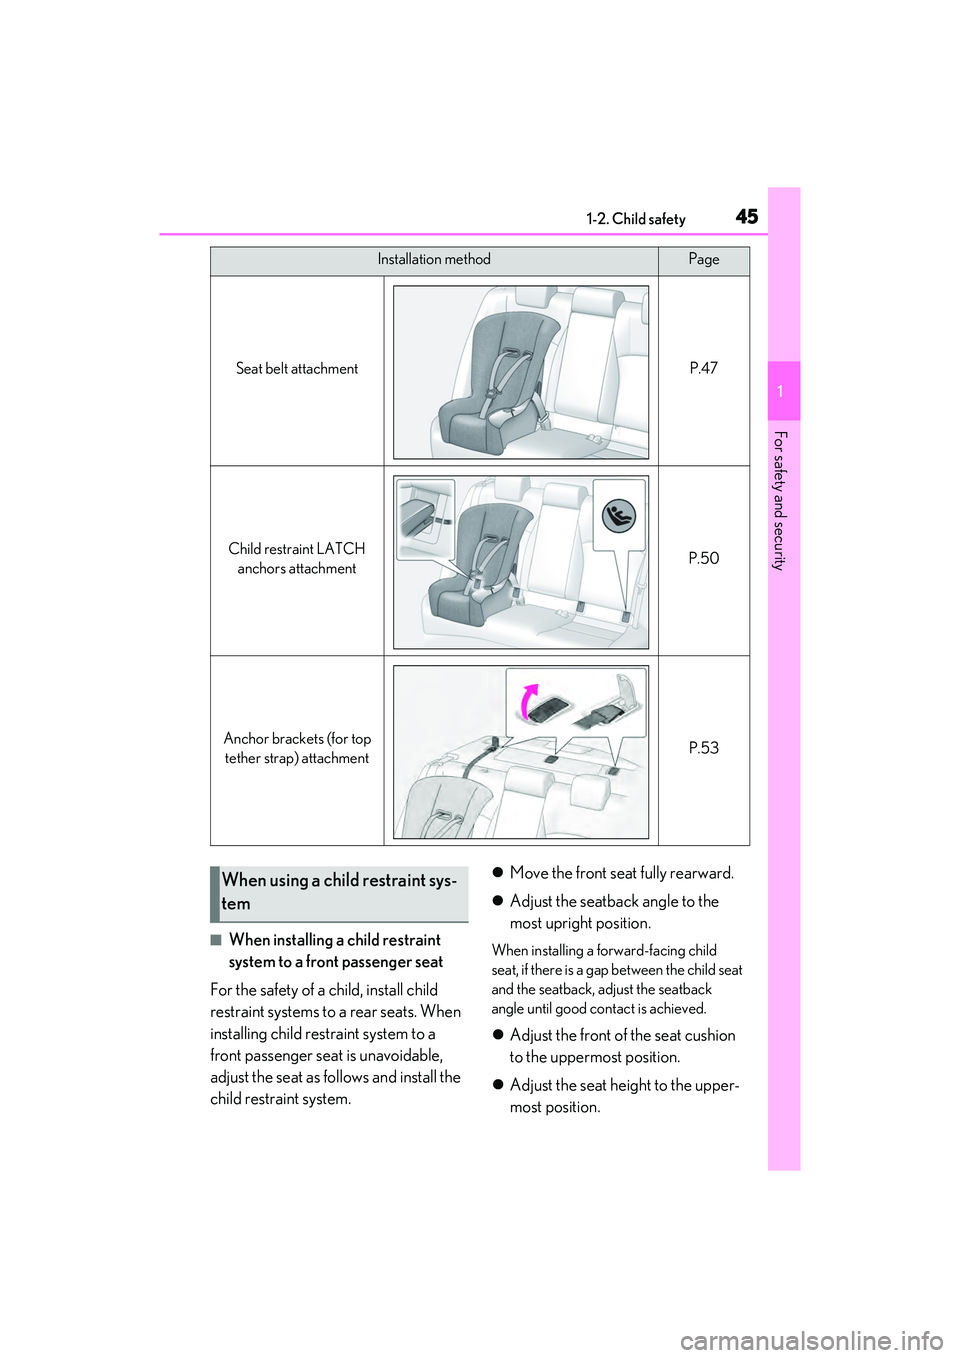
Installation methodPage
Seat belt attachmentP.47
Child restraint LATCH
anchors attachmentP.50
Anchor brackets (for top tether strap) attachmentP.53
When using a child restraint sys-
tem
Page 114 of 468
1123-3. Adjusting the seats
3-3.Adjusting the seats
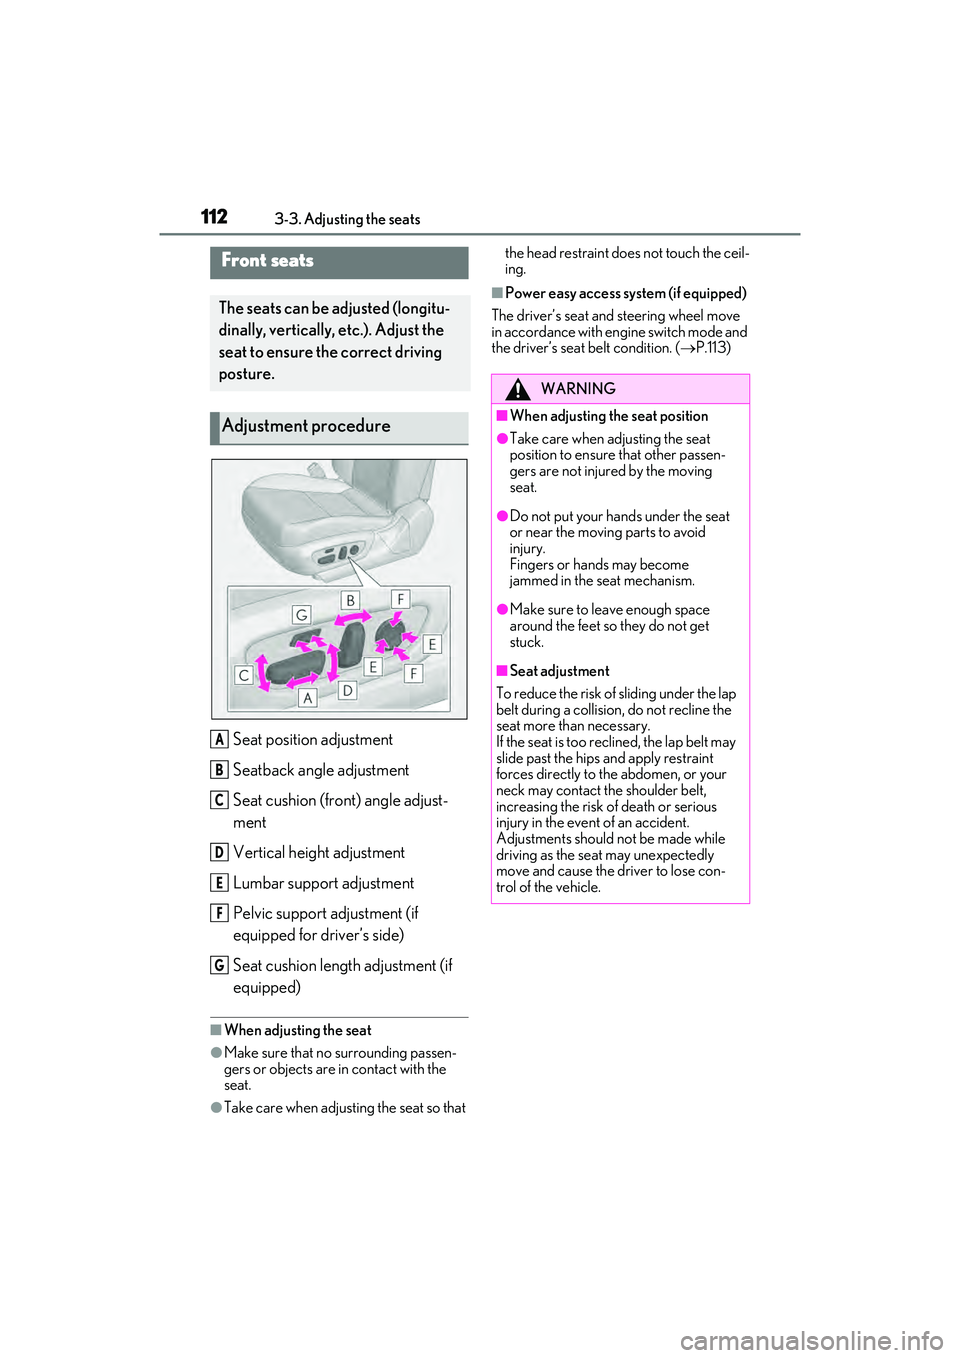
Seat position adjustment
Seatback angle adjustment
Seat cushion (front) angle adjust-
ment
Vertical height adjustment
Lumbar support adjustment
Pelvic support adjustment (if
equipped for driver’s side)
Seat cushion length adjustment (if
equipped)
■When adjusting the seat
●Make sure that no surrounding passen-
gers or objects are in contact with the
seat.
●Take care when adjusting the seat so that the head restraint does not touch the ceil-
ing.
■Power easy access system (if equipped)
The driver’s seat and steering wheel move
in accordance with engine switch mode and
the driver’s seat belt condition. ( P.113)
Front seats
The seats can be adjusted (longitu-
dinally, vertically, etc.). Adjust the
seat to ensure the correct driving
posture.
Adjustment procedure
A
B
C
D
E
F
G
WARNING
■When adjusting the seat position
●Take care when adjusting the seat
position to ensure that other passen-
gers are not injured by the moving
seat.
●Do not put your hands under the seat
or near the moving parts to avoid
injury.
Fingers or hands may become
jammed in the seat mechanism.
●Make sure to leave enough space
around the feet so they do not get
stuck.
■Seat adjustment
To reduce the risk of sliding under the lap
belt during a collision, do not recline the
seat more than necessary.
If the seat is too reclined, the lap belt may
slide past the hips and apply restraint
forces directly to the abdomen, or your
neck may contact the shoulder belt,
increasing the risk of death or serious
injury in the event of an accident.
Adjustments should not be made while
driving as the seat may unexpectedly
move and cause the driver to lose con-
trol of the vehicle.
Page 116 of 468

1143-3. Adjusting the seats
button is pressed, press button “1”,
“2” or “3” until the buzzer sounds.
If the selected button has already been
preset, the previously recorded position
will be overwritten.
■Seat positions that can be memorized
( P.112)
The positions adjusted by the following pro-
cedure can be recorded:
●Seat position adjustment
●Seatback angle adjustment
●Seat cushion (front) angle adjustment
●Vertical height adjustment
■In order to correctly use the driving
position memory function
If a seat position is already in the furthest
possible position and the seat is operated in
the same direction, the recorded position
may be slightly different when it is recalled.
1 Check that the shift lever is in P.
2 Turn the engine switch to IGNI-
TION ON mode. 3
Press one of the buttons for the
driving position you want to recall
until the buzzer sounds.
■To stop the position recall operation
part-way through
Perform any of the following:
●Press the “SET” button.
●Press button “1”, “2” or “3”.
●Operate any of the seat adjustment
switches (only cancels seat position
recall).
●Operate the tilt and telescopic steering
control switch (only cancels steering
wheel position recall).
●Vehicles with the head-up display: Oper-
ate the meter control switches to adjust
the head-up display position (only can-
cels head-up display position recall).
■Operating the driving position memory
after turning the engine switch off
Recorded seat positions can be activated
up to 180 seconds after the driver’s door is
opened and another 60 seconds after it is
closed again.
■When the recorded seat position can-
not be recalled
The seat position may not be recalled in
some situations when the seat position is
recorded in a certain range. For details,
contact your Lexus dealer.
WARNING
■Seat adjustment caution
Take care during seat adjustment so that
the seat does not strike the rear passen-
ger or squeeze your body against the
steering wheel.
Recalling a driving position
Page 118 of 468

1163-3. Adjusting the seats
the driving position that is recalled may
be different depending on the key being
carried.
●If the a door other than the driver’s door
is unlocked with the smart access system
with push-button start, the driving posi-
tion cannot be recalled. In this case, press
the driving position button which has
been set.
■Customization
The unlock door settings of the memory
recall function can be changed.
(Customizable features: P.408)
1 Up
Pull the head restraints up.
2Down
Push the head restraint down while press-
ing the lock release button .
■Adjusting the height of the head
restraints (front seats)
Make sure that the head restraints are
Head restraints
Head restraints are provided for all
seats.
WARNING
■Head restraint precautions
Observe the following precautions
regarding the head re straints. Failure to
do so may result in death or serious
injury.
●Use the head restraints designed for
each respective seat.
●Adjust the head restraints to the cor-
rect position at all times.
●After adjusting the head restraints,
push down on them and make sure
they are locked in position.
●Do not drive with the head restraints
removed.
Vertical adjustment
A
Page 119 of 468
1173-3. Adjusting the seats
3
Before driving
adjusted so that the center of the head
restraint is closest to the top of your ears.
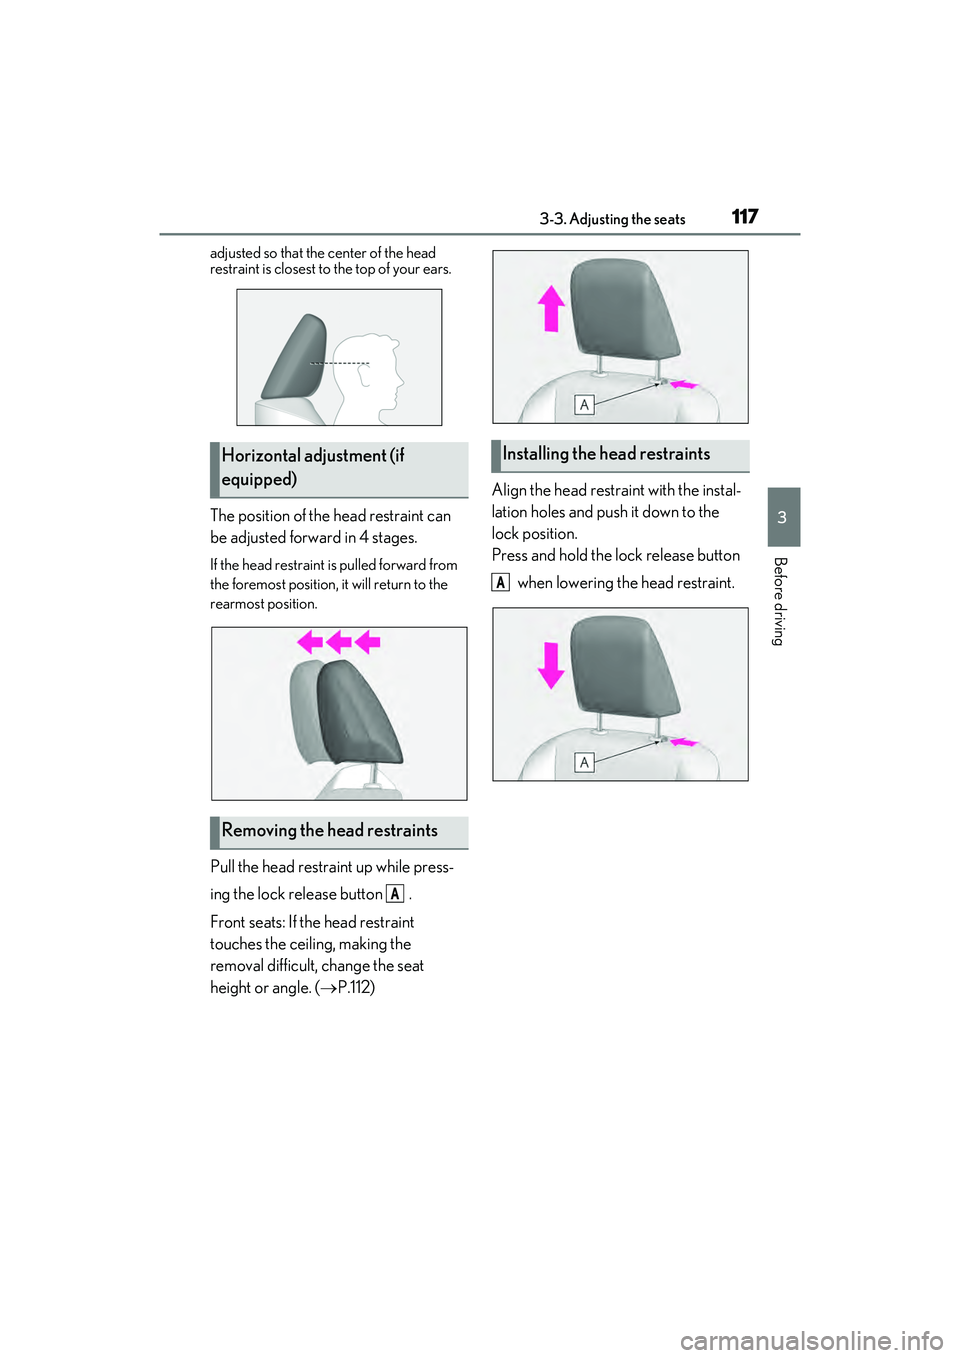
The position of the head restraint can
be adjusted forward in 4 stages.
If the head restraint is pulled forward from
the foremost position, it will return to the
rearmost position.
Pull the head restraint up while press-
ing the lock release button .
Front seats: If the head restraint
touches the ceiling, making the
removal difficult, change the seat
height or angle. (P.112) Align the head restraint with the instal-
lation holes and push it down to the
lock position.
Press and hold the lock release button
when lowering the head restraint.
Horizontal adjustment (if
equipped)
Removing the head restraints
A
Installing the head restraints
A
Page 121 of 468
1193-4. Adjusting the steering wheel and mirrors
3
Before driving
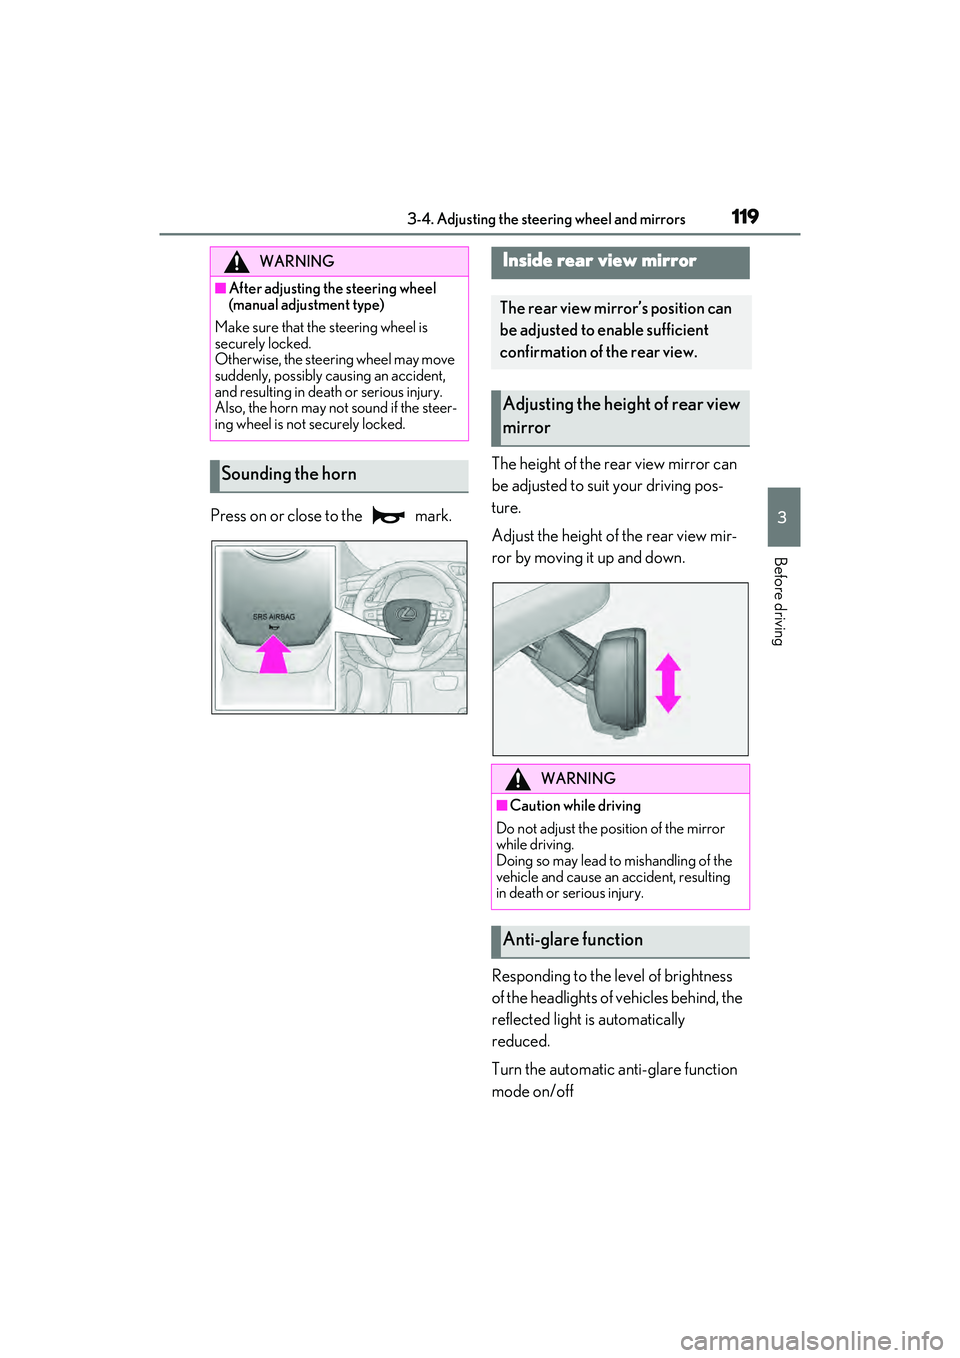
Press on or close to the mark.The height of the rear view mirror can
be adjusted to suit your driving pos-
ture.
Adjust the height of the rear view mir-
ror by moving it up and down.
Responding to the level of brightness
of the headlights of vehicles behind, the
reflected light is automatically
reduced.
Turn the automatic anti-glare function
mode on/off
WARNING
■After adjusting the steering wheel
(manual adjustment type)
Make sure that the steering wheel is
securely locked.
Otherwise, the steering wheel may move
suddenly, possibly causing an accident,
and resulting in death or serious injury.
Also, the horn may not sound if the steer-
ing wheel is not securely locked.
Sounding the horn
Inside rear view mirror
The rear view mirror’s position can
be adjusted to enable sufficient
confirmation of the rear view.
Adjusting the height of rear view
mirror
WARNING
■Caution while driving
Do not adjust the position of the mirror
while driving.
Doing so may lead to mishandling of the
vehicle and cause an accident, resulting
in death or serious injury.
Anti-glare function
Page 187 of 468
1854-5. Using the driving support systems
4
Driving
bicycle ridden by more than one person,
or a uniquely shaped bicycle (bicycle with
a child seat, tandem bicycle, etc.)
• If a pedestrian/or the riding height of a bicyclist ahead is shorter than approxi-
mately 3.2 ft. (1 m) or taller than approxi-
mately 6.5 ft. (2 m)
• If a pedestrian/bicyclist is wearing over- sized clothing (a rain coat, long skirt,
etc.), making their silhouette obscure
• If a pedestrian is bending forward or squatting or bicyclist is bending forward
• If a pedestrian/bicyclist is moving fast
• If a pedestrian is pushing a stroller, wheelchair, bicycle or other vehicle
• When driving in incl ement weather such
as heavy rain, fog, snow or a sandstorm
• When driving through steam or smoke
• When the surrounding area is dim, such as at dawn or dusk, or while at night or in
a tunnel, making a detectable object
appear to be nearly the same color as its
surroundings
• When driving in a place where the sur-
rounding brightness changes suddenly,
such as at the entrance or exit of a tunnel
• After the engine has started the vehicle
has not been driven for a certain amount
of time
• While making a left/right turn and for a
few seconds after making a left/right turn
• While driving on a curve and for a few seconds after driving on a curve
• If your vehicle is skidding
• If the front of the vehicle is raised or low- ered
• If the wheels are misaligned
• If a wiper blade is blocking the front cam- era
• The vehicle is being driven at extremely
high speeds
• When driving on a hill
• If the radar sensor or front camera is mis-
aligned • When driving in a traffic lane separated
by more than one lane where oncoming
vehicles are driving while making a
right/left turn
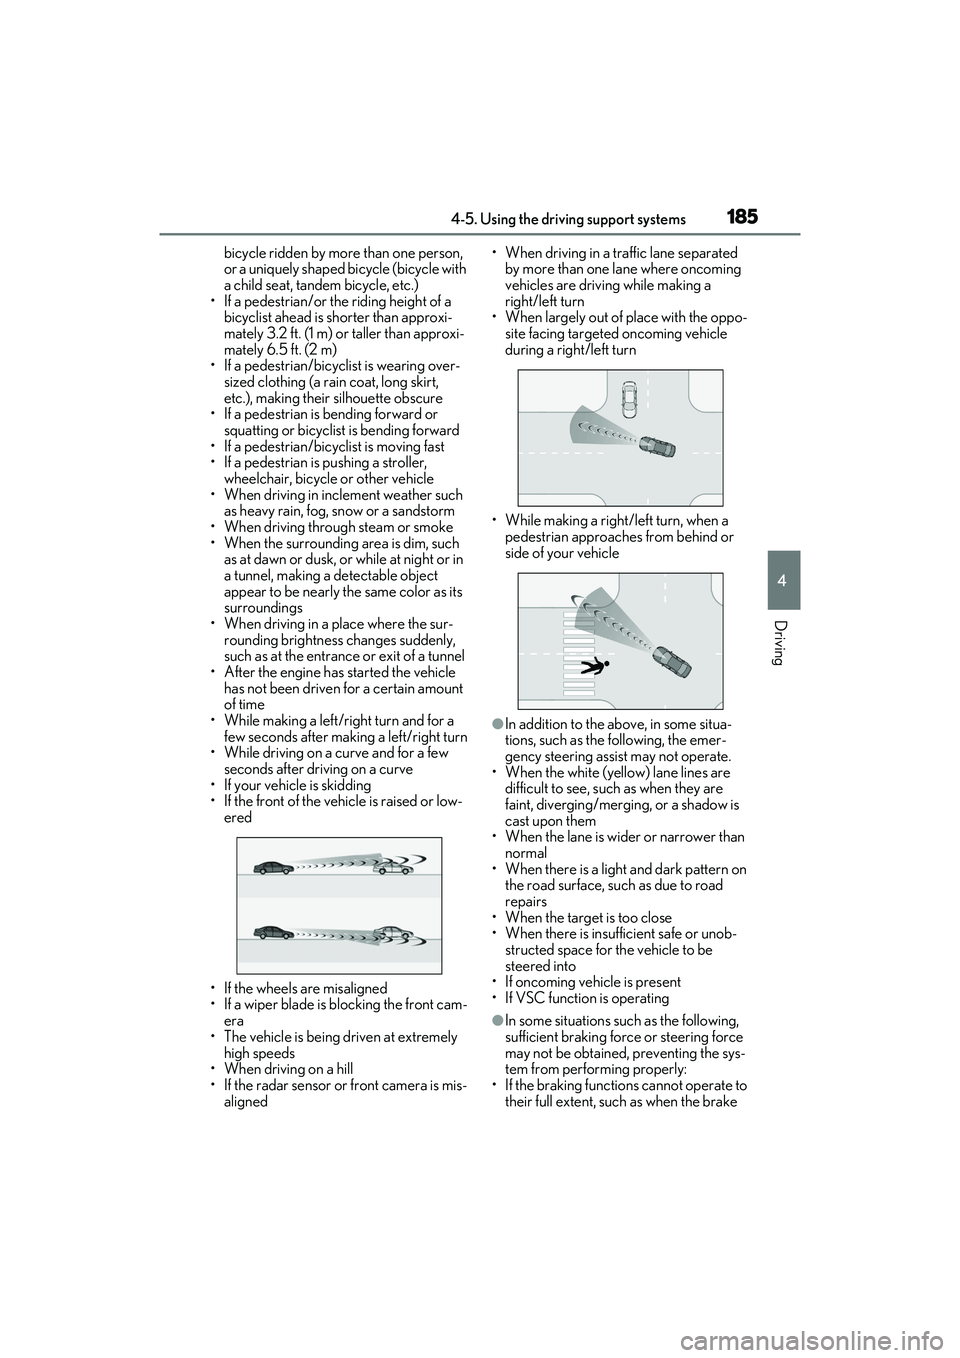
• When largely out of place with the oppo- site facing targeted oncoming vehicle
during a right/left turn
• While making a right/left turn, when a pedestrian approaches from behind or
side of your vehicle
●In addition to the above, in some situa-
tions, such as the following, the emer-
gency steering assist may not operate.
• When the white (yellow) lane lines are difficult to see, such as when they are
faint, diverging/merging, or a shadow is
cast upon them
• When the lane is wider or narrower than normal
• When there is a light and dark pattern on the road surface, such as due to road
repairs
• When the target is too close
• When there is insufficient safe or unob- structed space for the vehicle to be
steered into
• If oncoming vehicle is present
• If VSC function is operating
●In some situations such as the following,
sufficient braking force or steering force
may not be obtained, preventing the sys-
tem from performing properly:
• If the braking functions cannot operate to their full extent, such as when the brake