2022 LEXUS ES350 clock
[x] Cancel search: clockPage 70 of 468

682-1. Instrument cluster
■Locations of gauges and meters
The units of measure may differ depending on the intended destination of the vehicle.
Multi-information display
Presents the driver with a variety of vehicle data (P.76)
Displays warning messages if a malfunction occurs (P.361)
Outside temperature
Displays the outside temperature within the range of -40°F (-40°C) to 122°F (50°C)
Low outside temperature indicator comes on when the ambient temperature is 37°F
(3°C) or lower
Tachometer
Displays the engine speed in revolutions per minute
When sport mode is selected for the drivin g mode, the periphery of the tachometer will
change color and the scale of the tachometer will be emphasized.
Speedometer
Clock
Time displayed is linked to the analog clock on the center panel. ( P.280)
Engine coolant temperature gauge
Displays the engine coolant temperature
Fuel gauge
Displays the quantity of fuel remaining in the tank
Gauges and meters (e xcept F SPORT models)
Meter display
A
B
C
D
E
F
G
Page 74 of 468

722-1. Instrument cluster
Clock
Time displayed is linked to the analog clock on the center panel. (P.280)
Fuel gauge
Displays the quantity of fuel remaining in the tank
In the following situations, the actual quantity of fuel remaining in the tank may not be dis-
played correctly. Refer to P.74 if the actual quantity of fuel remaining in the tank is not dis-
played correctly.
• A small amount of fuel is added.
• Fuel is added with the fuel gauge near or at “F”.
• The vehicle is stopped on an uneven surface, such as a slope.
• The vehicle is driven on a slope or around a curve.
Multi-information display
Presents the driver with a variety of vehicle data ( P.76)
Displays warning messages if a malfunction occurs (P.361)
Main meter moved to the right
The units of measure may differ depending on the intended destination of the vehicle.
Outside temperature
Displays the outside temperature within the range of -40°F (-40°C) to 122°F (50°C)
Low outside temperature indicator comes on when the ambient temperature is 37°F
(3°C) or lower
Clock
Time displayed is linked to the analog clock on the center panel. ( P.280)
Tachometer
Displays the engine speed in revolutions per minute
When sport mode is selected for the drivin g mode, the periphery of the tachometer will
change color and the scale of the tachometer will be emphasized.
G
H
I
A
B
C
Page 82 of 468

802-1. Instrument cluster
generated, the G-force value display will
turn amber and be held for 2 seconds.
■Gear Position (F SPORT models)
Displays the current shift range or gear
position when the shift lever is in D or S.
■Units (F SPORT models)
The units of measure used can be
changed while driving.
Unlike the units setting performed on the
settings display, the units setting per-
formed on the drive information display
can be changed while driving.
■Eco Driving Indicator
Eco Driving Indicator will not operate
under the following conditions:
●The shift lever is in any position other than
D.
●A paddle shift switch is operated.
●The driving mode is set to other than nor-
mal mode or eco drive mode.
●The vehicle speed is approximately 80
mph (130 km/h) or higher.
Select to display the following naviga-
tion system-linked information.
Route guidance to destination
Compass display (heading-up dis-
play)
■Route guidance to destination display
When the route guidance to destination
display is enabled on the head-up display, it
will not be displayed on the multi-informa-
tion display. ( P.84)
Select to enable selection of an audio
source or track on the meter using the
meter control switches.
Select to display the operational status
of the following systems:
LTA (Lane Tracing Assist)
( P.186)
Dynamic radar cruise control with
full-speed range ( P.198)
RSA (Road Sign Assist) (if
equipped) ( P.195)
■Meter display settings that can be
changed
Language
Select to change the language displayed.
Units
Select to change the units of measure dis-
played.
Speedometer display (except F
SPORT models)
Select to set the display of the speedome-
ter to digital or analog.
Drive information 1/Drive informa-
tion 2
Select to select up to 2 items ( P.78) that
will be displayed on e ach Drive information
screen (Drive inform ation 1 screen and
Drive information 2 screen) respectively.
Clock
Navigation system-linked dis-
play (if equipped)
Audio system-linked display
Driving support system informa-
tion display
Settings display
Page 148 of 468

1464-2. Driving procedures
1Stop the vehicle completely.
2 Set the parking brake ( P.154),
and shift the shift lever to P
( P.150).
3 Press the engine switch.
4 Release the brake pedal and check
that “ACCESSORY” or “IGNI-
TION ON” is not shown on the
meter.
■Automatic engine shut off feature
●The vehicle is equipped with a feature
that automatically shuts off the engine
when the shift lever is in P with the engine
running for an extended period.
●The engine will automatically shut off
after approximately 1 hour if it has been
left running while the shift lever is in P.
●The timer for the automatic engine shut
off feature will reset if the brake pedal is
depressed or if the shift lever is in a posi-
tion other than P.
●After the vehicle is parked, if the door is
locked with the door lock switch
( P.98) from the inside or the mechani-
cal key from the outside, the automatic
engine shut off feature will be disabled.
The timer for the automatic engine shut
off feature will be re-enabled if the
driver’s door is opened.
■Locking the door from outside with the
engine running
1 With the driver’s door open, pull the
driver’s door handle and insert the
mechanical key.
2 Turn the mechanical key counterclock-
wise.
3 Pull out the mechanical key and close
the door.NOTICE
■Symptoms indicating a malfunction
with the engine switch
If the engine switch seems to be operat-
ing somewhat differently than usual, such
as the switch sticking slightly, there may
be a malfunction. Contact your Lexus
dealer immediately.
Stopping the engine
WARNING
■Stopping the engine in an emergency
●If you want to stop the engine in an
emergency while driving the vehicle,
press and hold the engine switch for
more than 2 seconds, or press it briefly
3 times or more in succession.
( P.344)
However, do not touch the engine
switch while driving except in an emer-
gency. Turning the engine off while
driving will not cause loss of steering
or braking control, but the power
assist to these systems will be lost. This
will make it more difficult to steer and
brake, so you should pull over and stop
the vehicle as soon as it is safe to do so.
●If the engine switch is operated while
the vehicle is running, a warning mes-
sage will be shown on the multi-infor-
mation display and a buzzer sounds.
Page 275 of 468

2735-4. Using the interior lights
5
Interior features
5-4.Using the interior lights
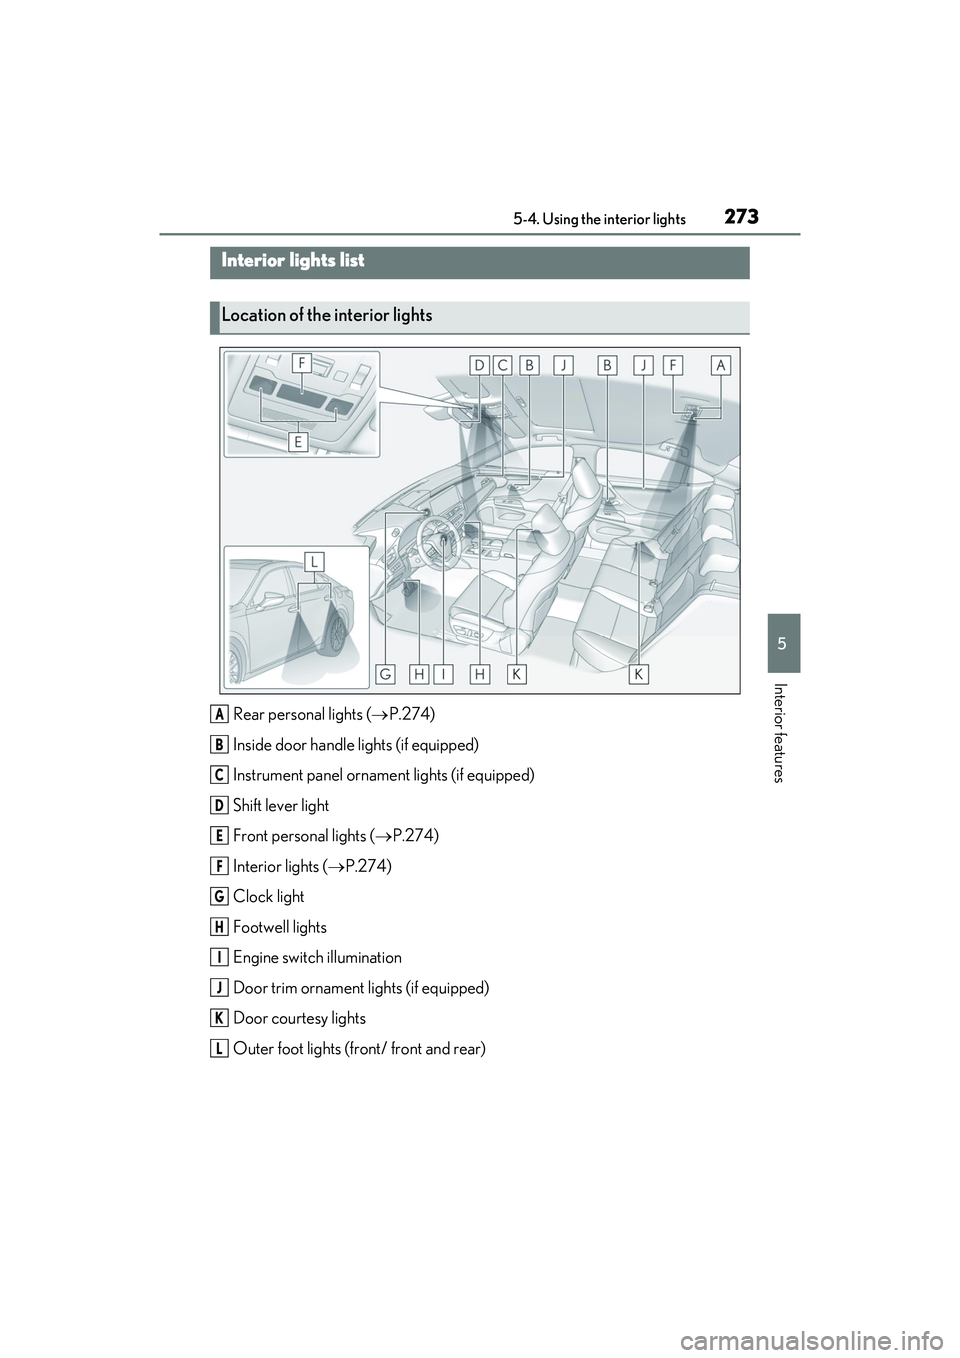
Rear personal lights (P.274)
Inside door handle lights (if equipped)
Instrument panel ornament lights (if equipped)
Shift lever light
Front personal lights ( P.274)
Interior lights ( P.274)
Clock light
Footwell lights
Engine switch illumination
Door trim ornament lights (if equipped)
Door courtesy lights
Outer foot lights (front/ front and rear)
Interior lights list
Location of the interior lights
A
B
C
D
E
F
G
H
I
J
K
L
Page 282 of 468

2805-6. Using the other interior features
5-6 .U sin g th e o th er in teri or f ea ture s
1To set the visor in the forward posi-
tion, flip it down.
2 To set the visor in the side position,
flip down, unhook, and swing it to
the side.
3 To use the side extender, place the
visor in the side position, then slide
it backward.
Slide the cover to open.
The light turns on when the cover is
opened.
The GPS clock’s time is automatically
adjusted by utilizing GPS time infor-
mation.
For details, refer to the “NAVIGATION
AND MULTIMEDIA SYSTEM
OWNER’S MANUAL”.
Please use as a power supply for elec-
tronic goods that use less than 12
VDC/10 A (power consumption of
120 W).
Front
Open the lid.
Rear
Open the lid.
Other interior features
Sun visors
Vanity mirrors
NOTICE
■To prevent battery discharge
Do not leave the lights on longer than
necessary when the engine is off.
Clock
Power outlets
Page 317 of 468

3156-3. Do-it-yourself maintenance
6
Maintenance and care
A25A-FKS engine
1 Remove the oil filler cap by turning
it counterclockwise.
2 Add engine oil slowly, checking the
dipstick.
3 Install the oil filler cap by turning it
clockwise.
■Engine oil consumption
A certain amount of engine oil will be con-
sumed while driving. In the following situa-
tions, oil consumption may increase, and
engine oil may need to be refilled in
between oil maintenance intervals.
●When the engine is new, for example
directly after purchasing the vehicle or
after replacing the engine
●If low quality oil or o il of an inappropriate
viscosity is used
●When driving at high engine speeds or
with a heavy load, or when driving while
accelerating or decelerating frequently
●When leaving the engine idling for a long
time, or when driving frequently through
heavy traffic
■After changing the engine oil
The engine oil maintenance data should be
reset. Perform the following procedures:
1 While the vehicle is stopped, press
of the meter control switches.
2 Press or of the meter control
switches, and select . 3
Press or of the meter control
switches, select “Veh icle Settings”, and
then press “OK”.
4 Press or of the meter control
switches, select “Oil Maintenance”, and
then press “OK”.
5 Select “Yes” and then press “OK”.
A message will be displayed on the multi-
information display when the reset proce-
dure has been completed.
WARNING
■Used engine oil
●Used engine oil contains potentially
harmful contaminants which may
cause skin disorders such as inflamma-
tion and skin cancer, so care should be
taken to avoid prolonged and
repeated contact. To remove used
engine oil from your skin, wash thor-
oughly with soap and water.
●Dispose of used oil an d filters only in a
safe and acceptable manner. Do not
dispose of used oil and filters in house-
hold trash, in sewers or onto the
ground.
Call your Lexus dealer, service station
or auto parts store for information
concerning recycling or disposal.
●Do not leave used engine oil within the
reach of children.
NOTICE
■To prevent serious engine damage
Check the oil level on a regular basis.
■When replacing the engine oil
●Be careful not to spill engine oil on the
vehicle components.
●Avoid overfilling, or the engine could
be damaged.
●Check the oil level on the dipstick
every time you refill the vehicle.
Page 342 of 468

3406-3. Do-it-yourself maintenance
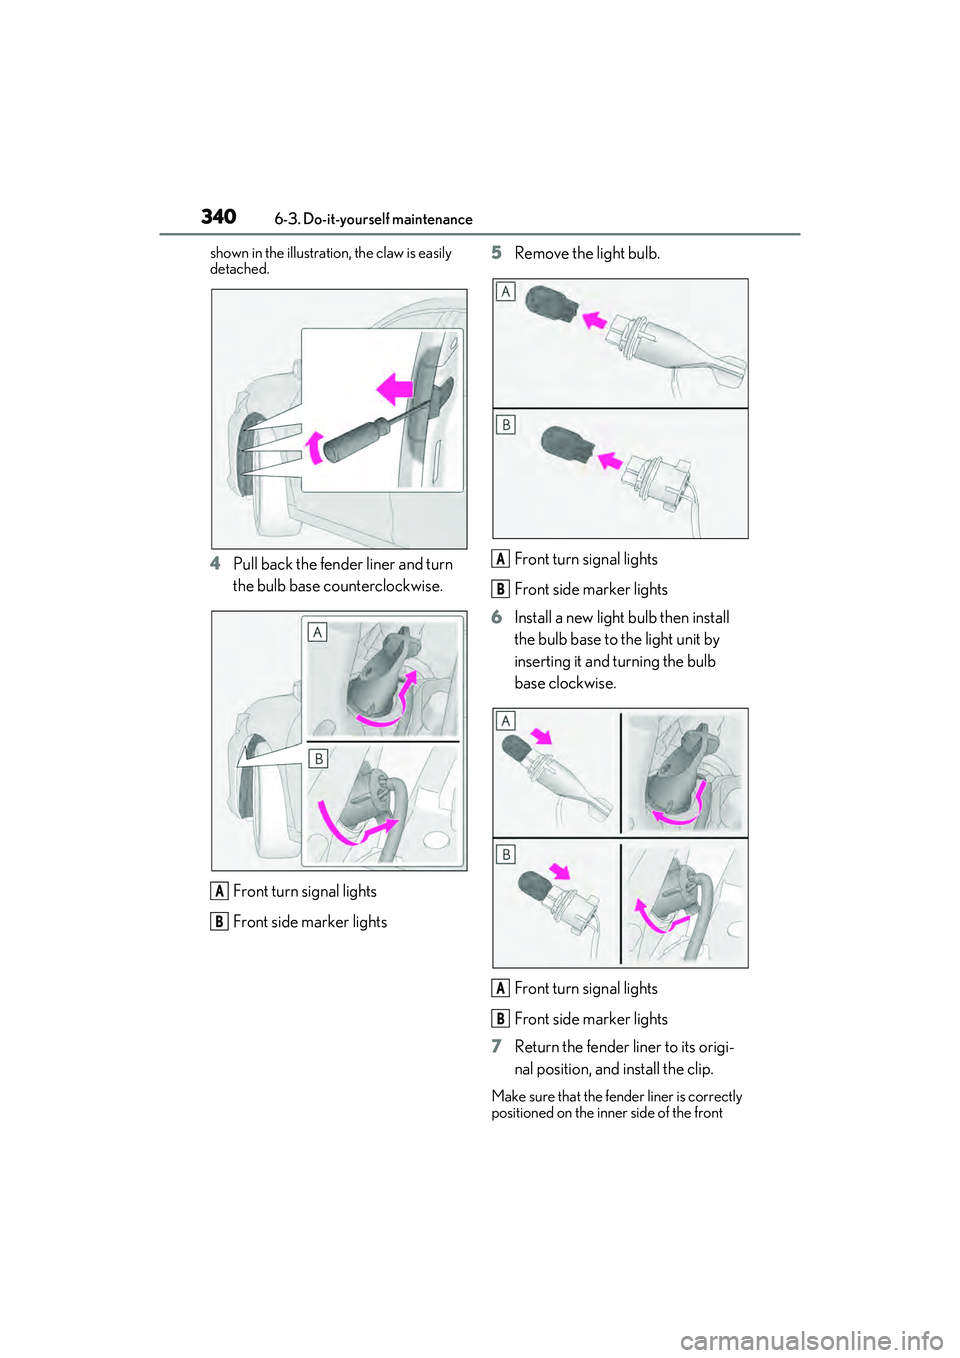
shown in the illustration, the claw is easily
detached.
4Pull back the fender liner and turn
the bulb base counterclockwise.
Front turn signal lights
Front side marker lights 5
Remove the light bulb.
Front turn signal lights
Front side marker lights
6 Install a new light bulb then install
the bulb base to the light unit by
inserting it and turning the bulb
base clockwise.
Front turn signal lights
Front side marker lights
7 Return the fender liner to its origi-
nal position, and install the clip.
Make sure that the fender liner is correctly
positioned on the inner side of the front
A
B
A
B
A
B