Page 25 of 58

23†LEGAL DISCL AIMERS ON BACK INSIDE COVER | *IF EQUIPPEDALWAYS CHECK THE OWNER ’S MANUAL FOR COMPLETE OPER ATING INFORMATION AND SAFET Y WARNINGS .
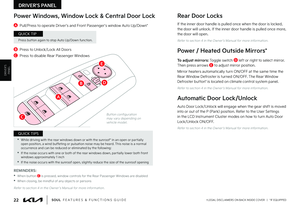
REMINDER: If the steering wheel becomes too warm, turn the system off . The heated steering wheel may cause burns even at low temperatures, especially if used for long periods of time .
(But ton located to the right of gearshift)
Heated Steering Wheel*
Press button A to turn ON/OFF steering wheel heater while the Engine Start/Stop Button is in the ON position . The steering wheel heater will turn off automatically in 30 minutes, or when button is pressed again to deactivate .
Refer to section 5 in the Owner ’s Manual for more information .
Refer to section 5 in the Owner ’s Manual for more information .
A
C
D
B
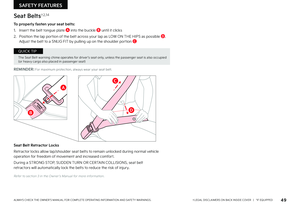
It may be helpful to pull/push bot tom of the steering wheel towards/away from you to adjust desired distance prior to adjusting the angle .
QUICK TIP
If ignition is turned OFF, then ON again, within 30 minutes of the steering wheel heater being turned on, the system will automatically be set ON again .
QUICK TIP
Tilt/Telescoping Steering Wheel†1 8
To adjust the Steering Wheel, push down the lock-release lever B and adjust to the desired angle C and distance D .
When finished, pull up the lock-release lever B to lock Steering Wheel in place .
STEERING WHEEL CONTROLS
STEERING WHEEL CONTROLS
Page 26 of 58
* po")
STEERING WHEEL CONTROLS
24†LEGAL DISCL AIMERS ON BACK INSIDE COVER | *IF EQUIPPEDSOUL FEATURES & FUNCTIONS GUIDE
STEERING WHEEL CON
-
TROLS
AUTOAutomatic Headlights / High Beam Assist (HBA)* position
Headlight position
Parking Light position
OFFOFF position
OFF
OFF
Headlights & High Beams
To operate:
Rotate lever switch to change the Headlight function
Push lever to turn High Beams ON
Pull lever to flash Headlights / High Beams
AUTO Light position – When the light switch is in the AUTO light position, the tail lights and headlights will turn ON/OFF automatically, depending on the amount of light outside the vehicle .
High Beam Assist (HBA)* – High Beam Assist is designed to automatically adjust the headlight range by switching between high and low beams based on light detected from other vehicles and road conditions .
To enable HBA , toggle the light switch to the AUTO Light position and turn on the high beams by pushing the lever away from you . The High Beam Assist indicator will illuminate .
Turn Signals & Fog Lights*
To operate:
•Turn Signals - Move lever Up/Down for Right/Left Turn Signal
•Slightly move lever up/down to activate One-Touch Lane Change Signal
•Fog Lights - Press switch up/down to turn Fog Lights ON/OFF
One-Touch Lane Change Signal is activated by briefly pressing the Turn Signal Lever up/down slightly up or down for less than 1 second and then releasing . The lane change signal will blink 3 times .
To change how many times the Lane Change Signal blinks (3/5/7), go to User Settings Mode* in the LCD Instrument Cluster modes (Type B cluster) .
REMINDER: Headlights must be ON for Fog Light operation .
REMINDERS:
•HBA will operate when vehicle speed exceeds 25 mph
•
If the lever is pushed away from you while HBA is operational, HBA will turn off and the high beams will be on continuously . If the lever is pulled toward you while HBA is operational, HBA will turn off
•
If the light switch is switched to the headlight position, HBA will turn off and low beams will be on continuously
•
When the warning pop-up illuminates on the instrument cluster, the HBA is not working properly . See an authorized Kia dealer for ser vice
•
High Beam Assist does not operate below cer tain speeds, or in some lighting and driving conditions . Please be aware of your surroundings and exercise proper road etiquet te when operating a vehicle using the high beams
OFF
OFF
�0�O�F���5�P�V�D�I��
�-�B�O�F���$�I�B�O�H�F��
�4�J�H�O�B�M
�'�P�S���J�M�M�V�T�U�S�B�U�J�W�F���Q�V�S�Q�P�T�F�T���P�O�M�Z�����:�P�V�S���B�D�U�V�B�M���E�J�T�Q�M�B�Z�
���C�V�U �U�P�O�T���B�O�E���P�S���G�F�B�U�V�S�F�T���N�B�Z���W�B�S �Z�����3�F�G�F�S���U�P���T�F�D�U�J�P�O�������J�O���U�I�F���0�X�O�F�S �s�T���.�B�O�V�B�M���G�P�S���N�P�S�F���J�O�G�P�S�N�B�U�J�P�O��
Page 27 of 58

STEERING WHEEL CON
-
TROLS
25†LEGAL DISCL AIMERS ON BACK INSIDE COVER | *IF EQUIPPEDALWAYS CHECK THE OWNER ’S MANUAL FOR COMPLETE OPER ATING INFORMATION AND SAFET Y WARNINGS .
MIST: Single wipe
OFF: Wiper off
INT: Intermit tent wipe
LO: Slow wipe
HI: Fast wipe
HI
LO
OFF
I N T
HI: Continuous wipe
LO: Intermit tent wipe
OFF: Wiper off
Rear Wiper & Washer*
To operate:
•Rotate Rear Wiper switch to change Wiper modes
•Push lever to spray and wipe
HI
LO
OFF
I N T
Windshield Wipers & Washers
To operate:
•Rotate switch to adjust Wiper mode
•Move lever Up/Down to change Wiper modes
•Press INT switch up/down E to adjust Intermittent
Wipe Speed
•Pull lever to spray and wipe
Refer to section 4 in the Owner ’s Manual for more information
Refer to section 4 in the Owner ’s Manual for more information
STEERING WHEEL CONTROLS
Refer to the inside front cover for more information on QR codes .www .youtube .com/KiaFeatureVideos
Wipers and Wiper Stalk Video
QR CODE
•Moving lever to HI increases intermit tent wipe frequency and wipe speed
•Moving lever to LO decreases frequency of wipes
•Set the wiper to OFF position when the wiper is not in use
QUICK TIPS
E
On Rear Wipers, intermit tent wipe function is not adjustable .
QUICK TIP
Page 28 of 58

26†LEGAL DISCL AIMERS ON BACK INSIDE COVER | *IF EQUIPPEDSOUL FEATURES & FUNCTIONS GUIDE
AUDIO SYSTEMS
AUDIOSYSTEMS
A Volume buttons: Press / to raise/lower speaker volume Mute audio: To mute the audio system, hold the button
B Talk button: Press to activate voice recognition*; recognition/bring up menus/place calls with minimal voice command prompts from the system . press and hold to exit voice recognition*
C Receive/Place Call button*: Press to receive/place calls . If no phone is paired, press button to pair a phone
D
End Call button: Press to end a call, reject an incoming call or cancel a function
Your vehicle’s steering wheel but tons may differ from those in the illustration .
For more information, refer to the Car Infotainment System Quick Reference Guide .
For Bluetooth® Wireless Technology FAQs, go to kia .com, Owners section, or call Consumer Information for Bluetooth® Technology at (800) 333-4KIA .
Driving while distracted is dangerous and should be avoided . Drivers should remain at tentive to driving and always exercise caution when using the steering-wheel-mounted controls while driving .
REMINDER: Microphone is located in the overhead console
Pairing a Phone
For instructions on how to pair a phone, refer to the audio system’s user ’s guide, your vehicle’s Quick Star t Guide or the Car Multimedia System User ’s Manual .
How to Place a Call
When using the voice command* feature, wait for the system BEEP before speaking the command .
There are two options for placing a call:
1 . Option 1: Press the Receive/Place Call button C (displays the call history screen)
2 . Option 2*: Press the Talk button B . Then say the command “Call {name}” or Dial {number} followed by contact name or number
Bluetooth® Wireless Technology†4 , 1 6
(But tons located on left side on Steering Wheel)
•When using the voice command feature, wait for the system BEEP before speaking the command
• Phone book transfer upload time varies by phone model and with number of phone book entries
•Because of differences in phone qualit y, ser vice providers and Bluetooth® Wireless Technology chip programming, functionalit y may differ from one phone to another
QUICK TIPS
During the pairing process, be sure to accept the connection requests on the phone for phone book download and to allow acceptance of all future Bluetooth® connection requests .
QUICK TIPS
B
C
D
A
Refer to the inside front cover for more information on QR codes .www .youtube .com/KiaFeatureVideos
Voice Recognition TipsVideo
QR CODE
Page 29 of 58

27†LEGAL DISCL AIMERS ON BACK INSIDE COVER | *IF EQUIPPEDALWAYS CHECK THE OWNER ’S MANUAL FOR COMPLETE OPER ATING INFORMATION AND SAFET Y WARNINGS .
AUDIO SYSTEMS
AUDIOSYSTEMS
Voice Recognition* and Phone Contact Tips
The system may have difficulty understanding some accents or uncommon names . Improve the per formance by making a few simple changes to your phone contacts, listed below . To help optimize the Bluetooth® Wireless Technology Voice Recognition system, see other tips and reminders under Quick Tips:
•Use full names (first and last names) vs . short or single-syllable names (“John Smith” vs . “Dad,” “Smith Residence” vs . “Home”)
•Avoid using special characters, emojis or hyphenated names (@, &, #, /, -, *, +, etc .)
•Avoid using acronyms (“In Case of Emergency” vs . “ICE”) or words with all capital letters
•Spell words completely, no abbreviations (“Doctor Smith” vs . “Dr . Smith”)
Bluetooth® Wireless Technology†4 , 1 6 (continued)Audio Controls†1 6
•The system may register or pair multiple Bluetooth® devices . See the Car Multimedia System User ’s Manual for more information on setup and limitations
•Bluetooth® Music Streaming: If the Bluetooth® music is inaudible or too low, turn up the volume on the connected phone
•When placing a call, speak in a natural, moderate tone, with clear pronunciation . The system may have trouble recognizing commands if you speak too softly or too loudly
•Always wait for the beep before speaking any commands
•Close windows and sunroof and turn off A /C to reduce inter ference with the Voice Recognition
•Press the talk but ton and say “Help” to get a list of available commands
QUICK TIPS
A
Audio MODE button: Press to cycle through FM/AM/SiriusXM®*/ M e dia
modes Audio System ON/OFF: Press to turn power on; Press and hold to turn power off; Press and hold to go to Advanced Setting / Steering Wheel mode (UVO link with Navigation)
B
Seek/Preset buttons Radio (FM/AM/SiriusXM®) Modes: Press to advance through Preset Stations . Press and hold to Auto Seek Media Mode: Press to move track up/down . Press & hold to fast forward/rewind (except for Bluetooth® Audio)
C
Volume button: Press up/down to raise/lower volume Mute audio: Press to mute all audio (Media pauses in some Media modes when pressed)
Driving while distracted is dangerous and should be avoided . Drivers should remain at tentive to driving and always exercise caution when using the steering-wheel-mounted controls while driving .
To help minimize driver distraction, some audio system functionalities have been modified while the vehicle is in Drive, Reverse or moved out of Park .
Your vehicle’s steering wheel but tons may differ from those in the illustrations . Refer to section 4 in the Owner ’s Manual for more information .
For other audio system information, refer to pages 28-32 .
B
C
A
Page 30 of 58

AUDIO SYSTEMS
AUDIOSYSTEMS
28†LEGAL DISCL AIMERS ON BACK INSIDE COVER | *IF EQUIPPEDSOUL FEATURES & FUNCTIONS GUIDE
Android AutoTM†3 / Apple CarPlay®†3 Setup
Driving while distracted can result in a loss of vehicle control that may lead to an accident, severe bodily injur y, or death . The driver ’s primar y responsibilit y is in the safe and legal operation of a vehicle . Handheld devices, other equipment, or vehicle systems which take the driver ’s eyes, at tention and focus away from the safe operation of a vehicle or which are not permissible by law, should never be used during operation of the vehicle .
Android Auto™ compatible smartphone setup – Download the Android Auto™ app from the Google Play™ Store†10 . Open the Android Auto™ app and proceed with the onscreen instructions to complete setup on the mobile device .
Wireless Connection setup for Android Auto™ & Apple CarPlay® (Standard Audio System & Standard Audio System-Value with UVO link):
1 . Press the SETUP key on the audio head unit
2 . Press DEVICE CONNECTION SETTINGS
3 . Press PHONE PROJECTION, then ADD NEW
Cable Connection setup for Android Auto™ (Standard Audio System, Standard Audio System-Value with UVO link & UVO link with Navigation):
1 . Press the SETUP key on the audio head unit
2 . Press DEVICE CONNECTION, select Android Auto™ and then select ENABLE ANDROID AUTO . Review all terms, conditions and requests on the head unit and phone . If you agree, accept them in order to use Android Auto™
3 . Connect the Android™ device with the vehicle’s USB port using the manufacturer ’s cable provided with your phone
4 . From the vehicle’s home screen, select the Android Auto™ button, where you’ll see all the Android Auto™ supported apps
Cable Connection setup for Apple CarPlay® (UVO link with Navigation only):
1 . Connect the Apple CarPlay® compatible iPhone® with the vehicle’s USB port using the manufacturer ’s cable provided with your iPhone®
2 . Press the SETUP key on the audio head unit
3 . Press DEVICE CONNECTION on the screen and select Apple CarPlay®
4 . Select ENABLE APPLE CARPL AY . Review all terms, conditions and requests on the head unit and phone . If you agree, accept them in order to use Apple CarPlay®
5 . From the audio head unit home screen, select the Apple CarPlay® button, where you’ll see all the Apple CarPlay® supported apps
Refer to the inside front cover for more information on QR codes .www .youtube .com/KiaFeatureVideos
Wireless Apple CarPlay® & Android™ Auto Video
QR CODE
•If Android Auto™ / Apple CarPlay® randomly disconnects:
– Ensure the USB cable is cer tified by the phone manufacturer for both power and data
– Clean the phones por t, which the USB cable connects to, with disposable compressed air
– The Phone should not be disturbed while driving as this can cause a disconnection at the phone’s USB por t
– Visit the phone manufacturer ’s website for Android Auto™ / Apple CarPlay® app concerns
QUICK TIPS
REMINDERS:
•Android Auto™ compatibilit y requirements for connection:
– UVO link with Navigation (USB cable connection only): OS Android™ 5 .0 or higher, phone manufacturer ’s USB cable and data plan with applicable feature(s)
•Standard Audio System-Value (USB cable & wireless connection):
– USB cable connection - OS Android™ 5 .0 or higher, phone manufacturer ’s USB cable and data plan with applicable feature(s)
– Wireless connection - OS Android™ 9 .0 or higher with data plan for applicable feature(s)
•Apple CarPlay® compatibilit y requirements for connection:
– UVO link with Navigation (USB cable connection only): iOS soft ware 8 .0 or higher, phone manufacturer ’s USB cable and data plan for applicable feature(s)
– Standard Audio System-Value (Wireless connection only): iOS soft ware 10 .0 and higher with data plan for applicable feature(s)
•
It is recommended to always update your phone to the latest operating system release
•
Wireless Android Auto™ system only works for cer tain Android models . Use the manufacturer ’s USB cable when wireless feature is not available
•
Using an approved USB cable provided by your smar tphone manufacturer is recommended
•
Using unapproved USB cables may cause a phone projection error or a system malfunction, black screen, no sound, disconnection, etc .
•Phone projection may not work due to a defect in the phone
iPhone is a registered trademark of Apple Inc .
Refer to the Car Infotainment System Quick Reference Guide for more information . For audio system information, refer to pages 27-32 .
Page 31 of 58

AUDIO SYSTEMS
AUDIOSYSTEMS
29†LEGAL DISCL AIMERS ON BACK INSIDE COVER | *IF EQUIPPEDALWAYS CHECK THE OWNER ’S MANUAL FOR COMPLETE OPER ATING INFORMATION AND SAFET Y WARNINGS .
RADIO
MEDIA
TRACK SEEKHOME
PHONE
SETUPPress to select FM/AM modes
A programmable key to provide quick access to one of several available system features
Press to Power ON/OFF . Rotate to adjust Volume
Press to select MEDIA modesPress to enter Phone Mode
Press to return to HOME screen
Press briefly to do the following:• FM/AM mode: Play the previous/next frequency• MEDIA mode: Change the track, file or title Press and hold to do the following (over 0 .8 seconds):• FM/AM mode: Move quickly through all of the frequencies . When released, the system seeks the next available frequency• MEDIA mode: Rewinds or fast for wards the track or file (except for Bluetooth® Audio)
Press to go to SETUP menu
Rotate to change Radio Stations/Media tracks/songs/files . Press to select .
Standard Audio System* – FM/AM /Media (USB, Bluetooth®†3 Audio, My Music)
SiriusXM® Smart Favorites – For the first ten favorite SiriusXM® channels, you may play live or repeat from the beginning of a song or a program segment . In Radio mode, choose SiriusXM®, then select any of the first ten favorites . During song or program play, tap the Skip Backward icon to start from the beginning of the song or program . Tap the Play Live icon to return to the live broadcast .
Radio Presets: You can listen to FM and AM radio and save frequently used stations . To Save a Preset, press and hold the desired slot . This saves the current station in the selected slot .
Custom Key H: A programmable key to provide quick access to one of several available system features . To program the Custom Key, press and hold the Custom key . Select one of the available features you would like the Custom key to open .
Your vehicle’s audio system may differ from that in the illustration . For further audio system operations, refer to pages 27-32 or the Car Infotainment System Quick Reference Guide .
Sound Settings – To adjust the Standard Audio Systems sound settings:
1 . Press the SETUP key on the audio control unit or the onscreen MENU button, when in MEDIA mode
2 . Select the onscreen SOUND button
3 . Select the menu item (Position, Volume, Tone, Priority, Advanced)
4 . Using the touchscreen, press arrows to adjust the settings
Driving while distracted is dangerous and should be avoided . Drivers should remain at tentive to driving and always exercise caution when using the steering-wheel-mounted controls while driving .
REMINDERS:
•
To help minimize driver distraction, some audio system functionalities have been modified while the vehicle is in Drive, Reverse or moved out of Park
•
Prolonged use of the audio control unit in ACC mode may drain the vehicle’s battery
•The system can register or pair multiple Bluetooth® devices . See the Car Infotainment System Quick Reference Guide for more information on setup and limitations
•Volume level bet ween different audio modes:
– When switching bet ween audio modes (AM, FM, Bluetooth® Audio, etc .), the audio system saves the previous volume level you were listening to . For example, if you were listening to FM radio at volume level 20 then switched to Bluetooth® Audio and adjusted the volume level to 30, the volume level will be at 20 when you switch back to FM radio
– When using Bluetooth® Audio, the overall volume is dependent on your device’s volume . If the volume is turned down low on your device it will remain low even if the system volume is turned up
•When connected to Android Auto™ or Apple CarPlay® on your smar tphone, the smar tphone’s navigation system may also be available
•A warning screen may appear periodically to remind users that the audio system should be operated when the engine is running to prevent bat ter y discharge
QUICK TIPS
Refer to the inside front cover for more information on QR codes .www .youtube .com/KiaFeatureVideos
Standard Audio System Video
QR CODE
Page 32 of 58

AUDIO SYSTEMS
AUDIOSYSTEMS
UVO link Activation*†1
Follow these steps to activate your UVO link system:
1 . Enter the activation screen on your vehicle’s head unit:
a . Press SETUP key b . Press UVO icon c . Press Activate UVO
2 . Read and agree to Terms of Service and Privacy Policy and press SUBMIT
3 . Enter number or email address to receive a verification code, then press SUBMIT
4 . Follow these steps to receive your verification code using
your phone text message or email:
a . Check your phone text message or email for verification code
b . Open the link in your phone text message or email . A page will open requesting that you create your account
N o t e : If you already have a Kia Owners Portal account using the email or phone number as your login ID, you will need to provide your password prior to receiving the verification code
c . Enter your first name, last name, email, phone number, an account password, and click CREATE ACCOUNT . A page will open displaying your verification code
d . Enter the code in the head unit and press ACTIVATE
e . Go back to the page with your verification code and press “I have entered my verification code .” A link will be provided to download the Kia Access with UVO link app from your app store . After installing the app, log in and enjoy
REMINDER: This vehicle is not equipped with over-the-air system updates .
Virtual Assistant A – Press to connect to a virtual assistant to hear information about the UVO features
UVO Voice Local Search B (systems with navigation) – Press to connect to the search function to find points of interest or other locations, like “cafe”
B (non-navigation systems) – Press to activate phone projection with Android Auto™ or Apple CarPlay® (smartphone must be connected via wireless or USB cable — see previous page for availability and setup
Roadside Assist C – Press to connect to the UVO Center where you can request vehicle towing services
UVO Assistance*†1
For fur ther UVO link operations, refer to the Car Infotainment System Quick Reference Guide . For other audio system information, refer to pages 27-32 .
Driving while distracted can result in a loss of vehicle control that may lead to an accident, severe bodily injur y, or death . The driver ’s primar y responsibilit y is in the safe and legal operation of a vehicle . Handheld devices, other equipment, or vehicle systems which take the driver ’s eyes, at tention and focus away from the safe operation of a vehicle or which are not permissible by law, should never be used during operation of the vehicle .
UVO link is currently unavailable for model year 2022 vehicles sold or purchased in Massachuset ts . See UVO Terms of Ser vice at owners .kia .com for more information .
(But tons on rear view mirror*)
UVO
30†LEGAL DISCL AIMERS ON BACK INSIDE COVER | *IF EQUIPPEDSOUL FEATURES & FUNCTIONS GUIDE
AB
Refer to the inside front cover for more information on QR codes .www .youtube .com/KiaFeatureVideos
Kia Access with UVO link app Video
QR CODE
UVO Assistance Video
REMINDER: These but tons may be located in the rear view mirror or the overhead console .
For more information, refer to the Car Infotainment System Quick Reference Guide . On cer tain models, UVO Assistance but tons are located on the Rear view Mirror .
C