Page 9 of 58

VEHICLESETTINGS
VEHICLE SETTINGS
7†LEGAL DISCL AIMERS ON BACK INSIDE COVER | *IF EQUIPPEDALWAYS CHECK THE OWNER ’S MANUAL FOR COMPLETE OPER ATING INFORMATION AND SAFET Y WARNINGS .
The Trip Computer is a driver information system that displays information related to driving on the display when the ignition switch or the Engine Start/Stop button* is in the ON position .
To cycle through the LCD Instrument Cluster modes, press the Mode/Select button A .
When in the Trip Computer mode , press the OK/Move/Select/Reset button B up or down to cycle through the screens . When displaying the Tripmeter, press in and hold the OK button B to reset the Tripmeter to zero .
REMINDERS:
•
Appearance of Tripmeter display may differ as equipped
•
All stored driving information (except Odometer and Range) is reset if the bat ter y is disconnected
CANCEL
RES
SET+ _CRUISE
RES
SET+ _<<+>>-MODE
+>>-
MODE
CRUISE
CANCELOK
<
� �'�P�S���5�Z�Q�F���#���D�M�V�T�U�F�S�����#�V�U �U�P�O�T���M�P�D�B�U�F�E���P�O���T�U�F�F�S�J�O�H���X�I�F�F�M�
Fuel Economy
Average16.8MPG0 10 2030
(Type B Cluster)
TRIP:
• Average Fuel Economy• Instant Fuel Economy
Digital Speedometer
Transmission Temperature*
ACCUMUL ATED INFO
• Tripmeter• Fuel Economy• Timer
DRIVE INFO
• Tripmeter • Fuel Economy • Timer
LCD Instrument Cluster Modes*
Press the Mode/Select button A to cycle through different LCD Instrument Cluster Modes:
Trip Modes / Trip Computer
Driving while distracted is dangerous and should be avoided . Drivers should remain at tentive to driving and always exercise caution when using the steering-wheel-mounted controls while driving .
Refer to section 4 in the Owner ’s Manual for more information .
Your vehicle’s steering wheel but tons may differ from those in the illustrations .
Refer to section 4 in the Owner ’s Manual for more information .
CANCEL
RES
SET+ _
CRUISE
RES
SET+ _<
<+>>-
MODE
+>
>-
MODE
CRUISE
CANCEL
OK
<
<
OK
�5�S�J�Q���$�P�N�Q�V�U�F�S���.�P�E�F�����%�J�T�Q�M�B�Z�T���E�S�J�W�J�O�H���J�O�G�P�S�N�B�U�J�P�O���G�P�S���G�V�F�M���F�D�P�O�P�N�Z�
���B�D�D�V�N�V�M�B�U�F�E���J�O�G�P�
���F�U�D ��
�5�V�S�O���C�Z���5�V�S�O���.�P�E�F�������%�J�T�Q�M�B�Z�T���U�I�F���S�P�V�U�F���H�V�J�E�B�O�D�F���B�O�E���E�F�T�U�J�O�B�U�J�P�O���J�O�G�P
�%�S�J�W�J�O�H���"�T�T�J�T�U�����%�J�T�Q�M�B�Z�T���U�I�F���-�B�O�F���4�B�G�F�U�Z���
���%�S�J�W�F�S���"�U�U�F�O�U�J�P�O���8�B�S�O�J�O�H���
���4�N�B�S�U���$�S�V�J�T�F���$�P�O�U�S�P�M�����B�O�E���5�1�.�4���J�O�G�P
�6�T�F�S���4�F�U�U�J�O�H�T���.�P�E�F�����$�I�B�O�H�F���T�F�U�U�J�O�H�T���P�G���U�I�F���)�F�B�E���6�Q���%�J�T�Q�M�B�Z���
���E�P�P�S�T�
���M�J�H�I�U�T�
���T�P�V�O�E�
���E�S�J�W�J�O�H���B�T�T�J�T�U�B�O�D�F���
���D�P�O�W�F�O�J�F�O�D�F�
���T�F�S�W�J�D�F���J�O�U�F�S�W�B�M���B�O�E���P�U�I�F�S���G�F�B�U�V�S�F�T
�.�B�T�U�F�S���8�B�S�O�J�O�H���.�P�E�F�����%�J�T�Q�M�B�Z�T���X�B�S�O�J�O�H���N�F�T�T�B�H�F�T���S�F�M�B�U�F�E���U�P���U�I�F���W�F�I�J�D�M�F���X�I�F�O���P�O�F���P�S���N�P�S�F���T�Z�T�U�F�N�T���J�T���O�P�U���P�Q�F�S�B�U�J�O�H���O�P�S�N�B�M�M�ZA
B
Page 10 of 58

VEHICLESETTINGS
VEHICLE SETTINGS
8†LEGAL DISCL AIMERS ON BACK INSIDE COVER | *IF EQUIPPEDSOUL FEATURES & FUNCTIONS GUIDE
Refer to section 4 in the Owner ’s Manual for more information .
CANCEL
RES
SET+ _
CRUISE
RES
SET+ _<
<+>>-
MODE
+>
>-
MODE
CRUISE
CANCEL
OK
<
<
OK
(For Type B cluster; But tons located on steering wheel)
A
B
User Settings Modes:
Head-Up Display*: •Display Height •Rotation
•Brightness •Contents Selection •Speedometer Size •Speedometer Color
Driver Assistance*: •Smart Cruise Control Response •Driver Attention Warning •Warning Timing
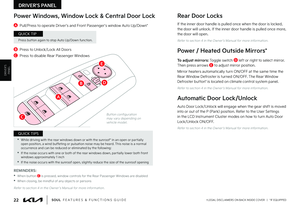
•Warning Volume •Forward Safety •Lane Safety •Blind-Spot Safety •Door/Liftgate: •Automatically Lock •Automatically Unlock
Lights: •One-Touch Turn Signal •Headlamp Delay
Sound: •Welcome Sound
Convenience*: •Welcome Mirror •Wipers/Lights Display
•Auto Rear Wiper •Gear Position Pop-Up •Icy-Road Warning
Service Interval: •Enable Service Interval •Adjust Interval •Reset
Other Features*: •Fuel Economy Auto Reset •Fuel Economy Unit •Temperature Unit •Tire Pressure Unit
•Torque Unit •Turbo Boost Pressure Unit
Reset: •Reset menus to factory settings (except language & service interval)
User Settings Mode*
To enter the User Settings mode in the LCD Instrument Cluster Modes, press the Mode/Select button A when the vehicle is at a standstill and with the Engine Start/Stop* button in the ON position and select User Settings .
You can navigate the selections on the display by pressing the Move/Reset button B, and then selecting the item by pressing the Mode/Select button A .
Vehicle Settings - Audio Head Unit*
(Vehicles with wide-screen navigation system)
To enter the Vehicle Settings mode in the audio head unit screen C, press the SETUP key on the audio head unit . Then press the Vehicle icon D, which will take you to the Vehicle Settings screen . Use the touchscreen to navigate through the menus .
Vehicle Settings modes:
Driver Assistance: Driving Assist, Warning Time, Warning Volume, Driver Attention Warning, Forward Safety, Blind-Spot Safety, Parking Safety
Climate: Recirculate Air, Automatic Ventilation, Defog/Defrost Options
Lights: One Touch Turn Signal, Headlight Display, High Beam Assist
Door: Auto Lock, Auto Unlock, Two-Press Unlock
Cluster: Energy Consumption Reset, Content Selection, Cluster Voice Guidance Volume, Welcome Sound
Convenience: Rear Occupant Alert, Wireless Charging System, Auto Rear Wiper (in R)
Reset: Reset Vehicle Settings to Factory Defaults
Vehicle Settings
Drive ModeDrive Mode Change AlertDetailed AlertClimate
Lights
Seats/Steering
Menu
Vehicle
REMINDER: Some set tings appear in User Set tings in the Instrument Cluster . Check section 4 in the Owner ’s Manual or the Car Infotainment System Quick Star t Guide for more information .
The above images are for illustration purposes only and may not reflect actual display .
C
D
Refer to the inside front cover for more information on QR codes .www .youtube .com/KiaFeatureVideos
Vehicle & User Set tings Video
QR CODE
Page 11 of 58

To enter Service Interval Mode, press the Mode/Select button A and select User Settings , then scroll to Service Interval by pressing Move/Reset button B . Press the Mode/Select button A to enter . System will display number of miles remaining until next service is due, and type of service .
When service is required, the following will be displayed: Service Required.
To reset the Service Interval Mode system, press and hold the Move/Reset button B for more than 1 second .
To turn Service Interval OFF, go to User Settings .
Service Interval Setting
To set the service interval when in User Settings mode:
•Press the Move/Reset button B and scroll to Service Interval . Press the Mode/Select button A to enter
•Press the Move/Reset button B and toggle to ON, then press the Move/Select button A . Then press the Move/Reset button B to scroll and select the desired
miles or months for your next service
•Press the Mode/Select button A to enter
VEHICLESETTINGS
VEHICLE SETTINGS
Service Interval Mode*
9†LEGAL DISCL AIMERS ON BACK INSIDE COVER | *IF EQUIPPEDALWAYS CHECK THE OWNER ’S MANUAL FOR COMPLETE OPER ATING INFORMATION AND SAFET Y WARNINGS .
CANCEL
RES
SET+ _
CRUISE
RES
SET+ _<
<+>>-
MODE
+>
>-
MODE
CRUISE
CANCELOK
<
<
OK
(For Type B cluster; But tons located on steering wheel)
REMINDERS:
•Mood Lights cannot be changed while vehicle is moving
•Park vehicle in a safe location before changing the settings
•When any door is opened, the lighting turns off
The vehicle’s speaker lights can be customized, including setting the lights to change according to the mood of the music playing .
To change the settings, go to All Menus in the audio head unit . Select Sound Mood Lamp and adjust the different settings .
(Instrument cluster LCD screen shown)
12:00 AM Jan. 1
MenuSound Mood LampColor ThemeSound MoodMood Lamp responds according to
the theme selected.
Glow Only
Music +Midnight CityCafe
Refer to the Car Multimedia System User ’s Manual for more information .
Refer to section 4 in the Owner ’s Manual for more information . For illustrative purposes only . Your actual display, but tons and/or features may var y .
Sound-Reactive Mood Light*
To reset back to the default set tings, press the Reset but ton on the audio head unit screen .
QUICK TIP
A
B
Refer to the inside front cover for more information on QR codes .www .youtube .com/KiaFeatureVideos
Ambient, Theme, Mood Lighting Video
Instrument Cluster’s LCD Display Video
QR CODE
36 days1,100 mi
Page 12 of 58
*†9
The Head-Up Display (HUD) is a semi-transparent display that projects a snippet of information from the instrument cluster and navigation system* onto the popup glass . To")
Head-Up Display (HUD)*†9
The Head-Up Display (HUD) is a semi-transparent display that projects a snippet of information from the instrument cluster and navigation system* onto the popup glass . To turn HUD ON or OFF, and press the HUD button A .
The HUD displays:
•Turn By Turn (TBT) navigation information
•Road signs
•Speedometer
•Cruise setting speed
•Smart Cruise Control information*
•Lane Safety information
•Blind-Spot Safety information
•Warning lights (low fuel)
•AV mode information
Head-Up Display (HUD) User Settings
Drivers can adjust the HUD settings from the LCD Instrument Cluster modes in User Settings . HUD settings include:
•Display Height: Adjust the height of the HUD image on the windshield glass
•Rotation: Adjust the degree of HUD rotation
•Brightness: Adjust the intensity of the HUD brightness
•Contents Selection: Activate or deactivate HUD content (Audio/video, Driving Assist, Lane Safety and Blind-Spot, Turn-by-Turn and Traffic Safety info)
•Speedometer Size: Choose the size of the HUD speedometer (Small, Medium, Large)
•Speedometer Color: Choose the color of the HUD speedometer (White, Orange, Green)
ADAS
ADVANCED DRIVER ASSISTANCE SYSTEMS (ADAS)
10†LEGAL DISCL AIMERS ON BACK INSIDE COVER | *IF EQUIPPEDSOUL FEATURES & FUNCTIONS GUIDE
For illustrative purposes only . Your actual display may var y .
The Head-Up Display is a supplemental system . Do not rely solely on the system, always drive safely, and pay at tention to the driving conditions on the road .
Refer to section 4 in the Owner ’s Manual for more information .
REMINDERS:
•The HUD image on the windshield glass may not be visible when:
– The driver has poor sit ting posture
– The driver is wearing polarized sunglasses
– There is an object covering the HUD
– Driving on a wet road
– Excessive lighting inside or outside the vehicle
•If Turn By Turn (TBT) navigation information is selected as HUD content, TBT information will not be displayed on the LCD
•Modifications made to the windshield, such as tinting or other aftermarket treatments, could affect the HUD . When replacing the front windshield glass of vehicles equipped with the HUD, owners must replace it with windshield glass designed for HUD operation . Other wise, duplicated images may be displayed on the windshield glass
(But ton located in panel to the left of steering wheel)
HUD
i...
P
�3�F�G�F�S���U�P���U�I�F���J�O�T�J�E�F���G�S�P�O�U���D�P�W�F�S���G�P�S�����N�P�S�F���J�O�G�P�S�N�B�U�J�P�O���P�O���2�3���D�P�E�F�T ���X�X�X���Z�P�V�U�V�C�F ���D�P�N���,�J�B�'�F�B�U�V�S�F�7�J�E�F�P�T
Head-Up Display (HUD) Video
QR CODE
A
Page 13 of 58

ADAS
11†LEGAL DISCL AIMERS ON BACK INSIDE COVER | *IF EQUIPPEDALWAYS CHECK THE OWNER ’S MANUAL FOR COMPLETE OPER ATING INFORMATION AND SAFET Y WARNING")
ADVANCED DRIVER ASSISTANCE SYSTEMS (ADAS)
ADAS
11†LEGAL DISCL AIMERS ON BACK INSIDE COVER | *IF EQUIPPEDALWAYS CHECK THE OWNER ’S MANUAL FOR COMPLETE OPER ATING INFORMATION AND SAFET Y WARNINGS .
CANCEL
RES
SET+ _CRUISE
RES
SET+ _<<+>>-
MODE
+>
>-
MODE
CRUISE
CANCELOK
<
<
OK
B
C
Collision Warning
Emergency Braking
FCA is designed to detect and monitor a vehicle ahead or detect a pedestrian in the roadway through front view camera recognition and front radar signals to warn the driver that a collision is imminent, and if necessary, temporarily apply emergency braking . If FCA detects a potential collision, FCA emits an audible warning and visual alert on the instrument cluster A .
If the system detects that the collision risk has increased, Forward Collision-Avoidance Assist (FCA) automatically applies the brakes to reduce your speed, potentially helping to reduce the effects of a possible collision .
FCA User Settings:
•FCA is on by default in most Kia models . FCA can be turned on/off by going to the User Settings in the Instrument Cluster
•To go to User Settings , press the Mode button B on the Steering Wheel when the vehicle is at a standstill, gear shift in Park and with the ignition on or the Engine Start/Stop button* in the ON position
•Press the OK button C up/down and select User Settings then Driver Assistance
•In some models, go to Driving Assist, then Forward Collision-Avoidance Assist or Forward Collision Warning and press the OK button C
•In other models, go to Forward Safety and select Active Assist, Warning Only or Off:
Active Assist: Vehicle will provide a warning (audible & visual) and apply the brakes if needed
Warning Only: Vehicle will provide a warning only (audible & visual)
Off: System is off, no warnings or braking provided
•To adjust the FCA initial warning timing, go to User Settings , Driver Assistance, Warning Timing then select Normal or Later, depending on your Kia model:
– N o r m a l : Maximizes the amount of distance between the vehicles before the initial warning occurs
–
Later: Reduces the amount of distance between the vehicles before the initial warning occurs
FCA will become active when the:
•Ignition is on or the Engine Start/Stop button* is ON
•Vehicle is traveling faster than 5 mph
•Electronic Stability Control (ESC) is ON
Forward Collision-Avoidance Assist (FCA)†4
For ward Collision-Avoidance Assist (FCA) is not a substitute for safe driving and may not detect all objects in front of the vehicle . Always drive safely and use caution .
Actual User Set tings steps may var y by model . Refer to section 5 in the Owner ’s Manual for more information .
For illustrative purposes only . Your actual display, but tons and/or features may var y .
(Controls located on right side of Steering Wheel)
FCA Warning Volume* can be adjusted in the User Set tings in the Instru ment Cluster or the Vehicle Set tings* on the audio head unit . Go to Driver Assistance, then Warning Volume
QUICK TIP
REMINDERS:
•
FCA will be activated by default when the ignition is cycled ON, even when previous set ting was OFF
•
If FCA is operating and the ESC (Electronic Stabilit y Control) is turned off, FCA system is automatically turned off
•
When the FCA system is off, the FCA warning indicator is on in the Instrument Cluster
A
Refer to the inside front cover for more information on QR codes .www .youtube .com/KiaFeatureVideos
Forward Collision-Avoidance Assist (FCA)Video
QR CODE
Page 14 of 58

12†LEGAL DISCL AIMERS ON BACK INSIDE COVER | *IF EQUIPPEDSOUL FEATURES & FUNCTIONS GUIDE
CANCEL
RESSET+ _CRUISE
RES
SET+ _<<+>>-
MODE
+>
>-
MODE
C")
ADAS
ADVANCED DRIVER ASSISTANCE SYSTEMS (ADAS)
12†LEGAL DISCL AIMERS ON BACK INSIDE COVER | *IF EQUIPPEDSOUL FEATURES & FUNCTIONS GUIDE
CANCEL
RESSET+ _CRUISE
RES
SET+ _<<+>>-
MODE
+>
>-
MODE
CRUISE
CANCELOK
<
<
OK
Lane Keeping Assist (LKA)*†4
Lane Keeping Assist (LK A) is designed to detect the lane markers on the road with a front view camera on the windshield, and may assist the driver ’s steering to potentially help keep the vehicle in the lane .When turned on, the instrument cluster indicator will initially illuminate white . It will remain white when vehicle is traveling less than 40 mph and the system does not detect the lane markers . When LK A detects the lane markers and can assist the steering, the LK A icon will illuminate green .
If LK A detects that you are moving outside of your lane, the system may give an audible warning and display a Lane Departure Warning on the instrument cluster . If the vehicle continues to move outside of the lane, LK A can provide steering inputs, trying to prevent the vehicle from moving outside its lane . LK A is the operating mode by default when the Lane Safety button A is depressed to ON .
To change the LK A mode, go to User Settings in the Instrument Cluster, press the Mode button B on the Steering Wheel when the vehicle is at a standstill, gear shift in Park and with the ignition on or the Engine Start/Stop button* in the ON position, and select User Settings . Go to Driver Assistance then Lane Safety and select one of the following modes:
Active LKA: LK A will automatically assist the driver ’s steering, more frequently than standard LK A , when lane departure is detected to help prevent the vehicle from moving out of its lane .
Lane Keeping Assist: LK A will automatically assist the driver ’s steering when lane departure is detected to help prevent the vehicle from moving out of its lane .
Lane Departure Warning: LK A will warn the driver with an audible warning when lane departure is detected . This mode does NOT provide any steering assist .
Off: LK A will turn off . The B indicator light will turn off on the cluster .
All systems will operate under the following conditions:
•The vehicle exceeds approximately 40 mph
•The vehicle is between the lane markers
•LK A recognizes the lane the vehicle is traveling in
Lane Keeping Assist* is not a substitute for safe and proper driving . Always drive safely and use caution . LK A may not always aler t the driver if the vehicle is driven outside of its lane .
For illustrative purposes only .Your actual display, but tons and/or features may var y .Actual User Set tings steps may var y by model .
When the front view camera detects the lanes traveling in, the indicators are illuminated
When the front view camera does not detect the lanes traveling in, the indicator will not illuminate
When the front view camera detects the vehicle moving outside of the lane the vehicle’s traveling in, a yellow indicator will illuminate, either on the left or right lane
Lane Keeping AssistLane Keeping AssistLane Keeping Assist
REMINDERS:
• W h e n the vehicle changes lanes without a turn signal, LK A may sound an audible warning. The warning sound can be adjusted in the User Settings.
• LK A /LDW will not issue a warning if the turn signal or hazard signal is activated
• LKA/LDW will return to its previous state when the ignition is cycled
HUD
i...
P(But ton located in panel to the left of steering wheel)
Lane Keeping Assist
The LK A Warning Volume can be adjusted in the User Set tings or the Vehicle Set tings* on the audio head unit .
QUICK TIP
B
C
(Controls located on right side of Steering Wheel)
Refer to section 5 in the Owner ’s Manual for more information .
Refer to the inside front cover for more information on QR codes .www .youtube .com/KiaFeatureVideos
Lane Keeping AssistVideo
QR CODE
A
Page 15 of 58

ADAS
13†LEGAL DISCL AIMERS ON BACK INSIDE COVER | *IF EQUIPPEDALWAYS CHECK THE OWNER ’S MANUAL FOR COMPLETE OPER ATING INFORMATION AND SAFET Y WARNING")
ADVANCED DRIVER ASSISTANCE SYSTEMS (ADAS)
ADAS
13†LEGAL DISCL AIMERS ON BACK INSIDE COVER | *IF EQUIPPEDALWAYS CHECK THE OWNER ’S MANUAL FOR COMPLETE OPER ATING INFORMATION AND SAFET Y WARNINGS .
Blind-Spot Collision Warning (BCW)*†4
BCW uses rear corner radar sensors in the rear bumper to monitor and warn the driver, in certain situations, if it detects an approaching vehicle in the driver ’s blind spot area . The BCW System is ON when the button A is pressed – the button light will illuminate . The outside rearview mirror warning lights will also illuminate for 3 seconds .
1st-stage warning: When another vehicle is detected within the blind-spot area B, or when a vehicle is detected closing at high speed, a yellow indicator will illuminate on the outside rearview mirrors .
2nd-stage warning: When 1st-stage warning is on and the driver activates a turn signal, a flashing yellow indicator will illuminate on the outside rearview mirrors and the system will sound a warning .
BCW User Settings:
To activate BCW, go to User Settings in the Instrument Cluster by pressing the Mode button C on the Steering Wheel . Select Driver Assistance > Blind-Spot Safety and then press the OK button D . Select Warning Only or Off .
REMINDERS:
•
BCW will not issue a warning if the vehicle speed is 6 mph or more than the speed of the surrounding vehicles
•
When BCW is ON and the ignition is cycled, BCW returns to its previous state
•
The BCW warning sound can be adjusted in User Set tings
HUD
i...
P
� �#�V�U �U�P�O���M�P�D�B�U�F�E���J�O���Q�B�O�F�M���U�P���U�I�F���M�F�G�U���P�G���T�U�F�F�S�J�O�H���X�I�F�F�M�
�#�$�8���J�T���B���T�V�Q�Q�M�F�N�F�O�U�B�M���T�Z�T�U�F�N �����%�P���O�P�U���S�F�M�Z���T�P�M�F�M�Z���P�O���U�I�J�T���T�Z�T�U�F�N���B�O�E���B�M�X�B�Z�T���Q�B�Z���B�U �U�F�O�U�J�P�O���U�P���U�I�F���S�P�B�E���B�O�E���J�U�T���D�P�O�E�J�U�J�P�O�T�����#�$�8���J�T���O�P�U���B���T�V�C�T�U�J�U�V�U�F���G�P�S���T�B�G�F���B�O�E���Q�S�P�Q�F�S���E�S�J�W�J�O�H�����"�M�X�B�Z�T���E�S�J�W�F���T�B�G�F�M�Z���B�O�E���V�T�F���D�B�V�U�J�P�O ��
�*�N�B�H�F�T���B�S�F���G�P�S���J�M�M�V�T�U�S�B�U�J�W�F���Q�V�S�Q�P�T�F�T���P�O�M�Z���B�O�E���N�B�Z���O�P�U���S�F7U�F�D�U���B�D�U�V�B�M���P�Q�F�S�B�U�J�P�O ��
�3�F�G�F�S���U�P���T�F�D�U�J�P�O�������J�O���U�I�F���0�X�O�F�S �s�T���.�B�O�V�B�M���G�P�S���N�P�S�F���J�O�G�P�S�N�B�U�J�P�O ��
�3�F�G�F�S���U�P���U�I�F���J�O�T�J�E�F���G�S�P�O�U���D�P�W�F�S���G�P�S�����N�P�S�F���J�O�G�P�S�N�B�U�J�P�O���P�O���2�3���D�P�E�F�T ���X�X�X���Z�P�V�U�V�C�F ���D�P�N���,�J�B�'�F�B�U�V�S�F�7�J�E�F�P�T
Blind-Spot CollisionWarning Video
QR CODE
•BCW Warning Volume* can be adjusted in the User Set tings in the Instrument Cluster or the Vehicle Set tings* on the audio head unit . Go to Driver Assistance, then Warning Volume
•BCW will activate when:
– The system is turned on
– Other vehicles are detected on the rear sides of the vehicle
– Vehicle speed is above approximately 20 mph
QUICK TIPS
CANCEL
RES
SET+ _
CRUISE
RES
SET+ _<
<+>>-
MODE
+>
>-
MODE
CRUISE
CANCELOK
<
<
OK
(Controls located on right side of Steering Wheel)
C
D
B
A
Page 16 of 58

Driver Attention Warning (DAW)*†4
REMINDERS:
•The se")
14†LEGAL DISCL AIMERS ON BACK INSIDE COVER | *IF EQUIPPEDSOUL FEATURES & FUNCTIONS GUIDE
ADAS
ADVANCED DRIVER ASSISTANCE SYSTEMS (ADAS)
Driver Attention Warning (DAW)*†4
REMINDERS:
•The setup of DAW will be maintained, as selected, when the ignition is cycled
•
When activated, DAW does not display “Consider taking a break ” message when the total trip driving time is less than 10 minutes
•
The DAW System will enter a standby mode if the front-view camera does not detect the lanes and/or the driving speed remains under 40 mph
Driver Attention WarningSystem Off
Level Time ——:——Attention Level
LOW HIGH
Level Time 00:27 Attention Level
LOW
HIGH
Level Time 05:27
Consider taking a break
22.4
°C4025km
Driver Attention Warning System Off
Level Time ——:——Attention Level
LOW HIGH
Level Time 00:27
Attention Level
LOWHIGH
Level Time 05:27
Consider taking a break
22.4
°C4025km
Driver Attention Warning System Off
Level Time ——:—— Attention Level
LOW
HIGH
Level Time 00:27
Attention Level
LOWHIGH
Level Time 05:27
Consider taking a break
22.4 °C4025km
Driver At tention Warning is not a substitute for safe driving and may not detect all instances of inat tentive driving practices . Failure to pay at tention to travel conditions and vehicle operation could result in loss of vehicle control . Always drive safely and use caution .
Refer to section 5 in the Owner ’s Manual for more information
DAW is designed to alert the driver if it detects certain inattentive driving and, in certain situations, can give a warning signal to take a break from driving .
DAW User Settings:
DAW is set to OFF by default . To turn DAW ON, turn the ignition on and then select User Settings in the LCD Display on the Instrument Cluster . Then go to Driver Assistance and select Driver Attention Warning . Set DAW to Normal or High Sensitivity .
Driver Attention Warning modes:
OFF: The Driver Attention Warning system is deactivated A .
Normal Sensitivity: Driver Attention Warning warns the driver of inattentive driving practices
High Sensitivity: Driver Attention Warning warns the driver of inattentive driving practices faster than Normal mode .
If DAW System is activated, DAW information will appear on the Instrument Cluster LCD Display B when you select the ASSIST mode in the Instrument Cluster .
A message, “Consider taking a break,” appears on the LCD display and a warning sounds to suggest the driver to take a break when the driver ’s attention level is below one bar C .
Refer to the inside front cover for more information on QR codes .www .youtube .com/KiaFeatureVideos
Driver At tention Warning (DAW) Video
QR CODE
ABC