Page 142 of 446
3-64
The trip computer is a microcomput-
er-controlled driver information sys-
tem that displays information related
to driving.
Information
Some driving information stored in the
trip computer (for example Average
Vehicle Speed) resets if the battery is
disconnected.
Trip modes
To change the trip mode, toggle the
" , " switch on the steering
wheel.
i
TRIP COMPUTER
Convenient features of your vehicle
OPDEN047404
• Tripmeter
• Fuel Economy
• Timer
Drive Info
• Tripmeter
• Fuel Economy
• Timer
Accumulated Info
• Average Fuel Economy
• Instant Fuel Economy
Fuel Economy
Digital Speedometer
↕
↕
↕
Page 143 of 446

3-65
Convenient features of your vehicle
3
Average fuel economy/
Instant fuel economy
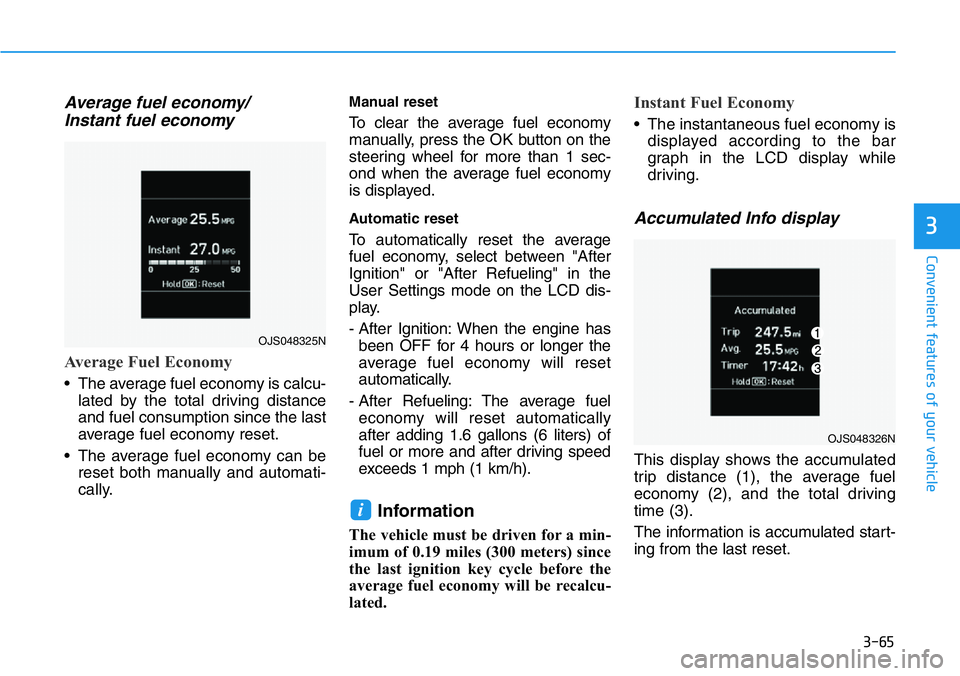
Average Fuel Economy
• The average fuel economy is calcu-
lated by the total driving distance
and fuel consumption since the last
average fuel economy reset.
• The average fuel economy can be
reset both manually and automati-
cally.
Manual reset
To clear the average fuel economy
manually, press the OK button on the
steering wheel for more than 1 sec-
ond when the average fuel economy
is displayed.
Automatic reset
To automatically reset the average
fuel economy, select between "After
Ignition" or "After Refueling" in the
User Settings mode on the LCD dis-
play.
- After Ignition: When the engine has
been OFF for 4 hours or longer the
average fuel economy will reset
automatically.
- After Refueling: The average fuel
economy will reset automatically
after adding 1.6 gallons (6 liters) of
fuel or more and after driving speed
exceeds 1 mph (1 km/h).
Information
The vehicle must be driven for a min-
imum of 0.19 miles (300 meters) since
the last ignition key cycle before the
average fuel economy will be recalcu-
lated.
Instant Fuel Economy
• The instantaneous fuel economy is
displayed according to the bar
graph in the LCD display while
driving.
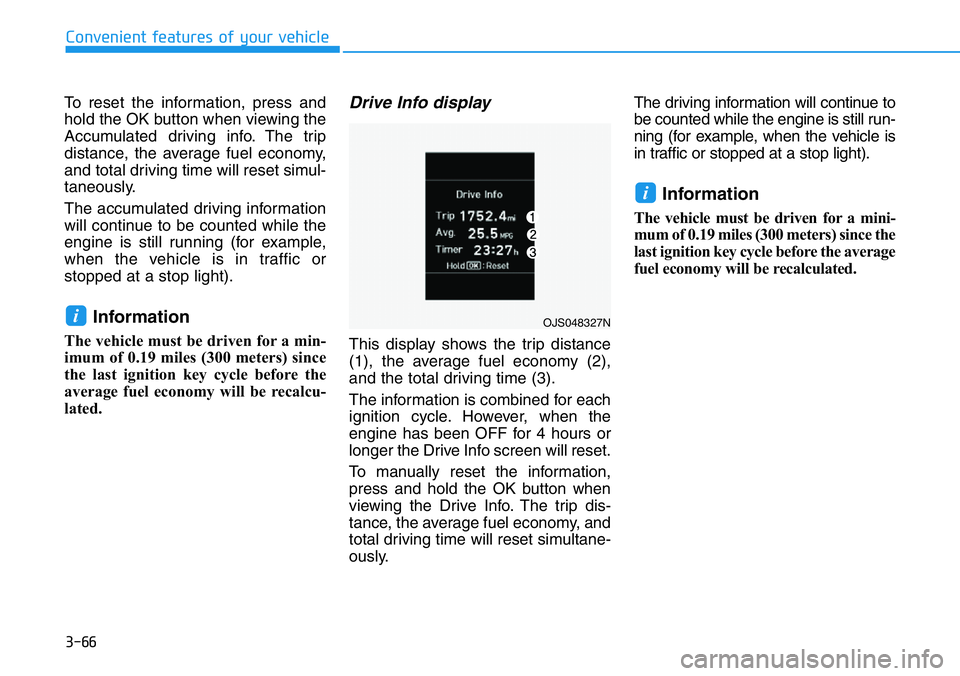
Accumulated Info display
This display shows the accumulated
trip distance (1), the average fuel
economy (2), and the total driving
time (3).
The information is accumulated start-
ing from the last reset.
i
OJS048325N
OJS048326N
Page 144 of 446

3-66
Convenient features of your vehicle
To reset the information, press and
hold the OK button when viewing the
Accumulated driving info. The trip
distance, the average fuel economy,
and total driving time will reset simul-
taneously.
The accumulated driving information
will continue to be counted while the
engine is still running (for example,
when the vehicle is in traffic or
stopped at a stop light).
Information
The vehicle must be driven for a min-
imum of 0.19 miles (300 meters) since
the last ignition key cycle before the
average fuel economy will be recalcu-
lated.
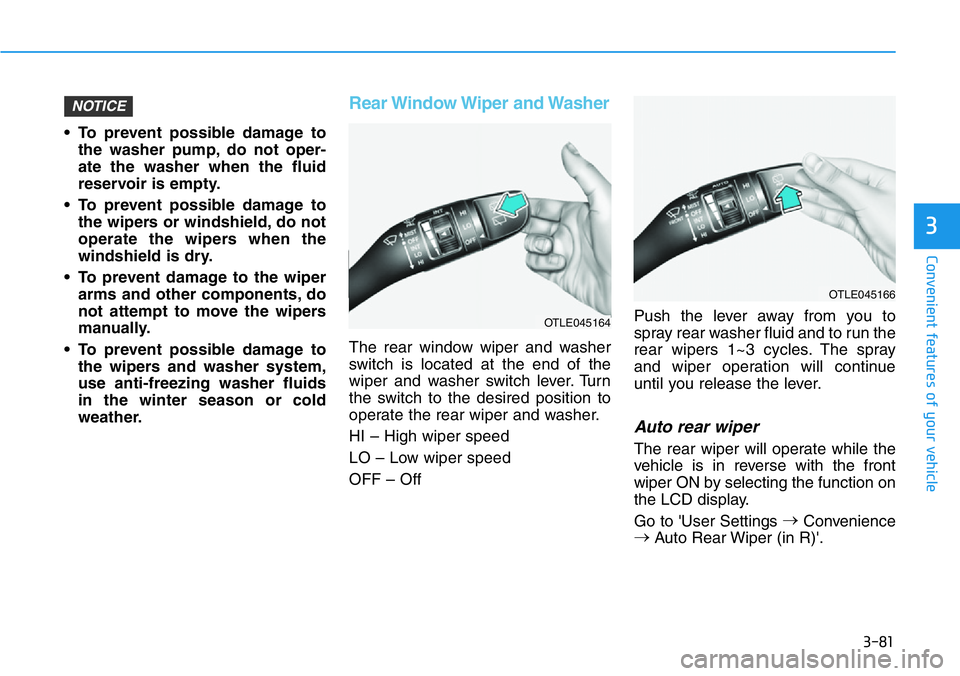
Drive Info display
This display shows the trip distance
(1), the average fuel economy (2),
and the total driving time (3).
The information is combined for each
ignition cycle. However, when the
engine has been OFF for 4 hours or
longer the Drive Info screen will reset.
To manually reset the information,
press and hold the OK button when
viewing the Drive Info. The trip dis-
tance, the average fuel economy, and
total driving time will reset simultane-
ously.The driving information will continue to
be counted while the engine is still run-
ning (for example, when the vehicle is
in traffic or stopped at a stop light).
Information
The vehicle must be driven for a mini-
mum of 0.19 miles (300 meters) since the
last ignition key cycle before the average
fuel economy will be recalculated.
i
iOJS048327N
Page 145 of 446
3-67
Convenient features of your vehicle
3
Digital speedometer
The digital speedometer display
shows the speed of the vehicle.
OPDE046145R
Page 148 of 446
3-70
Convenient features of your vehicle
To flash the high beam headlamp,
pull the lever towards you, then
release the lever. The high beams
will remain ON as long as you hold
the lever towards you.
Turn signals and lane change
signals
To signal a turn, push down on the
lever for a left turn or up for a right
turn in position (A).
If an indicator stays on and does not
flash or if it flashes abnormally, one of
the turn signal bulbs may be burned
out and will require replacement.
Onetouch turn signal function
To activate the One Touch Turn
Signal function, push the turn signal
lever up or down to position (B) and
then release it.
The lane change signals will blink 3,
5 or 7 times.
You can activate or deactivate the
One Touch Turn Signal function or
choose the number of blinks (3, 5, or
7) from the User Settings mode in
the LCD display.
For more details, refer to the "LCD
Display" section in this chapter.
OOS047408N
OOS047410N
Page 149 of 446

3-71
Convenient features of your vehicle
Battery saver function
The purpose of this feature is to pre-
vent the battery from being dis-
charged. The system automatically
turns off the parking lamp when the
driver turns the vehicle off and opens
the driver-side door.
With this feature, the parking lamps
will turn off automatically if the driver
parks on the side of road at night.
If necessary, to keep the lamps on
when the vehicle is turned off, perform
the following:
1) Open the driver-side door.
2) Turn the parking lamps OFF and
ON again using the headlamp
switch on the steering column.
Headlamp delay function
If the key is removed from the ignition
switch or placed in the ACC position
or the LOCK/OFF position with the
headlamps ON, the headlamps
(and/or parking lamps) remain on for
about 5 minutes. However, if the dri-
ver’s door is opened and closed, the
headlights are turned off after 15
seconds. Also, with the engine off if
the driver's door is opened and
closed, the headlamps (and/or park-
ing lamps) are turned off after 15
seconds.
The headlamps (and/or parking
lamps) can be turned off by pressing
the lock button on the smart key
twice or turning the headlamp switch
to the OFF or AUTO position.
You can activate or deactivate the
Headlamp Delay function from the
User Settings Mode in the LCD dis-
play.
For more details, refer to the "LCD
Display" section in this chapter.If the driver exits the vehicle
through another door besides the
driver door, the battery saver func-
tion does not operate and the
headlamp delay function does not
turn OFF automatically.
This may cause the battery to dis-
charge. To avoid battery dis-
charge, turn OFF the headlamps
manually from the headlamp
switch before exiting the vehicle.
NOTICE
3
Page 154 of 446

3-76
Convenient features of your vehicle
System operation
Display and control
• High Beam Assist will operate by
following the procedure below.
- Place the headlamp switch in the
AUTO position and push the
headlamp lever towards the
instrument cluster. The High
Beam Assist ( ) indicator light
will illuminate on the cluster and
the system will be enabled.
- When the system is enabled,
high beam will turn on when vehi-
cle speed is above 25 mph (40
km/h). When vehicle speed is
below 15 mph (25 km/h), high
beam will not turn on.
- The High Beam ( ) indicator
light will illuminate on the cluster
when high beam is on.• When High Beam Assist is operat-
ing, if the headlamp lever or switch
is used, the system operates as
follow:
- If the headlamp lever is pulled
towards you when the high beam
is off, the high beam will turn on
without High Beam Assist can-
celed. When you let go of the
headlamp lever, the lever will
move to the middle and the high
beam will turn off.
- If the headlamp lever is pulled
towards you when the high beam
is on by High Beam Assist, low
beam will be on and the system
will turn off.
- If the headlamp switch is placed
from AUTO to another position
(headlamp/position/off), High
Beam Assist will turn off and the
corresponding lamp will turn on.• When High Beam Assist is operat-
ing, high beam switches to low
beam if any of the following condi-
tions occur:
- When the headlamp of an
oncoming vehicle is detected.
- When the tail lamp of a vehicle in
front is detected.
- When the headlamp or tail lamp
of a motorcycle or a bicycle is
detected.
- When the surrounding ambient
light is bright enough that high
beams are not required.
- When streetlights or other lights
are detected.
Page 159 of 446

3-81
Convenient features of your vehicle
3
• To prevent possible damage to
the washer pump, do not oper-
ate the washer when the fluid
reservoir is empty.
• To prevent possible damage to
the wipers or windshield, do not
operate the wipers when the
windshield is dry.
• To prevent damage to the wiper
arms and other components, do
not attempt to move the wipers
manually.
• To prevent possible damage to
the wipers and washer system,
use anti-freezing washer fluids
in the winter season or cold
weather.
Rear Window Wiper and Washer
The rear window wiper and washer
switch is located at the end of the
wiper and washer switch lever. Turn
the switch to the desired position to
operate the rear wiper and washer.
HI – High wiper speed
LO – Low wiper speed
OFF – OffPush the lever away from you to
spray rear washer fluid and to run the
rear wipers 1~3 cycles. The spray
and wiper operation will continue
until you release the lever.
Auto rear wiper
The rear wiper will operate while the
vehicle is in reverse with the front
wiper ON by selecting the function on
the LCD display.
Go to 'User Settings →
Convenience
→
Auto Rear Wiper (in R)'.
NOTICE
OTLE045166
OTLE045164