2022 HYUNDAI KONA EV change time
[x] Cancel search: change timePage 1 of 548

All information in this Owner’s Manual is current at the time
of publication. However, HYUNDAI reserves the right to make
changes at any time so that our policy of continual product
improvement may be carried out.
This manual applies to all models of this vehicle and includes
descriptions and explanations of optional as well as standard
equipment.
As a result, you may find material in this manual that does not
apply to your specific vehicle.
OWNER’S MANUAL
Operation
MaintenanceSpecifications
Page 15 of 548

Foreword / Electric Vehicle System Overview
1-10
Energy Information
OOSEV040526L
Select ‘EV ÞEnergy information’ on the
screen.
You can check battery information and
energy consumption.
Battery information
OOSEV040527L
You can check the reachable range, total
battery power remaining, and expected
charging time for each charge type. • The distance to empty is calculated
based on the real-time electric energy
efficiency while driving. The distance
may change if the driving pattern changes.
• The distance to empty may vary
according to the change of the driving
pattern even if the same target battery
charge level is set. Energy consumption
OOSEV040528L
You can check the current energy
consumption for each system of the
vehicle.
(1) ‘Driving’ shows the total power and energy consumption of the
driving motor’s driving energy and
regenerative energy.
(2) ‘Climate’ shows the power and energy consumption which are used
by the heater or air conditioner.
(3) ‘Electronics’ shows the power and energy consumption which are used
by the vehicle systems including the
cluster, infotainment system (speaker
and navigation), headlamp, vehicle
control unit, etc.
(4) ‘Battery care’ shows the momentary
power and energy consumption
which are used when: • Operating the winter mode to
increase the battery temperature
during winter to improve the driving
performance.
• Cooling down the battery
temperature during summer to
prevent over temperature of the
battery.
Page 38 of 548
01
1-33
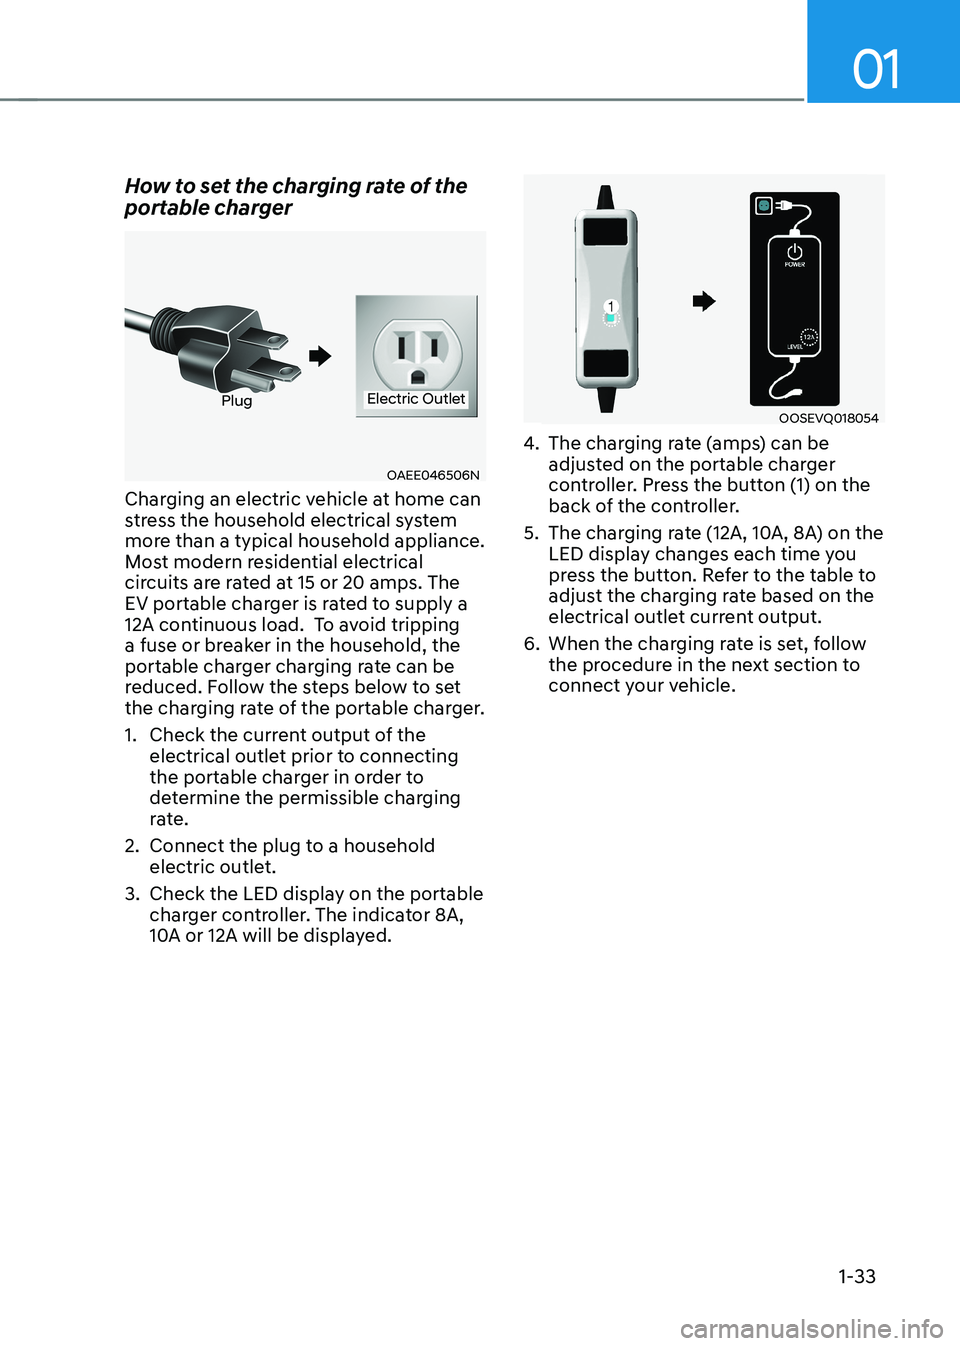
How to set the charging rate of the
portable charger
OAEE046506N
PlugElectric Outlet
Charging an electric vehicle at home can
stress the household electrical system
more than a typical household appliance.
Most modern residential electrical
circuits are rated at 15 or 20 amps. The
EV portable charger is rated to supply a
12A continuous load. To avoid tripping
a fuse or breaker in the household, the
portable charger charging rate can be
reduced. Follow the steps below to set
the charging rate of the portable charger.
1. Check the current output of the electrical outlet prior to connecting
the portable charger in order to
determine the permissible charging
rate.
2. Connect the plug to a household electric outlet.
3. Check the LED display on the portable charger controller. The indicator 8A,
10A or 12A will be displayed.OOSEVQ018054
4. The charging rate (amps) can be
adjusted on the portable charger
controller. Press the button (1) on the
back of the controller.
5. The charging rate (12A, 10A, 8A) on the LED display changes each time you
press the button. Refer to the table to
adjust the charging rate based on the
electrical outlet current output.
6. When the charging rate is set, follow the procedure in the next section to
connect your vehicle.
Page 86 of 548
03
3 -7
Reclining seatback
Sitting in a reclined position when the
vehicle is in motion can be dangerous.
Even when buckled up, the protections
of your restraint system (seat belts and/
or air bags) are greatly reduced by
reclining your seatback.
WARNING
NEVER ride with a reclined seatback
when the vehicle is moving.
Riding with a reclined seatback
increases your chance of serious or fatal
injuries in the event of a collision or
sudden stop.
Drivers and passengers should ALWAYS
sit well back in their seats, properly
belted, and with the seatbacks upright.
Seat belts must be snug against your
hips and chest to work properly. When
the seatback is reclined, the shoulder
belt cannot do its job because it will not
be snug against your chest. Instead,
it will be in front of you. During an
accident, you could be thrown into the
seat belt, causing neck or other injuries.
The more the seatback is reclined,
the greater chance the passenger’s hips will slide under the lap belt or the
passenger’s neck will strike the shoulder belt.
OOS037004
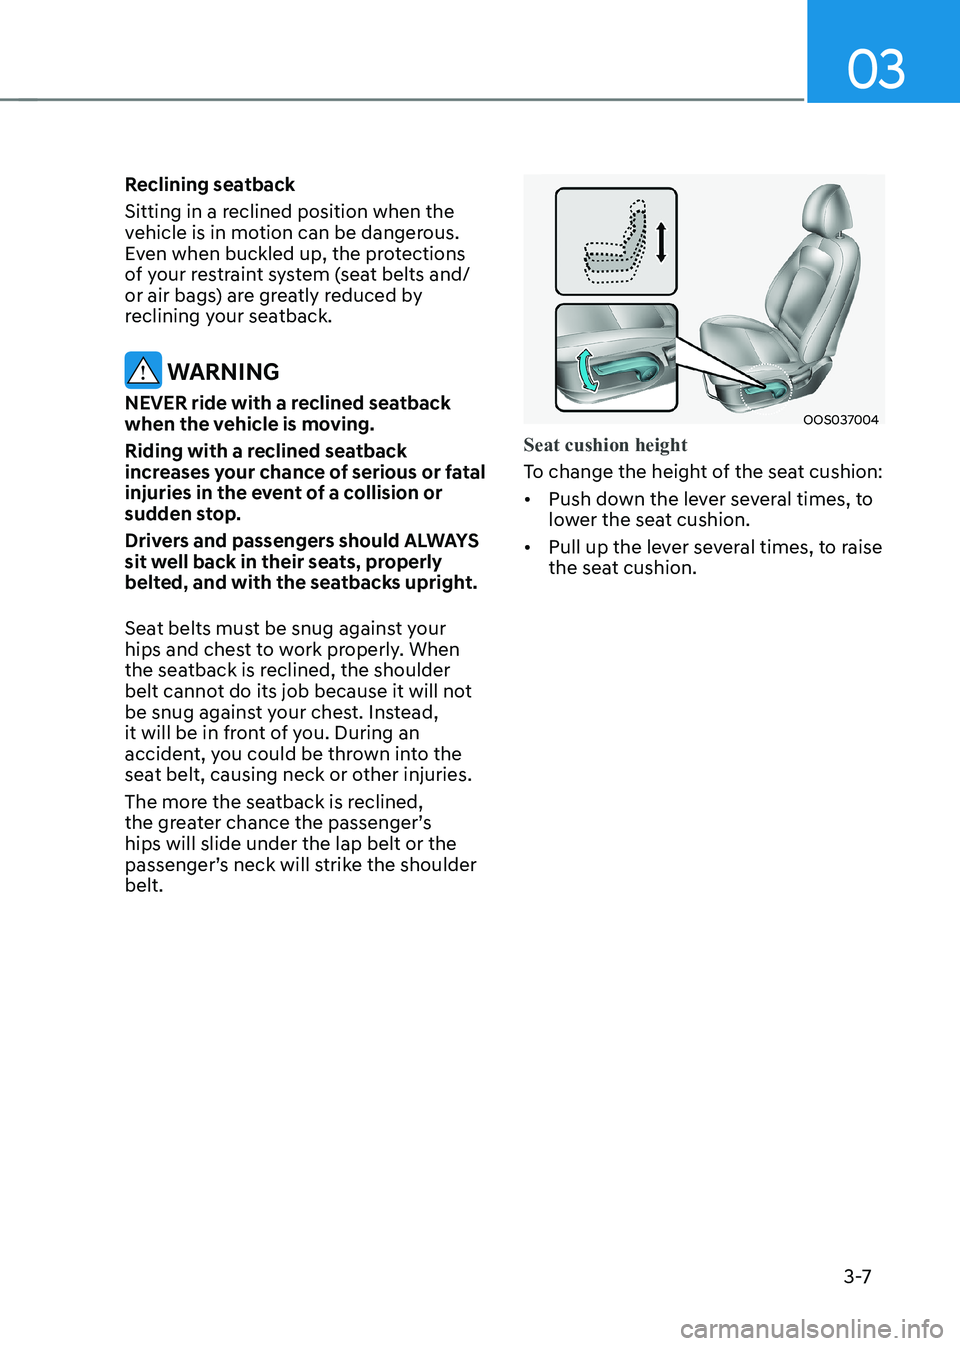
Seat cushion height
To change the height of the seat cushion: • Push down the lever several times, to
lower the seat cushion.
• Pull up the lever several times, to raise
the seat cushion.
Page 96 of 548
03
3-17
OOS037018
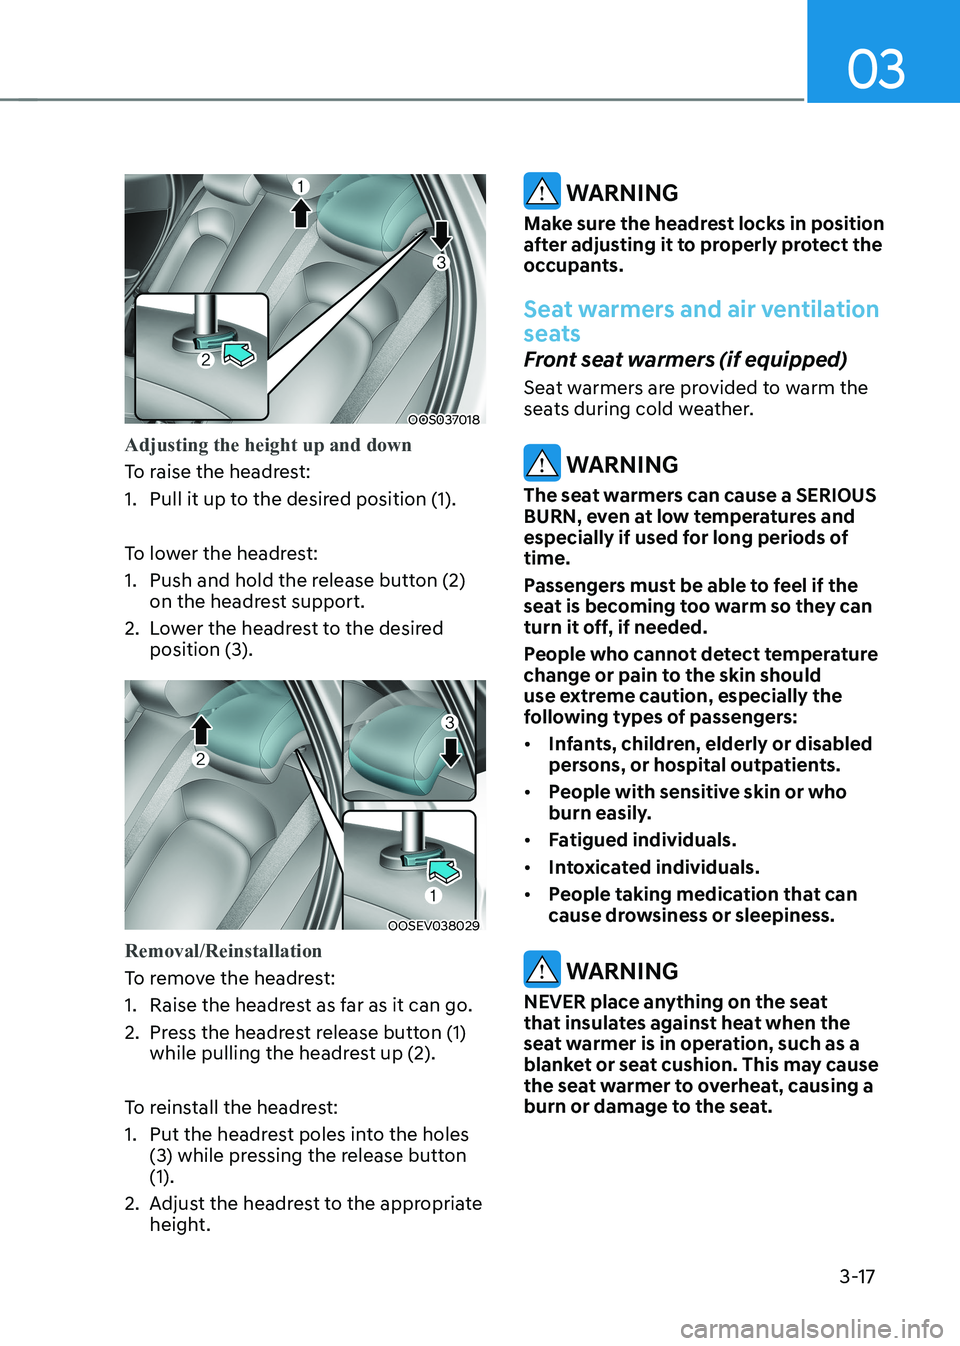
Adjusting the height up and down
To raise the headrest:
1. Pull it up to the desired position (1).
To lower the headrest:
1. Push and hold the release button (2) on the headrest support.
2. Lower the headrest to the desired position (3).
OOSEV038029
Removal/Reinstallation
To remove the headrest:
1. Raise the headrest as far as it can go.
2. Press the headrest release button (1) while pulling the headrest up (2).
To reinstall the headrest:
1. Put the headrest poles into the holes (3) while pressing the release button (1).
2. Adjust the headrest to the appropriate height.
WARNING
Make sure the headrest locks in position
after adjusting it to properly protect the
occupants.
Seat warmers and air ventilation
seats
Front seat warmers (if equipped)
Seat warmers are provided to warm the
seats during cold weather.
WARNING
The seat warmers can cause a SERIOUS
BURN, even at low temperatures and
especially if used for long periods of time.
Passengers must be able to feel if the
seat is becoming too warm so they can
turn it off, if needed.
People who cannot detect temperature
change or pain to the skin should
use extreme caution, especially the
following types of passengers: • Infants, children, elderly or disabled
persons, or hospital outpatients.
• People with sensitive skin or who
burn easily.
• Fatigued individuals.
• Intoxicated individuals.
• People taking medication that can
cause drowsiness or sleepiness.
WARNING
NEVER place anything on the seat
that insulates against heat when the
seat warmer is in operation, such as a
blanket or seat cushion. This may cause
the seat warmer to overheat, causing a
burn or damage to the seat.
Page 97 of 548
Safety system
3-18
NOTICE
To prevent damage to the seat warmers
and seats: • Never use a solvent such as paint
thinner, benzene, alcohol or gasoline
to clean the seats.
• Do not place heavy or sharp objects
on seats equipped with seat
warmers.
• Do not change the seat cover. It may
damage the seat warmer.
OOSEV030007L
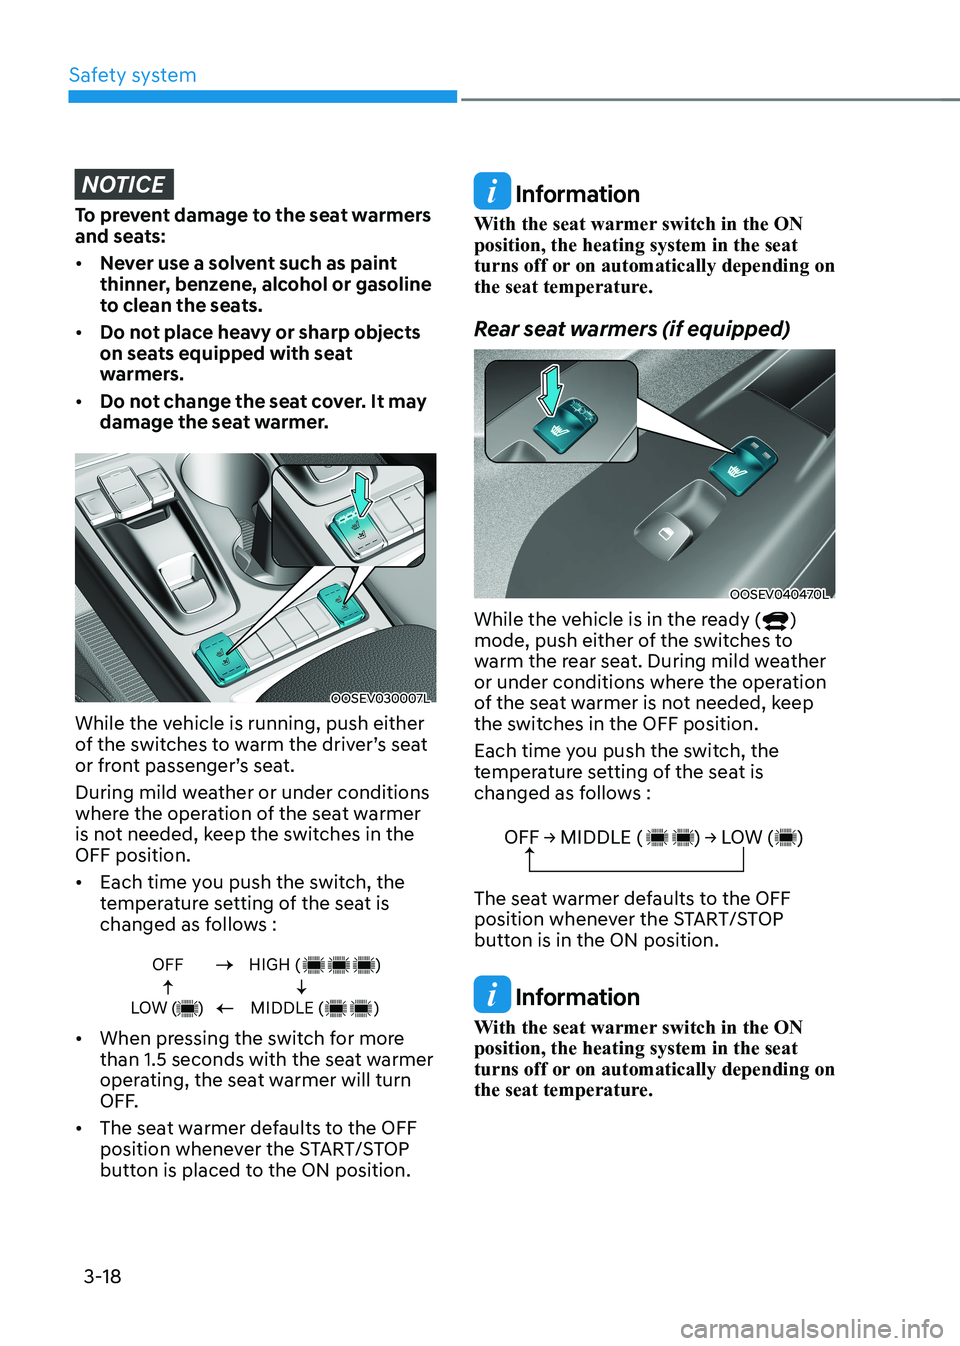
While the vehicle is running, push either
of the switches to warm the driver’s seat
or front passenger’s seat.
During mild weather or under conditions
where the operation of the seat warmer
is not needed, keep the switches in the OFF position. • Each time you push the switch, the
temperature setting of the seat is
changed as follows :
OFF
LOW ( )HIGH ( )
MIDDLE ( )
• When pressing the switch for more
than 1.5 seconds with the seat warmer
operating, the seat warmer will turn
OFF.
• The seat warmer defaults to the OFF
position whenever the START/STOP
button is placed to the ON position.
Information
With the seat warmer switch in the ON position, the heating system in the seat
turns off or on automatically depending on
the seat temperature.
Rear seat warmers (if equipped)
OOSEV040470L
While the vehicle is in the ready (
)
mode, push either of the switches to
warm the rear seat. During mild weather
or under conditions where the operation
of the seat warmer is not needed, keep
the switches in the OFF position.
Each time you push the switch, the
temperature setting of the seat is
changed as follows :
OFF → MIDDLE ( ) → LOW ( )
The seat warmer defaults to the OFF
position whenever the START/STOP
button is in the ON position.
Information
With the seat warmer switch in the ON position, the heating system in the seat
turns off or on automatically depending on
the seat temperature.
Page 98 of 548
03
3-19
Front air ventilation seat (if equipped)
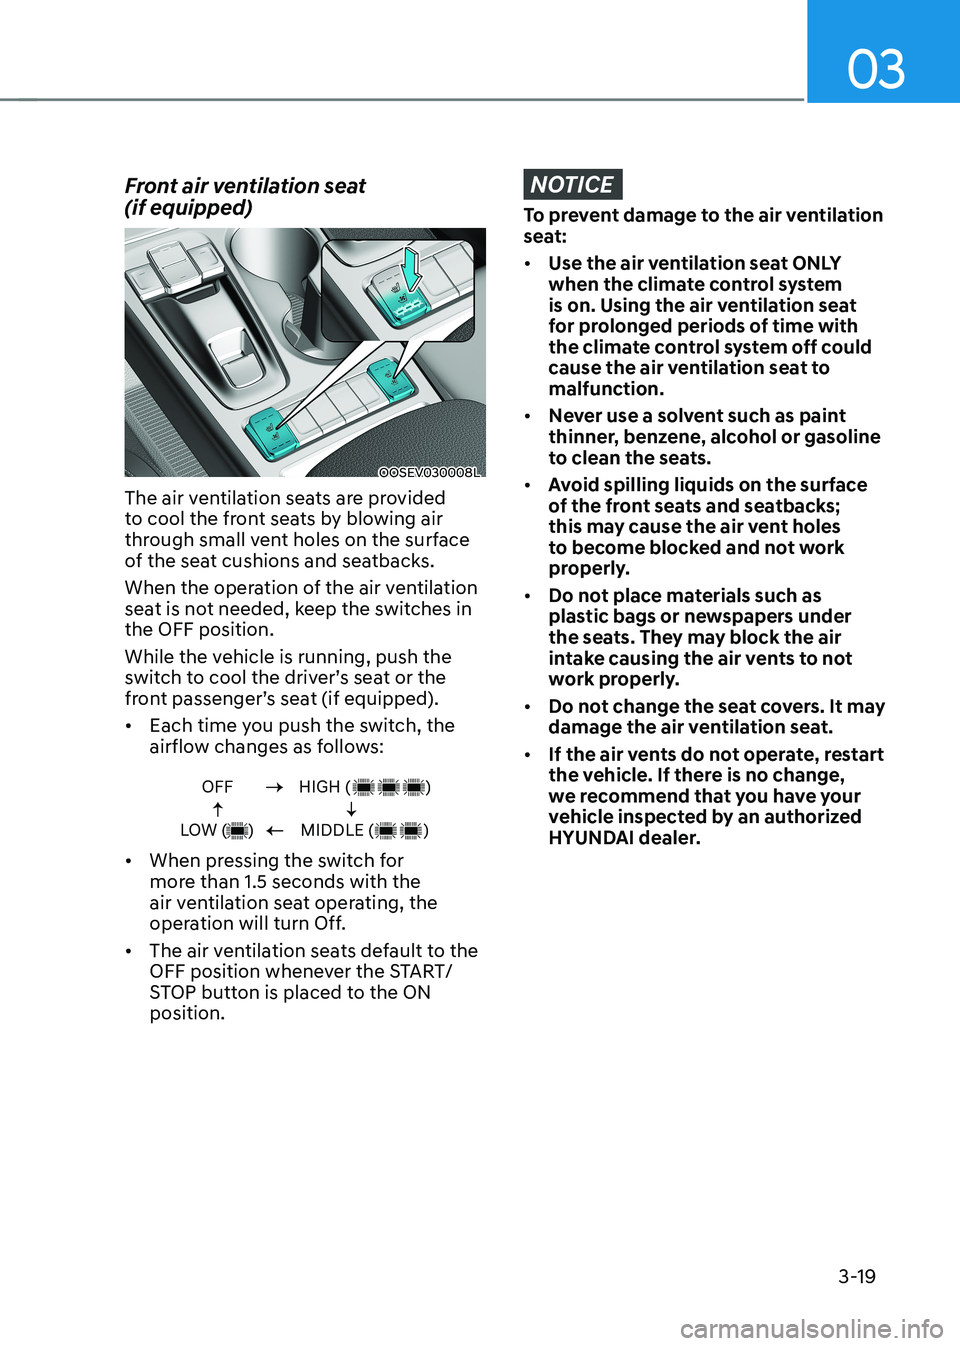
OOSEV030008L
The air ventilation seats are provided
to cool the front seats by blowing air
through small vent holes on the surface
of the seat cushions and seatbacks.
When the operation of the air ventilation
seat is not needed, keep the switches in the OFF position.
While the vehicle is running, push the
switch to cool the driver’s seat or the
front passenger’s seat (if equipped). • Each time you push the switch, the
airflow changes as follows:
OFF
LOW ( )HIGH ( )
MIDDLE ( )
• When pressing the switch for
more than 1.5 seconds with the
air ventilation seat operating, the
operation will turn Off.
• The air ventilation seats default to the
OFF position whenever the START/
STOP button is placed to the ON position.
NOTICE
To prevent damage to the air ventilation
seat: • Use the air ventilation seat ONLY
when the climate control system
is on. Using the air ventilation seat
for prolonged periods of time with
the climate control system off could
cause the air ventilation seat to malfunction.
• Never use a solvent such as paint
thinner, benzene, alcohol or gasoline
to clean the seats.
• Avoid spilling liquids on the surface
of the front seats and seatbacks;
this may cause the air vent holes
to become blocked and not work
properly.
• Do not place materials such as
plastic bags or newspapers under
the seats. They may block the air
intake causing the air vents to not
work properly.
• Do not change the seat covers. It may
damage the air ventilation seat.
• If the air vents do not operate, restart
the vehicle. If there is no change,
we recommend that you have your
vehicle inspected by an authorized
HYUNDAI dealer.
Page 160 of 548
04
4-17
lcD DIsplay messages
Shift to P
This warning message is displayed if you
try to turn off the vehicle when the gear
is not in the P (Park) position.
At this time, the START/STOP button
changes to the ACC position (If you press
the START/STOP button once more, it will
turn to the ON position).
Low key battery
This warning message is displayed if the
battery of the smart key is discharged
while changing the START/STOP button
to the OFF position.
Press START/STOP button while turning wheel
This warning message is displayed if the
steering wheel does not unlock normally
when the START/STOP button is pressed.
You should press the START/STOP button
while turning the steering wheel right
and left.
Check steering wheel lock system
This warning message is displayed if the
steering wheel does not lock normally
while the START/STOP button changes to the OFF position.
Press brake pedal to start vehicle
This warning message is displayed if the
START/STOP button changes to the ACC
position twice by pressing the button
repeatedly without depressing the brake pedal.
You can start the vehicle by depressing
the brake pedal.Key not in vehicle
This warning message is displayed if the
smart key is not in the vehicle when you
press the START/STOP button.
When attempting to start the vehicle,
always have the smart key with you.
Key not detected
This warning message is displayed if the
smart key is not detected when you press
the START/STOP button.
Press START/STOP button again
This message is displayed if you were
unable to start the vehicle when the
START/STOP button was pressed.
If this occurs, attempt to start the vehicle
by pressing the START/STOP button again.
If the warning message appears each
time you press the START/STOP button,
we recommend you to have your vehicle
inspected by an authorized Hyundai
dealer.
Press START/STOP button with key
This warning message is displayed if you
press the START/STOP button while the
warning message "Key not detected" is
displayed.
At this time, the immobilizer indicator
light blinks.