2022 HYUNDAI KONA EV key
[x] Cancel search: keyPage 231 of 548
05
5-47
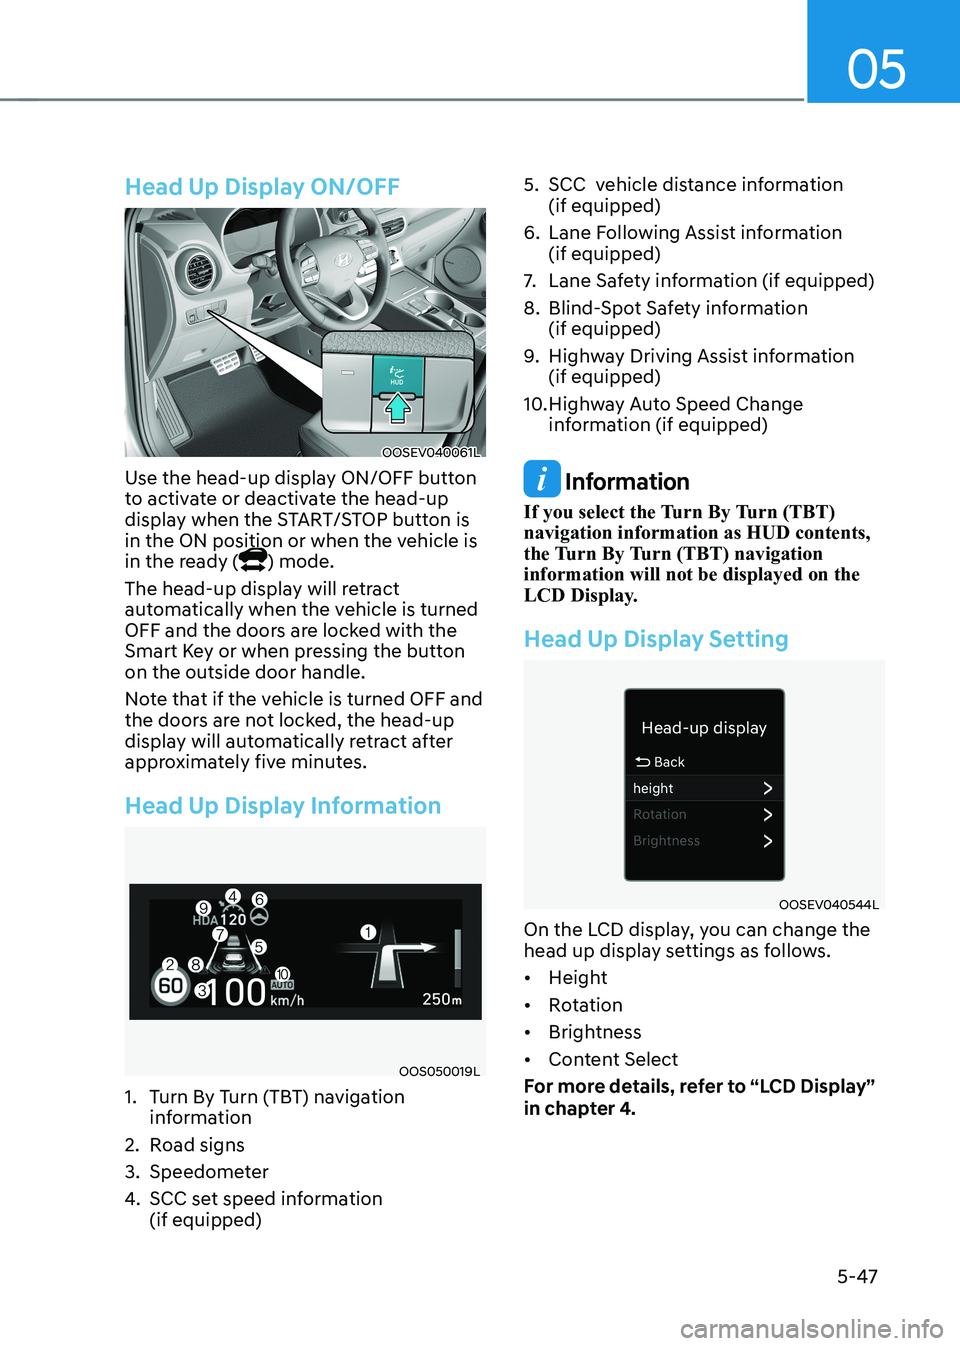
Head Up Display ON/OFF
OOSEV040061L
Use the head-up display ON/OFF button
to activate or deactivate the head-up
display when the START/STOP button is
in the ON position or when the vehicle is
in the ready (
) mode.
The head-up display will retract
automatically when the vehicle is turned
OFF and the doors are locked with the
Smart Key or when pressing the button on the outside door handle.
Note that if the vehicle is turned OFF and
the doors are not locked, the head-up
display will automatically retract after
approximately five minutes.
Head Up Display Information
OOS050019L
1. Turn By Turn (TBT) navigation information
2. Road signs
3. Speedometer
4. SCC set speed information (if equipped) 5. SCC vehicle distance information
(if equipped)
6. Lane Following Assist information (if equipped)
7. Lane Safety information (if equipped)
8. Blind-Spot Safety information (if equipped)
9. Highway Driving Assist information (if equipped)
10. Highway Auto Speed Change information (if equipped)
Information
If you select the Turn By Turn (TBT) navigation information as HUD contents,
the Turn By Turn (TBT) navigation information will not be displayed on the
LCD Display.
Head Up Display Setting
OOSEV040544L
On the LCD display, you can change the
head up display settings as follows. • Height
• Rotation
• Brightness
• Content Select
For more details, refer to “LCD Display”
in chapter 4.
Page 235 of 548
05
5-51
Headlamp delay function (if equipped)
If you place the START/STOP button
to the ACC or OFF position with the
headlamps ON, the headlamps (and/or
position lamps) remain on for about 5
minutes. However, with the vehicle off if
the driver’s door is opened and closed,
the headlamps (and/or position lamps)
are turned off after 15 seconds.
The headlamps (and/or position lamps)
can be turned off by pressing the lock
button on the smart key twice or turning
the light switch to the OFF or AUTO
position. However, if you turn the light
switch to the AUTO position when it is
dark outside, the headlamps will not be
turned off.
You can activate or deactivate the
Headlamp Delay function from the User
Settings mode on the LCD display. For
more details, refer to “LCD Display” in
chapter 4.
NOTICE
If the driver gets out of the vehicle
through other doors (except driver’s
door), the battery saver function
does not operate and the headlamp
delay function does not turn off
automatically. Therefore, It causes the
battery to be discharged. In this case,
make sure to turn off the headlamps
before getting out of the vehicle.
Welcome system (if equipped)
Headlamp and position lamp
When the headlamp (lamp switch in the
headlamp or AUTO position) is on and
all doors (and tailgate) are locked and closed, the position lamp and headlamp
will come on for 15 seconds when the
door unlock button is pressed on the
smart key.
At this time, if you press the door lock
or unlock button, the position lamp and
headlamp will turn off immediately
Interior lamp
When the interior lamp switch is in
the DOOR position and all doors (and
tailgate) are closed and locked, the room
lamp will come on for 30 seconds if any
of the below is performed. • When the door unlock button is
pressed on the smart key.
• When the button of the outside door
handle is pressed with the smart key in possession.
At this time, if you press the door lock or
unlock button, the room lamp will turn
off immediately.
Page 237 of 548
05
5-53
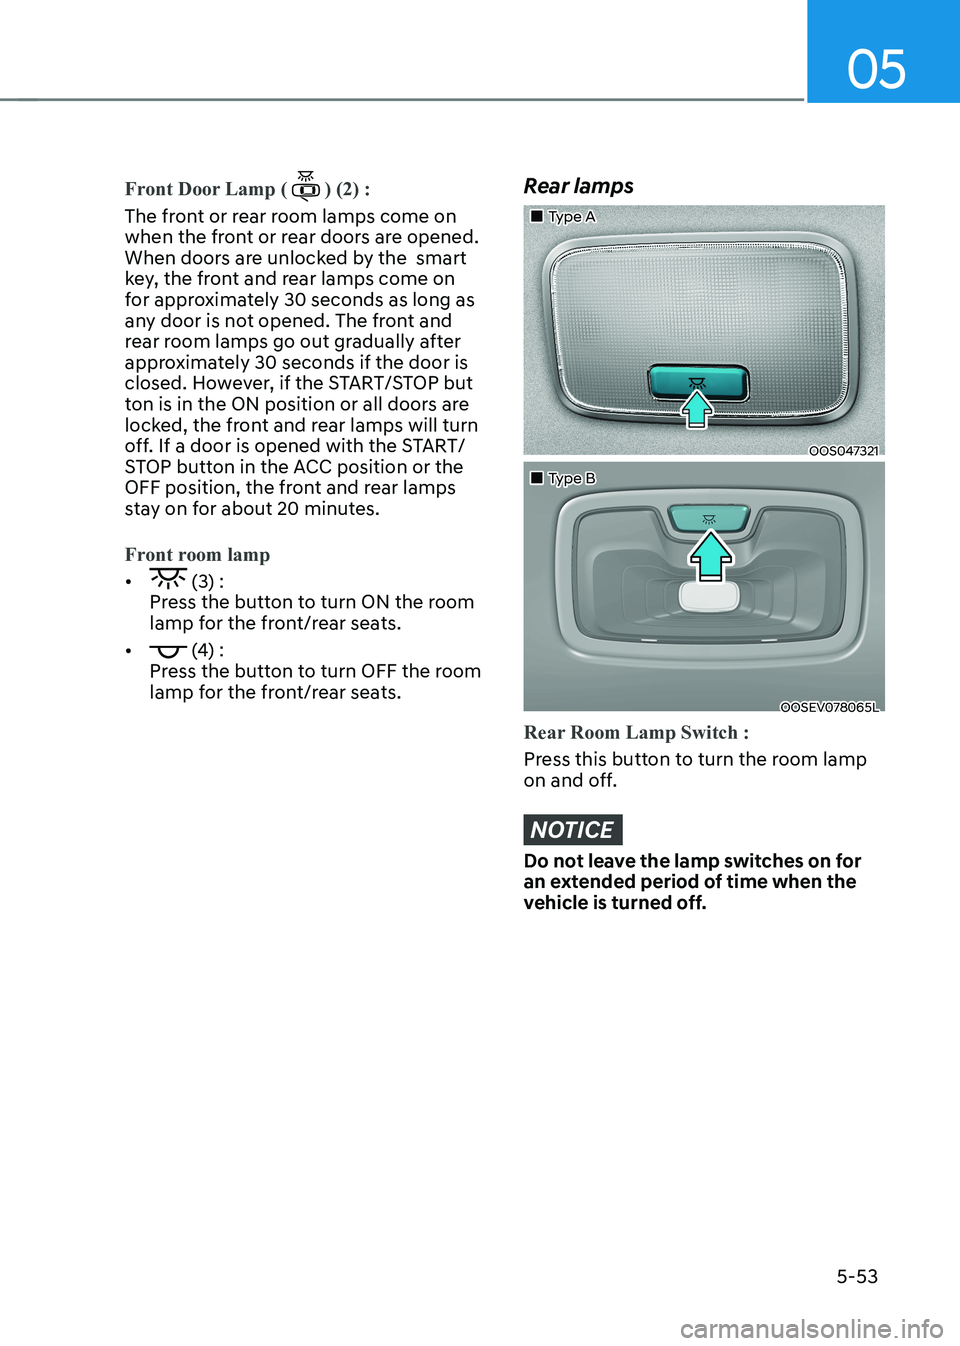
Front Door Lamp () (2) :
The front or rear room lamps come on
when the front or rear doors are opened.
When doors are unlocked by the smart
key, the front and rear lamps come on
for approximately 30 seconds as long as
any door is not opened. The front and
rear room lamps go out gradually after
approximately 30 seconds if the door is
closed. However, if the START/STOP but
ton is in the ON position or all doors are
locked, the front and rear lamps will turn
off. If a door is opened with the START/
STOP button in the ACC position or the
OFF position, the front and rear lamps
stay on for about 20 minutes.
Front room lamp
• (3) :
Press the button to turn ON the room
lamp for the front/rear seats.
•
(4) :
Press the button to turn OFF the room
lamp for the front/rear seats.
Rear lamps
„„Type A
OOS047321
„„Type B
OOSEV078065L
Rear Room Lamp Switch :
Press this button to turn the room lamp
on and off.
NOTICE
Do not leave the lamp switches on for
an extended period of time when the
vehicle is turned off.
Page 271 of 548
![HYUNDAI KONA EV 2022 Owners Manual 05
5-87
Wireless cellular phone charging
system (if equipped)
OOSEV041034N
[A] : Indicator light, [B] : Charging pad
There is a wireless cellular phone charger
inside the front console.
The sy HYUNDAI KONA EV 2022 Owners Manual 05
5-87
Wireless cellular phone charging
system (if equipped)
OOSEV041034N
[A] : Indicator light, [B] : Charging pad
There is a wireless cellular phone charger
inside the front console.
The sy](/manual-img/35/56171/w960_56171-270.png)
05
5-87
Wireless cellular phone charging
system (if equipped)
OOSEV041034N
[A] : Indicator light, [B] : Charging pad
There is a wireless cellular phone charger
inside the front console.
The system is available when all doors
are closed, and when the START/STOP
button is in the ON position (1).
After use, to close the cover, slightly pull
down the cover.
The system is available when all doors
are closed, and when the START/STOP
button is in the ON or START position.
To charge a cellular phone
The wireless cellular phone charging
system charges only the Qi-enabled cellular phones (
). Read the label on
the cellular phone accessory cover or
visit your cellular phone manufacturer’s
website to check whether your cellular
phone supports the Qi technology.
The wireless charging process starts
when you put a Qi-enabled cellular
phone on the wireless charging unit.
1. Remove other items, including the smart key, from the wireless charging
unit. If not, the wireless charging
process may be interrupted. Place
the cellular phone on the center of
charging pad.
2. The indicator light is orange when the cellular phone is charging. The
indicator light turns green when
phone charging is complete. 3. You can turn ON or OFF the wireless
charging function in the User Settings
mode on the instrument cluster. For
further information, refer to the “User
setting mode” in chapter 4.
If your cellular phone is not charging: - Slightly change the position of the cellular phone on the charging pad.
- Make sure the indicator light is orange.
The indicator light will blink orange for 10
seconds if there is a malfunction in the
wireless charging system.
In this case, temporarily stop the
charging process, and re-attempt to
wirelessly charge your cellular phone again.
The system warns you with a message
on the LCD display if the cellular phone
is still on the wireless charging unit after
the vehicle is turned OFF and the front door is opened. • High speed wireless charging can
be activated only when the cellular
phones equipped with a wireless
charging function is on the charging pad. Information
For some manufacturers’ cellular phones, the system may not warn you even though
the cellular phone is left on the wireless
charging unit. This is due to the particular
characteristic of the cellular phone and
not a malfunction of the wireless charging.
Page 272 of 548
Convenient features
5-88
NOTICE
• The wireless smart phone charging
system may not support certain
smart phones, which are not verified
for the Qi specification (
).
• When placing your smart phone on
the charging pad, position the phone
in the middle of the mat for optimal
charging performance. If your smart
phone is off to the side, the charging
rate may be less and in some cases
the smart phone may experience
higher heat conduction.
• In some cases, the wireless charging
may stop temporarily when the
smart key is used, either when
starting the vehicle or locking/
unlocking the doors, etc.
• When charging certain smart
phones, the charging indicator may
not change to blue when the smart
phone is fully charged.
• The wireless charging process may
temporarily stop, when temperature
abnormally increases inside the
wireless smart phone charging
system. The wireless charging
process restarts, when temperature
falls to a certain level.
• The wireless charging process may
temporarily stop when there is
any metallic item, such as a coin,
between the wireless smart phone
charging system and smart phone.
• When charging some smart phones
with a self-protection feature,
the wireless charging speed may
decrease and the wireless charging
may stop.
• If the smart phone has a thick cover,
the wireless charging may not be possible.
• If the smart phone is not completely
contacting the charging pad,
wireless charging may not operate
properly. •
Some magnetic items like credit
cards, phone cards or rail tickets may
be damaged if left with the smart
phone during the charging process.
• When any smart phone without
a wireless charging function or a
metallic object is placed on the
charging pad, a small noise may
sound. This small sound is due to the
vehicle discerning compatibility of
the object placed on the charging
pad. It does not affect your vehicle or
the smart phone in any way.
Information
If the START/STOP button is OFF, the charging also stops.
Information
This device complies with Industry Canada RSS-210 standard. Operation is subject to the following two conditions: 1. This device may not cause harmful
interference, and
2. This device must accept any
interference received, including
interference that may cause undesired operation.
Page 284 of 548
Driving your vehicle
6-4
WARNING
To reduce the risk of SERIOUS INJURY or
DEATH, take the following precautions: • NEVER allow children or any person
who is unfamiliar with the vehicle
to touch the START/STOP button
or related parts. Unexpected and
sudden vehicle movement can occur.
• NEVER reach through the steering
wheel for the START/STOP button or
any other control, while the vehicle
is in motion. The presence of your
hand or arm in this area may cause a
loss of vehicle control resulting in an
accident.
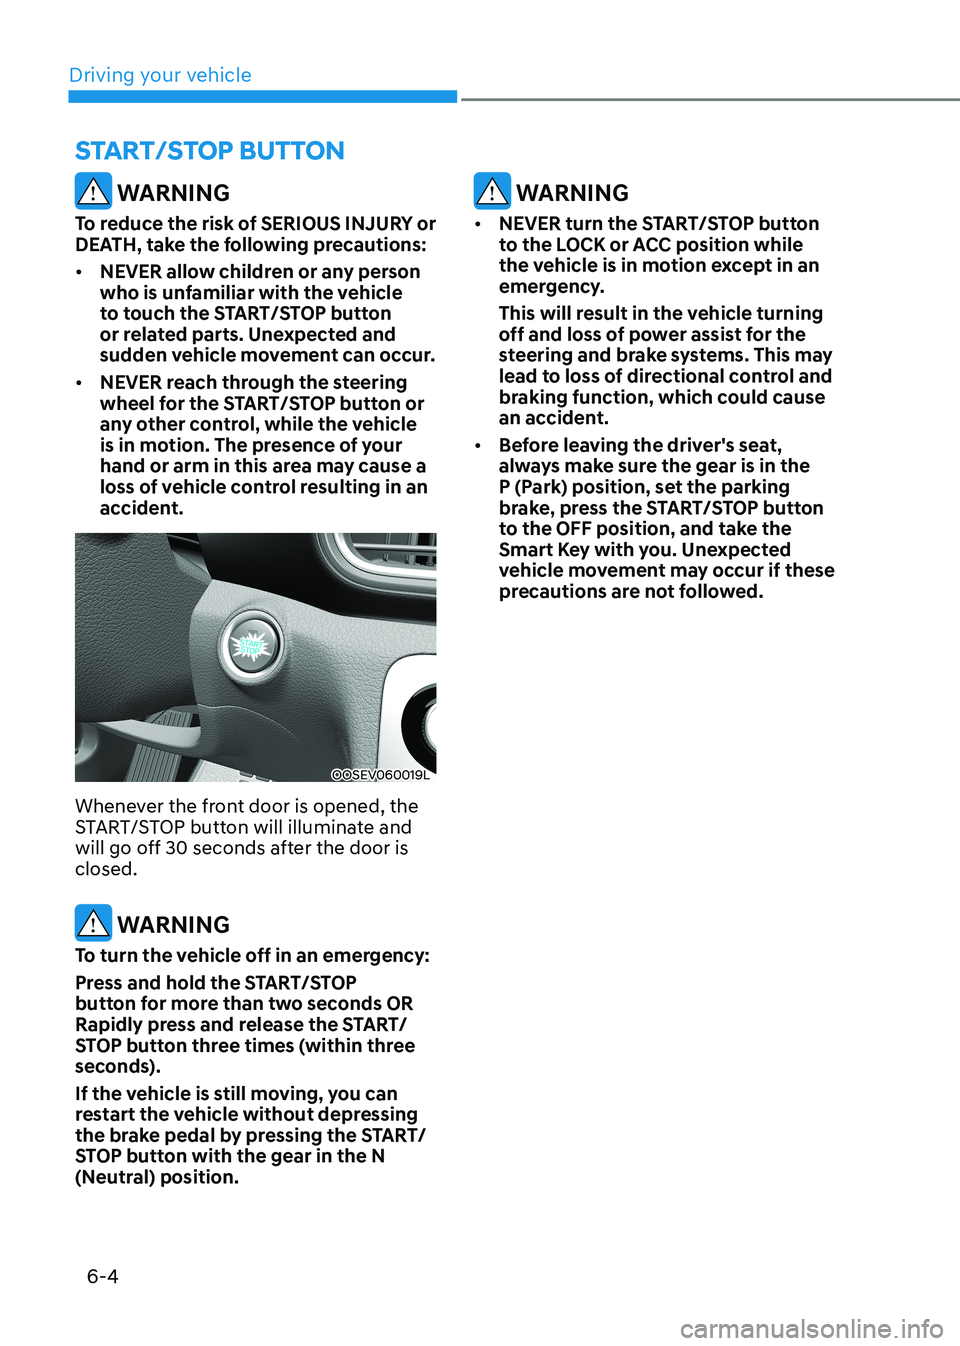
OOSEV060019L
Whenever the front door is opened, the
START/STOP button will illuminate and
will go off 30 seconds after the door is closed.
WARNING
To turn the vehicle off in an emergency:
Press and hold the START/STOP
button for more than two seconds OR
Rapidly press and release the START/
STOP button three times (within three
seconds).
If the vehicle is still moving, you can
restart the vehicle without depressing
the brake pedal by pressing the START/
STOP button with the gear in the N
(Neutral) position.
WARNING
• NEVER turn the START/STOP button
to the LOCK or ACC position while
the vehicle is in motion except in an
emergency.
This will result in the vehicle turning
off and loss of power assist for the
steering and brake systems. This may
lead to loss of directional control and
braking function, which could cause
an accident.
• Before leaving the driver's seat,
always make sure the gear is in the
P (Park) position, set the parking
brake, press the START/STOP button
to the OFF position, and take the
Smart Key with you. Unexpected
vehicle movement may occur if these
precautions are not followed.
START/STOP BuTTON
Page 286 of 548
Driving your vehicle
6-6
Starting the vehicle
WARNING
• Always wear appropriate shoes when
operating your vehicle. Unsuitable
shoes, such as high heels, ski boots,
sandals, flip-flops, etc., may interfere
with your ability to use the brake,
accelerator and clutch pedals.
• Do not start the vehicle with the
accelerator pedal depressed. The
vehicle can move which can lead to
an accident.
Information
• The vehicle will start by pressing the
START/STOP button, only when the smart key is in the vehicle.
• Even if the smart key is in the vehicle,
and when it is far away from the driver, the vehicle may not start.
• When the START/STOP button is in
the ACC or ON position, any door is
open, the system checks for the smart
key. When the smart key is not in the vehicle, the "
" indicator will blink
and the warning "Key not in vehicle"
will come on. When all doors are
closed, the chime will also sound for about 5 seconds. Keep the smart key in
the vehicle when in the ACC position or
if the vehicle is in the ready (
) mode.
1. Always carry the smart key with you.
2. Make sure the parking brake is applied.
3. Make sure the gear is in P (Park).
4. Depress the brake pedal.
5. Press the START/STOP button. If the vehicle starts, the "
" indicator will
come on.
Information
• Always start the vehicle with your foot
on the brake pedal. Do not depress the
accelerator while starting the vehicle.
• If ambient temperature is low, the "
" indicator may remain illuminated
longer than the normal amount of time.
NOTICE
To prevent damage to the vehicle: • If the "
" indicator turns off while
you are in motion, do not attempt to
shift to the P (Park) position.
If traffic and road conditions permit,
you may shift to the N (Neutral)
position while the vehicle is still
moving and press the START/STOP
button in an attempt to restart the
vehicle.
• Do not push or tow your vehicle to
start the vehicle.
Page 287 of 548
06
6 -7
NOTICE
To prevent damage to the vehicle:
Do not press the START/STOP button for
more than 10 seconds except when the
stop lamp fuse is blown.
When the stop lamp fuse is blown, you
can’t start the vehicle normally. Replace
the fuse with a new one. If you are not
able to replace the fuse, you can start
the vehicle by pressing and holding
the START/STOP button for 10 seconds
with the START/STOP button in the ACC position.
For your safety always depress the
brake before starting the vehicle.
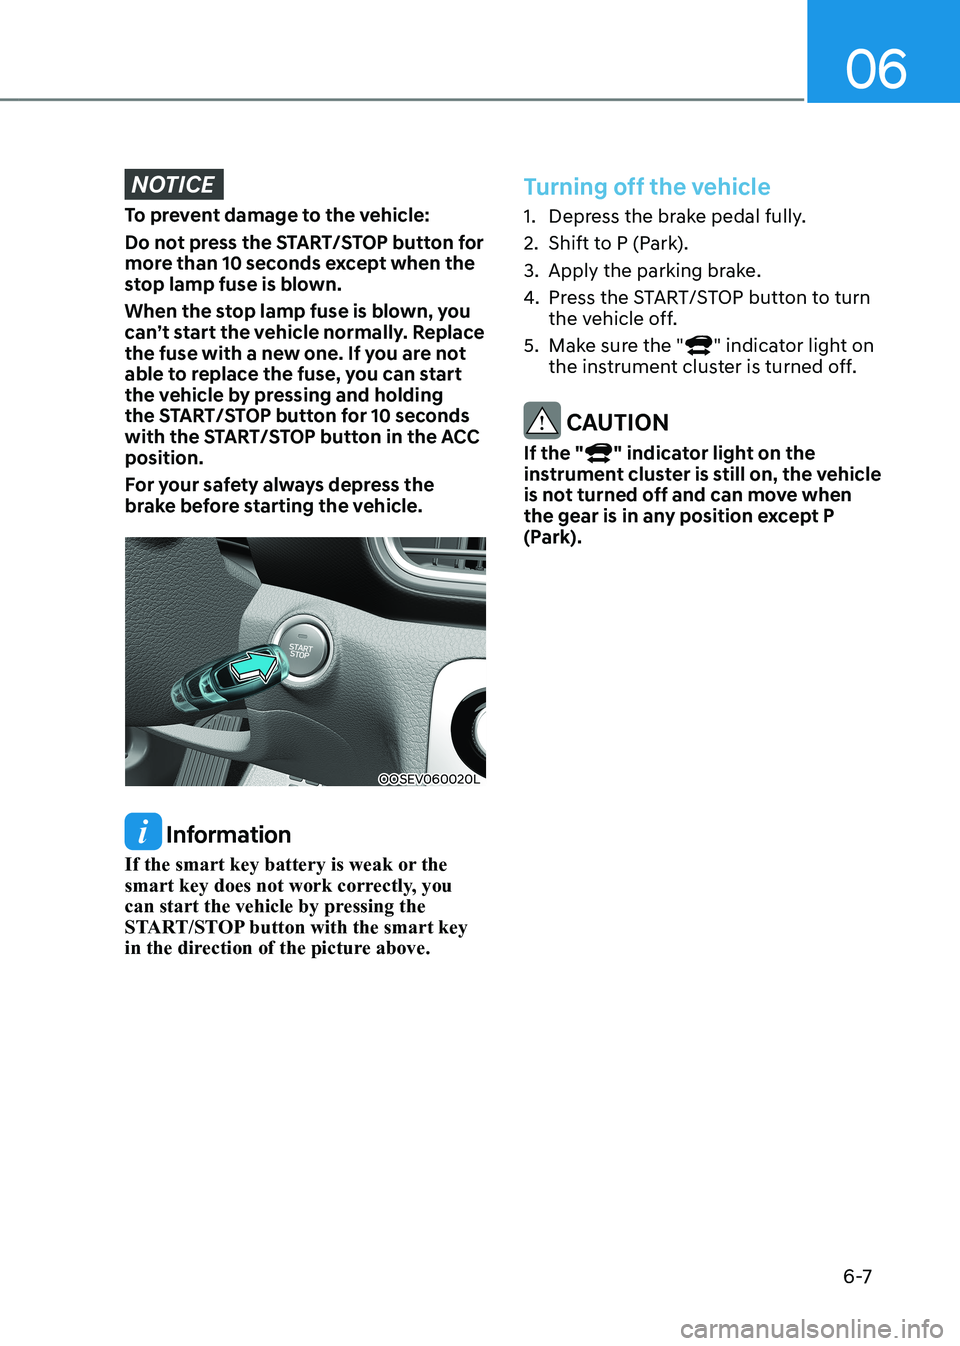
OOSEV060020L
Information
If the smart key battery is weak or the
smart key does not work correctly, you
can start the vehicle by pressing the
START/STOP button with the smart key
in the direction of the picture above.
Turning off the vehicle
1. Depress the brake pedal fully.
2. Shift to P (Park).
3. Apply the parking brake.
4. Press the START/STOP button to turn
the vehicle off.
5. Make sure the "
" indicator light on
the instrument cluster is turned off.
CAUTION
If the "
" indicator light on the
instrument cluster is still on, the vehicle
is not turned off and can move when
the gear is in any position except P
(Park).