2022 FORD F-550 ECU
[x] Cancel search: ECUPage 321 of 740
INSTALLING AND REMOVING THE
PICKUP BED TIE-DOWN CLEATS
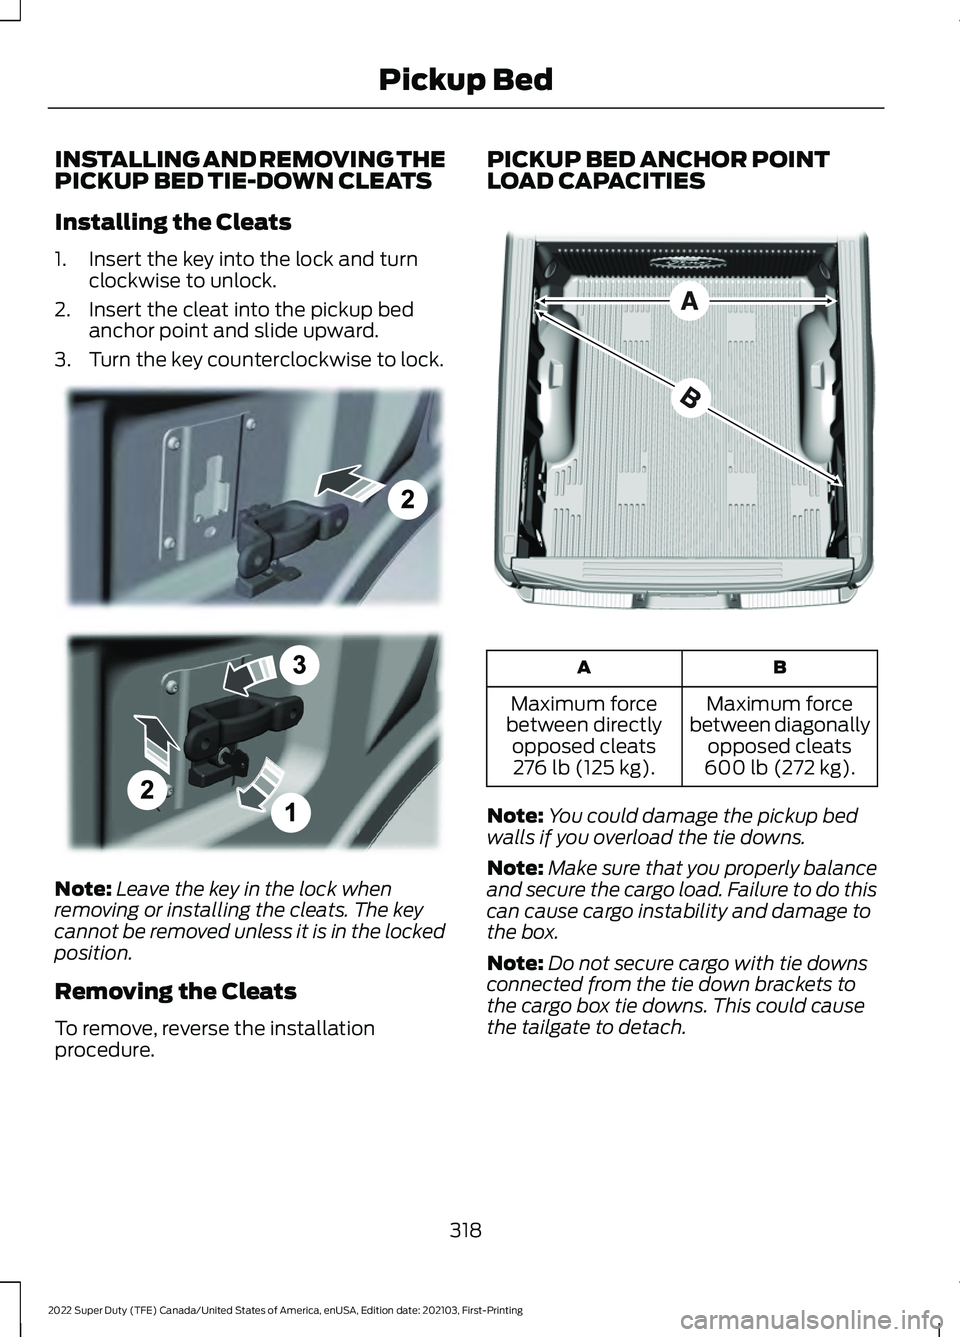
Installing the Cleats
1. Insert the key into the lock and turn
clockwise to unlock.
2. Insert the cleat into the pickup bed anchor point and slide upward.
3. Turn the key counterclockwise to lock. Note:
Leave the key in the lock when
removing or installing the cleats. The key
cannot be removed unless it is in the locked
position.
Removing the Cleats
To remove, reverse the installation
procedure. PICKUP BED ANCHOR POINT
LOAD CAPACITIES
B
A
Maximum force
between diagonally opposed cleats
600 lb (272 kg).
Maximum force
between directly opposed cleats276 lb (125 kg).
Note: You could damage the pickup bed
walls if you overload the tie downs.
Note: Make sure that you properly balance
and secure the cargo load. Failure to do this
can cause cargo instability and damage to
the box.
Note: Do not secure cargo with tie downs
connected from the tie down brackets to
the cargo box tie downs. This could cause
the tailgate to detach.
318
2022 Super Duty (TFE) Canada/United States of America, enUSA, Edition date: 202103, First-Printing Pickup BedE327575 E327576
Page 322 of 740
TAILGATE ANCHOR POINTS (IF
EQUIPPED)
LOCATING THE TAILGATE
ANCHOR POINTS
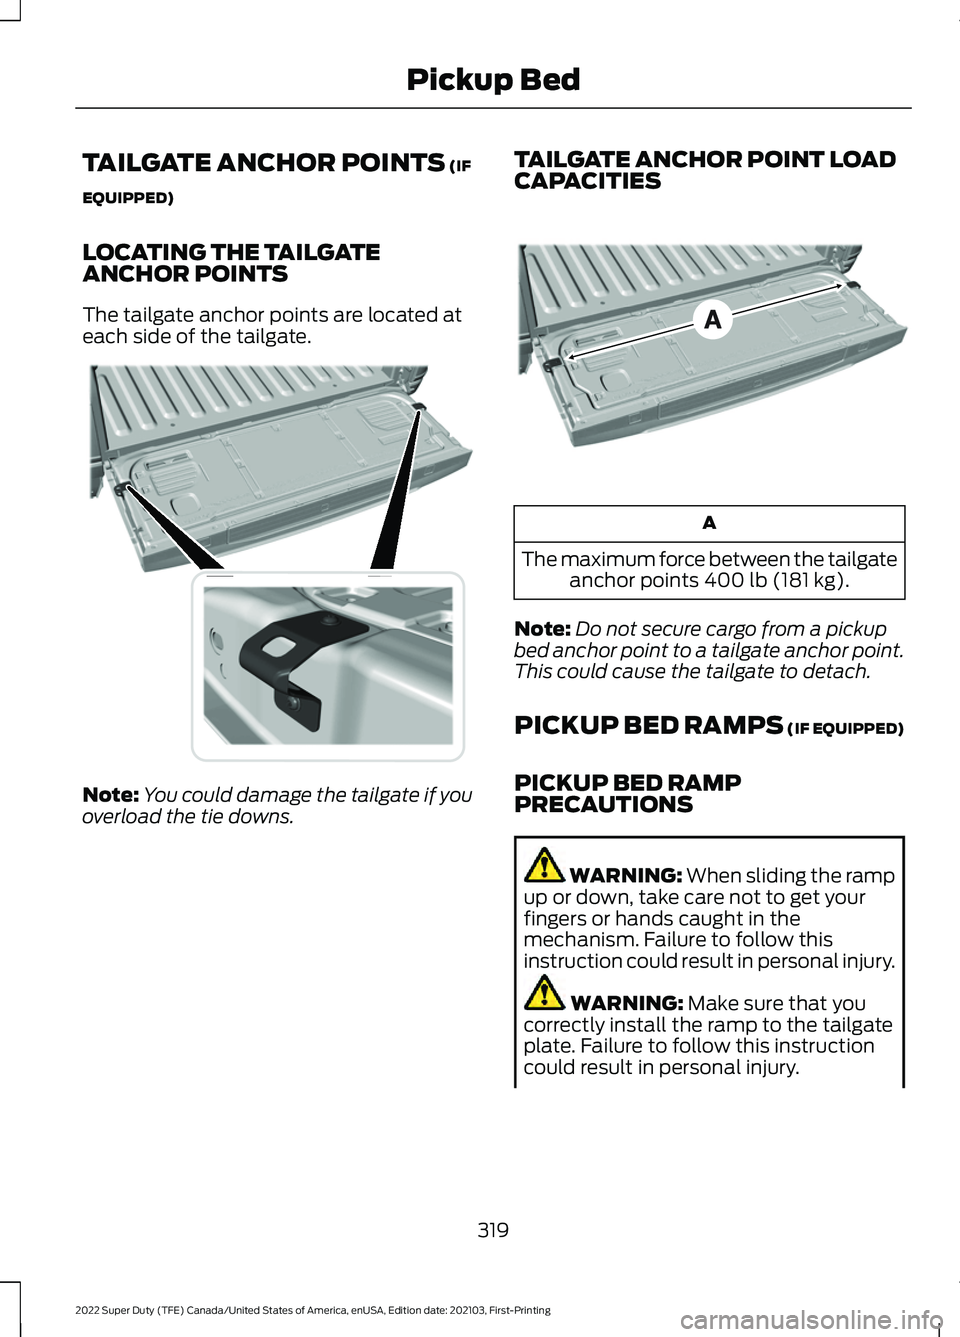
The tailgate anchor points are located at
each side of the tailgate. Note:
You could damage the tailgate if you
overload the tie downs. TAILGATE ANCHOR POINT LOAD
CAPACITIES A
The maximum force between the tailgate anchor points
400 lb (181 kg).
Note: Do not secure cargo from a pickup
bed anchor point to a tailgate anchor point.
This could cause the tailgate to detach.
PICKUP BED RAMPS (IF EQUIPPED)
PICKUP BED RAMP
PRECAUTIONS WARNING:
When sliding the ramp
up or down, take care not to get your
fingers or hands caught in the
mechanism. Failure to follow this
instruction could result in personal injury. WARNING:
Make sure that you
correctly install the ramp to the tailgate
plate. Failure to follow this instruction
could result in personal injury.
319
2022 Super Duty (TFE) Canada/United States of America, enUSA, Edition date: 202103, First-Printing Pickup BedE327594 E327790
Page 325 of 740
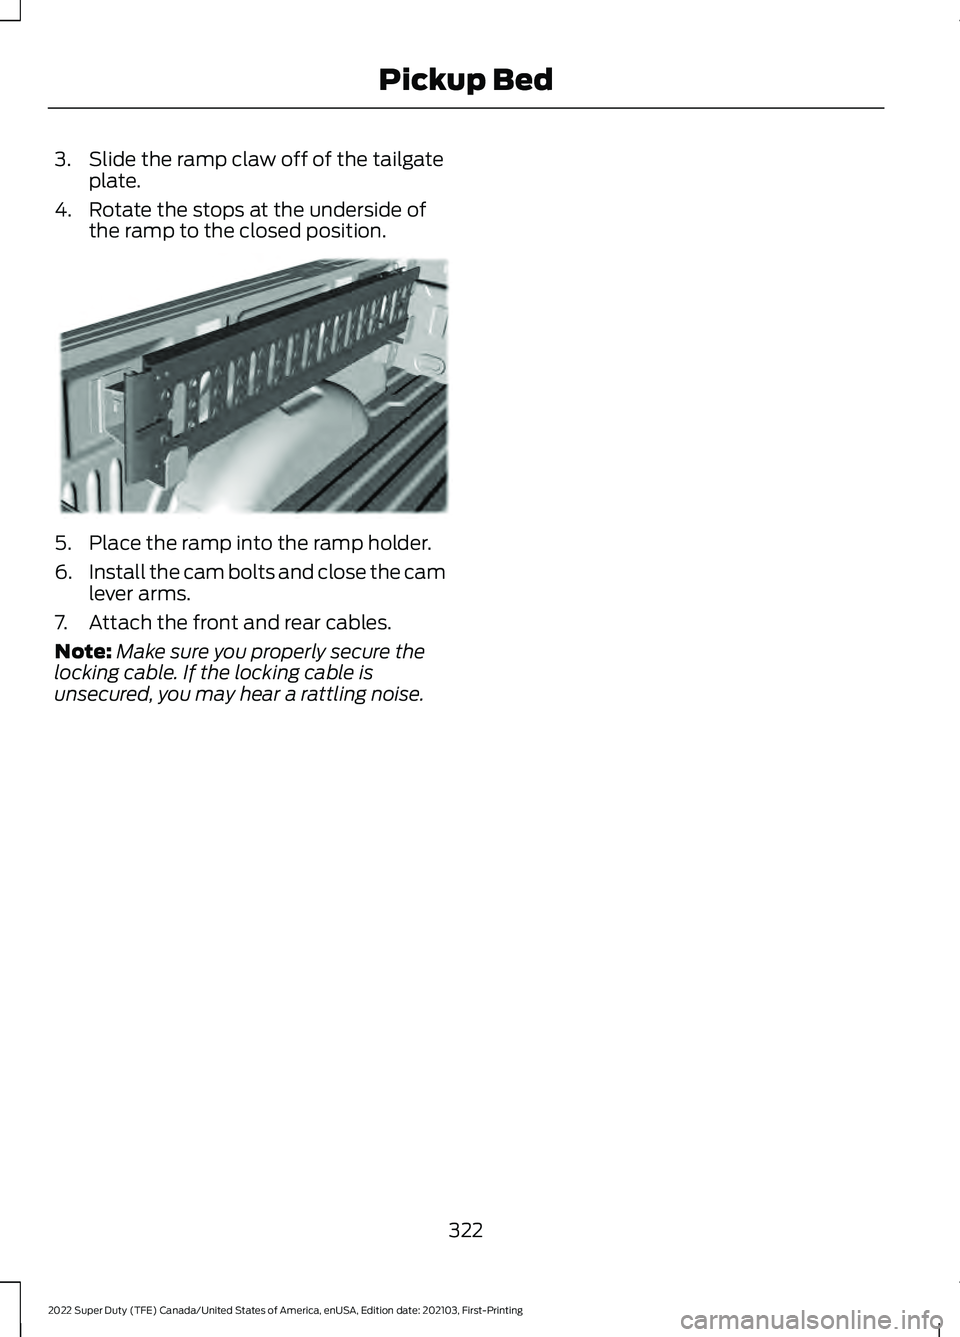
3. Slide the ramp claw off of the tailgate
plate.
4. Rotate the stops at the underside of the ramp to the closed position. 5. Place the ramp into the ramp holder.
6.
Install the cam bolts and close the cam
lever arms.
7. Attach the front and rear cables.
Note: Make sure you properly secure the
locking cable. If the locking cable is
unsecured, you may hear a rattling noise.
322
2022 Super Duty (TFE) Canada/United States of America, enUSA, Edition date: 202103, First-Printing Pickup BedE194391
Page 377 of 740
When driving through standing water, drive
very slowly and do not stop your vehicle.
Your brake performance and traction could
be limited. After driving through water and
as soon as it is safe to do so:
•
Lightly press the brake pedal to dry the
brakes and to check that they work.
• Turn the steering wheel to check that
the steering power assist works.
Check the function of the following:
• Horn
• Exterior lights
FLOOR MATS WARNING: Use a floor mat
designed to fit the footwell of your
vehicle that does not obstruct the pedal
area. Failure to follow this instruction
could result in the loss of control of your
vehicle, personal injury or death. WARNING:
Pedals that cannot
move freely can cause loss of vehicle
control and increase the risk of serious
personal injury. WARNING:
Secure the floor mat
to both retention devices so that it
cannot slip out of position and interfere
with the pedals. Failure to follow this
instruction could result in the loss of
control of your vehicle, personal injury or
death. WARNING: Do not place additional
floor mats or any other covering on top
of the original floor mats. This could
result in the floor mat interfering with the
operation of the pedals. Failure to follow
this instruction could result in the loss of
control of your vehicle, personal injury or
death. WARNING:
Always make sure that
objects cannot fall into the driver foot
well while your vehicle is moving. Objects
that are loose can become trapped
under the pedals causing a loss of
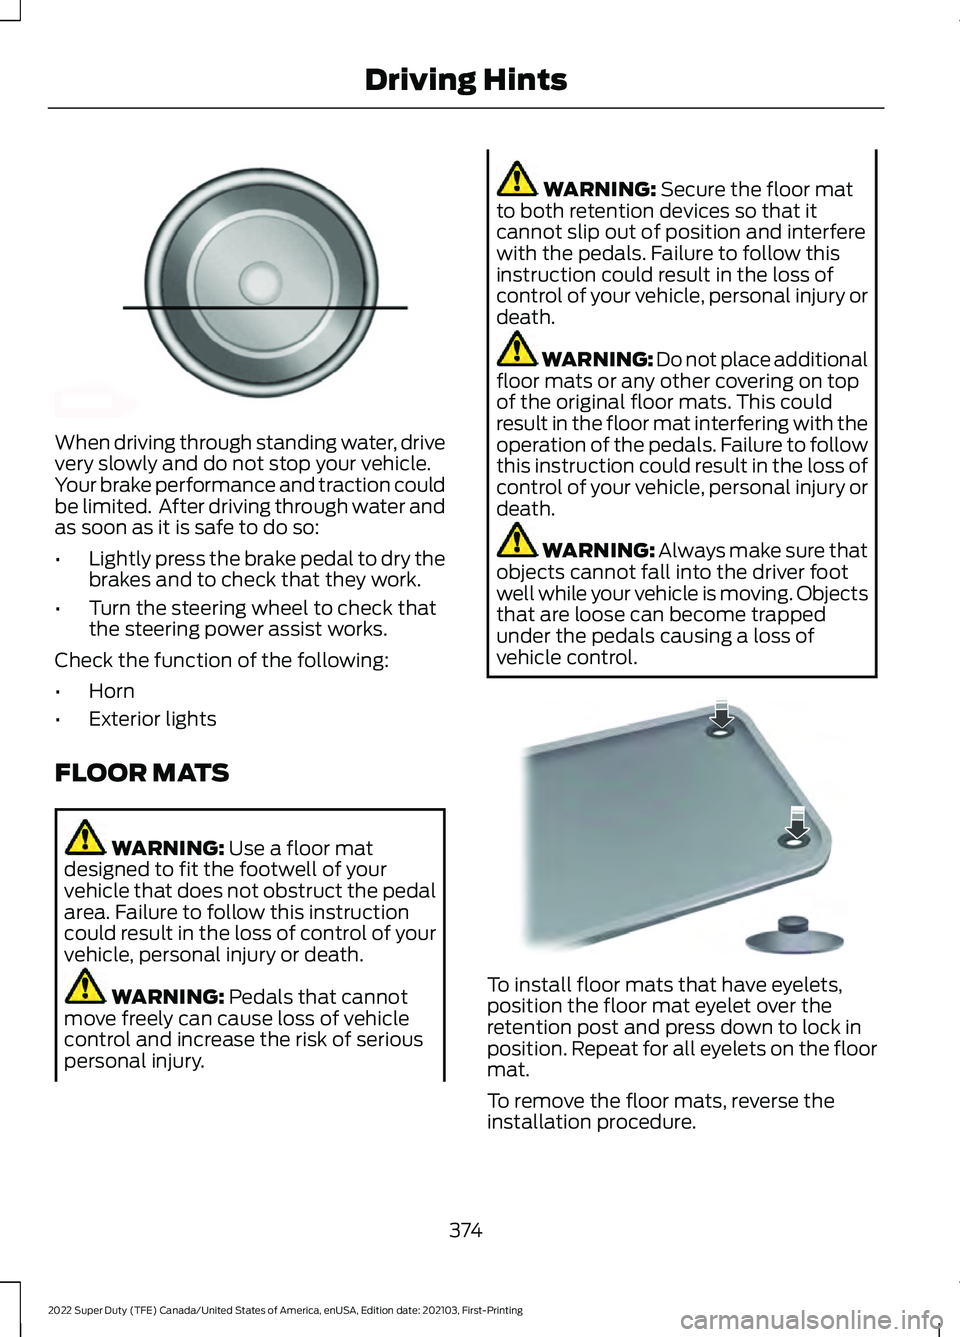
vehicle control. To install floor mats that have eyelets,
position the floor mat eyelet over the
retention post and press down to lock in
position. Repeat for all eyelets on the floor
mat.
To remove the floor mats, reverse the
installation procedure.
374
2022 Super Duty (TFE) Canada/United States of America, enUSA, Edition date: 202103, First-Printing Driving HintsE176913 E142666
Page 378 of 740
Note:
Regularly check the floor mats to
make sure they are secure.
375
2022 Super Duty (TFE) Canada/United States of America, enUSA, Edition date: 202103, First-Printing Driving Hints
Page 385 of 740
AUTOMATIC CRASH SHUTOFF
PRECAUTIONS
WARNING: If your vehicle has been
involved in a crash, have the fuel system
checked. Failure to follow this instruction
could result in fire, personal injury or
death.
RE-ENABLING YOUR VEHICLE
1. Switch the ignition off.
2. Attempt to start your vehicle.
3. Switch the ignition off.
4. Attempt to start your vehicle.
Note: If your vehicle does not start after the
third attempt, have your vehicle checked as
soon as possible.
RECOVERY TOWING
ACCESSING THE FRONT TOWING
POINT WARNING: Using recovery hooks
is dangerous and should only be done by
a person familiar with proper vehicle
recovery safety practices. Improper use
of recovery hooks may cause hook failure
or separation from the vehicle and could
result in serious injury or death. WARNING:
Slowly remove the
slack from the recovery strap prior to
pulling. Failure to do so can introduce
significantly higher loads which can
cause the recovery hooks to break off, or
the recovery strap to fail which can cause
serious injury or death. WARNING:
Never link two straps
together with a clevis pin. These heavy
metal objects could become projectiles
if the strap breaks and can cause serious
injury or death.
Your vehicle has frame-mounted front
recovery hooks.
Note: Do not apply a load to the recovery
hooks that is greater than the gross vehicle
weight rating of your vehicle.
Before using recovery hooks:
• Make sure all attaching points are
secure and capable of withstanding
the applied load.
• Do not use chains, cables or tow straps
with metal hook ends.
• Only use recovery straps that have a
minimum breaking strength two to
three times the gross vehicle weight of
the stuck vehicle.
• Make sure the recovery strap is in good
condition and free of visible cuts, tears
or damage.
• Use a damper device such as a tarp,
heavy blanket or piece of carpet, and
place it over the recovery strap to help
absorb the energy in the event the
strap breaks.
• Make sure the stuck vehicle is not
loaded heavier than its gross vehicle
weight rating specified on the
certification label.
• Align the tow vehicle and stuck vehicle
in a straight line, within 10 degrees.
• Keep bystanders to the sides of the
vehicle, at a distance of at least twice
the length of the recovery strap. This
helps avoid injury from the hazard of a
recovery hook or strap breaking, or a
vehicle lurching into their path.
382
2022 Super Duty (TFE) Canada/United States of America, enUSA, Edition date: 202103, First-Printing Crash and Breakdown Information
Page 387 of 740
TOWING YOUR VEHICLE
PRECAUTIONS
Use the following guidelines when towing
your vehicle. Failure to follow this
instruction could result in vehicle damage
not covered by the vehicle warranty.
Note:
Make sure you properly secure your
vehicle to the tow vehicle.
Note: If you are unsure of the vehicle ’s
configuration, contact an authorized dealer.
RECREATIONALLY TOWING
YOUR VEHICLE - 4X4 WARNING: Do not disconnect the
battery when recreationally towing your
vehicle. This prevents the transfer case
from shifting properly and could cause
the vehicle to roll, even if the
transmission is in park (P). WARNING:
Placing the transfer
case in its neutral position could cause
your vehicle to freely roll. Make sure you
press and hold the brake pedal and the
vehicle is in a secure, safe position when
you place the transfer case in its neutral
position.
Follow these guidelines if you have a need
for recreational towing. An example of
recreational towing would be towing your
vehicle behind a motorhome. These
guidelines are to make sure that you do
not damage the transmission. You can only tow your vehicle with all
wheels on the ground by placing the
transfer case in its neutral position and
engaging the recreational tow feature.
Perform the following steps after
positioning your vehicle behind the tow
vehicle and properly securing them
together.
Note:
Put your climate control system in
recirculated air mode to prevent exhaust
fumes from entering your vehicle.
Note: Failure to put the transfer case in its
neutral position can damage vehicle
components.
Note: You can check the towing status at
any time by opening the driver door or
turning the ignition to the accessory or on
position. Neutral Tow Enabled Leave
Transmission in Neutral
appears in the
instrument cluster display to confirm you
can recreationally tow your vehicle.
Note: If your vehicle has an anti-theft
alarm, make sure you switch perimeter
sensing on when towing. See
Setting the
Alarm Security Level (page 107).
Switching
Neutral Tow On
1. Place your vehicle in accessory mode by pressing the push button ignition
switch once without pressing the brake
pedal or by turning the ignition key to
the on position.
2. Press and hold the brake pedal.
3. Rotate the four-wheel drive control to 2H
.
4. Shift into neutral (N).
5. Using the instrument cluster controls on the steering wheel, select Settings.
6. Select
Advanced Settings.
7. Select
Vehicle.
8. Select
Neutral Tow.
384
2022 Super Duty (TFE) Canada/United States of America, enUSA, Edition date: 202103, First-Printing Towing Your Vehicle
Page 388 of 740

9. Press and hold the OK button until a
confirmation message appears in the
information display.
Note: If completed successfully, the
information display shows
Neutral Tow
Enabled Leave Transmission in Neutral.
This indicates that your vehicle is safe to
tow with all wheels on the ground.
Note: If you do not see a confirmation
message in the instrument cluster display,
you must perform the procedure again from
the beginning.
Note: You may hear noise as the transfer
case shifts into its neutral position. This is
normal.
10. Leave the transmission in neutral (N)
and switch your vehicle off by
pressing the push button ignition
switch once without pressing the
brake pedal or turning the key as far
toward the off position.
Note: Vehicles with keys do not turn to the
off position when the transmission is in
neutral (N). You must leave the key in the
ignition when towing. Use the keyless entry
keypad or an extra set of keys to lock and
unlock your vehicle.
Switching
Neutral Tow Off
1. With your vehicle properly secured to the tow vehicle, place your vehicle in
accessory mode by pressing the push
button ignition switch once without
pressing the brake pedal or by turning
the ignition key to the on position.
2. Press and hold the brake pedal.
3. Shift out of neutral (N).
4. Release the brake pedal.
Note: If completed successfully, the
instrument cluster displays 2H and Neutral
Tow Disabled
. Note:
You must perform the switching
neutral tow on and switching neutral tow
off procedures again from the beginning if
the indicator light and message do not
display.
Note: You may hear a noise as the transfer
case shifts out of its neutral position. This
is normal.
5. Apply the parking brake, then disconnect your vehicle from the tow
vehicle.
6. Release the parking brake, start the engine, and shift into drive (D) to make
sure the transfer case is out of the
neutral tow position.
7. If the transfer case does not successfully shift out of its neutral
position, set the parking brake. Have
your vehicle checked as soon as
possible.
Resolving the
Shift Delayed Pull
Forward Message
1. Press and hold the brake pedal.
2. Start your vehicle.
3. Shift into neutral (N).
4. With the vehicle running, shift into drive
(D) and let the vehicle roll forward up
to
3 ft (1 m).
Note: You may hear a noise as the transfer
case shifts out of its neutral position. This
is normal.
5. Make sure the instrument cluster displays
Neutral Tow Disabled.
385
2022 Super Duty (TFE) Canada/United States of America, enUSA, Edition date: 202103, First-Printing Towing Your Vehicle