2022 FORD F-550 ECU
[x] Cancel search: ECUPage 409 of 740

2. Remove the clips (x3) that secure the
air filter housing cover. Remove the air
filter housing cover. Disconnect and
pull the air intake tube away, as
needed. 3.
Remove the air filter element from the
air filter housing.
4. Remove the auxiliary foam filter from the air filter housing, if required. 5. To install, reverse the removal
procedure. You can oscillate the
housing cover slightly left to right to
assist with installation as needed, until
positioned such that all three clips can
be re-engaged.
After operating your vehicle during heavy
snowfall or extreme rain, do the following:
• Snow: At the earliest opportunity, open
the hood, clear any snow and ice from
the air filter housing inlet and reset the
air filter restriction gauge.
• Extreme rain: The air filter element
dries out after approximately 15– 30
minutes of driving at highway speeds.
At the earliest opportunity, open the
hood and reset the air filter restriction
gauge.
Note: Do not remove the foam filter.
ENGINE AIR FILTER - INFORMATION MESSAGES Action
Message
Indicates the engine air filter is performing as expected.
Filter OK
Indicates that there is a higher than expected restriction
across the engine air filter, which could represent an air filter at full useful life or a filter with an obstruction.
When this displays, inspect the engine air filter and replace if necessary.
After the inspection or engine air filter replacement, you must reset the system in order to change the status from Check Filter to Filter OK.
Check Filter See Manual
Indicates that there is an error within the electronic air filtermaintenance minder system requiring service.
System Fault See Manual
406
2022 Super Duty (TFE) Canada/United States of America, enUSA, Edition date: 202103, First-Printing MaintenanceE310319
Page 413 of 740

To maintain correct operation of the
battery management system, if you add
any electrical devices to your vehicle, do
not connect the ground connection directly
to the negative battery terminal. A
connection at the negative battery terminal
can cause inaccurate measurements of
the battery condition and potential
incorrect system operation.
Note:
If you add electrical accessories or
components to your vehicle this may
adversely affect battery performance,
durability and the performance of other
electrical systems on your vehicle.
If you replace the battery make sure it
matches the electrical requirements of
your vehicle.
If you disconnect or replace the battery
and your vehicle has an automatic
transmission, it must relearn its adaptive
strategy. Because of this, the transmission
may shift firmly when first driven. This is
normal operation while the transmission
fully updates its operation to optimum
shift feel.
Remove and Reinstall the Battery
To disconnect or remove the battery, do
the following:
1. Apply the parking brake and switch the
ignition off.
2. Switch all electrical equipment off, for
example lights and radio.
3. Wait a minimum of two minutes before
disconnecting the battery.
Note: The engine management system has
a power hold function and remains powered
for a period of time after you switch the
ignition off. This is to allow diagnostic and
adaptive tables to be stored. Disconnecting
the battery without waiting can cause
damage not covered by the vehicle
Warranty. 4. Disconnect the negative battery cable
terminal.
5. Disconnect the positive battery cable terminal.
6. Remove the battery securing clamp.
7. Remove the battery.
8. To install, reverse the removal procedure.
Note: Before reconnecting the battery,
make sure the ignition remains switched off.
Note: Make sure the battery cable terminals
are fully tightened.
Note: After cleaning or replacing the
battery, make sure you reinstall the battery
cover or shield.
If you disconnect or replace the vehicle
battery, you must reset the following
features:
• Window bounce-back. See Window
Bounce-Back (page 126).
• Clock Settings.
• Pre-set radio stations.
• Steering Angle Sensor.
Note: To calibrate the steering angle
sensor, drive the vehicle above
30 mph
(50 km/h) for a minimum of 1.2 mi (2 km).
Make sure to drive straight ahead for a
minimum of 30 seconds. Several vehicle
functions are disabled and a warning light
could appear until the sensor is calibrated.
Battery Management System
The battery management system monitors
battery conditions and takes actions to
extend battery life. If excessive battery
drain is detected, the system temporarily
disables some of the following features:
• Heated rear window.
• Heated seats.
• Climate control.
• Heated steering wheel.
410
2022 Super Duty (TFE) Canada/United States of America, enUSA, Edition date: 202103, First-Printing Maintenance
Page 442 of 740

cause steering, suspension, axle, transfer
case or power transfer unit failure.
Follow the recommended tire inflation
pressures found on the Safety
Compliance Certification label, or the
Tire Label on the B-Pillar or the edge of
the driver door. Failure to follow this
instruction could result in loss of vehicle
control, vehicle rollover, or personal injury
or death.
Note: Do not use snow chains on vehicles
with LT275/65R20 or LT 285/75R18 sized
tires.
Note: The suspension insulation and
bumpers will help prevent vehicle damage.
Do not remove these components from your
vehicle when using snow tires and chains.
The tires on your vehicle have all-weather
treads to provide traction in rain and snow.
However, in some climates, you may need
to use snow tires and cables. If you need
to use cables, we recommend that you use
steel wheels of the same size and
specification, as cables may chip
aluminum wheels. Follow these guidelines when using snow
tires and chains:
•
If possible, avoid fully loading your
vehicle.
• Use only SAE Class S chains.
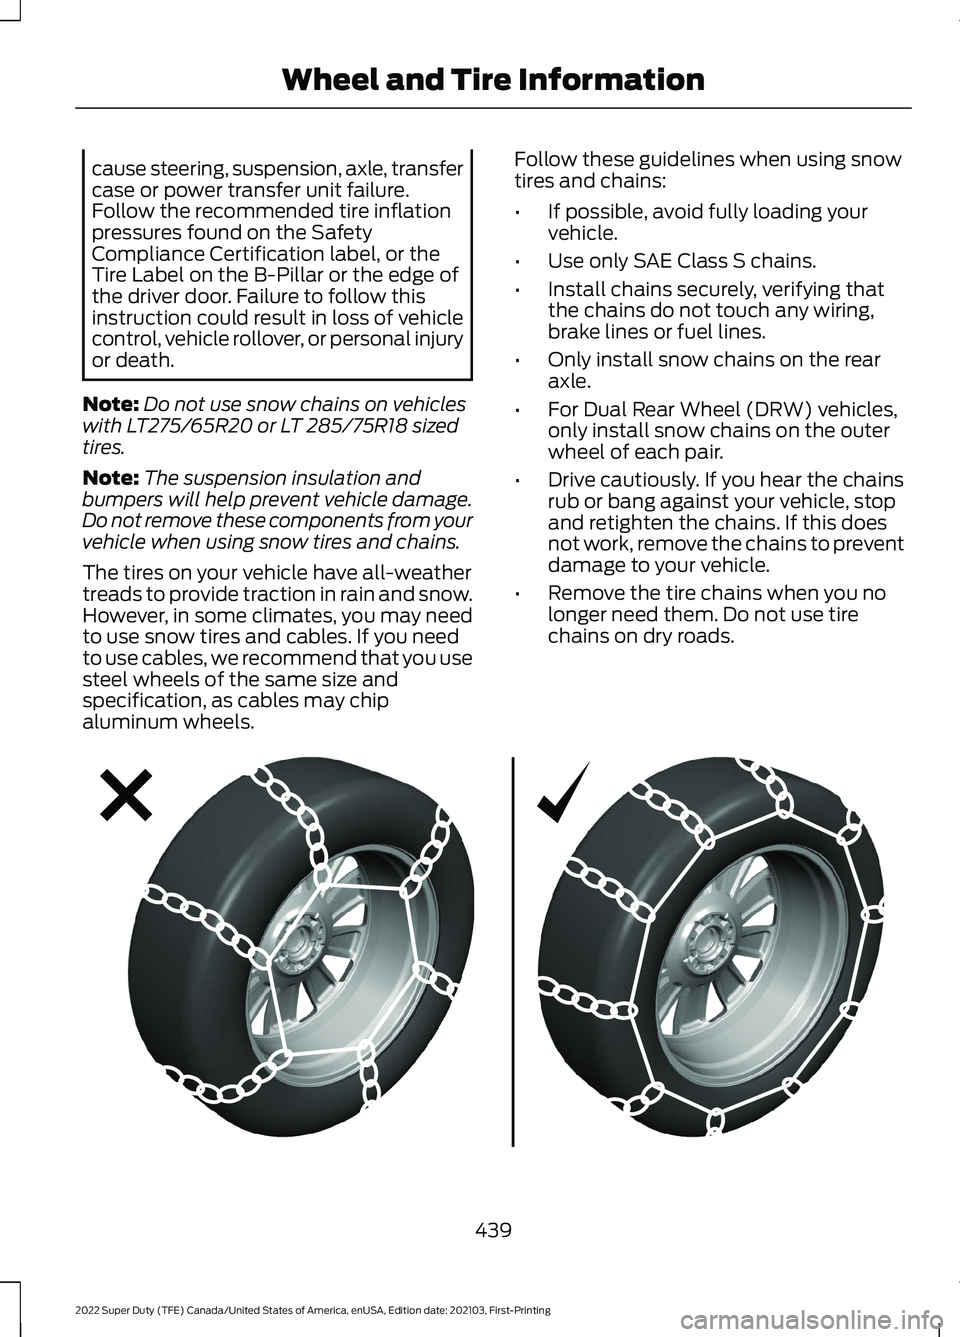
• Install chains securely, verifying that
the chains do not touch any wiring,
brake lines or fuel lines.
• Only install snow chains on the rear
axle.
• For Dual Rear Wheel (DRW) vehicles,
only install snow chains on the outer
wheel of each pair.
• Drive cautiously. If you hear the chains
rub or bang against your vehicle, stop
and retighten the chains. If this does
not work, remove the chains to prevent
damage to your vehicle.
• Remove the tire chains when you no
longer need them. Do not use tire
chains on dry roads. 439
2022 Super Duty (TFE) Canada/United States of America, enUSA, Edition date: 202103, First-Printing Wheel and Tire InformationE292547
Page 460 of 740

WARNING: To help prevent your
vehicle from moving when changing a
wheel, shift the transmission into park
(P), set the parking brake and use an
appropriate block or wheel chock to
secure the wheel diagonally opposite to
the wheel being changed. For example,
when changing the front left wheel,
place an appropriate block or wheel
chock on the right rear wheel. WARNING:
Always use the jack
provided as original equipment with your
vehicle. If using a jack other than the one
provided, make sure the jack capacity is
adequate for the vehicle weight,
including any vehicle cargo or
modifications. If you are unsure if the jack
capacity is adequate, contact the
authorized dealer. WARNING:
Failure to follow these
guidelines could result in an increased
risk of loss of vehicle control, injury or
death. WARNING:
Never place anything
between the vehicle jack and your
vehicle. WARNING:
Never place anything
between the vehicle jack and the ground. WARNING:
Park your vehicle so
that you do not obstruct the flow of
traffic or place yourself in any danger and
set up a warning triangle. WARNING:
The jack supplied with
this vehicle is only intended for changing
a flat tire in an emergency. Do not
attempt to do any other work on your
vehicle when it is supported by the jack,
as your vehicle could slip off the jack.
Failure to follow this instruction could
result in personal injury or death. WARNING:
Do not attempt to
change a tire on the side of the vehicle
close to moving traffic. Pull far enough
off the road to avoid the danger of being
hit when operating the jack or changing
the wheel. WARNING:
Only use the spare
wheel carrier to stow wheels provided
with your vehicle.
Note: Do not use impact tools or power
tools operating at over 200 RPM on the
spare wheel carrier winch, which may cause
it to malfunction and result in the wheel and
tire not being securely stowed.
Note: Passengers should not remain in the
vehicle when the vehicle is being jacked.
1. Park the vehicle on a level firm ground and activate the hazard flashers.
2. Apply the parking brake, place the transmission in park (P), switch the
engine off.
3. Block the wheel diagonally opposite the flat tire. For example, if the left
front tire is flat, block the right rear
wheel. 4. You can find the jack on the floor
behind the rear-most seat on the
passenger side. Turn the retainers
counterclockwise to remove the jack.
457
2022 Super Duty (TFE) Canada/United States of America, enUSA, Edition date: 202103, First-Printing Changing a Road WheelE175447
Page 468 of 740

2. Slide the wheel partially under the
vehicle and install the retainer through
the wheel center. If equipped, you may
have to remove the wheel center cap
prior to pushing the retainer through
the center of the wheel. To remove the
center cap, press it off with the lug
wrench tip from the inner side of the
wheel. Pull on the cable to align the
components at the end of the cable.
3. Reinsert the lug wrench extension(s) through the rear bumper and guide
tube and turn the lug wrench clockwise
until the tire is raised to its stowed
position underneath the vehicle. The
wrench will become harder to turn and
the spare tire winch will ratchet or slip
when the tire is raised to maximum
tightness. You will hear a clicking sound
from the winch indicating that the tire
is properly stowed, tighten until a
minimum of three clicks are heard.
Check that the tire lies flat against the
frame and is secure.
4. Carefully place all tools back in the tool
kit bag.
5. Reinstall the tool kit bag and tighten the wing nut.
6. Properly reinstall the jack into the bracket and tighten the wing nut. WHEEL NUTS WARNING: When you install a
wheel, always remove any corrosion, dirt
or foreign materials present on the
mounting surfaces of the wheel or the
surface of the wheel hub, brake drum or
brake disc that contacts the wheel. Make
sure to secure any fasteners that attach
the rotor to the hub so they do not
interfere with the mounting surfaces of
the wheel. Installing wheels without
correct metal-to-metal contact at the
wheel mounting surfaces can cause the
wheel nuts to loosen and the wheel to
come off while your vehicle is in motion,
resulting in loss of vehicle control,
personal injury or death. lb.ft (Nm)
1
Bolt Size
150 lb.ft (204 Nm)
M14 x 1.5
1 Torque specifications are for nut and bolt
threads free of dirt and rust. Use only our
recommended replacement wheel nuts
and or wheel bolts.
Retighten the wheel nuts to the specified
torque within
100 mi (160 km) after any
wheel disturbance, such as tire rotation,
changing a flat tire or wheel removal.
On vehicles equipped with dual rear
wheels, retighten the wheel lug nuts to the
specified torque at
100 mi (160 km), and
again at 500 mi (800 km) of new vehicle
operation and after any wheel disturbance,
such as tire rotation, changing a flat tire,
or wheel removal.
It is important to follow the proper wheel
mounting and lug nut torque procedures.
465
2022 Super Duty (TFE) Canada/United States of America, enUSA, Edition date: 202103, First-Printing Changing a Road WheelE162800
Page 502 of 740

3. Switch Wi-Fi on.
4. Press
View Available Networks. 5. Select an available Wi-Fi network.
Note:
Enter the network password to
connect to a secure network.
CONNECTED VEHICLE – TROUBLESHOOTING - VEHICLES WITH:
MODEM Possible Cause and Resolution
Symptom
I cannot confirm the
connection of my FordPass
account to the modem. –
Modem is not enabled.
•Switch connectivity features on.
– Weak network signal.
•Move your vehicle closer to a place where the
network signal is not obstructed.
499
2022 Super Duty (TFE) Canada/United States of America, enUSA, Edition date: 202103, First-Printing Connected Vehicle - Vehicles With: SYNC 3
Page 505 of 740

WHAT IS A CONNECTED
VEHICLE
A connected vehicle has technology that
allows your vehicle to connect to a mobile
network and for you to access a range of
features. When used in conjunction with
the FordPass app, it could allow you to
monitor and control your vehicle further,
for example checking the tire pressures,
the fuel level and the vehicle location. For
additional information, refer to the local
Ford website.
CONNECTED VEHICLE
REQUIREMENTS
Connected service and related feature
functionality requires a compatible vehicle
network.
Some remote features require additional
service activation. Log in to your Ford
account for details. Some restrictions, third
party terms and message or data rates
may apply.
CONNECTED VEHICLE
LIMITATIONS
Evolving technology, cellular networks, or
regulations could affect functionality and
availability, or continued provision of some
features. These changes could even stop
some features from functioning.
CONNECTING THE VEHICLE TO
A MOBILE NETWORK
WHAT IS THE MODEM
The modem allows access to a
range of features built into your
vehicle. ENABLING AND DISABLING THE
MODEM
1. Press Settings.
2. Press
Connectivity.
3. Press
Connected Vehicle Features.
4. Switch vehicle connectivity on or off.
CONNECTING FORDPASS TO THE
MODEM
1. Make sure that the modem is enabled using the vehicle settings menu.
2. Open the FordPass app on your device
and log in.
3. Add your vehicle or select your vehicle if already added.
4. Select the option for vehicle details.
5. Select the option to activate your vehicle.
6. Make sure that the name on the screen
matches the name shown in your
FordPass account.
7. Confirm that FordPass account is connected to the modem.
CONNECTING THE VEHICLE TO
A WI-FI NETWORK Select the settings option on the
feature bar.
1. Press
Connectivity.
2. Press
Manage Wi-Fi Networks.
3. Switch
Wi-Fi on.
4. Press
View Available Networks.
5. Select an available Wi-Fi network.
Note: Enter the network password to
connect to a secure network.
502
2022 Super Duty (TFE) Canada/United States of America, enUSA, Edition date: 202103, First-Printing Connected Vehicle - Vehicles With: SYNC 4 E280315
Page 507 of 740

CONNECTED VEHICLE – FREQUENTLY ASKED QUESTIONS
Possible Cause and Resolution
Symptom
I cannot connect to a Wi-Fi
network. –
Password error.
•Enter the correct network password.
– Weak network signal.
•Move your vehicle closer to the Wi-Fi router or to
a place where the network signal is not obstructed.
– Multiple access points in range with the same network
name.
•Use a unique name for your network name. Do not
use the default name unless it contains a unique
identifier, for example as part of the MAC address.
The Wi-Fi connection
disconnects after successful
connection. –
Weak network signal.
•Move your vehicle closer to the Wi-Fi router or to
a place where the network signal is not obstructed.
I am close to a Wi-Fi router
but the network signal
strength is weak. –
Obstructed network signal.
•If your vehicle has a heated windshield, position
your vehicle so that the windshield is not facing the
Wi-Fi router.
• If your vehicle has metallic tinting on the windows
but not on the windshield, position your vehicle so
that the windshield is facing the Wi-Fi router or
open the windows that are facing the router.
• If your vehicle has metallic tinting on the windows
and the windshield, open the windows that are
facing the router.
• If your vehicle is in a garage and you have the
garage door closed, open the garage door as it may
block the signal.
– Hidden network.
•Make the network visible and try again, or use the
Add Network Manually option in Wi-Fi settings
menu.
– Unsupported security type.
•Some network security types are not supported,
for example WEP.
I cannot see a network in the
list of available networks
that I expect to see.
504
2022 Super Duty (TFE) Canada/United States of America, enUSA, Edition date: 202103, First-Printing Connected Vehicle - Vehicles With: SYNC 4