Page 9 of 228
7
Overview
“In the event of a breakdown - 12V battery /
Accessory batteries” section:
24V12V
Page 10 of 228
 and CO
2 emissions.")
8
Eco-driving
Eco-driving
Eco-driving refers to a range of everyday
practices that allow the motorist to optimise
the vehicle's energy consumption (fuel and/or
electricity) and CO
2 emissions.
Optimise your use of the gearbox
With an automatic gearbox, favour automatic
mode. Do not depress the accelerator pedal
heavily or suddenly.
The gear shift indicator prompts you to engage
the most suitable gear. Whenever this indication
is displayed on the instrument panel, follow it
straight away.
With an automatic gearbox, this indicator
appears only in manual mode.
Drive smoothly
Maintain a safe distance between vehicles, use
engine braking rather than the brake pedal and
press the accelerator gradually. These practices
help to save on energy consumption, reduce
CO
2 emissions and decrease general traffic
noise.
When the traffic is flowing smoothly, select the
cruise control.
Control the use of electrical equipment
Before moving off, if the passenger compartment
is too warm, ventilate it by opening the windows
and air vents before using the air conditioning.
At speeds above 31
mph (50 km/h), close the
windows and leave the air vents open. Consider using equipment that can help keep
the temperature in the passenger compartment
down (e.g.
sunroof blind, window blinds).
Unless automatically regulated, switch off the air
conditioning as soon as the desired temperature
has been reached.
Switch off the demisting and defrosting functions,
if they are not managed automatically.
Switch off the heated seat as soon as possible.
Adapt the use of headlamps and/or foglamps
depending on visibility conditions.
Avoid running the engine before moving off,
particularly in winter (other than in severe wintry
conditions: temperature below -23°C). The
vehicle will warm up much faster while driving.
As a passenger, avoid connecting your
multimedia devices (e.g. film, music, video
game) to help reduce the consumption of energy.
Disconnect all portable devices before leaving
the vehicle.
Limit the causes of excess consumption
Spread loads throughout the vehicle. Place the
heaviest items in the boot as close as possible to
the rear seats.
Limit the loads carried in the vehicle and
minimise wind resistance (e.g.
roof bars, roof
rack, bicycle carrier, trailer). Preferably, use a
roof box.
Remove roof bars and roof racks after use.
At the end of winter, remove snow tyres and refit
summer tyres.
Comply with the servicing instructions
Check tyre pressures regularly, with the tyres
cold, referring to the label in the door aperture on
the driver's side.
Carry out this check in particular:
–
before a long journey
.
–
at each change of season.
–
after a long period out of use.
Do not forget the spare wheel and, where
applicable, the tyres on your trailer or caravan.
Have your vehicle serviced regularly (e.g.
engine
oil, oil filter, air filter, passenger compartment
filter, etc.). Observe the schedule of operations in
the manufacturer's service schedule.
When filling the fuel tank, do not continue after
the third cut-out of the nozzle, to avoid overflow.
You will only see the fuel consumption of your
new vehicle settle down to a consistent average
after the first 1,900 miles (3,000 kilometres).
Optimising the driving range
(rechargeable hybrid vehicles)
Connect the vehicle as soon as possible.
Favour the ECO zone of the power indicator by
driving smoothly and at a steady speed.
Anticipate slowing down as much as possible
and, if possible, favour decelerations with
regenerative braking mode activated (power
indicator in the CHARGE zone).
With the vehicle connected, carry out
temperature pre-conditioning before setting off.
To optimise consumption during a journey:
Page 11 of 228
9
Eco-driving
► Programme a destination in the vehicle’s
GPS navigation system.
►
Select the
Hybrid driving mode.
►
Make sure that the battery charge level is
close to maximum.
►
Do not use the e-Save function while driving.
►
Use the heating/air conditioning system
wisely
.
Page 12 of 228

10
Instruments
Information to the driver
Instrument panel
The instrument panel contains all the information
required by the driver on the status of the
vehicle's various systems.
This information appears in the form of indicator
lamps, indicators and messages.
The instrument panel is in the form of a fully
digital panel.
E-HUD
Depending on version, driver information also
appears in the extended head-up display.
For more information on E-HUD, refer to the
corresponding section.
Digital instrument panel
The digital instrument panel can be personalised
using a page system.
Depending on the page displayed, certain
information is hidden or presented differently.
1. Speedometer (mph or km/h)
2. Driving aid in reduced display (if the function
is activated)
Display of speed limit signs 3.
Status of the gearbox
Active driving mode
READY indicator lamp (Rechargeable hybrid)
4.
Fuel gauge and remaining range (miles or
km)
5. T
otal distance recorder (miles or km) (Petrol)
Traction battery charge level and remaining
range (miles or km) (Rechargeable hybrid)
6. Personalisable area:
–
Energy flows (Rechargeable hybrid).
–
Thermal Comfort Consumption
(Rechargeable hybrid).
–
Current media.
–
Driving aids.
–
Navigation (depending on equipment).
–
Rev counter
.
–
Engine temperature.
–
T
rip computer.
7. Power indicator (Rechargeable hybrid)
Information displayed on
the instrument panel
The information displayed on the instrument
panel (e.g.
warning lamps, indicators) may have
a fixed or variable location depending on the
page or the driving aid activated.
For the functions that have indicator lamps for
both operation and deactivation, there is only
one dedicated location.
Page 13 of 228

11
Instruments
1Display language and units
These depend on the touch screen
settings.
When travelling abroad, the speed must be
shown in the official units of the country you
are driving in (mph, miles or km/h, km).
Choice of the displayed page
By default, pages are memorised in the
instrument panel.
► Press the button located at the end of the
lighting control stalk to scroll through the different
pages.
The new page is applied immediately
.
When a message is displayed in a
temporary window, pressing this button
will cause this window to disappear
immediately.
Settings for displayed pages
The available settings operations are: addition,
deletion and layout of pages.
It is possible to memorise up to 5 pages.
The colour can also be configured according to
the selected driving mode.
The settings are made in the
Settings>Customisation touch screen
application.
E-HUD
This extended head-up display system projects information onto the windscreen in the driver's
field of vision, so that they do not need to take
their eyes off the road.
No object must be placed in the cavity
- risk of damaging the system!
For optimal use, remember to adjust the
driver's seat and the height of the
head-up display.
In certain extreme weather conditions
(e.g. rain and/or snow, bright sunshine),
and when wearing polarised sunglasses, the
extended head-up display may not be
readable or may be temporarily disrupted.
E-HUD is associated with a specific
windscreen approved by CITROËN.
If the windscreen is replaced outside
the CITROËN
dealer network, follow the
Manufacturer’s recommendations.
Information displayed
during operation
Once the system is activated, the information
gathered on the extended head-up display is, for
example:
A. Speed of the vehicle
B. Road signs recognition and Driving aid in
reduced display (if the function is activated)
C. Navigation instructions and guidance map
D. Personalisable area:
–
Navigation (depending on equipment).
–
Driving aids.
–
Empty.
Temporary display of media lists, alerts
and feedback following a modification or
adjustment (volume, station search, etc.)
Page 14 of 228

12
Instruments
Settings
Brightness adjustment is available after
activation of the function.
The system status and settings are memorised
when the ignition is switched off.
Activation/Deactivation
It can be activated/deactivated in the
Settings > Brightness touch screen
application.
►
With the ignition on, press the “ Head-Up
Display
” button to change the function status
(confirmed by the slider moving to the right/left:
function activated/deactivated).
Brightness adjustment
Brightness adjustment is configured in the
Settings > Brightness touch screen
application.
►
With the ignition on, press or move the slider
to the desired setting.
Adjusting the height
► With the ignition on and the control in the
central high position, move the control up/down
to adjust the desired height of the display
.
Warning and indicator
lamps
Displayed as symbols, the warning and indicator
lamps inform the driver of the occurrence of a
malfunction (warning lamps) or of the operating
status of a system (operation or deactivation
indicator lamps). Certain lamps light up in two
ways (fixed or flashing) and/or in several colours.
Associated warnings
The illumination of a lamp may be accompanied
by an audible signal and/or a message displayed
in a screen.
Relating the type of alert to the operating status
of the vehicle allows you to determine whether
the situation is normal or whether a fault has occurred: refer to the description of each lamp
for further information.
When the ignition is switched on
Certain red or orange warning lamps come on
for a few seconds when the ignition is switched
on. These warning lamps should go off as soon
as the engine is started.
For more information on a system or a function,
refer to the corresponding section.
Persistent warning lamp
If a red or orange warning lamp comes on, there
may be fault which needs further investigation.
If a lamp remains lit
The references (1), (2) and (3) in the warning
and indicator lamp description indicate whether
you should contact a qualified professional in
addition to the immediate recommended actions.
(1): You must stop the vehicle
.
Stop as soon as it is safe to do so and switch off
the ignition.
(2): Contact a CITROËN dealer or a qualified
workshop.
(3): Visit a CITROËN dealer or a qualified
workshop.
Page 15 of 228

13
Instruments
1List of warning and
indicator lamps
Red warning/indicator lamps
STOP
Fixed, associated with another warning
lamp, accompanied by the display of a
message and an audible signal.
A serious fault with the engine, braking system,
power steering or automatic gearbox or a major
electrical fault has been detected.
Carry out (1) and then (2).
Maximum engine coolant temperatureFixed.
The temperature of the cooling system is
too high.
Carry out (1), then wait until the engine has
cooled down before topping up the level, if
necessary. If the problem persists, carry out (2).
Engine oil pressureFixed.
There is a fault with the engine lubrication
system.
Carry out (1) and then (2).
System malfunction (Rechargeable hybrid)Fixed.
The rechargeable hybrid system is faulty.
Carry out (1) and then (2).
Cable connected (Rechargeable hybrid)Fixed when the ignition is switched on.
The charging cable is connected to the
vehicle's connector.
Fixed when the ignition is switched on,
accompanied by a message.
It is not possible to start the vehicle while the
charging cable is connected to the vehicle’s
connector.
Disconnect the charging cable and close the
flap.
12V battery chargeFixed.
The battery charging circuit is faulty
(e.g.
dirty terminals, loose or severed alternator
belt).
Carry out (1).
If the electric parking brake stops working,
immobilise the vehicle:
►
Fit the chock against one of the wheels.
Clean and tighten the terminals. If the warning
lamp does not go off when the engine is started,
carry out (2).
BrakingFixed.
The brake fluid level in the braking circuit
has dropped significantly.
Carry out (1), then top up with fluid that complies
with the manufacturer's recommendations. If the
problem persists, carry out (2).
Fixed.
The electronic brake force
distribution
(EBFD) system is faulty.
Carry out (1) and then (2).
Electric parking brakeFixed.
The electric parking brake is applied.
Flashing.
Application/release is faulty.
Carry out (1): park on flat ground (on a level
surface).
Select mode
P on the automatic gearbox.
Switch off the ignition and carry out (2).
Door(s) openFixed, associated with a message
identifying the access.
An audible signal supplements the alert if the
speed is higher than 6 mph (10
km/h).
A door or the boot is not properly closed.
Seat belts not fastened/unfastenedFixed or flashing, accompanied by an
increasing audible signal.
A seat belt has not been fastened or has been
unfastened.
Orange warning/indicator lamps
Service
Temporarily on, accompanied by the display of a message.
One or more minor faults, for which there is/are
no specific warning lamp(s), have been detected.
Page 16 of 228

14
Instruments
Identify the cause of the fault using the message
displayed on the instrument panel.
You may be able to deal with some faults
yourself, such as changing the battery in the
remote control.
For other faults, such as with the tyre under-
inflation detection system, carry out (3).
Fixed, accompanied by the display of a
message.
One or more major faults, for which there is/are
no specific warning lamp(s), have been detected.
Identify the cause of the fault using the message
displayed on the instrument panel, then carry
out (3).
Fixed, accompanied by the message
"Parking brake fault".
Automatic release of the electric parking brake is
unavailable.
Carry out (2).
Malfunction (with electric parking brake)Fixed, accompanied by the
message "Parking brake fault".
The vehicle cannot be immobilised with the
engine running.
If manual application and release commands are
not working, the electric parking brake control
lever is faulty.
The automatic functions must be used at all
times and are automatically re-enabled in the
event of a control lever fault.
Carry out (2).
Fixed, accompanied by the
message "Parking brake
fault".
The parking brake is faulty: manual and
automatic functions may not be working.
When stationary, to immobilise the vehicle:
►
Pull and hold the control lever for
approximately 7 to 15 seconds, until the indicator
lamp lights up on the instrument panel.
If this procedure does not work, secure the
vehicle:
►
Park on a level surface.
►
With an automatic gearbox, select
P
, then
place the supplied chocks against one of the
wheels.
Then carry out (2).
Automatic functions deactivated (electric
parking brake)
Fixed.
The "automatic application" (on switching
off the engine) and "automatic release" (on
acceleration) functions are deactivated.
If automatic application/release is no longer
possible:
►
Start the engine.
►
Use the control to apply the parking brake.
►
T
ake your foot fully off the brake pedal.
►
Hold the control pressed in the release
direction for between 10 and 15 seconds.
►
Release the control.
►
Depress and hold the brake pedal.
►
Pull the control in the application direction for
2
seconds. ►
Release the control and the brake pedal.
BrakingFixed.
A minor fault with the braking system has
been detected.
Drive carefully.
Carry out (3).
Anti-lock braking system (ABS)Fixed.
The anti-lock braking system has a fault.
The vehicle retains conventional braking.
Drive carefully at moderate speed, then carry
out (3).
Engine self-diagnostic systemFlashing.
The engine management system has a
fault.
There is a risk that the catalytic converter will be
destroyed.
You must carry out (2).
Fixed.
The emissions control system has a fault.
The warning lamp should go off when the engine
is started.
Carry out (3) without delay.
Fixed.
A minor engine fault has been
detected.
Carry out (3).
 1
1 2
2 3
3 4
4 5
5 6
6 7
7 8
8 9
9 10
10 11
11 12
12 13
13 14
14 15
15 16
16 17
17 18
18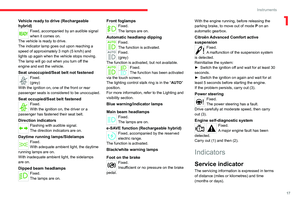 19
19 20
20 21
21 22
22 23
23 24
24 25
25 26
26 27
27 28
28 29
29 30
30 31
31 32
32 33
33 34
34 35
35 36
36 37
37 38
38 39
39 40
40 41
41 42
42 43
43 44
44 45
45 46
46 47
47 48
48 49
49 50
50 51
51 52
52 53
53 54
54 55
55 56
56 57
57 58
58 59
59 60
60 61
61 62
62 63
63 64
64 65
65 66
66 67
67 68
68 69
69 70
70 71
71 72
72 73
73 74
74 75
75 76
76 77
77 78
78 79
79 80
80 81
81 82
82 83
83 84
84 85
85 86
86 87
87 88
88 89
89 90
90 91
91 92
92 93
93 94
94 95
95 96
96 97
97 98
98 99
99 100
100 101
101 102
102 103
103 104
104 105
105 106
106 107
107 108
108 109
109 110
110 111
111 112
112 113
113 114
114 115
115 116
116 117
117 118
118 119
119 120
120 121
121 122
122 123
123 124
124 125
125 126
126 127
127 128
128 129
129 130
130 131
131 132
132 133
133 134
134 135
135 136
136 137
137 138
138 139
139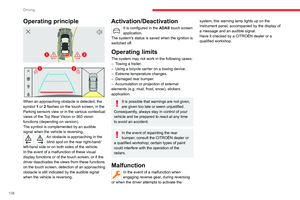 140
140 141
141 142
142 143
143 144
144 145
145 146
146 147
147 148
148 149
149 150
150 151
151 152
152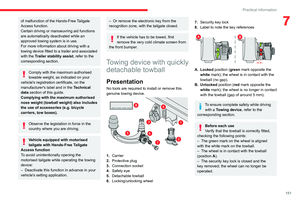 153
153 154
154 155
155 156
156 157
157 158
158 159
159 160
160 161
161 162
162 163
163 164
164 165
165 166
166 167
167 168
168 169
169 170
170 171
171 172
172 173
173 174
174 175
175 176
176 177
177 178
178 179
179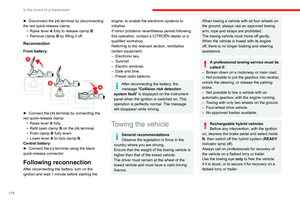 180
180 181
181 182
182 183
183 184
184 185
185 186
186 187
187 188
188 189
189 190
190 191
191 192
192 193
193 194
194 195
195 196
196 197
197 198
198 199
199 200
200 201
201 202
202 203
203 204
204 205
205 206
206 207
207 208
208 209
209 210
210 211
211 212
212 213
213 214
214 215
215 216
216 217
217 218
218 219
219 220
220 221
221 222
222 223
223 224
224 225
225 226
226 227
227
