2021 VOLVO V90 CROSS COUNTRY ESP
[x] Cancel search: ESPPage 393 of 683

DRIVER SUPPORT
}}
391
Common camera and radar limitations
Obstructed camera
The area marked in the illustration must be cleaned regularly and kept free of decals, objects, solar film,etc.
The camera is located on the upper interior section of the windshield along with the radarsensor. Do not place, affix or mount anything on the inside or outside of the windshield, or in frontof or around the camera and radar sensor –this could disrupt camera and radar-basedfunctions. It could cause functions to bereduced, deactivated completely or to producean incorrect function response.
High temperatures
If the temperature in the passenger compart- ment is very high, the camera/radar sensorwill switch off temporarily forapprox. 15 minutes after the engine is startedto protect its electronic components. Whenthe temperature has cooled sufficiently, thecamera/radar sensor will automatically restart.
Damaged windshield
NOTE
Failure to take action could result in reduced performance for the driver supportsystems that use the camera and radarunit. It could cause functions to bereduced, deactivated completely or to pro-duce an incorrect function response.
To avoid the risk of malfunction of the driver support systems that use the radar sensor, thefollowing also apply:
If there are cracks, scratches or stonechips on the windshield in front of any ofthe camera and radar sensor "windows"and this covers an area ofabout 0.5 × 3.0 mm (0.02 × 0.12 in.) ormore, contact a workshop to have the windshield replaced 126
.
Volvo advises
against repairing cracks,
scratches or stone chips in the area in front of the camera and radar sensor – the entire windshield should instead bereplaced.
Before replacing the windshield, contact a workshop 126
to verify that the right wind-
shield has been ordered and installed.
The same type of windshield wipers or wipers approved by Volvo should be usedfor replacement.
If the windshield is replaced, the cameraand radar sensor must be recalibrated by a workshop 126
to help ensure proper func-
tioning of all of the vehicle's camera and radar-based systems.
Additional radar limitations
Vehicle speed
The radar sensor's ability to detect a vehicle ahead is significantly reduced if the speed ofthe vehicle ahead differs greatly from yourvehicle's speed.
126 An authorized Volvo workshop is recommended.
Page 401 of 683
STARTING AND DRIVING
}}
399
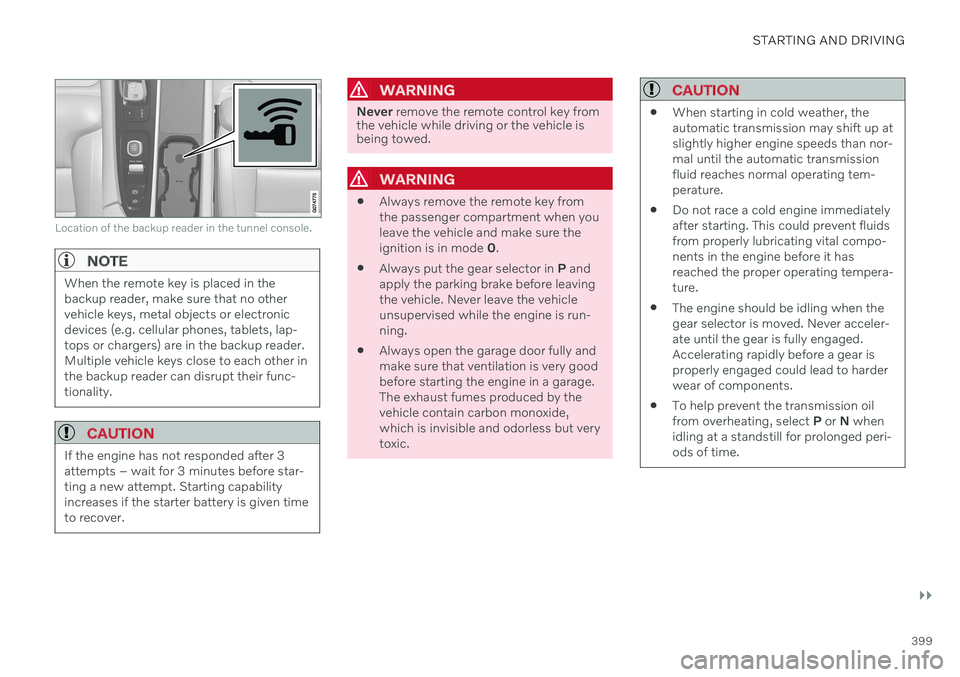
Location of the backup reader in the tunnel console.
NOTE
When the remote key is placed in the backup reader, make sure that no othervehicle keys, metal objects or electronicdevices (e.g. cellular phones, tablets, lap-tops or chargers) are in the backup reader.Multiple vehicle keys close to each other inthe backup reader can disrupt their func-tionality.
CAUTION
If the engine has not responded after 3 attempts – wait for 3 minutes before star-ting a new attempt. Starting capabilityincreases if the starter battery is given timeto recover.
WARNING
Never remove the remote control key from
the vehicle while driving or the vehicle is being towed.
WARNING
Always remove the remote key from the passenger compartment when youleave the vehicle and make sure theignition is in mode
0.
Always put the gear selector in
P and
apply the parking brake before leavingthe vehicle. Never leave the vehicleunsupervised while the engine is run-ning.
Always open the garage door fully andmake sure that ventilation is very goodbefore starting the engine in a garage.The exhaust fumes produced by thevehicle contain carbon monoxide,which is invisible and odorless but verytoxic.
CAUTION
When starting in cold weather, the automatic transmission may shift up atslightly higher engine speeds than nor-mal until the automatic transmissionfluid reaches normal operating tem-perature.
Do not race a cold engine immediatelyafter starting. This could prevent fluidsfrom properly lubricating vital compo-nents in the engine before it hasreached the proper operating tempera-ture.
The engine should be idling when thegear selector is moved. Never acceler-ate until the gear is fully engaged.Accelerating rapidly before a gear isproperly engaged could lead to harderwear of components.
To help prevent the transmission oilfrom overheating, select
P or N when
idling at a standstill for prolonged peri-ods of time.
Page 407 of 683
STARTING AND DRIVING
405
Braking on wet roadsProlonged driving in heavy rain without brak- ing may cause braking effect to be slightlydelayed the first time the brakes are applied.
This may also occur after washing the vehicle. It will then be necessary to apply greater pres-sure to the brake pedal. You should thereforemaintain a greater distance to the vehicleahead. Firmly apply the brakes after washing the vehicle or driving on wet roads. This helpswarm up the brake discs, enabling them to drymore quickly and protecting them against cor-rosion. Consider the current traffic situationwhen braking.
Related information
Brakes (p. 403)
Braking on salted roads (p. 405)
Braking on salted roads
When driving on salted roads, a layer of salt may form on the brake discs and brake pads.
This could increase stopping distance. Main- tain an extra large safety distance to the vehi-cle ahead. Make sure to also:
Apply the brakes from time to time to helpremove salt. Make sure braking does notpose a risk to any other road users.
Gently apply the brakes when you havefinished driving and before driving again.
Related information
Brakes (p. 403)
Braking on wet roads (p. 405)
Maintenance of the brake system
Regularly check the brake system compo- nents for wear.
To keep the vehicle as safe and reliable as possible, follow the Volvo service schedulespecified in the Warranty and MaintenanceRecords Information booklet. After replacingbrake pads and brake discs, braking effect isnot adapted until they are "broken in" by driv-ing a few hundred kilometers (miles). Com-pensate for the reduced braking effect byapplying greater pressure to the brake pedal.Volvo recommends only using brake padsapproved for your Volvo.
CAUTION
The brake system's components should be regularly checked for wear. Contact a workshop for advice on how to do this or let a workshop perform theinspection - an authorized Volvo workshopis recommended.
Related information
Brakes (p. 403)
Page 422 of 683
||
STARTING AND DRIVING
* Option/accessory.
420
Comfort
Comfort is the vehicle's default mode. This
setting offers driving comfort, light steering and soft suspension. In
Comfort mode, no tachometer will be dis-
played in the instrument panel 10
.
Eco
Adapt the vehicle for more fuel-efficient and eco-friendly driving with Eco mode.
In this mode, the Start/Stop function is acti- vated and certain climate settings arereduced. When driving in
Eco mode, an ECO gauge
indicating how economical the driving is will be displayed in the instrument panel.
Off Road
Helps maximize the vehicle's ability to tra- verse difficult terrain or poor roads.
Steering is light and all-wheel drive and thelow-speed function with assistance for driving downhill (HDC 11
) are activated. The Start/Stop
function is deactivated. This mode can only be activated at low speeds. The permitted speed range will beshown in the speedometer. If this speed is exceeded,
Off Road mode will be deactivated
and another drive mode activated. In
Off Road mode, a compass will be dis-
played between the speedometer and the tachometer in the instrument panel.
NOTE
This drive mode is not designed to be used for normal street driving.
Dynamic
Dynamic mode is designed to help pro-
vide sportier driving characteristics and a faster acceleration response.
Gear shifting will be faster and more distinctand the transmission will prioritize gears witha higher traction force. Steering response is faster and suspension is stiffer 12
to help reduce body roll when corner-
ing. The Start/Stop function is deactivated.
Dynamic mode is also available in a Polestar
Engineered* version.
Individual
Customizes drive mode to personal prefer- ences. Select one of the drive modes as a basis andadjust the settings to achieve your preferreddriving characteristics. These settings will bestored in the active driver profile and will beavailable every time the vehicle is unlockedwith that remote key. Individual drive mode is only available if it has been activated in the center display.
9
All Wheel Drive
10 Only applies to vehicles with 8-inch instrument panels.
11 Hill Descent Control
12 Vehicles with Four-C.
Page 424 of 683
||
STARTING AND DRIVING
* Option/accessory.
422 3. Press the drive mode control or tap its
button in the center display to confirm the selection.
> The selected drive mode is shown inthe instrument panel.
Related information
Drive modes
* (p. 419)
Activating and deactivating Eco drive mode using the function button (p. 424)
Activating and deactivating Low SpeedControl using the function button (p. 433)
Activating and deactivating Hill DescentControl using the function button (p. 434)
Eco drive mode
Eco drive mode can help make driving more
fuel-efficient and eco-friendly.
Use this mode to save fuel and promote eco- friendly driving. When
Eco mode is activated, the following
characteristics are modified:
The automatic transmission's shifting points.
Engine control and accelerator pedalresponse.
Eco Coast functionality is activated andengine braking is disabled when the accel-erator pedal is released at speedsbetween 65 and 140 km/h(40 and 87 mph).
Some of the climate system settings willbe reduced or switched off.
Information will be shown in the ECOgauge in the instrument panel to help pro-mote more eco-friendly and economicaldriving.
Coast function Eco CoastEco Coast essentially deactivates engine brak-ing, allowing the vehicle's kinetic energy to beused to roll greater distances. When the driverreleases the accelerator pedal, the transmis-sion is automatically disengaged from theengine. Engine speed is reduced to idlingspeed to reduce fuel consumption. This function is most effective in driving situa-tions where the vehicle can roll freely for along distance e.g. on roads with slight down-grades or when a decrease in speed is antici-pated such as when approaching an area witha lower speed limit.
Activating Eco Coast
The function is activated when the accelerator pedal is fully released and the following condi-tions are met:
Eco drive mode is activated.
The gear selector is in
D.
The vehicle's speed is approximately 65-140 km/h (40-87 mph).
The gradient of the downgrade is less thanapproximately 6%.
COASTING will be displayed in the instrument
panel when Eco Coast is being used.
Page 428 of 683

||
STARTING AND DRIVING
426
Symbols in the instrument panel
White – Displayed in the tachometer
when the function is available.
Green – Shown in the tachometer
when the function is active and the engine is auto-stopped.
Gray – When the symbol is grayed-
out with a line through it, the function is not available. If no symbol is shown, the function is switched off.
The function is active and the engine has auto-stop- ped.
On vehicles with the 8-inch instrument panel, the symbol will be shown at the bottom of thespeedometer.
Related information
Deactivating the Start/Stop function(p. 426)
Conditions for the Start/Stop function(p. 427)
Start/Stop function (p. 425)
Hill Start Assist (p. 411)
Auto-hold brakes (p. 409)
Deactivating the Start/Stop function
In certain situations, it may be advisable to turn the Start/Stop function off.
To turn off Start/Stop, tap theStart/Stop function button
in the center display's Func- tion view. The indicator lightin the button will go outwhen the function has beenturned off.
The function will remain turned off until:
it is reactivated
the drive mode is changed to
Eco.
Related information
Driving with the Start/Stop function (p. 425)
Conditions for the Start/Stop function(p. 427)
Page 434 of 683
STARTING AND DRIVING
* Option/accessory.
432
Leveling control settings *
Turn off leveling control before lifting the vehicle with a jack to help avoid problemswith the pneumatic suspension.
Center display settings
Disable Leveling Control
In certain situations this function must be turned off e.g. before the vehicle is raised using a jack *. The level difference caused by
raising the vehicle with a jack could cause problems with the pneumatic suspension. Turning off the function in the center display:1. Tap
Settings in the Top view.
2. Tap
My CarParking Brake and
Suspension.
3. Select
Disable Leveling Control.
Related information
Leveling control
* and suspension (p. 429)
Loading recommendations (p. 570)
Low Speed Control
The low-speed function (LSC 15
) facilitates
and improves control and traction on rough roads and slippery surfaces, e.g. when towinga trailer on grass or up boat ramps. In vehicles equipped with drive mode con- trol *, the function is included in the
Off Roaddrive mode.Low Speed Control is designed for driving on rough roads and when towing trailers at lowspeeds, up to approximately 40 km/h (25mph). Low Speed Control prioritizes low gear posi- tions and traction. If the vehicle is all-wheeldrive, power is automatically distributedevenly to provide as much traction as possibleon all wheels and reduce the risk of wheelspin. The accelerator pedal will be less respon-sive to improve traction and speed control atlow speeds. The function is activated together with Hill Descent Control (HDC 16
), which makes it pos-
sible to control speed going down steep hills using the accelerator pedal and reduces theneed to use the brake pedal. The systemmakes it possible to maintain a low and uni-form speed when driving down steep hills.
NOTE
When LSC with HDC is activated, the feel of the accelerator pedal and engineresponse will change.
NOTE
This drive mode is not designed to be used for normal street driving.
NOTE
The function is deactivated when driving at high speeds and must be reactivated atlower speeds if so desired.
Related information
Activating and deactivating Low Speed Control using the function button (p. 433)
Changing drive mode
* (p. 421)
Hill Descent Control (p. 433)
All Wheel Drive (AWD) (p. 419)
15
Low Speed Control
16 Hill Descent Control
Page 435 of 683
STARTING AND DRIVING
}}
* Option/accessory.433
Activating and deactivating Low Speed Control using the functionbutton There is a function button for driving at low speeds with
Hill Descent Control in the cen-
ter display's Function view if the vehicle is not equipped with a drive mode control in thetunnel console.
Selecting Low Speed Control in the center display's Function view
–Tap the Hill Descent Control button to
activate or deactivate the function.
> An indicator light in the button will illu- minate when the function is activated.
When the engine is switched off, the function will be automatically deactivated.
NOTE
The function is deactivated when driving at high speeds and must be reactivated atlower speeds if so desired.
Related information
Low Speed Control (p. 432)
Changing drive mode
* (p. 421)
Hill Descent Control
The function for assisting when driving down- hill (HDC 17
) is a low-speed function with
increased engine braking. The function makes it possible to increase or decrease thevehicle's speed on steep downhill gradientsby only using the accelerator pedal, withoutapplying the brakes. In vehicles equipped with drive mode con- trol *, the function is included in the
Off Roaddrive mode.HDC is designed for driving on rough roads at low speeds and downhill gradients with slip-pery or otherwise difficult road surfaces. Thedriver does not need to use the brake pedalbut can instead focus on steering.
WARNING
HDC is only intended to be a supplemen- tary braking aid and it does not function inall situations. The driver is always ultimately responsible for operating the vehicle in a safe manner.
FunctionHill Descent Control allows the vehicle to move forward or backward at very low speedsassisted by the brake system. The driver canincrease the speed by pressing the accelerator
17
Hill Descent Control