2021 VOLVO V90 CROSS COUNTRY ESP
[x] Cancel search: ESPPage 542 of 683
WHEELS AND TIRES
540
Uniform Tire Quality GradingALL PASSENGER VEHICLE TIRES MUST CONFORM TO FEDERAL SAFETYREQUIREMENTS IN ADDITION TO THESEGRADES .
Quality grades can be found, where applica- ble, on the tire sidewall between the treadshoulder and maximum section width. Forexample: Treadwear 200 Traction AA Temperature A
TREADWEARThe treadwear grade is a comparative rating based on the wear rate of the tire when testedunder controlled conditions on a specifiedgovernment test course. For example, a tiregraded 150 would wear one and one half (1 ½)times as well on the government course as atire graded 100. The relative performance oftires depends upon the actual conditions oftheir use, however, and many depart signifi-cantly from the norm due to variation in drivinghabits, maintenance practices and differencesin road characteristics and climate.
TRACTIONThe traction grades, from highest to lowest,are AA, A, B, and C, as measured under con-trolled conditions on specified governmenttest surfaces of asphalt and concrete. A tiremarked C may have poor traction perform-ance.
WARNING
The traction grade assigned to this tire is based on braking (straight-ahead) tractiontests and is not a measure of cornering(turning) traction.
TEMPERATUREThe temperature grades are A (the highest), B, and C, representing the tire's resistance to thegeneration of heat and its ability to dissipateheat when tested under controlled conditionson a specified indoor laboratory test wheel.Sustained high temperature can cause thematerial of the tire to degenerate and reducetire life, and excessive temperature can lead tosudden tire failure. The grade C correspondsto a minimum level of performance that allpassenger vehicle tires must meet under theFederal Motor Safety Standard No. 109.Grades B and A represent higher levels of per-formance on the laboratory test wheel thanthe minimum required by law.
WARNING
The temperature grade for this tire is estab- lished for a tire that is properly inflated andnot overloaded. Excessive speed, under-inflation, or excessive loading, either sepa-rately or in combination, can cause heatbuildup and tire failure.
Related information
Tires (p. 534)
Tire sidewall designations (p. 538)
Page 543 of 683
WHEELS AND TIRES
* Option/accessory.541
Checking tire pressure
Correct inflation pressure helps improve driv- ing stability, save fuel and increase the serv-ice life of the tires.
Tire pressure decreases over time, which is normal. Tire pressure also varies depending onthe ambient temperature. Driving on under-inflated tires could cause the vehicle to over-heat and lead to damage. Tire pressure affectstraveling comfort, road noise and driving cha-racteristics. Check the pressure in the tires every month. Use the recommended inflation pressure forcold tires to help maintain good tire perform-ance. Under-inflated or over-inflated tirescould cause uneven tread wear. Use an air pressure gauge and check the infla- tion pressure on all the tires, including the spare tire 4
, at least once a month and before
long trips. Volvo recommends buying a relia- ble air pressure gauge, as the automaticgauges provided at service stations may beinaccurate.
WARNING
Under-inflation is the most common cause of tire failure and may result insevere tire cracking, tread separation,or "blow-out," with unexpected loss ofvehicle control and increased risk ofinjury.
Under-inflated tires reduce the loadcarrying capacity of your vehicle.
Cold tiresInflation pressure should be checked when thetires are cold. The tires are considered to becold when they have the same temperature asthe surrounding (ambient) air. This tempera-ture is normally reached after the vehicle hasbeen parked for at least 3 hours. After driving for approximately 1.6 km (1 mile), the tires are considered to be warm. If youneed to drive longer than that to inflate thetires, check and record the inflation pressureof the tires first and inflate accordingly whenyou arrive at the pump. When the ambient temperature changes, so does the inflation pressure. A 10-degree tem-perature drop causes a corresponding drop ininflation pressure of 1 psi (7 kPa). Check theinflation pressure of the tires regularly andadjust to the correct pressure, which can be found on the vehicle's tire information decal orcertification label. If you check inflation pressure when the tires are warm, you should never release air. Thetires become warm after driving and it is nor-mal for warm tires to have an inflation pres-sure above the recommended pressure forcold tires. A warm tire with an inflation pres-sure equal to or under the recommended pres-sure for cold tires could be significantly under-inflated.Related information
Adjusting tire pressure (p. 542)
Recommended tire pressure (p. 543)
Tire pressure monitoring system
*
(p. 543)
Tires (p. 534)
4
Not available in all models.
Page 546 of 683
||
WHEELS AND TIRES
544
General information about the tire pressure monitoring system
In the following description, the tire monitor- ing system is generally referred to as TPMS. Each tire, including the spare (if provided)7
should be checked monthly when cold and inflated to the inflation pressure recom-mended by the vehicle manufacturer on thevehicle placard or tire inflation pressure label.(If your vehicle has tires of a different size thanthe size indicated on the vehicle placard or tireinflation pressure label, you should determinethe proper tire inflation pressure for thosetires.) As an added safety feature, your vehicle has been equipped with a tire pressure monitoringsystem (TPMS) that illuminates a low tirepressure telltale when one or more of yourtires is significantly under-inflated. Accord-ingly, when the low tire pressure telltale illumi-nates, you should stop and check your tires assoon as possible, and inflate them to theproper pressure. Driving on a significantly under-inflated tire causes the tire to overheat and can lead to tirefailure. Under-inflation also reduces fuel effi-ciency and tire tread life, and may affect thevehicle's handling and stopping ability. Please note that the TPMS is not a substitute forproper tire maintenance, and it is the driver'sresponsibility to maintain correct tire pressure,even if under-inflation has not reached thelevel to trigger illumination of the TPMS lowtire pressure telltale. Your vehicle has also been equipped with a TPMS malfunction indicator to indicate whenthe system is not operating properly. TheTPMS malfunction indicator is combined withthe low tire pressure telltale. When the systemdetects a malfunction, the telltale will flash forapproximately one minute and then remaincontinuously illuminated. This sequence willcontinue upon subsequent vehicle start-ups aslong as the malfunction exists. When the mal-function indicator is illuminated, the systemmay not be able to detect or signal low tirepressure as intended. TPMS malfunctions may occur for a variety of reasons, including the installation of replace-ment or alternate tires or wheels on the vehi-cle that prevent the TPMS from functioningproperly. Always check the TPMS malfunction telltale after replacing one or more tires or wheels onyour vehicle to ensure that the replacement oralternate tires and wheels allow the TPMS tocontinue to function properly.
To keep in mind
Always save the new inflation pressure inthe system after changing a tire or adjust-ing the inflation pressure.
If you switch to a tire of another size thanthe factory-mounted tires, the systemmust be reset by storing a new inflationpressure for these tires to avoid falsewarnings.
If a spare wheel 8
is used, it is possible that
the tire pressure monitoring system willnot work correctly due to the differencesbetween the wheels.
The system does not replace the need forregular tire inspection and maintenance.
It is not possible to deactivate the tirepressure monitoring system.
WARNING
Incorrect inflation pressure could lead to tire failure, which could cause thedriver to lose control of the vehicle.
The system cannot predict sudden tiredamage.
6
Tire Pressure Monitoring System (TPMS)
7 Not available on all models.
8 Not available on all models.
Page 554 of 683
||
WHEELS AND TIRES
552
CAUTION
Make sure you have a solid connection between bolt and wheel bolt key whenloosening/tightening the wheel bolts.Applying force at an angle could damagethe slots in the wheel bolts and the wheelbolt key and make it impossible to install orremove the wheel.
When the wheel bolt key is not being used, stow it in its designated location in the foamblock under the cargo compartment floor. Thisis important to remember so that the tool isavailable if the vehicle is taken to a workshop.If you lose the key, contact your Volvo retailer.
Related information
Changing a wheel (p. 548)
Tool kit (p. 550)
Spare wheel 14
The spare wheel is a Temporary Spare and can be used to temporarily replace a punc-tured tire on one of the vehicle's regularwheels.
The spare wheel is only intended for tempo- rary use. Replace it with a normal wheel assoon as possible. The driving characteristics of the vehicle change and ground clearance reduces whenthe spare wheel is used. Do not wash the vehi-cle in an automatic car wash while using theTemporary Spare. The recommended tire pressure must be maintained regardless of at which position thetemporary spare wheel is used on the vehicle. If the spare wheel is damaged, a replacement can be purchased from a Volvo retailer.
WARNING
Current legislation prohibits the use of the "Temporary Spare" wheel other than as atemporary replacement for a puncturedtire. It must be replaced as soon as possi-ble by a standard tire. Roadholding andhandling may be affected with the "Tempo-rary Spare" wheel in use.
WARNING
Never drive faster than 80 km/h (50 mph) with a spare tire mounted onthe vehicle.
The vehicle must never be driven withmore than one "Temporary Spare"wheel mounted.
Driving with a spare wheel may alterthe driving characteristics of the vehi-cle. Replace the spare wheel with anormal wheel as soon as possible.
The spare wheel is smaller than thenormal wheel, which affects the vehi-cle's ground clearance. Watch for highcurbs and do not wash the vehicle inan automatic car wash when a sparewheel is mounted.
Follow the manufacturer's recom-mended tire inflation pressure for thespare wheel.
On all-wheel drive vehicles, the driveon the rear axle can be disconnected.
If the spare wheel is mounted on thefront axle, snow chains must not beused.
The spare wheel must not be repaired.
14
Not available on all models.
Page 555 of 683

WHEELS AND TIRES
}}
553
CAUTION
The vehicle must not be driven with tires of different dimensions or with a spare wheelother than the one that came with the vehi-cle. The use of different size wheels canseriously damage your vehicle's transmis-sion.
Related information
Changing a wheel (p. 548)
Recommended tire pressure (p. 543)
Handling the spare wheel 15
Follow these instructions regarding handling the spare wheel.
Accessing the spare wheel
This illustration is generic and appearance may vary.
The spare tire is located in the spare wheel well under the cargo compartment with theoutside of the wheel facing downward. Thespare tire is secured with a bolt that goesthrough the tire and attaches it to the body.The foam block contains all tools needed tochange a wheel.
1. Lift the rear edge of the cargo compart- ment floor.
2. Unscrew the retaining bolt.
3. Lift out the spare wheel.
Stowing a flat tire1. Screw the spare tire's retaining bolt back on.
CAUTION
Do not attempt to unscrew the lower part of the retaining bolt if it is attached to thebody, as this could cause it to break. If the retaining bolt becomes dislodged from its lower attachment point in thebody under the spare tire, replace it in thehole and turn clockwise to secure it again.
WARNING
On vehicles with 48 V batteries, the bolt is attached to the battery box instead of thebody. If the lower part of the retaining boltis not dislodged when the spare tire istaken out, it should be removed to helpprevent injury when the flat tire is replaced.
2. Put the tools back in their correct posi- tions in the foam block.
3. Then lower the trunk/cargo compartment floor and place the punctured tire in the trunk/cargo compartment.
15Not available on all models.
Page 556 of 683

||
WHEELS AND TIRES
554
Related information
Spare wheel (p. 552)
Tool kit (p. 550)
Changing a wheel (p. 548)
Snow tires
Snow tires are designed for winter driving conditions.
Volvo recommends snow tires with specific dimensions. The tire dimensions vary depend-ing on engine type. When driving with snowtires, the correct type of tires must be moun-ted on all four wheels.
Tips for changing snow tiresWhen switching between regular tires andsnow tires, mark the tires according to whichside they were mounted on, e.g. L for left and
R for right.
Contact a Volvo retailer for assistance deter-mining the most suitable rims and tires.
Studded tiresStudded tires should be broken in by driving500–1000 km (300–600 miles) slowly andgently to help the studs settle properly in thetires. This gives the tire, and especially thestuds, a longer service life.
NOTE
Legal requirements concerning the use of studded tires may vary. Always follow locallaws and regulations.
Tread depthRoad conditions with ice, slush and low tem- peratures place considerably higher demands on tires than summer conditions. Volvo there-fore recommends not driving on snow tiresthat have a tread depth of less than 4 mm(0.15 inch).
Related information
Changing a wheel (p. 548)
Winter driving (p. 436)
Tread wear indicator (p. 537)
Volvo Cars support site (p. 21)
Page 559 of 683
WHEELS AND TIRES
}}}}
557
Using the tire sealing system
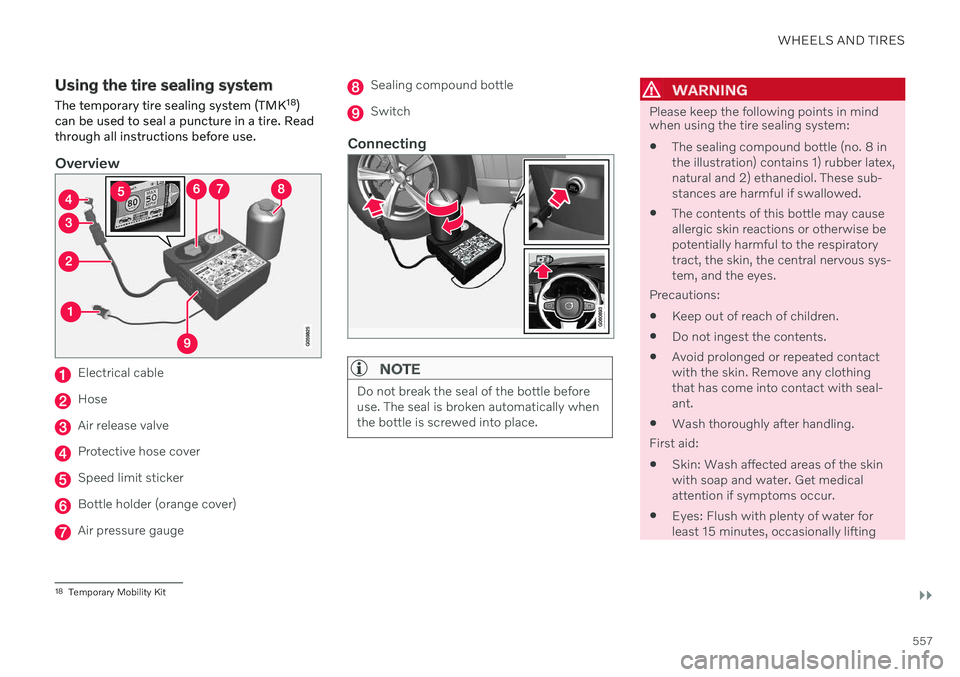
The temporary tire sealing system (TMK 18
)
can be used to seal a puncture in a tire. Read through all instructions before use.
Overview
Electrical cable
Hose
Air release valve
Protective hose cover
Speed limit sticker
Bottle holder (orange cover)
Air pressure gauge
Sealing compound bottle
Switch
Connecting
NOTE
Do not break the seal of the bottle before use. The seal is broken automatically whenthe bottle is screwed into place.
WARNING
Please keep the following points in mind when using the tire sealing system:
The sealing compound bottle (no. 8 in the illustration) contains 1) rubber latex,natural and 2) ethanediol. These sub-stances are harmful if swallowed.
The contents of this bottle may causeallergic skin reactions or otherwise bepotentially harmful to the respiratorytract, the skin, the central nervous sys-tem, and the eyes.
Precautions:
Keep out of reach of children.
Do not ingest the contents.
Avoid prolonged or repeated contact with the skin. Remove any clothing that has come into contact with seal-ant.
Wash thoroughly after handling.
First aid:
Skin: Wash affected areas of the skinwith soap and water. Get medicalattention if symptoms occur.
Eyes: Flush with plenty of water forleast 15 minutes, occasionally lifting
18
Temporary Mobility Kit
Page 572 of 683
LOADING, STORAGE AND PASSENGER COMPARTMENT
* Option/accessory.
570
Loading recommendations
There are a number of things that are impor- tant to consider when carrying loads in or onthe vehicle.
Load-carrying capacity is determined by the vehicle's curb weight. The total weight of allpassengers and any installed accessoriesreduces the vehicle's load-carrying capacity bythe corresponding amount.
WARNING
The vehicle's driving characteristics change depending on the weight and position ofthe load.
Loading the cargo compartment/trunkKeep the following in mind when loading:
Position objects so they are pressing against the rear seat backrests.
Heavy objects should be positioned as lowas possible. Avoid placing heavy objectson folded-down seat backrests.
Cover sharp corners with a soft cloth orsimilar to help prevent damage to theupholstery.
Use the load anchoring eyelets and ten-sioning straps or similar to secure allobjects.
WARNING
In a head-on collision at a speed of 50 km/h (30 mph), an unsecured objectweighing 20 kg (44 pounds) can reach aprojectile weight equivalent to 1000 kg(2200 pounds).
WARNING
If objects are loaded higher than the upper edge of the side windows, leave a 10 cm(4 in.) space between the objects and thewindow. Objects placed closer to thiscould impede the function of the inflatablecurtain concealed inside the headlining.
WARNING
Always secure the load. Otherwise, it may shift during heavy braking and injure peo-ple in the vehicle. Cover sharp edges and sharp corners with something soft. Turn off the engine and apply the parking brake when loading/unloading longobjects. Otherwise, it is possible for theload to reach the gear lever or gear selectorand move it to a drive position – whichcould cause the vehicle to begin rolling.
Extra cargo space
The rear seat backrests can be folded down to increase cargo space in the cargo compart- ment/trunk and simplify loading. If the rearseat backrests are folded down, make surethat no objects loaded into the vehicle preventthe WHIPS system for the front seats fromfunctioning correctly. A ski hatch in the rear seat can be folded down to carry skis or other long, thin objects.
Related information
Load anchoring eyelets (p. 572)
Folding down the rear seat backrests(p. 200)
Rear seat ski hatch (p. 573)
Roof loads and load carriers (p. 571)
Leveling control
* and suspension (p. 429)
Weights (p. 655)