2021 VOLVO V90 CROSS COUNTRY key
[x] Cancel search: keyPage 506 of 683
||
AUDIO, MEDIA AND INTERNET
504opened using the
button on the right-side
steering wheel keypad.
Making multiple calls
While the call is in progress: 1. Tap
Add call.
2. Select from the list of recent calls, favor- ites or contacts.
3. Tap an item/row in the list of recent calls or
for the contact in the phone book.
4. Tap
Swap call to switch between calls.
5. Tap
to end the current call.
Group (conference) calls
While multiple calls are in progress: 1.
Tap
Join calls to merge ongoing calls.
2. Tap
to end the call.
Incoming callsIncoming phone calls will be shown on the instrument panel and in the center display.Manage the calls using the right-side steeringwheel keypad or the center display. 1.
Tap
Answer/Reject.
2. Tap
to end the call.
Incoming calls while another call is in progress
1.
Tap Answer/Reject. 2.
Tap
to end the call.
Privacy–While a call is in progress, tap Privacyand select setting:
Switch to mobile phone - the hands-
free function will be disabled and the call will proceed on the cellular phone.
Driver focused - the microphone in the
ceiling liner on the passenger side will be muted and the call will proceedusing the vehicle's hands-free function.
Related information
Phone (p. 499)
Connecting a phone to the car via Blue-tooth for the first time (p. 500)
Voice control for cellular phones (p. 152)
Handling the App menu in the instrumentpanel (p. 109)
Entering characters, letters and words byhand in the center display (p. 133)
Managing the phone book (p. 506)
Handling text messages (p. 504)
Sound settings (p. 462)
Handling text messages 21
A Bluetooth-connected cellular phone's text messages can be handled in the vehicle.
Text message functionality needs to be acti- vated in certain phones. Not all phones arefully compatible and therefore cannot displaycontacts and messages in the vehicle.
Handling text messages in the center
display
Text messages are only shown in the centerdisplay if the relevant setting is made.
Tap
Messages in App view
to handle text messages in the center display.
NOTE
When the vehicle is moving:
Only one row of the message will be displayed. Tap
Read out to have the
entire message read aloud.
The center display's keyboard cannot be used.
Page 507 of 683
AUDIO, MEDIA AND INTERNET
* Option/accessory.505
Reading text messages in the center display aloud
Tap the icon to have the message read aloud.
Sending text messages in the center display22
1. It is possible to reply to text messages or
create a new message.
To reply to a text message - tap the name of the contact who sent the mes- sage and then tap
Answer.
To create a new message - tap
Create
new. Select a contact or enter a phone
number.
2. Write the message. 3. Tap
Send.
Handling text messages in the instrument panel
Text messages are only shown in the instru- ment panel if the relevant setting is made.
Reading new text messages in the instrument panel aloud
–To have the message read aloud, selectRead out using the steering wheel key-
pad.
Dictating replies in the instrument panel
After the text message has been read aloud, it is possible to dictate a brief reply if the vehiclehas an Internet connection.
–Tap Answer using the steering wheel key-
pad. A dictation dialog will start.
Message alertAlerts can be activated and deactivated in the text message settings.
Related information
Phone (p. 499)
Text message settings (p. 505)
Phone settings (p. 506)
Internet-connected vehicle
* (p. 514)
Voice control for cellular phones (p. 152)
Entering characters, letters and words byhand in the center display (p. 133)
Connecting a phone to the car via Blue-tooth for the first time (p. 500)
Terms of use and data sharing (p. 520)
Text message settings Settings for handling text messages received through a connected phone can be personal-ized.
1.
Tap Settings in the Top view.
2. Tap
CommunicationText Messagesand select settings:
Notification in center display - dis-
play text message notifications in the center display's status bar.
Notification in driver display - dis-
plays notifications in the driver's display and incoming messages can be man-aged using the steering wheel's right-hand keypad.
Text message tone - select tone for
incoming text messages.
Related information
Phone (p. 499)
Connecting a phone to the car via Blue- tooth for the first time (p. 500)
Handling text messages (p. 504)
Phone settings (p. 506)
21
Only applies to certain markets. Contact a Volvo retailer for more information.22Only certain phones can send text messages via the vehicle. The connected phone must support the Bluetooth profile Message Access Profile (MAP).
Page 552 of 683
||
WHEELS AND TIRES
* Option/accessory.
550
WARNING
The wheel bolts may need to be tightened again several days after a wheel change.Temperature fluctuations and vibrationscan cause them to loosen slightly.
NOTE
After inflating a tire, always replace the valve cap to help prevent valve damagecaused by gravel, dirt, etc.
Use plastic valve caps only. Metal capscould corrode and become difficult toremove.
Related information
Leveling control settings
* (p. 432)
Hoisting the vehicle (p. 589)
Tool kit (p. 550)
Saving new reference values for tire infla- tion pressure monitoring
* (p. 545)
Tool kit
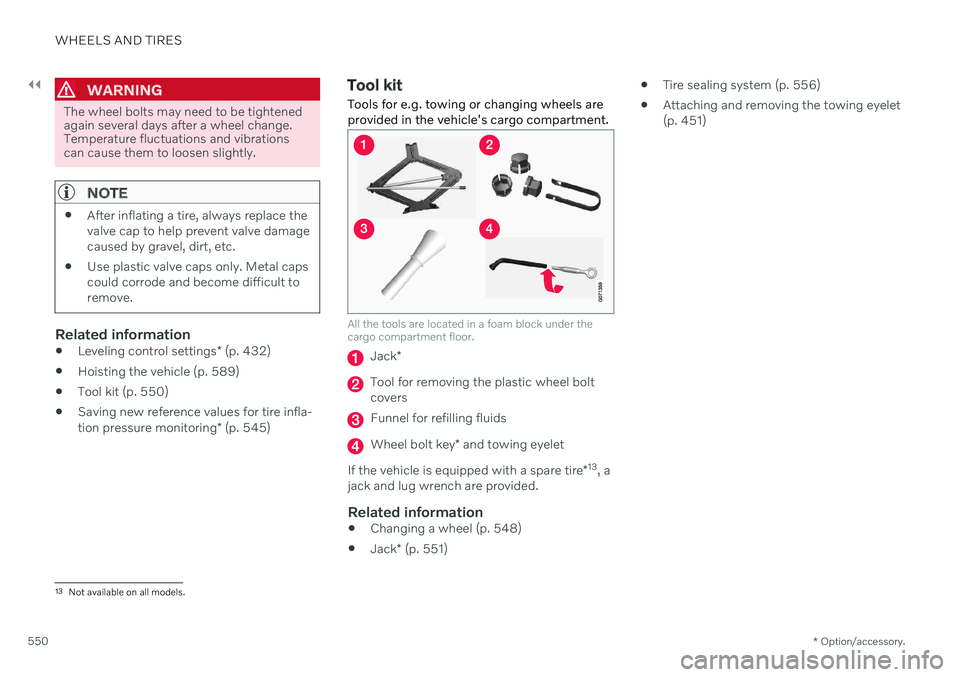
Tools for e.g. towing or changing wheels are provided in the vehicle's cargo compartment.
All the tools are located in a foam block under the cargo compartment floor.
Jack *
Tool for removing the plastic wheel bolt covers
Funnel for refilling fluids
Wheel bolt key * and towing eyelet
If the vehicle is equipped with a spare tire *13
, a
jack and lug wrench are provided.
Related information
Changing a wheel (p. 548)
Jack
* (p. 551)
Tire sealing system (p. 556)
Attaching and removing the towing eyelet (p. 451)
13
Not available on all models.
Page 554 of 683
||
WHEELS AND TIRES
552
CAUTION
Make sure you have a solid connection between bolt and wheel bolt key whenloosening/tightening the wheel bolts.Applying force at an angle could damagethe slots in the wheel bolts and the wheelbolt key and make it impossible to install orremove the wheel.
When the wheel bolt key is not being used, stow it in its designated location in the foamblock under the cargo compartment floor. Thisis important to remember so that the tool isavailable if the vehicle is taken to a workshop.If you lose the key, contact your Volvo retailer.
Related information
Changing a wheel (p. 548)
Tool kit (p. 550)
Spare wheel 14
The spare wheel is a Temporary Spare and can be used to temporarily replace a punc-tured tire on one of the vehicle's regularwheels.
The spare wheel is only intended for tempo- rary use. Replace it with a normal wheel assoon as possible. The driving characteristics of the vehicle change and ground clearance reduces whenthe spare wheel is used. Do not wash the vehi-cle in an automatic car wash while using theTemporary Spare. The recommended tire pressure must be maintained regardless of at which position thetemporary spare wheel is used on the vehicle. If the spare wheel is damaged, a replacement can be purchased from a Volvo retailer.
WARNING
Current legislation prohibits the use of the "Temporary Spare" wheel other than as atemporary replacement for a puncturedtire. It must be replaced as soon as possi-ble by a standard tire. Roadholding andhandling may be affected with the "Tempo-rary Spare" wheel in use.
WARNING
Never drive faster than 80 km/h (50 mph) with a spare tire mounted onthe vehicle.
The vehicle must never be driven withmore than one "Temporary Spare"wheel mounted.
Driving with a spare wheel may alterthe driving characteristics of the vehi-cle. Replace the spare wheel with anormal wheel as soon as possible.
The spare wheel is smaller than thenormal wheel, which affects the vehi-cle's ground clearance. Watch for highcurbs and do not wash the vehicle inan automatic car wash when a sparewheel is mounted.
Follow the manufacturer's recom-mended tire inflation pressure for thespare wheel.
On all-wheel drive vehicles, the driveon the rear axle can be disconnected.
If the spare wheel is mounted on thefront axle, snow chains must not beused.
The spare wheel must not be repaired.
14
Not available on all models.
Page 566 of 683
LOADING, STORAGE AND PASSENGER COMPARTMENT
* Option/accessory.
564
Passenger compartment interior
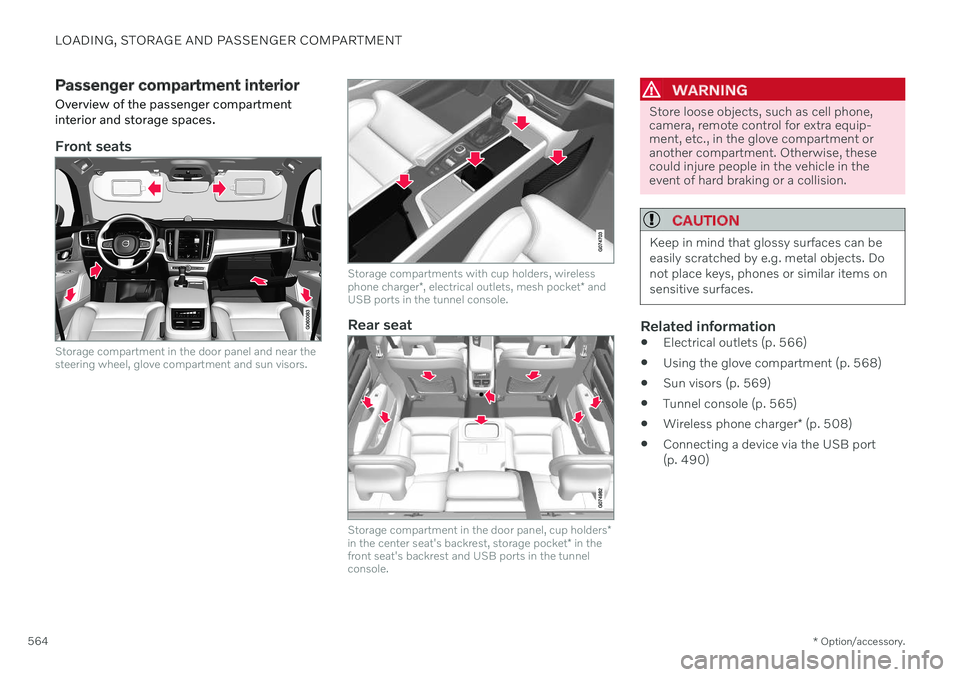
Overview of the passenger compartment interior and storage spaces.
Front seats
Storage compartment in the door panel and near the steering wheel, glove compartment and sun visors.
Storage compartments with cup holders, wireless phone charger *, electrical outlets, mesh pocket * and
USB ports in the tunnel console.
Rear seat
Storage compartment in the door panel, cup holders *
in the center seat's backrest, storage pocket * in the
front seat's backrest and USB ports in the tunnel console.
WARNING
Store loose objects, such as cell phone, camera, remote control for extra equip-ment, etc., in the glove compartment oranother compartment. Otherwise, thesecould injure people in the vehicle in theevent of hard braking or a collision.
CAUTION
Keep in mind that glossy surfaces can be easily scratched by e.g. metal objects. Donot place keys, phones or similar items onsensitive surfaces.
Related information
Electrical outlets (p. 566)
Using the glove compartment (p. 568)
Sun visors (p. 569)
Tunnel console (p. 565)
Wireless phone charger
* (p. 508)
Connecting a device via the USB port (p. 490)
Page 567 of 683

LOADING, STORAGE AND PASSENGER COMPARTMENT
* Option/accessory.565
Tunnel console
The tunnel console is located between the front seats.
Storage compartment with cover * and 12
V outlet 1
. Press the handle to open/close
the cover.
Storage compartment with cup holder and wireless phone charger *.
Storage compartment and USB port under the armrest.
Climate control panel for the rear seats * or
storage compartment. There is also a USB port underneath.
WARNING
Store loose objects, such as cell phone, camera, remote control for extra equip-ment, etc., in the glove compartment oranother compartment. Otherwise, thesecould injure people in the vehicle in theevent of hard braking or a collision.
CAUTION
Keep in mind that glossy surfaces can be easily scratched by e.g. metal objects. Donot place keys, phones or similar items onsensitive surfaces.
NOTE
One of the sensors for the alarm * is located
under the cup holder in the center console. Avoid placing coins, keys and other metalobjects in the cup holder as this could trig-ger the alarm.
NOTE
The USB port can be used to e.g. charge a cellular phone or tablet. Only the front USBport can be used to play media through thevehicle's speakers.
Related information
Passenger compartment interior (p. 564)
Electrical outlets (p. 566)
Climate system controls (p. 218)
1
If the vehicle does not have a wireless phone charger, the 12 V outlet is located in the center storage compartment.
Page 570 of 683
LOADING, STORAGE AND PASSENGER COMPARTMENT
* Option/accessory.
568
Using the glove compartment
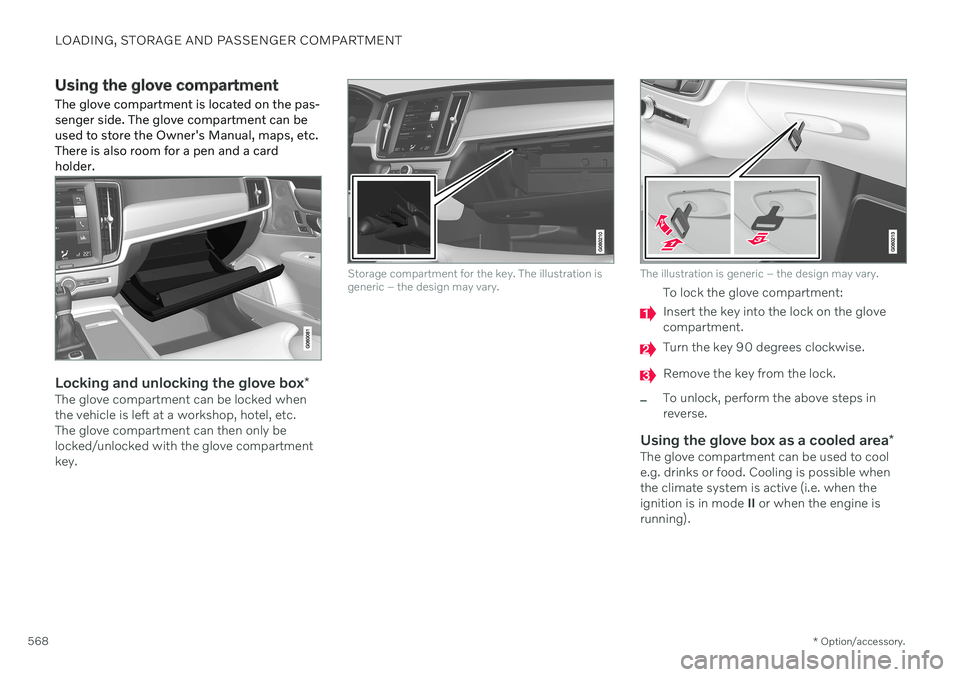
The glove compartment is located on the pas- senger side. The glove compartment can beused to store the Owner's Manual, maps, etc.There is also room for a pen and a cardholder.
Locking and unlocking the glove box *The glove compartment can be locked when the vehicle is left at a workshop, hotel, etc.The glove compartment can then only belocked/unlocked with the glove compartmentkey.
Storage compartment for the key. The illustration is generic – the design may vary.The illustration is generic – the design may vary.
To lock the glove compartment:
Insert the key into the lock on the glove compartment.
Turn the key 90 degrees clockwise.
Remove the key from the lock.
–To unlock, perform the above steps in reverse.
Using the glove box as a cooled area*The glove compartment can be used to cool e.g. drinks or food. Cooling is possible when the climate system is active (i.e. when the ignition is in mode II or when the engine is
running).
Page 586 of 683
||
MAINTENANCE AND SERVICE
584
Monthly:
Check cold tire pressure in all tires. Inspect the tires for wear.
Check that engine coolant and other fluidlevels are between the indicated "min"and "max" markings.
Clean interior glass surfaces with a glasscleaner and soft paper towels.
Wipe driver information displays with asoft cloth.
Visually inspect battery terminals for cor-rosion. Corrosion may indicate a loose ter-minal connector, or a battery near the endof its useful service life. Consult your Volvoretailer for additional information.
As needed:
Wash the vehicle, including the undercarriage, to reduce wear that can be caused by abuildup of dirt, and corrosion that can becaused by salt residues. Clean leaves and twigs from air intake vents at the base of the windshield, and from other pla-ces where they may collect.
NOTE
Complete service information for qualified technicians is available online for purchaseor subscription at www.volvotechinfo.com.
Related information
Vehicle status (p. 586)
Scheduling service and repairs (p. 587)
Connecting equipment to the vehicle's data link connector (p. 37)
Technician certification (p. 38)
Climate control system service (p. 592)
Maintenance of the brake system (p. 405)
Engine compartment overview (p. 594)
Data transfer between vehicle and workshop over Wi-Fi
Volvo workshops have a designated Wi-Fi network for data transfer between your vehi-cle and the workshop. Your visit to the work-shop will be easier and more effective whendiagnostics information and software can betransferred over the workshop's network.
At the workshop, your service technician can connect your vehicle to the workshop's Wi-Finetwork to perform troubleshooting anddownload software. For this type of communi-cation, the vehicle only connects to a work-shop's network. It is not possible to connectthe vehicle to another Wi-Fi network (e.g. yourhome network) in the same way as to a work-shop's network.
Connecting with remote keyConnection is usually managed by the servicetechnician, who will use the remote key but-tons. It is therefore important to bring a keywith buttons with you when you visit theworkshop. Pressing the lock button on theremote key three times will connect the vehi-cle to the workshop's Wi-Fi network. When the car is connected to a Wi-Fi net- work, the
symbol appears in the center
display.