2021 VOLVO V90 CROSS COUNTRY ECO mode
[x] Cancel search: ECO modePage 555 of 683

WHEELS AND TIRES
}}
553
CAUTION
The vehicle must not be driven with tires of different dimensions or with a spare wheelother than the one that came with the vehi-cle. The use of different size wheels canseriously damage your vehicle's transmis-sion.
Related information
Changing a wheel (p. 548)
Recommended tire pressure (p. 543)
Handling the spare wheel 15
Follow these instructions regarding handling the spare wheel.
Accessing the spare wheel
This illustration is generic and appearance may vary.
The spare tire is located in the spare wheel well under the cargo compartment with theoutside of the wheel facing downward. Thespare tire is secured with a bolt that goesthrough the tire and attaches it to the body.The foam block contains all tools needed tochange a wheel.
1. Lift the rear edge of the cargo compart- ment floor.
2. Unscrew the retaining bolt.
3. Lift out the spare wheel.
Stowing a flat tire1. Screw the spare tire's retaining bolt back on.
CAUTION
Do not attempt to unscrew the lower part of the retaining bolt if it is attached to thebody, as this could cause it to break. If the retaining bolt becomes dislodged from its lower attachment point in thebody under the spare tire, replace it in thehole and turn clockwise to secure it again.
WARNING
On vehicles with 48 V batteries, the bolt is attached to the battery box instead of thebody. If the lower part of the retaining boltis not dislodged when the spare tire istaken out, it should be removed to helpprevent injury when the flat tire is replaced.
2. Put the tools back in their correct posi- tions in the foam block.
3. Then lower the trunk/cargo compartment floor and place the punctured tire in the trunk/cargo compartment.
15Not available on all models.
Page 557 of 683

WHEELS AND TIRES
555
Snow chainsUsing snow chains and/or snow tires can help improve traction in winter driving condi-tions.
Volvo does not recommend use of snow chains on wheel dimensions larger than18 inches
WARNING
Use Volvo genuine snow chains or equiva- lent snow chains that are suitable for thevehicle model and the tire and wheel sizes.Only one-sided snow chains are permit-
ted. If uncertain about snow chains, Volvo rec- ommends contacting an authorized Volvoworkshop. Use of the wrong snow chainscould cause serious damage to the vehicleand result in an accident.
CAUTION
Snow chains can be used on the vehicle, with the following restrictions:
Always follow the manufacturer'sinstallation instructions carefully. Installchains as tightly as possible andretighten periodically.
Only put snow chains on the frontwheels (also applies to all-wheel drivevehicles).
If accessory, aftermarket or "custom"tires and wheels with different dimen-sions than the original tires and wheelsare used, snow chains in some casesmay NOT be used. Sufficient distancebetween the chains and brakes, sus-pension and body components mustbe maintained.
Check local regulations regarding theuse of snow chains before installing.
Never exceed the snow chain manu-facturer's specified maximum speedlimit. Under no circumstances shouldyou exceed 50 km/h (30 mph).
Avoid bumps, holes or sharp turnswhen driving with snow chains.
Avoid driving on surfaces withoutsnow as this wears out both the snowchains and the tires.
The handling of the vehicle can be adversely affected when driving withchains. Avoid fast or sharp turns aswell as locked wheel braking.
Some types of strap-on chains affectbrake components and therefore mustNOT be used.
Consult a Volvo retailer for more information about snow chains.
Related information
Winter driving (p. 436)
Page 569 of 683

LOADING, STORAGE AND PASSENGER COMPARTMENT
567
Using the electrical outlets
The 12 V outlet can be used for devices intended for this such as MP3 players, cool-ers and cellular phones.
The ignition must be in at least mode I for the
outlets to supply current. The outlets will then be active as long as there is sufficient chargein the start battery. If the engine is turned off and the vehicle is locked, the outlets will be deactivated. If theengine is turned off and the vehicle remainsunlocked, the sockets will remain active for upto 7 minutes.
NOTE
Bear in mind that using the electrical out- lets when the engine is off could cause thestarter battery to have too low of a chargelevel, which could limit other functionality. Accessories connected to the electrical outlets can be activated even when thevehicle electrical system is off or if precon-ditioning is used. For this reason, discon-nect plugs when they are not in use to pre-vent the starter battery from becoming dis-charged.
WARNING
Do not use accessories with large or heavy plugs – they could damage theoutlet or come loose while you are driv-ing.
Do not use accessories that couldcause disruptions to e.g. the vehicle'sradio receiver or electrical system.
Position the accessory so that there isno risk of it injuring the driver or pas-sengers in the event of heavy brakingor a collision.
Pay attention to connected accessoriesas they can generate heat that couldburn passengers or the interior.
Using 12 V outlets1. Remove the stopper (tunnel console) or
fold down the cover (trunk/cargo com-partment) over the socket and plug in thedevice.
2. Unplug the device and put the stopper back in (tunnel console) or fold up thecover (trunk/cargo compartment) whenthe socket is not in use or left unattended.
CAUTION
The maximum power is 120 W (10 A) per outlet.
Related information
Electrical outlets (p. 566)
Passenger compartment interior (p. 564)
Page 575 of 683

LOADING, STORAGE AND PASSENGER COMPARTMENT
}}
* Option/accessory.573
Rear seat ski hatch
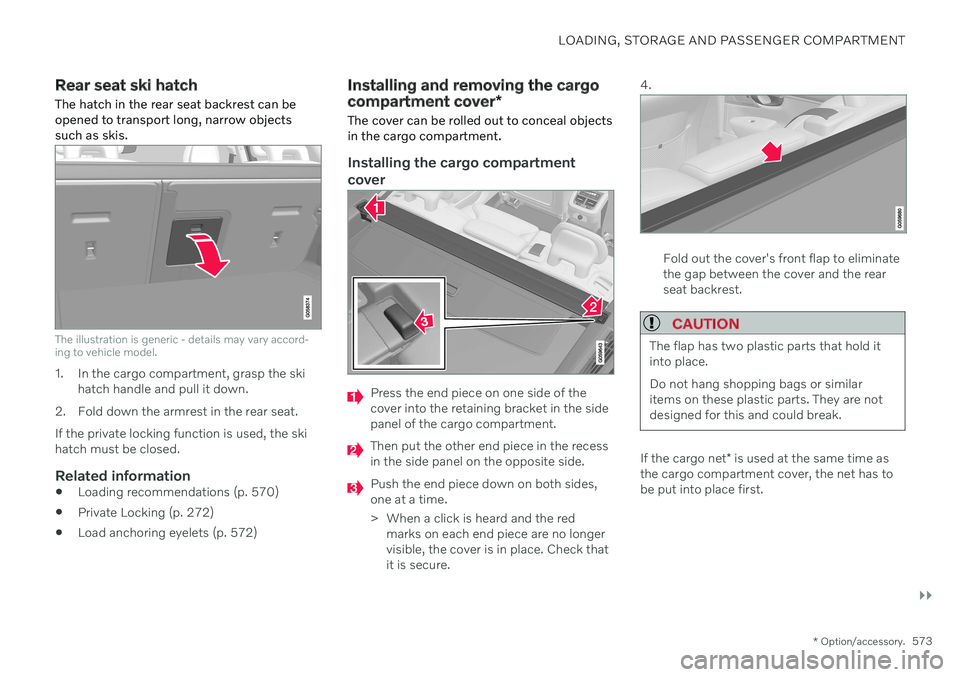
The hatch in the rear seat backrest can be opened to transport long, narrow objectssuch as skis.
The illustration is generic - details may vary accord- ing to vehicle model.
1. In the cargo compartment, grasp the ski hatch handle and pull it down.
2. Fold down the armrest in the rear seat. If the private locking function is used, the ski hatch must be closed.
Related information
Loading recommendations (p. 570)
Private Locking (p. 272)
Load anchoring eyelets (p. 572)
Installing and removing the cargo compartment cover
*
The cover can be rolled out to conceal objects in the cargo compartment.
Installing the cargo compartment cover
Press the end piece on one side of the cover into the retaining bracket in the sidepanel of the cargo compartment.
Then put the other end piece in the recess in the side panel on the opposite side.
Push the end piece down on both sides, one at a time.
> When a click is heard and the red marks on each end piece are no longer visible, the cover is in place. Check thatit is secure. 4.
Fold out the cover's front flap to eliminate the gap between the cover and the rearseat backrest.
CAUTION
The flap has two plastic parts that hold it into place. Do not hang shopping bags or similar items on these plastic parts. They are notdesigned for this and could break.
If the cargo net
* is used at the same time as
the cargo compartment cover, the net has to be put into place first.
Page 591 of 683

MAINTENANCE AND SERVICE
}}
* Option/accessory.589
Hoisting the vehicle
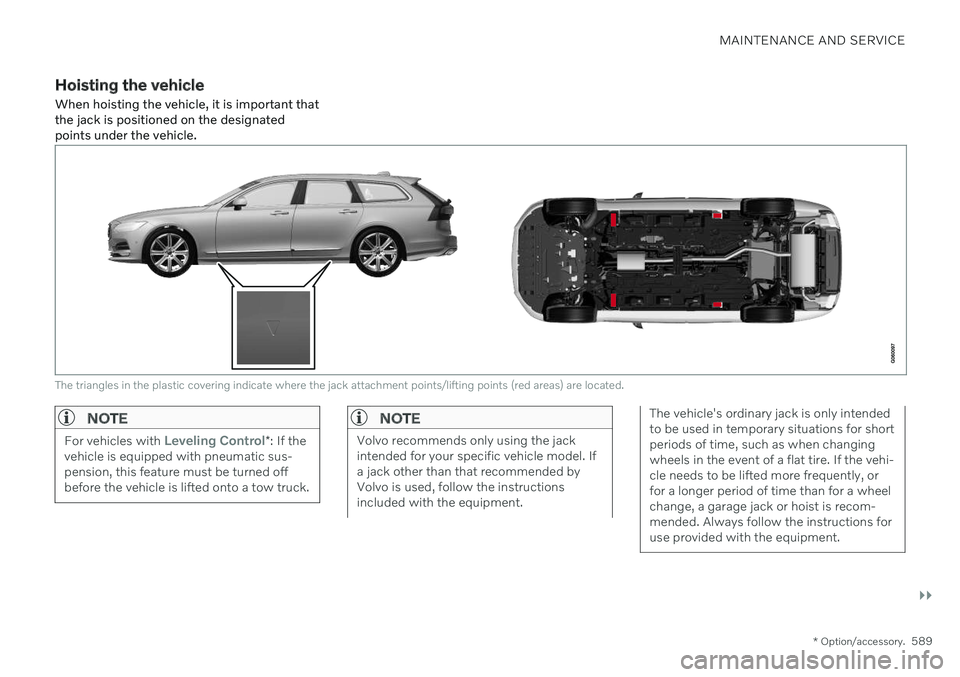
When hoisting the vehicle, it is important that the jack is positioned on the designatedpoints under the vehicle.
The triangles in the plastic covering indicate where the jack attachment points/lifting points (red areas) are located.
NOTE
For vehicles with Leveling Control* : If the
vehicle is equipped with pneumatic sus- pension, this feature must be turned offbefore the vehicle is lifted onto a tow truck.
NOTE
Volvo recommends only using the jack intended for your specific vehicle model. Ifa jack other than that recommended byVolvo is used, follow the instructionsincluded with the equipment.
The vehicle's ordinary jack is only intended to be used in temporary situations for shortperiods of time, such as when changingwheels in the event of a flat tire. If the vehi-cle needs to be lifted more frequently, orfor a longer period of time than for a wheelchange, a garage jack or hoist is recom-mended. Always follow the instructions foruse provided with the equipment.
Page 596 of 683

MAINTENANCE AND SERVICE
594
Engine compartment overview
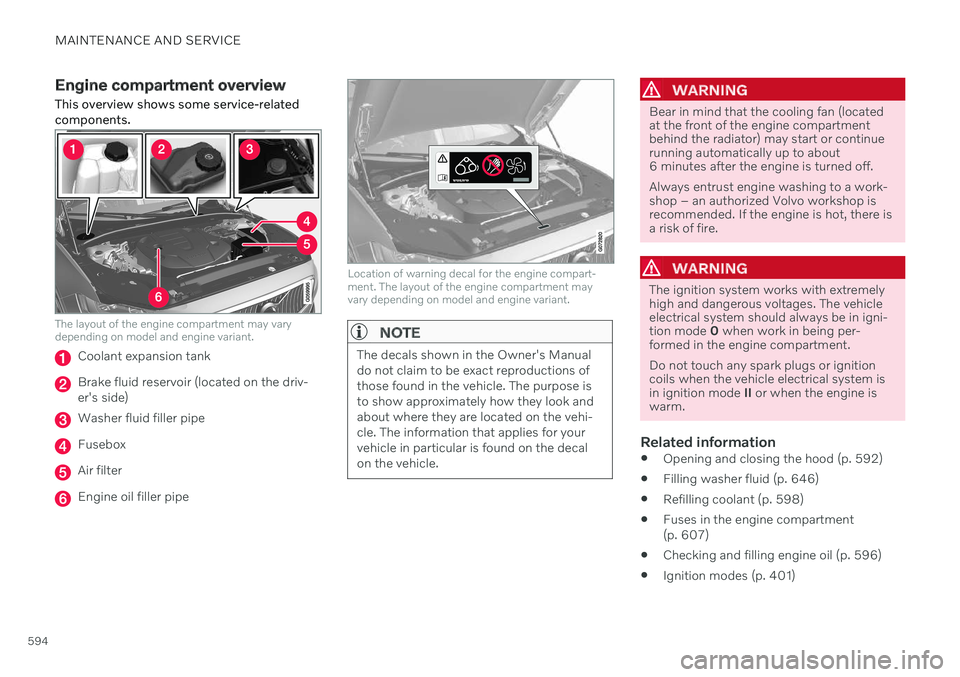
This overview shows some service-related components.
The layout of the engine compartment may vary depending on model and engine variant.
Coolant expansion tank
Brake fluid reservoir (located on the driv- er's side)
Washer fluid filler pipe
Fusebox
Air filter
Engine oil filler pipe
Location of warning decal for the engine compart- ment. The layout of the engine compartment mayvary depending on model and engine variant.
NOTE
The decals shown in the Owner's Manual do not claim to be exact reproductions ofthose found in the vehicle. The purpose isto show approximately how they look andabout where they are located on the vehi-cle. The information that applies for yourvehicle in particular is found on the decalon the vehicle.
WARNING
Bear in mind that the cooling fan (located at the front of the engine compartmentbehind the radiator) may start or continuerunning automatically up to about6 minutes after the engine is turned off. Always entrust engine washing to a work- shop – an authorized Volvo workshop isrecommended. If the engine is hot, there isa risk of fire.
WARNING
The ignition system works with extremely high and dangerous voltages. The vehicleelectrical system should always be in igni-tion mode 0 when work in being per-
formed in the engine compartment. Do not touch any spark plugs or ignition coils when the vehicle electrical system isin ignition mode II or when the engine is
warm.
Related information
Opening and closing the hood (p. 592)
Filling washer fluid (p. 646)
Refilling coolant (p. 598)
Fuses in the engine compartment (p. 607)
Checking and filling engine oil (p. 596)
Ignition modes (p. 401)
Page 597 of 683

MAINTENANCE AND SERVICE
}}
595
Engine oil For the recommended service intervals and warranties to be applied, an approved engineoil must be used.
Location of warning decal for the engine compart- ment. The layout of the engine compartment mayvary depending on model and engine variant.
Volvo recommends:
If the engine oil is not checked regularly and the level becomes low, this could cause seri-ous engine damage.
NOTE
The decals shown in the Owner's Manual do not claim to be exact reproductions ofthose found in the vehicle. The purpose isto show approximately how they look andabout where they are located on the vehi-cle. The information that applies for yourvehicle in particular is found on the decalon the vehicle.
CAUTION
To satisfy the requirements for the engine's service intervals, all engines are factory-filled with a specially adapted syntheticengine oil. Great care has been put into thechoice of oil, with consideration given toservice life, startability, fuel consumptionand environmental impact. For the recommended service intervals to apply, an approved engine oil must beused. Only use the prescribed oil grade totop off or change the oil. Otherwise, thereis a risk of the vehicle's service life, starta-bility, fuel consumption and environmentalimpact being affected. Failure to use engine oil of the prescribed grade and viscosity could cause damage toengine-related components. Volvo dis-claims warranty liability for such type ofdamage. Volvo recommends entrusting oil changes to an authorized Volvo workshop.
Symbols for low oil levelVolvo uses different systems to warn if the oil level is too low/high or the oil pressure is low.For oil pressure sensors, a warning symbol isdisplayed in the instrument panel when oil pressure is low
. For oil level sensors, the
warning symbol in the instrument panel
Page 599 of 683

MAINTENANCE AND SERVICE
597
Filling engine oil
Filler pipe12
,13
It may be necessary to top up engine oil between regularly scheduled services. Noaction is necessary with regard to engine oillevel until a message appears in the instru-ment panel.
WARNING
If the message Engine oil level Service
required is displayed, drive to a workshop
– an authorized Volvo workshop is recom- mended. The oil level may be too high.
WARNING
Do not spill oil on the hot exhaust pipes as this could cause a fire.
CAUTION
If the messageEngine oil level low Refill
1 liter is displayed, fill only with the speci-
fied volume, e.g. 1 liter (1 quart).
Related information
Engine oil (p. 595)
Engine oil specifications (p. 658)
Ignition modes (p. 401)
Vehicle status (p. 586)
Contacting Volvo (p. 26)
Coolant
The coolant helps ensure that excess heat is distributed in the circuit in order to, for exam-ple, warm up the start battery or provideheating to the passenger compartment.
To avoid deterioration of the cooling system, engine trouble, etc., only approved Volvo cool-ant should be used. Recommended grade: Volvo-approved pre-
mixed coolant. If concentrated coolant is used, mix with 50% water of acceptable quality (i.e.not salt water, etc.). Consult a Volvo retailer ifyou have any questions. To avoid deterioration of the cooling system, engine trouble, etc., only approved Volvo cool-ant should be used.
WARNING
Coolant is hazardous if ingested and could cause damage to organs (kidneys). Theproduct contains ethylene glycol, inhibitor,water, etc.
Related information
Refilling coolant (p. 598)
12
Engines with an electronic oil level sensor do not have a dipstick.
13 The layout of the engine compartment may vary depending on model and engine variant.