2021 TOYOTA YARIS CROSS cover
[x] Cancel search: coverPage 8 of 650

6
YARIS CROSS Owner's Manual_Europe_M52K60_en
Please note that this manual
applies to all models and explains
all equipment, including options.
Therefore, you may find some
explanations for equipment not
installed on your vehicle.
All specifications provided in this
manual are current at the time of
printing. However, because of the
Toyota policy of continual product
improvement, we reserve the right
to make changes at any time with-
out notice.
Depending on specifications, the
vehicle shown in the illustrations
may differ from your vehicle in
terms of equipment.
Both genuine Toyota and a wide
variety of other spare parts and
accessories for Toyota vehicles are
currently available on the market.
Should it be determined that any of
the genuine Toyota parts or acces-
sories supplied with the vehicle
need to be replaced, Toyota recom-
mends that genuine Toyota parts or
accessories, be used to replace
them. Other parts or accessories of
matching quality can also be used.
Toyota cannot accept any liability or
guarantee spare parts and acces-
sories which are not genuine
Toyota products, nor for replace-
ment or installation involving such
parts. In addition, damage or per-
formance problems resulting from
the use of non-genuine Toyota
spare parts or accessories may not
be covered under warranty.
Also, remodeling like this will have
an effect on advanced safety equip-
ment such as Toyota Safety Sense
and there is a danger that it will not
work properly or the danger that it
may work in situations where it
should not be working.
The installation of an RF-transmit-
ter system in your vehicle could
affect electronic systems such as:
Hybrid system
Multiport fuel injection sys-
tem/sequential multiport fuel
injection system
Toyota Safety Sense (if
equipped)
Dynamic radar cruise control
with full-speed range (if
equipped)
Anti-lock brake system
SRS airbag system
Seat belt pretensioner system
Be sure to check with any autho-
rized Toyota retailer or Toyota
For your information
Main Owner’s Manual
Accessories, spare parts
and modification of your
To y o t a
Installation of an RF-trans-
mitter system
Page 42 of 650

40
YARIS CROSS Owner's Manual_Europe_M52K60_en
1-1. For safe use
“PASSENGER AIR BAG” indicator
Airbag sensor assembly
The main SRS airbag system components are shown above. The SRS air-
bag system is controlled by the airbag sensor assembly. As the airbags
deploy, a chemical reaction in the inflators quickly fills the airbags with non-
toxic gas to help restrain the motion of the occupants.
■If the SRS airbags deploy (inflate)
●Slight abrasions, burns, bruising etc., may be sustained from SRS airbags,
due to the extremely high speed deployment (inflation) by hot gases.
●A loud noise and white powder will be emitted.
●Parts of the airbag module (steering wheel hub, airbag cover and inflator) as well as the front seats, parts of the
front and rear pillars, and roof side rails, may be hot for several minutes.
The airbag itself may also be hot.
●The windshield may crack.
●The hybrid system will be stopped and fuel supply to the engine will be
stopped. ( P.82)
●The brakes and stop lights will be con-
trolled automatically. ( P.337)
●The interior lights will turn on automat-
ically. ( P.359)
●The emergency flashers will turn on
automatically. ( P.430)
●Vehicles with eCall: If any of the fol-
lowing situations occur, the system is
designed to send an emergency call* to the eCall control center, notifying
them of the vehicle’s location (without needing to push the “SOS” button) and an agent will attempt to speak
with the occupants to ascertain the level of emergency and assistance required. If the occupants are unable
to communicate, the agent automati- cally treats the call as an emergency and helps to dispatch the necessary
emergency services. ( P.65) • An SRS airbag is deployed.
• A seat belt pretensioner is activated. • The vehicle is involved in a severe rear-end collision.*: In some cases, the call cannot be
made. ( P. 6 6 )
■SRS airbag deployment conditions
(SRS front airbags)
●The SRS front airbags will deploy in
the event of an impact that exceeds the set threshold level (the level of force corresponding to an approxi-
mately 20 - 30 km/h [12 - 18 mph] frontal collision with a fixed wall that does not move or deform).
However, this threshold velocity will be
considerably higher in the following situ-
ations:
• If the vehicle strikes an object, such as a parked vehicle or sign pole, which can move or deform on impact
• If the vehicle is involved in an under- ride collision, such as a collision in which the front of the vehicle “under-
rides”, or goes under, the bed of a truck
●Depending on the type of collision, it is possible that only the seat belt pretensioners will activate.
■SRS airbag deployment conditions
(SRS side and curtain shield air- bags and SRS front seat center air-bags)
●The SRS side and curtain shield air-bags and SRS front seat center air-
bags will deploy in the event of an impact that exceeds the set threshold level (the level of force corresponding
to the impact force produced by an approximately 1500 kg [3300 lb.] vehi-
Page 47 of 650

45
1
YARIS CROSS Owner's Manual_Europe_M52K60_en
1-1. For safe use
For safety and security
WARNING
●Do not use seat accessories which cover the parts where the SRS side
airbags and SRS front seat center airbags inflate as they may interfere with inflation of the SRS airbags.
Such accessories may prevent the SRS side airbags and SRS front seat center airbags from activating
correctly, disable the system or cause the SRS side airbags and SRS front seat center airbags to
inflate accidentally, resulting in death or serious injury.
●Do not strike or apply significant levels of force to the area of the SRS airbag components or the
front doors. Doing so can cause the SRS air-bags to malfunction.
●Do not touch any of the component parts immediately after the SRS air-
bags have deployed (inflated) as they may be hot.
●If breathing becomes difficult after the SRS airbags have deployed, open a door or window to allow
fresh air in, or leave the vehicle if it is safe to do so. Wash off any resi-due as soon as possible to prevent
skin irritation.
●If the areas where the SRS airbags
are stored, such as the steering wheel pad and front and rear pillar garnishes, are damaged or
cracked, have them replaced by any authorized Toyota retailer or Toyota authorized repairer, or any
reliable repairer.
■Modification and disposal of SRS airbag system components
Do not dispose of your vehicle or per-
form any of the following modifica- tions without consulting your Toyota retailer or Toyota authorized repairer,
or any reliable repairer. The SRS air- bags may malfunction or deploy (inflate) accidentally, causing death or
serious injury.
●Installation, removal, disassembly
and repair of the SRS airbags
●Repairs, modifications, removal or
replacement of the steering wheel, instrument panel, dashboard, seats or seat upholstery, front, side and
rear pillars, roof side rails, front door panels, front door trims or front door speakers
●Modifications to the front door panel (such as making a hole in it)
●Repairs or modifications of the front fender, front bumper, or side of the
occupant compartment
●Installation of a grille guard (bull
bars, kangaroo bar, etc.), snow plows or winches
●Modifications to the vehicle’s sus-pension system
●Installation of electronic devices such as mobile two-way radios (RF-transmitter) and CD players
Page 64 of 650

62
YARIS CROSS Owner's Manual_Europe_M52K60_en
1-2. Child safety
■ISOFIX lower anchorages
(ISOFIX child restraint system)
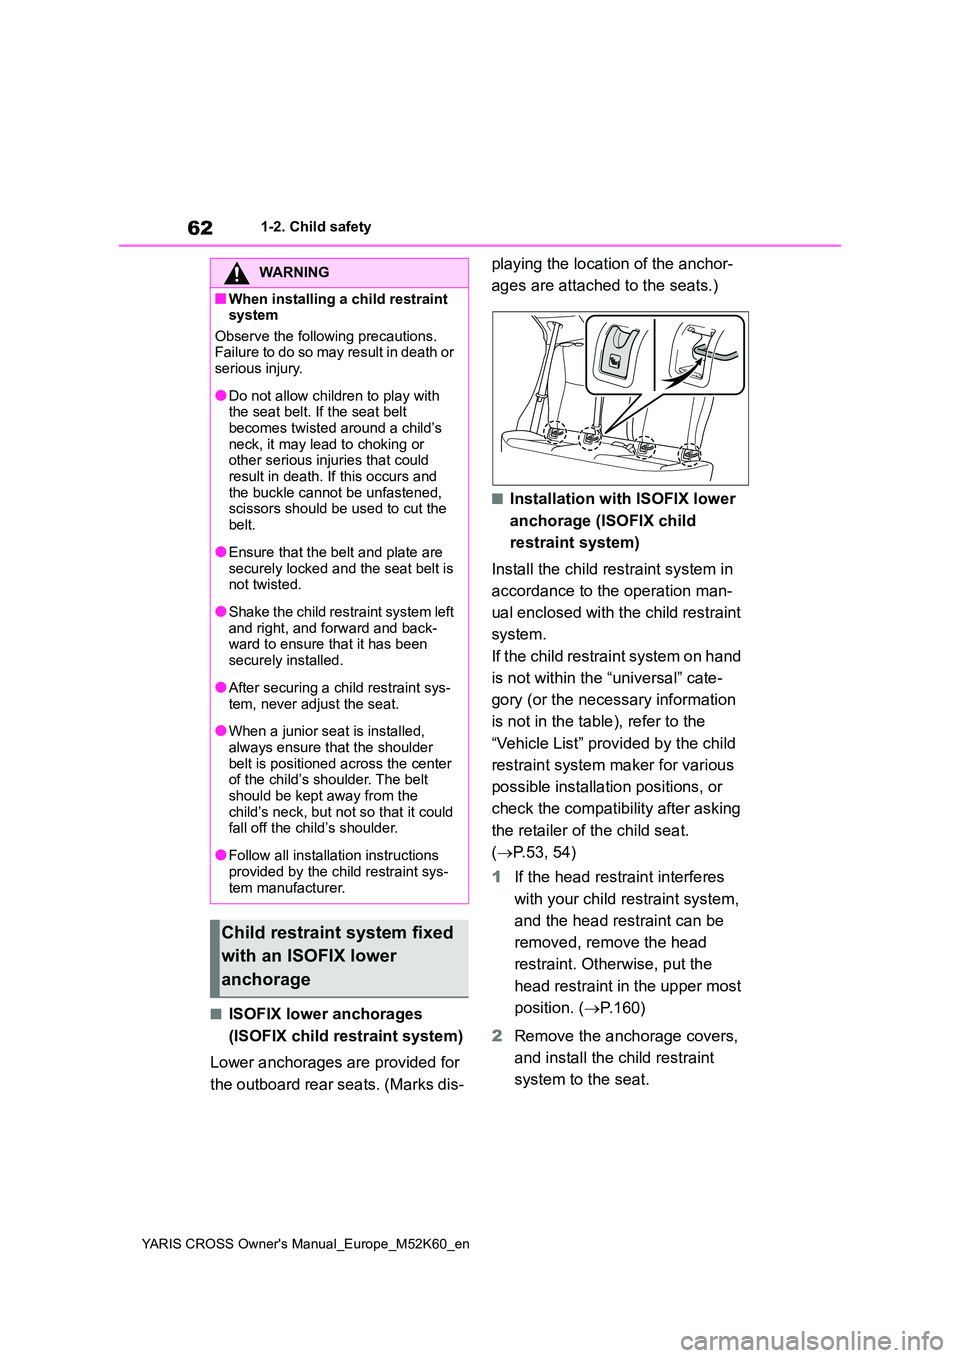
Lower anchorages are provided for
the outboard rear seats. (Marks dis-
playing the location of the anchor-
ages are attached to the seats.)
■Installation with ISOFIX lower
anchorage (ISOFIX child
restraint system)
Install the child restraint system in
accordance to the operation man-
ual enclosed with the child restraint
system.
If the child restraint system on hand
is not within the “universal” cate-
gory (or the necessary information
is not in the table), refer to the
“Vehicle List” provided by the child
restraint system maker for various
possible installation positions, or
check the compatibility after asking
the retailer of the child seat.
( P.53, 54)
1 If the head restraint interferes
with your child restraint system,
and the head restraint can be
removed, remove the head
restraint. Otherwise, put the
head restraint in the upper most
position. ( P.160)
2 Remove the anchorage covers,
and install the child restraint
system to the seat.
WARNING
■When installing a child restraint system
Observe the following precautions. Failure to do so may result in death or serious injury.
●Do not allow children to play with the seat belt. If the seat belt
becomes twisted around a child’s neck, it may lead to choking or other serious injuries that could
result in death. If this occurs and the buckle cannot be unfastened, scissors should be used to cut the
belt.
●Ensure that the belt and plate are
securely locked and the seat belt is not twisted.
●Shake the child restraint system left and right, and forward and back-ward to ensure that it has been
securely installed.
●After securing a child restraint sys-
tem, never adjust the seat.
●When a junior seat is installed,
always ensure that the shoulder belt is positioned across the center of the child’s shoulder. The belt
should be kept away from the child’s neck, but not so that it could fall off the child’s shoulder.
●Follow all installation instructions provided by the child restraint sys-
tem manufacturer.
Child restraint system fixed
with an ISOFIX lower
anchorage
Page 65 of 650

63
1
YARIS CROSS Owner's Manual_Europe_M52K60_en
1-2. Child safety
For safety and security
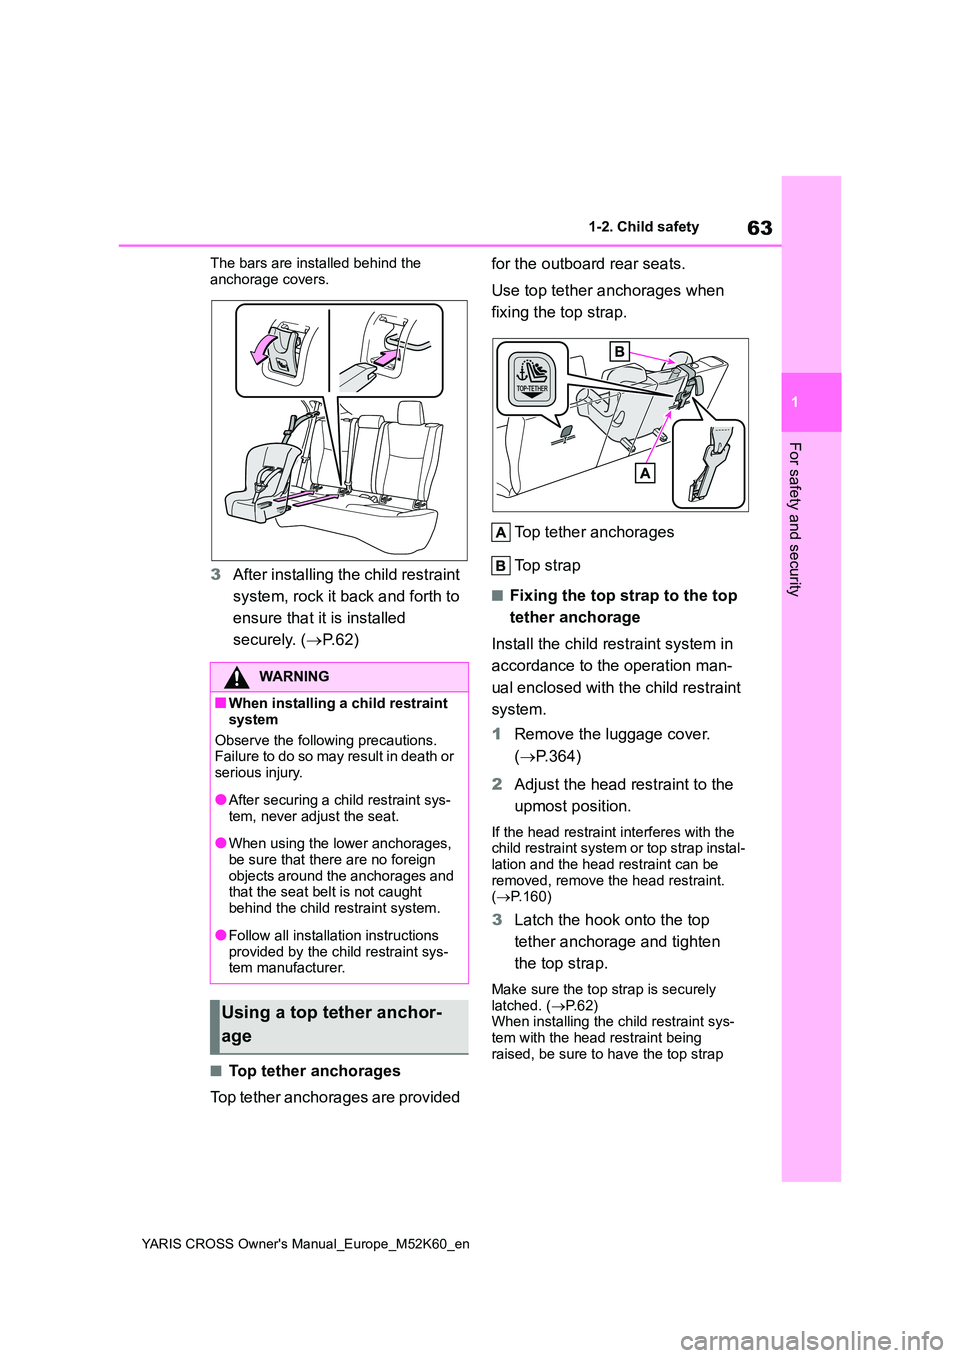
The bars are installed behind the
anchorage covers.
3 After installing the child restraint
system, rock it back and forth to
ensure that it is installed
securely. ( P. 6 2 )
■Top tether anchorages
Top tether anchorages are provided
for the outboard rear seats.
Use top tether anchorages when
fixing the top strap.
Top tether anchorages
Top strap
■Fixing the top strap to the top
tether anchorage
Install the child restraint system in
accordance to the operation man-
ual enclosed with the child restraint
system.
1 Remove the luggage cover.
( P.364)
2 Adjust the head restraint to the
upmost position.
If the head restraint interferes with the child restraint system or top strap instal-
lation and the head restraint can be removed, remove the head restraint. ( P.160)
3Latch the hook onto the top
tether anchorage and tighten
the top strap.
Make sure the top strap is securely latched. ( P. 6 2 ) When installing the child restraint sys-
tem with the head restraint being raised, be sure to have the top strap
WARNING
■When installing a child restraint
system
Observe the following precautions. Failure to do so may result in death or
serious injury.
●After securing a child restraint sys-
tem, never adjust the seat.
●When using the lower anchorages,
be sure that there are no foreign objects around the anchorages and that the seat belt is not caught
behind the child restraint system.
●Follow all installation instructions
provided by the child restraint sys- tem manufacturer.
Using a top tether anchor-
age
Page 66 of 650

64
YARIS CROSS Owner's Manual_Europe_M52K60_en
1-2. Child safety
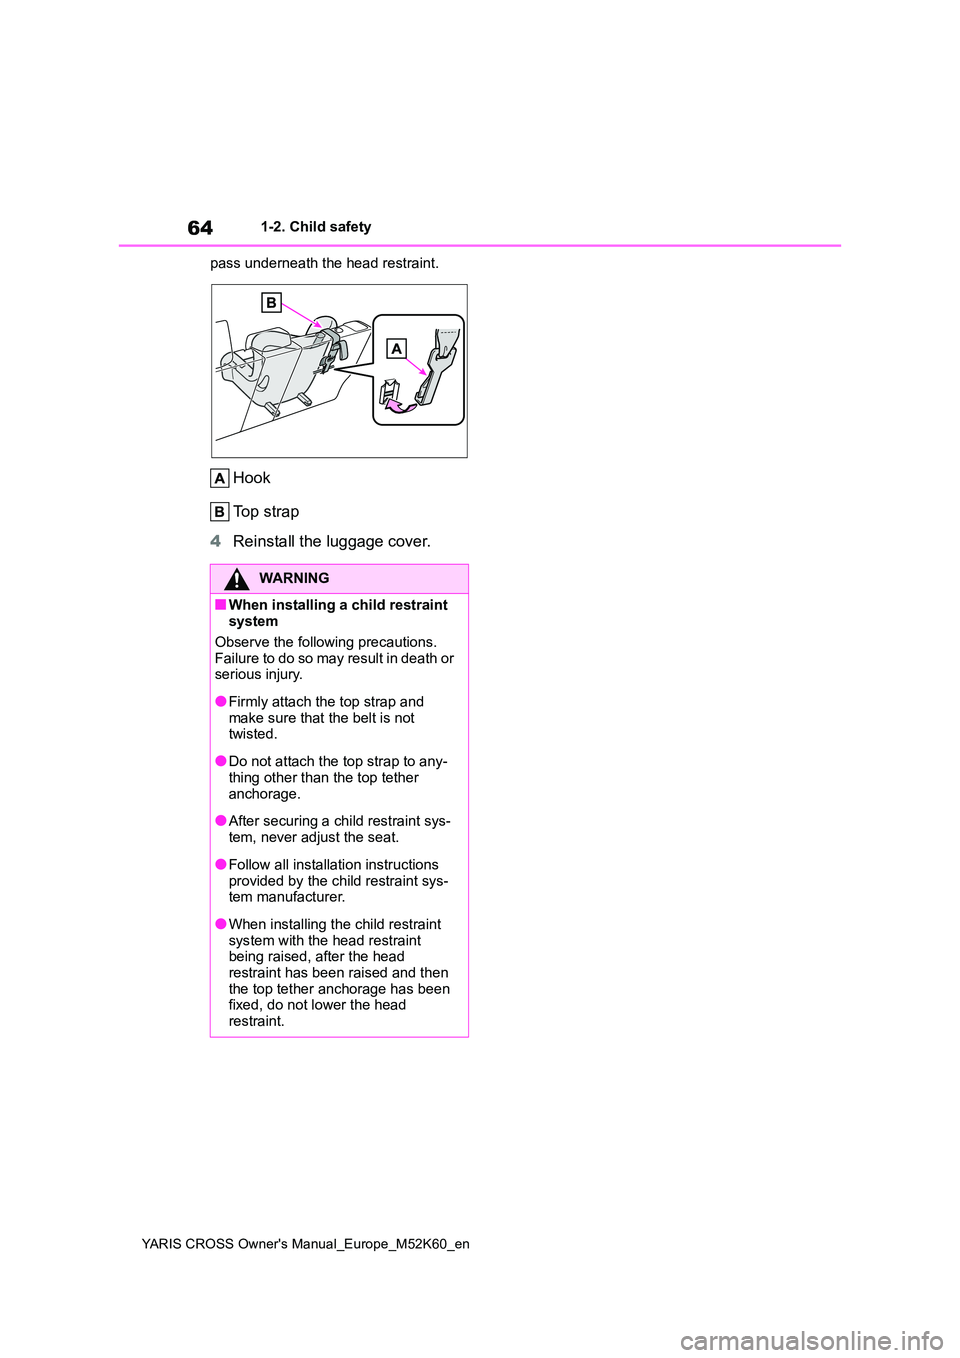
pass underneath the head restraint.
Hook
Top strap
4 Reinstall the luggage cover.
WARNING
■When installing a child restraint system
Observe the following precautions.
Failure to do so may result in death or serious injury.
●Firmly attach the top strap and make sure that the belt is not twisted.
●Do not attach the top strap to any-thing other than the top tether
anchorage.
●After securing a child restraint sys-
tem, never adjust the seat.
●Follow all installation instructions
provided by the child restraint sys- tem manufacturer.
●When installing the child restraint system with the head restraint being raised, after the head
restraint has been raised and then the top tether anchorage has been fixed, do not lower the head
restraint.
Page 67 of 650

65
1
YARIS CROSS Owner's Manual_Europe_M52K60_en
1-3. Emergency assistance
For safety and security
1-3.Emerg ency as sista nce
*1: If equipped
*2: Operates within the eCall coverage.
The system name differs depending
on the country.
Microphone
“SOS” button*
Indicator lights
Speaker
*: This button is intended for communi-
cation with the eCall system operator.
Other SOS buttons available in other
systems of a motor vehicle do not
relate to the device and are not
intended for communication with the
eCall system operator.
■Automatic Emergency Calls
If any airbag deploys, the system is
designed to automatically call the
eCall control center.* The answer-
ing operator receives the vehicle’s
location, the time of the incident
and the vehicle VIN, and attempts
to speak with the vehicle occupants
to assess the situation. If the occu-
pants are unable to communicate,
the operator automatically treats
the call as an emergency and con-
tacts the nearest emergency ser-
vices provider (112 system etc.) to
describe the situation and request
that assistance be sent to the loca-
tion.
*: In some cases, the call cannot be
made. ( P. 6 6 )
■Manual Emergency Calls
In the event of an emergency, press
the “SOS” button to call the eCall
control center.* The answering
operator will determine your vehi-
cle’s location, assess the situation,
and dispatch the necessary assis-
eCall*1, 2
eCall is a telematics service
that uses Global Navigation
Satellite System (GNSS) data
and embedded cellular tech-
nology to enable the following
emergency calls to be made:
Automatic emergency calls
(Automatic Collision Notifica-
tion) and manual emergency
calls (by pressing the “SOS”
button). This service is
required by European Union
Regulations.
System components
Emergency Notification Ser-
vices
Page 68 of 650

66
YARIS CROSS Owner's Manual_Europe_M52K60_en
1-3. Emergency assistance
tance required.
Make sure to open the cover before
pressing the “SOS” button.
If you accidentally press the “SOS” but-
ton, tell the operator that you are not
experiencing an emergency.
*: In some cases, the call cannot be
made. ( P. 6 6 )
When the power switch is turned to
ON, the red indicator light will illumi-
nate for 10 seconds and then the
green indicator light will illuminate,
indicating that the system is
enabled. The indicator lights indi-
cate the following:
If the green indicator light illumi-
nates and stays on, the system is
enabled.
If the green indicator light
flashes, an automatic or manual
Emergency Call is being made.
If the red indicator light illumi-
nates at any time other than
immediately after the power
switch is turned to ON, the sys-
tem may be malfunctioning or
the backup battery may be
depleted.
If the red indicator light blinks for
approximately 30 seconds during
an Emergency Call, the call has
been disconnected or the cellular
network signal is weak.
Indicator lights
WARNING
■When the Emergency Call may
not be made
●It may not be possible to make Emergency Calls in any of the fol-
lowing situations. In such cases, report to emergency services pro-vider (112 system etc.) by other
means such as nearby public phones.
• Even when the vehicle is in the cel- lular phone service area, it may be difficult to connect to the eCall con-
trol center if the reception is poor or the line is busy. In such cases, even though the system attempts to con-
nect to the eCall control center, you may not be able to connect to the eCall control center to make Emer-
gency Calls and contact emergency services.
• When the vehicle is out of the cellu- lar phone service area, the Emer-gency Calls cannot be made.
• When any related equipment (such as the “SOS” button panel, indicator
lights, microphone, speaker, DCM, antenna, or any wires connecting the equipment) is malfunctioning,
damaged or broken, the Emer- gency Call cannot be made.