Page 437 of 650

435
7
YARIS CROSS Owner's Manual_Europe_M52K60_en
7-2. Steps to take in an emergency
When trouble arises
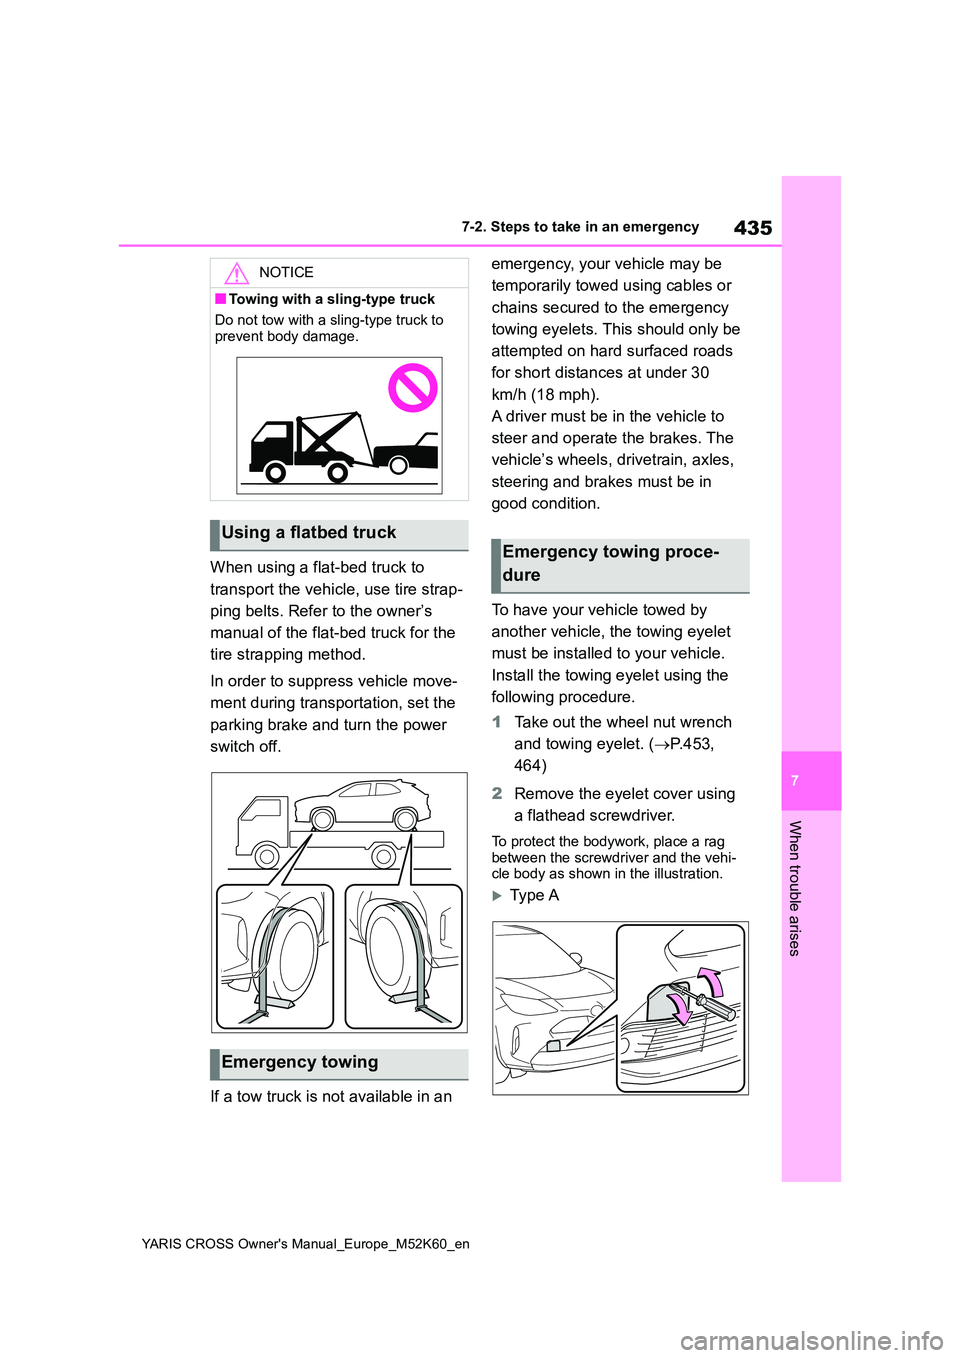
When using a flat-bed truck to
transport the vehicle, use tire strap-
ping belts. Refer to the owner’s
manual of the flat-bed truck for the
tire strapping method.
In order to suppress vehicle move-
ment during transportation, set the
parking brake and turn the power
switch off.
If a tow truck is not available in an
emergency, your vehicle may be
temporarily towed using cables or
chains secured to the emergency
towing eyelets. This should only be
attempted on hard surfaced roads
for short distances at under 30
km/h (18 mph).
A driver must be in the vehicle to
steer and operate the brakes. The
vehicle’s wheels, drivetrain, axles,
steering and brakes must be in
good condition.
To have your vehicle towed by
another vehicle, the towing eyelet
must be installed to your vehicle.
Install the towing eyelet using the
following procedure.
1 Take out the wheel nut wrench
and towing eyelet. ( P. 4 5 3 ,
464)
2 Remove the eyelet cover using
a flathead screwdriver.
To protect the bodywork, place a rag between the screwdriver and the vehi-cle body as shown in the illustration.
Typ e A
NOTICE
■Towing with a sling-type truck
Do not tow with a sling-type truck to
prevent body damage.
Using a flatbed truck
Emergency towing
Emergency towing proce-
dure
Page 446 of 650

444
YARIS CROSS Owner's Manual_Europe_M52K60_en
7-2. Steps to take in an emergency
■Toyota parking assist-sensor OFF indicator* (warning buzzer)
*: This light illuminates on the multi-information display (with 7-inch display only).
■RCTA OFF indicator* (warning buzzer)
*: This light illuminates on the multi-information display (with 7-inch display only).
Warning lightDetails/Actions
(Flashes)
(if equipped)
Indicates a malfunction in the Toyota parking assist-sensor fun c-
tion
Have the vehicle inspected by any authorized Toyota
retailer or Toyota authorized repairer, or any reliable
repairer immediately.
Indicates that the system is temporarily unavailable, possibly due
to a sensor being dirty or covered with ice, etc.
Follow the instructions displayed on the multi-information
display. ( P.278)
Warning lightDetails/Actions
(Flashes)
(if equipped)
Indicates a malfunction in the RCTA (Rear Crossing Traffic Aler t)
function
Have the vehicle inspected by any authorized Toyota
retailer or Toyota authorized repairer, or any reliable
repairer immediately.
Indicates that the rear bumper around the radar sensor is cover ed
with dirt, etc. ( P.271)
Follow the instructions displayed on the multi-information
display. ( P.286)
Page 447 of 650

445
7
YARIS CROSS Owner's Manual_Europe_M52K60_en
7-2. Steps to take in an emergency
When trouble arises
■PKSB OFF indicator*
*: This light illuminates on the multi-information display (with 7-inch display only).
■PCS warning light
Warning lightDetails/Actions
(if equipped)
When a buzzer sounds:
Indicates a malfunction in the PKSB (Parking Support Brake) sys -
tem
Have the vehicle inspected by any authorized Toyota
retailer or Toyota authorized repairer, or any reliable
repairer immediately.
When a buzzer does not sound:
Indicates that the system is temporarily unavailable, possibly due
to a sensor being dirty or covered with ice, etc.
Follow the instructions displayed on the multi-information
display. ( P.295, 449)
Warning lightDetails/Actions
(Flashes or illumi- nates)
(if equipped)
When a buzzer sounds simultaneously:
Indicates a malfunction has occurred in the PCS (Pre-Collision
System).
Have the vehicle inspected by any authorized Toyota
retailer or Toyota authorized repairer, or any reliable
repairer immediately.
When a buzzer does not sound:
The PCS (Pre-Collision System) has become temporarily unavail-
able, corrective action may be necessary.
Follow the instructions displayed on the multi-information
display. ( P.229, 449)
If the PCS (Pre-Collision System) or VSC (Vehicle Stability Con-
trol) system is disabled, the PCS warning light will illuminate .
P. 3 3 7
Page 458 of 650
456
YARIS CROSS Owner's Manual_Europe_M52K60_en
7-2. Steps to take in an emergency
1Open the deck board and floor
cover. ( P.363)
2 Take out the emergency tire
puncture repair kit. ( P.453)
2WD models
AWD models
1 Attach the sticker provided with
the tire puncture repair kit to a
position easily seen from the
driver’s seat.
2 Remove the valve cap from the
valve of the punctured tire.
3 Remove the cap from the noz-
zle.
4 Connect the nozzle to the valve.
Screw the end of the nozzle clockwise
as far as possible. The bottle should hang vertically without contacting the ground. If the bottle does not hang ver-
tically, move the vehicle so that the tire
Taking out the emergency
tire puncture repair kit
Emergency repair method
Page 467 of 650

465
7
YARIS CROSS Owner's Manual_Europe_M52K60_en
7-2. Steps to take in an emergency
When trouble arises
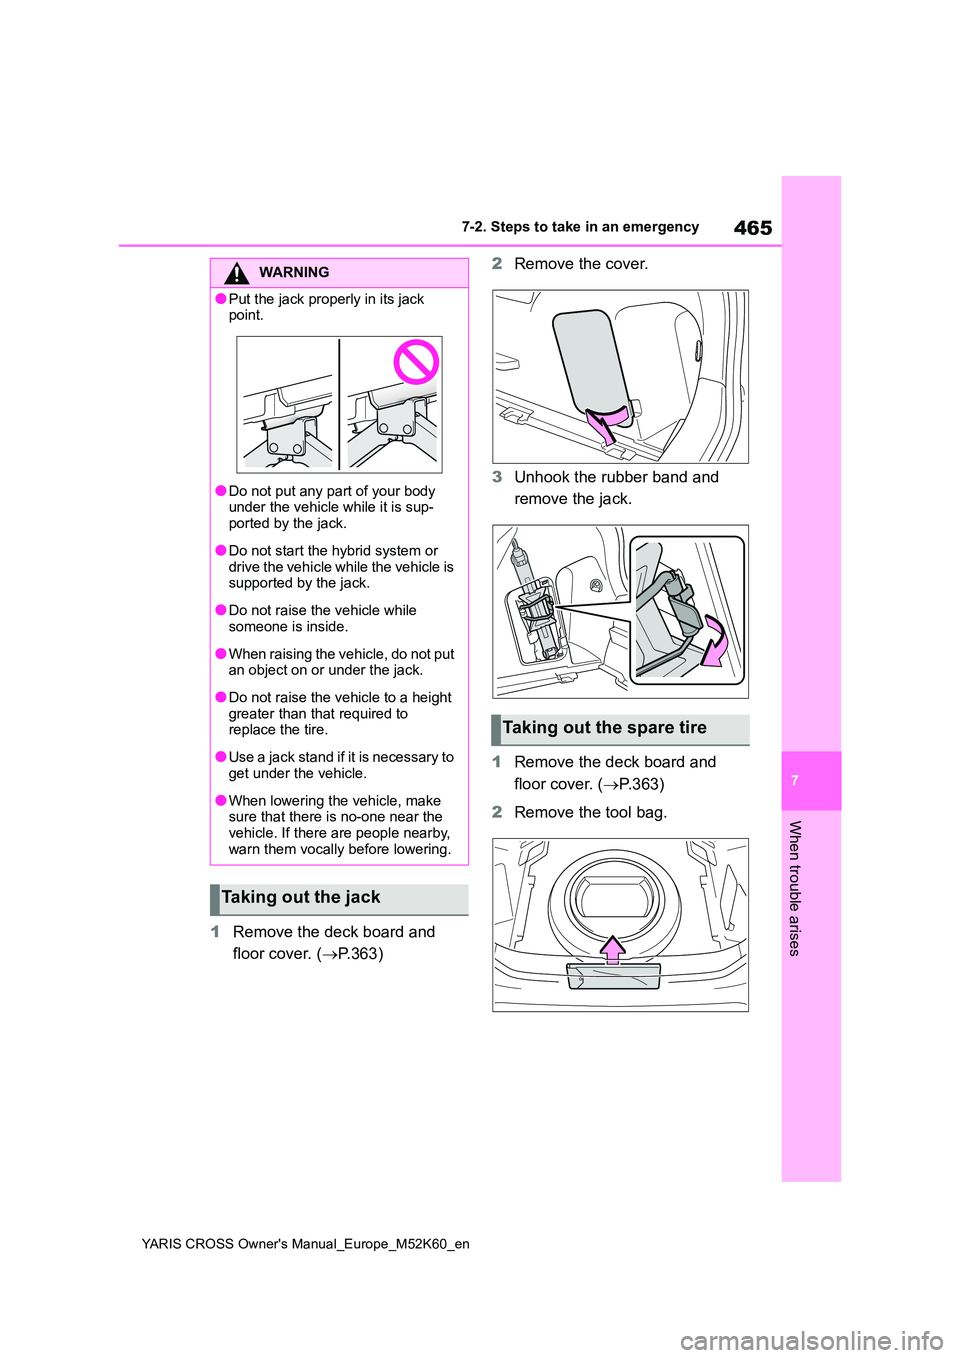
1Remove the deck board and
floor cover. ( P.363)
2 Remove the cover.
3 Unhook the rubber band and
remove the jack.
1 Remove the deck board and
floor cover. ( P.363)
2 Remove the tool bag.
WARNING
●Put the jack properly in its jack point.
●Do not put any part of your body under the vehicle while it is sup-
ported by the jack.
●Do not start the hybrid system or
drive the vehicle while the vehicle is supported by the jack.
●Do not raise the vehicle while someone is inside.
●When raising the vehicle, do not put an object on or under the jack.
●Do not raise the vehicle to a height greater than that required to replace the tire.
●Use a jack stand if it is necessary to get under the vehicle.
●When lowering the vehicle, make sure that there is no-one near the
vehicle. If there are people nearby, warn them vocally before lowering.
Taking out the jack
Taking out the spare tire
Page 472 of 650

470
YARIS CROSS Owner's Manual_Europe_M52K60_en
7-2. Steps to take in an emergency
system. Also, if you replace the compact
spare tire after the tire pressure warning light comes on, the light remains on.
■If you have a flat rear tire (vehicles
with a compact spare tire in some
countries*)
Do not install the compact spare tire to rear axles.
Install the compact spare tire on one of the front wheels of the vehicle.
1 Replace a front tire with the compact spare tire.
2 Replace the flat rear tire with the tire
removed from the front of the vehi- cle.*: Guadelope, Martinique, F. Guiana,
Ceuta & Melilla, Ukraine, Turkey, New
Caledonia, Tahiti, Morocco
■If you have a flat front tire on a road covered with snow or ice (vehicles
with a compact spare tire)
Install the compact spare tire on one of the rear wheels of the vehicle. Perform
the following steps and fit tire chains to the front tires:
1 Replace a rear tire with the compact spare tire.
2 Replace the flat front tire with the tire
removed from the rear of the vehicle.
3 Fit tire chains to the front tires.
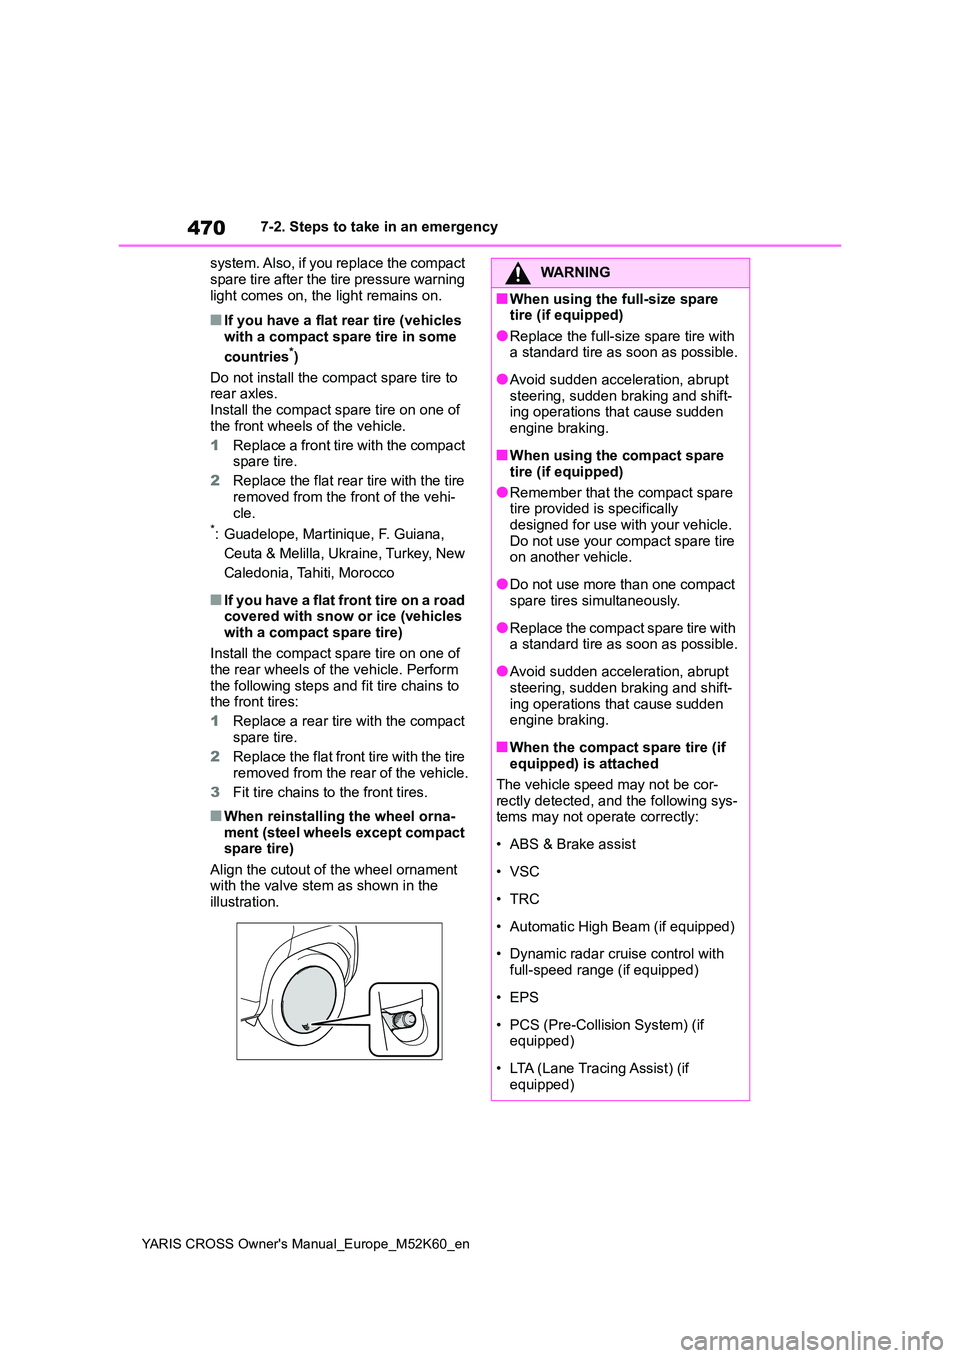
■When reinstalling the wheel orna- ment (steel wheels except compact spare tire)
Align the cutout of the wheel ornament with the valve stem as shown in the illustration.
WARNING
■When using the full-size spare tire (if equipped)
●Replace the full-size spare tire with a standard tire as soon as possible.
●Avoid sudden acceleration, abrupt steering, sudden braking and shift-ing operations that cause sudden
engine braking.
■When using the compact spare
tire (if equipped)
●Remember that the compact spare tire provided is specifically
designed for use with your vehicle. Do not use your compact spare tire on another vehicle.
●Do not use more than one compact spare tires simultaneously.
●Replace the compact spare tire with a standard tire as soon as possible.
●Avoid sudden acceleration, abrupt steering, sudden braking and shift-
ing operations that cause sudden engine braking.
■When the compact spare tire (if equipped) is attached
The vehicle speed may not be cor-
rectly detected, and the following sys- tems may not operate correctly:
• ABS & Brake assist
• VSC
•TRC
• Automatic High Beam (if equipped)
• Dynamic radar cruise control with
full-speed range (if equipped)
• EPS
• PCS (Pre-Collision System) (if equipped)
• LTA (Lane Tracing Assist) (if equipped)
Page 478 of 650

476
YARIS CROSS Owner's Manual_Europe_M52K60_en
7-2. Steps to take in an emergency
If you have a set of jumper (or
booster) cables and a second vehi-
cle with a 12-volt battery, you can
jump start your vehicle by following
the steps below.
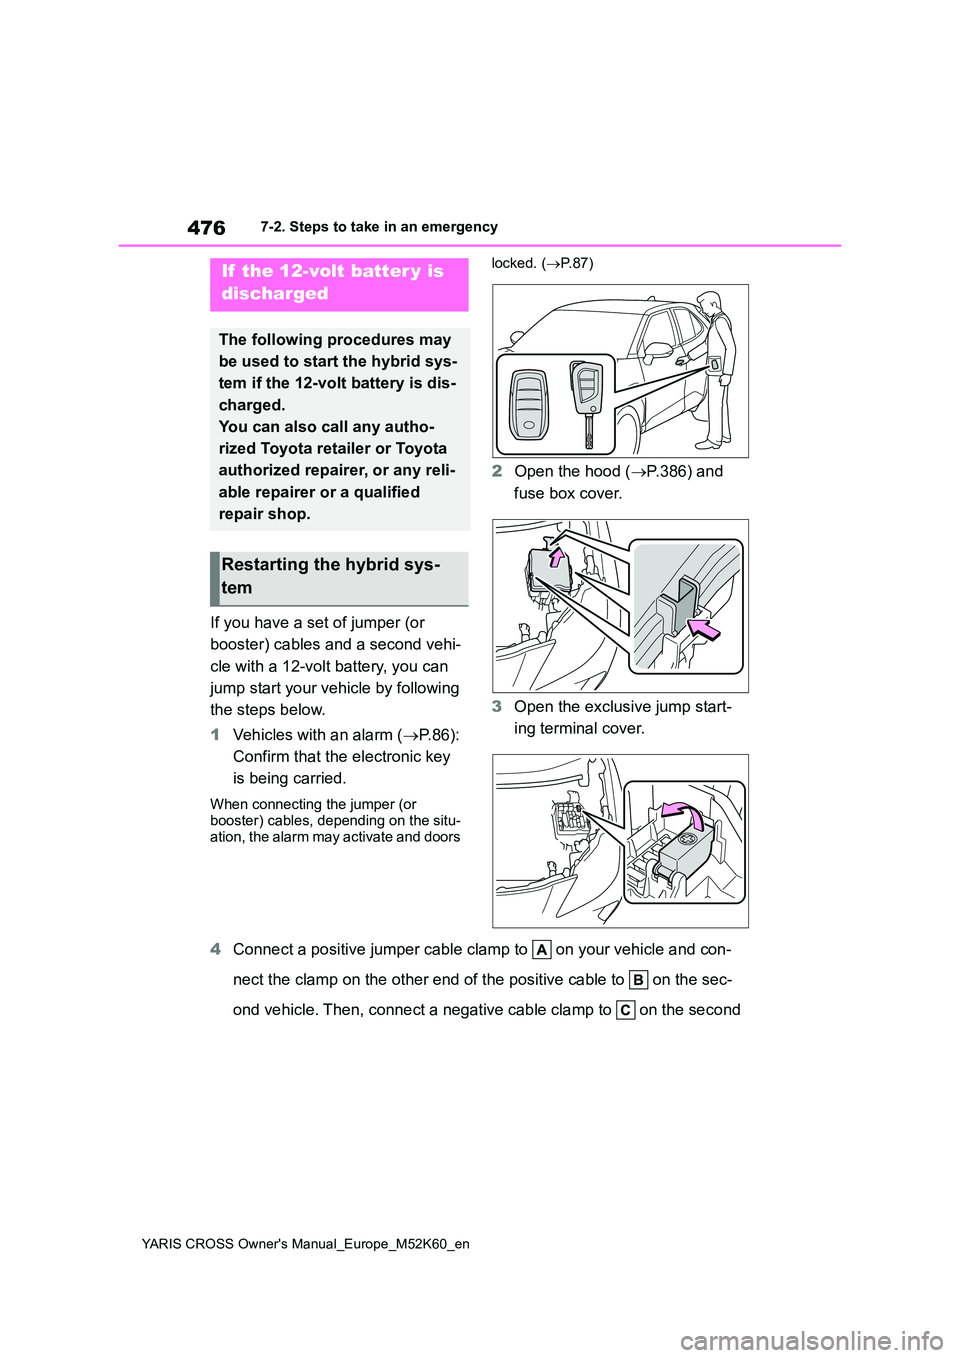
1 Vehicles with an alarm (P. 8 6 ) :
Confirm that the electronic key
is being carried.
When connecting the jumper (or booster) cables, depending on the situ-
ation, the alarm may activate and doors
locked. ( P. 8 7 )
2Open the hood (P.386) and
fuse box cover.
3 Open the exclusive jump start-
ing terminal cover.
4 Connect a positive jumper cable clamp to on your vehicle and con-
nect the clamp on the other end of the positive cable to on th e sec-
ond vehicle. Then, connect a negative cable clamp to on the se cond
If the 12-volt batter y is
discharged
The following procedures may
be used to start the hybrid sys-
tem if the 12-volt battery is dis-
charged.
You can also call any autho-
rized Toyota retailer or Toyota
authorized repairer, or any reli-
able repairer or a qualified
repair shop.
Restarting the hybrid sys-
tem
Page 479 of 650

477
7
YARIS CROSS Owner's Manual_Europe_M52K60_en
7-2. Steps to take in an emergency
When trouble arises
vehicle and connect the clamp at the other end of the negative cable to
.
Exclusive jump starting terminal (your vehicle)
Positive (+) battery terminal (second vehicle)
Negative (-) battery terminal (second vehicle)
Solid, stationary, unpainted metallic point away from the exclu sive jump
starting terminal and any moving parts as shown in the illustra tion
5 Start the engine of the second
vehicle. Increase the engine
speed slightly and maintain at
that level for approximately 5
minutes to recharge the 12-volt
battery of your vehicle.
6 Vehicles with a smart entry &
start system: Open and close
any of the doors of your vehicle
with the power switch OFF.
7 Maintain the engine speed of
the second vehicle and start the
hybrid system of your vehicle by
turning the power switch to ON.
8 Make sure the “READY” indica-
tor comes on. If the indicator
does not come on, contact any
authorized Toyota retailer or
Toyota authorized repairer, or
any reliable repairer.
9 Once the hybrid system has
started, remove the jumper
cables in the exact reverse
order from which they were con-
nected.
10 Close the exclusive jump start-
ing terminal cover and install the
fuse box cover to its original
position.
Once the hybrid system starts,
have the vehicle inspected at any
authorized Toyota retailer or Toyota