Page 59 of 124
4. Select a paired phone or pair a new phone
(see page 94 and page 98 in the How To
Appendix). Then select “Next”.
5. Enter a Home Address and Work Address
(if equipped with navigation). Then select
“Next”.
6. Select a Wallpaper then select “Next”.
7. Select “Finish”.
Retrieving a Driver Profile
The system automatically retrieves the profile once you are in your Subaru with the radio
on and your phone’s Bluetooth®active. You can also manually retrieve or change the
profile by following these steps:
1. Press the “Home” button and then select “Settings”.
2. Select “Driver Profile”, select the profile you want to use, and select “Activate”.
DRIVER PROFILE
57
Page 61 of 124
Presets
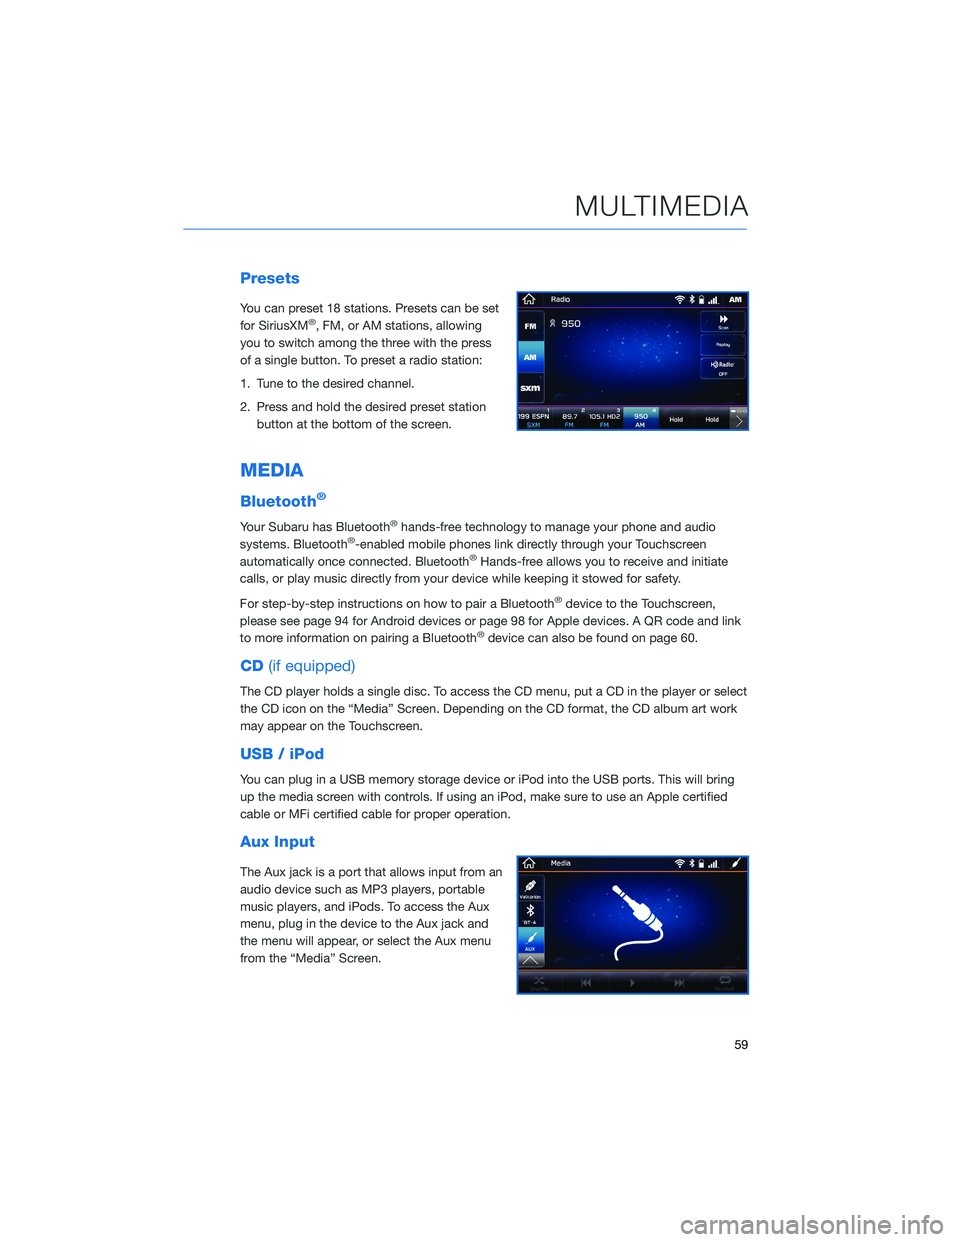
You can preset 18 stations. Presets can be set
for SiriusXM®, FM, or AM stations, allowing
you to switch among the three with the press
of a single button. To preset a radio station:
1. Tune to the desired channel.
2. Press and hold the desired preset station
button at the bottom of the screen.
MEDIA
Bluetooth®
Your Subaru has Bluetooth®hands-free technology to manage your phone and audio
systems. Bluetooth®-enabled mobile phones link directly through your Touchscreen
automatically once connected. Bluetooth®Hands-free allows you to receive and initiate
calls, or play music directly from your device while keeping it stowed for safety.
For step-by-step instructions on how to pair a Bluetooth
®device to the Touchscreen,
please see page 94 for Android devices or page 98 for Apple devices. A QR code and link
to more information on pairing a Bluetooth
®device can also be found on page 60.
CD(if equipped)
The CD player holds a single disc. To access the CD menu, put a CD in the player or select
the CD icon on the “Media” Screen. Depending on the CD format, the CD album art work
may appear on the Touchscreen.
USB / iPod
You can plug in a USB memory storage device or iPod into the USB ports. This will bring
up the media screen with controls. If using an iPod, make sure to use an Apple certified
cable or MFi certified cable for proper operation.
Aux Input
The Aux jack is a port that allows input from an
audio device such as MP3 players, portable
music players, and iPods. To access the Aux
menu, plug in the device to the Aux jack and
the menu will appear, or select the Aux menu
from the “Media” Screen.
MULTIMEDIA
59
Page 62 of 124
PAIRING A PHONE
To begin using your Bluetooth®Hands-free device you must first
pair your phone with the system. Phone pairing provides access to
the contact list on your phone and allows you to use the voice
recognition system to make and receive calls. The system can also
read incoming text messages, as well as allowing you to reply to
texts or send short messages. The system automatically reconnects
to your Bluetooth
®device and will remember your driver profile.
For instructions on how to pair your phone to the Touchscreen,
see page 94 for Android devices or page 98 for Apple devices.
Visithttps://www.subaru.com/owners/index.htmlfor complete
details on what is available by connecting a phone to the Touchscreen.
MAKING A CALL
You can make a call through voice recognition by
pressing the “Voice Recognition Switch” on the
steering wheel. After pressing the “Voice Recognition
Switch”, wait for the “Voice Guidance” screen to
appear on the Touchscreen and say “Call [name and
phone type]” or “Dial [number]”.
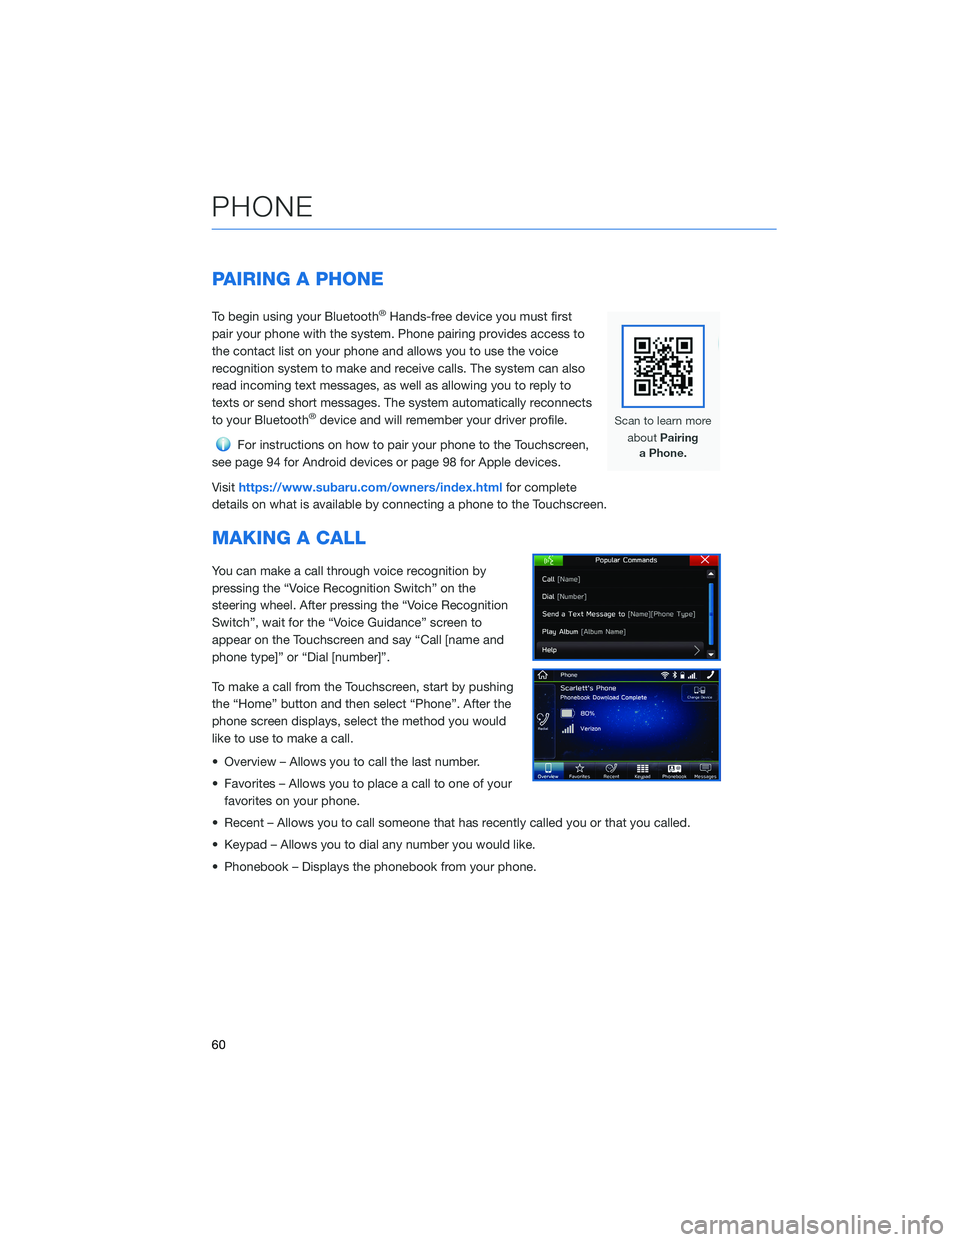
To make a call from the Touchscreen, start by pushing
the “Home” button and then select “Phone”. After the
phone screen displays, select the method you would
like to use to make a call.
• Overview – Allows you to call the last number.
• Favorites – Allows you to place a call to one of your
favorites on your phone.
• Recent – Allows you to call someone that has recently called you or that you called.
• Keypad – Allows you to dial any number you would like.
• Phonebook – Displays the phonebook from your phone.
PHONE
60
Page 64 of 124
TEXT MESSAGES
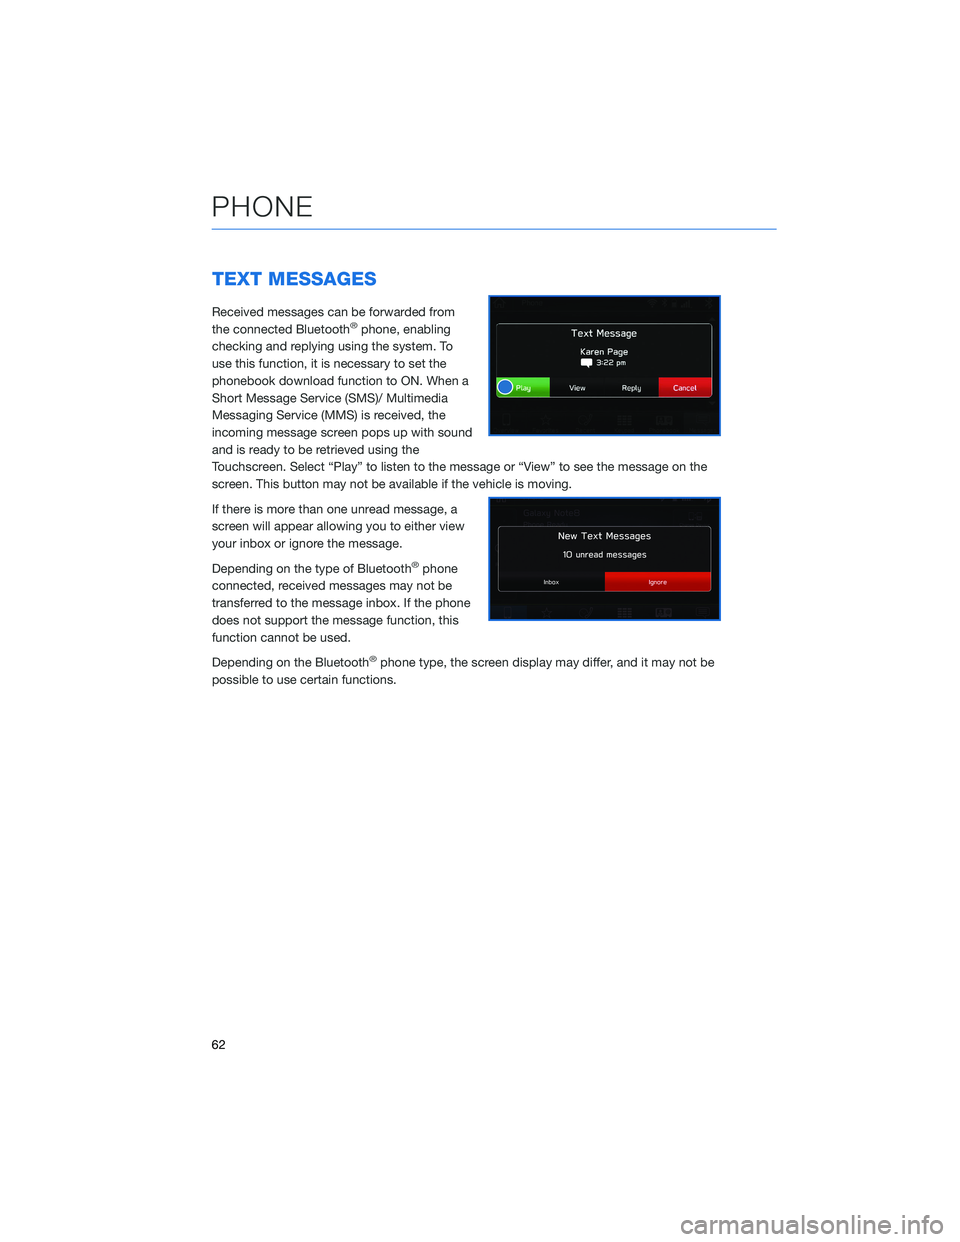
Received messages can be forwarded from
the connected Bluetooth®phone, enabling
checking and replying using the system. To
use this function, it is necessary to set the
phonebook download function to ON. When a
Short Message Service (SMS)/ Multimedia
Messaging Service (MMS) is received, the
incoming message screen pops up with sound
and is ready to be retrieved using the
Touchscreen. Select “Play” to listen to the message or “View” to see the message on the
screen. This button may not be available if the vehicle is moving.
If there is more than one unread message, a
screen will appear allowing you to either view
your inbox or ignore the message.
Depending on the type of Bluetooth
®phone
connected, received messages may not be
transferred to the message inbox. If the phone
does not support the message function, this
function cannot be used.
Depending on the Bluetooth
®phone type, the screen display may differ, and it may not be
possible to use certain functions.
PHONE
62
Page 65 of 124
SUBARU STARLINK®IN-VEHICLE APPS
SUBARU STARLINK®Multimedia offers advanced connectivity
through Apple CarPlay®, Android Auto™, and Pandora®apps.
Wireless pairing and hands-free smartphone operation allow for
safe and easy connection to your favorite apps and content. You
can access news, navigation, music, podcasts, and more through
the available SUBARU STARLINK
®app.
For a complete list of all the apps available, visit
www.subaru.com/engineering/starlink/multimedia.html.
aha™ by HARMAN
aha is a cloud-based application that connects to the system and
gives you access to your favorite web content safely and easily.
There are thousands of available stations spanning internet radio,
personalized music, audiobooks, Facebook, Twitter, restaurant and
hotel searches, weather and more. For more about aha, visit
www.aharadio.com.
To use the aha application, connect your iPhone or Android device
via Bluetooth
®. When connecting an iPhone or Android device with
the aha application installed, you can control, view, and hear aha
content through the system.
With the 8.0-inch Multimedia Navigation function, you may also display Points Of Interest
(POI) information from the aha application on the map screen and route to these POIs.
Pandora®
Pandora is a free, personalized radio that offers effortless and endless music enjoyment.
To use the Pandora application, first install the Pandora application on your smartphone.
Then connect your iPhone or Android device via Bluetooth
®.
NOTE: Some vehicles might be incompatible with this app depending on difference
between models and software version.
APPS
63
Page 71 of 124
SAFETY AND SECURITY OVERVIEW
STARLINK®Safety and Security services* are designed to help in your time of need. These
include Advanced Automatic Collision Notification, SOS Emergency Assistance, Enhanced
Roadside Assistance, Stolen Vehicle Recovery, the added convenience of Remote Engine
Start with Climate Control, and so much more.
With the SUBARU STARLINK
®system integrated into your vehicle, advanced safety and
security technology is just a button press away. The SUBARU STARLINK®experience
includes in-vehicle call center support, maintenance and diagnostic alerts as well as
remote services that keep you connected to your Subaru vehicle.
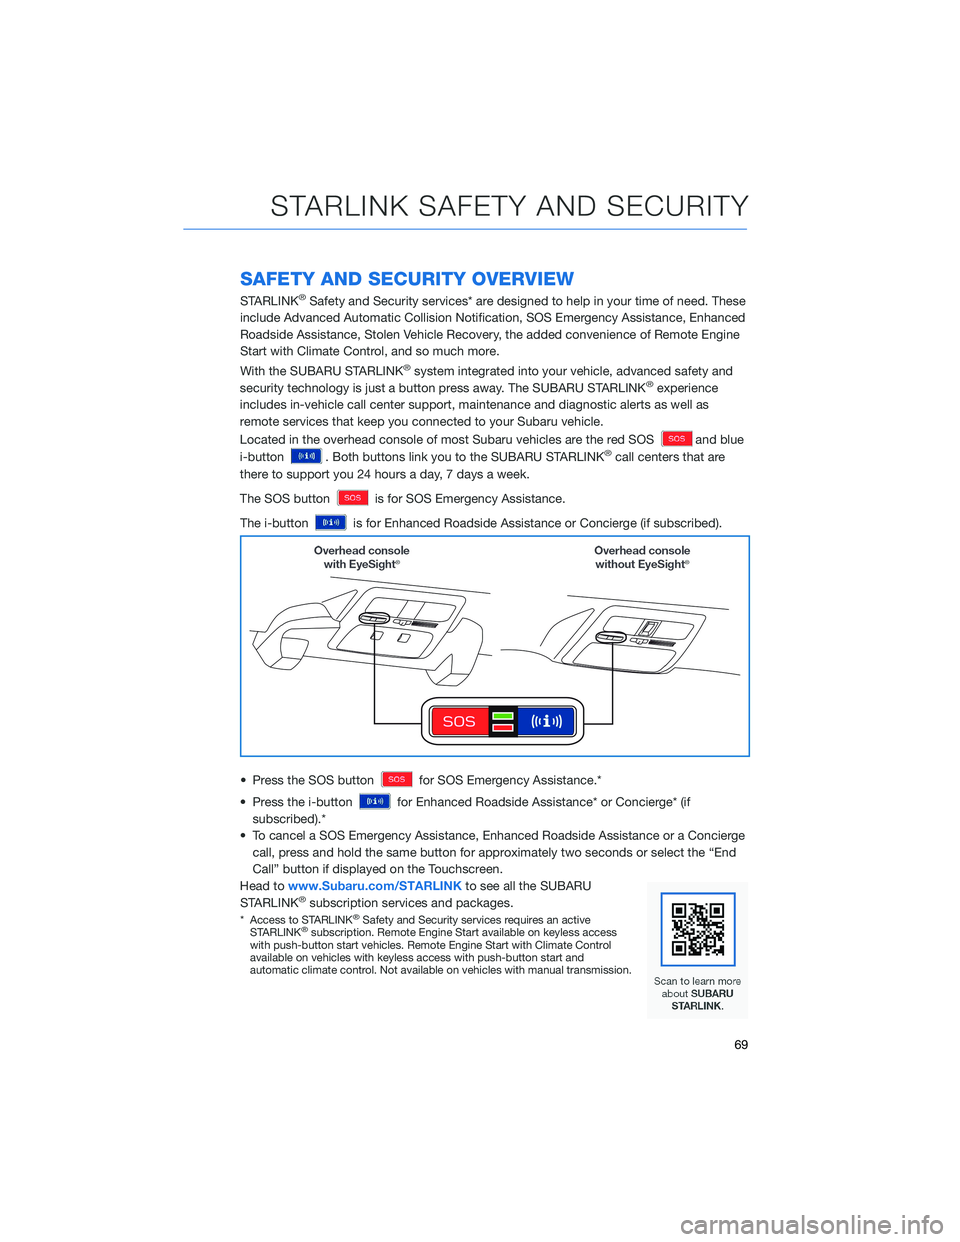
Located in the overhead console of most Subaru vehicles are the red SOS
and blue
i-button
. Both buttons link you to the SUBARU STARLINK®call centers that are
there to support you 24 hours a day, 7 days a week.
The SOS button
is for SOS Emergency Assistance.
The i-button
is for Enhanced Roadside Assistance or Concierge (if subscribed).
• Press the SOS button
for SOS Emergency Assistance.*
• Press the i-button
for Enhanced Roadside Assistance* or Concierge* (if
subscribed).*
• To cancel a SOS Emergency Assistance, Enhanced Roadside Assistance or a Concierge
call, press and hold the same button for approximately two seconds or select the “End
Call” button if displayed on the Touchscreen.
Head towww.Subaru.com/STARLINKto see all the SUBARU
STARLINK
®subscription services and packages.
* Access to STARLINK®Safety and Security services requires an active
STARLINK®subscription. Remote Engine Start available on keyless access
with push-button start vehicles. Remote Engine Start with Climate Control
available on vehicles with keyless access with push-button start and
automatic climate control. Not available on vehicles with manual transmission.
STARLINK SAFETY AND SECURITY
69
Page 75 of 124
SOUND
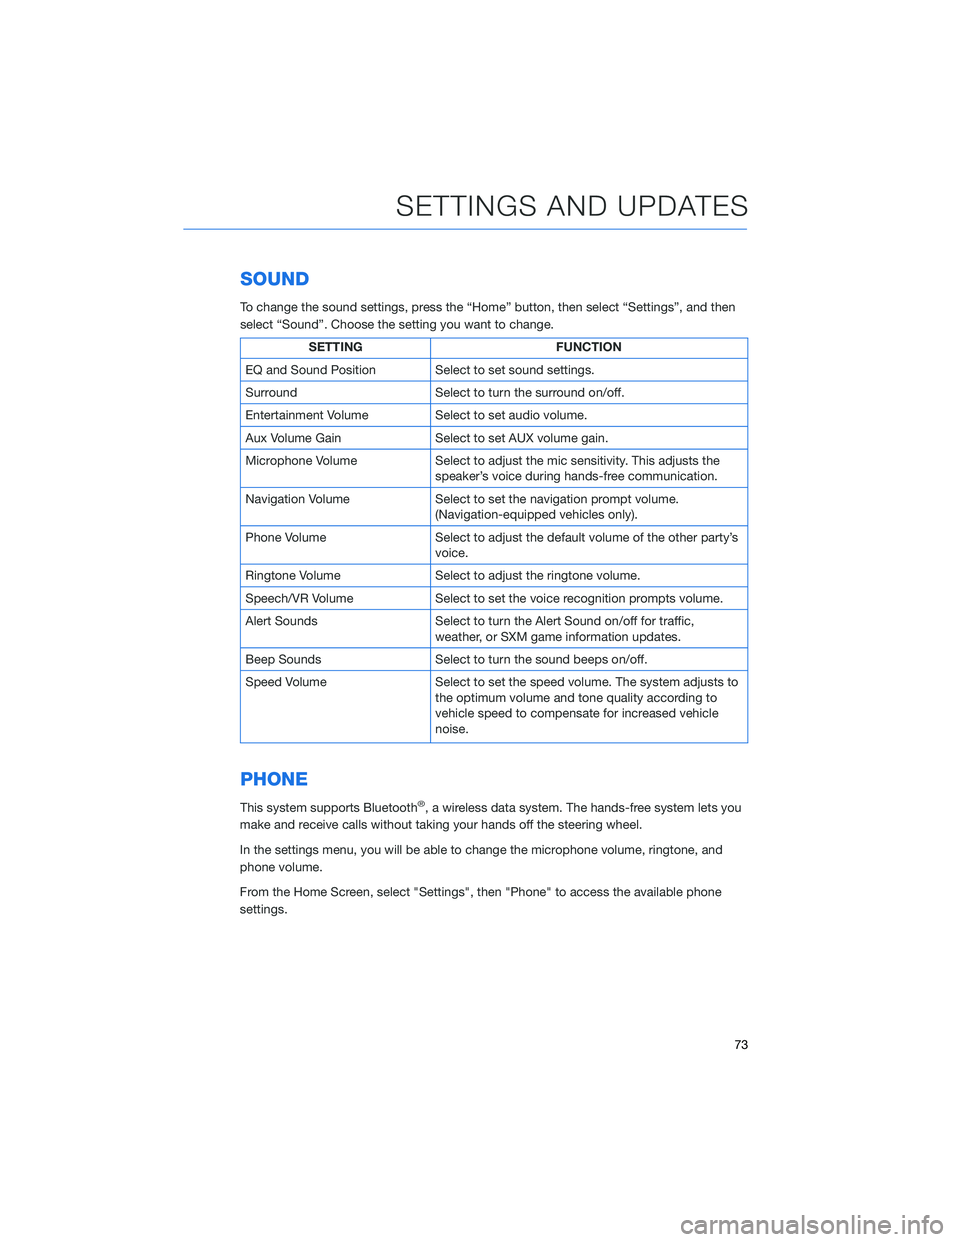
To change the sound settings, press the “Home” button, then select “Settings”, and then
select “Sound”. Choose the setting you want to change.
SETTING FUNCTION
EQ and Sound Position Select to set sound settings.
Surround Select to turn the surround on/off.
Entertainment Volume Select to set audio volume.
Aux Volume Gain Select to set AUX volume gain.
Microphone Volume Select to adjust the mic sensitivity. This adjusts the
speaker’s voice during hands-free communication.
Navigation Volume Select to set the navigation prompt volume.
(Navigation-equipped vehicles only).
Phone Volume Select to adjust the default volume of the other party’s
voice.
Ringtone Volume Select to adjust the ringtone volume.
Speech/VR Volume Select to set the voice recognition prompts volume.
Alert Sounds Select to turn the Alert Sound on/off for traffic,
weather, or SXM game information updates.
Beep Sounds Select to turn the sound beeps on/off.
Speed Volume Select to set the speed volume. The system adjusts to
the optimum volume and tone quality according to
vehicle speed to compensate for increased vehicle
noise.
PHONE
This system supports Bluetooth®, a wireless data system. The hands-free system lets you
make and receive calls without taking your hands off the steering wheel.
In the settings menu, you will be able to change the microphone volume, ringtone, and
phone volume.
From the Home Screen, select "Settings", then "Phone" to access the available phone
settings.
SETTINGS AND UPDATES
73
Page 78 of 124
CLOCK
The clock can be set manually or automatically. When set to “Auto”, the clock
automatically adjusts when a Bluetooth®connected phone is paired (vehicles without
navigation), or through the GPS signal (vehicles with navigation system).
Manually
Use the STARLINK®Touchscreen to set the clock:
1Press the “Home” button.
2Select “Settings”.
3Select “Vehicle”.
4Select “Time/Date”.
5Select “Mode”.
6Select “Manual”.
7Now adjust the time and date using the “+” and
“-” buttons. Select the check mark when finished.
For black-and-white Multi-Function Display
(MFD), use the “+” and “-” buttons next to the
clock.
SETTINGS AND UPDATES
76