2021 RAM PROMASTER CITY trailer
[x] Cancel search: trailerPage 5 of 280

3
INSTRUMENT CLUSTER DISPLAY ......................44 Location And Controls ................................. 45
Change Engine Oil — If Equipped................ 46
Instrument Cluster Display Menu Items..... 46
TRIP COMPUTER ...................................................47
Trip Button.................................................... 48
Trip Functions ............................................. 48
Values Displayed ......................................... 49
WARNING LIGHTS AND MESSAGES ..................49
Red Warning Lights...................................... 49
Yellow Warning Lights ................................. 52
Green Indicator Lights ................................. 55
Blue Indicator Lights .................................... 56
ONBOARD DIAGNOSTIC SYSTEM — OBD II .......56
Onboard Diagnostic System (OBD II)
Cybersecurity................................................ 56
EMISSIONS INSPECTION AND MAINTENANCE
PROGRAMS ...........................................................57
STARTING AND OPERATING
STARTING THE ENGINE .......................................58
Automatic Transmission .............................. 58
Normal Starting ............................................ 58
Cold Weather Operation ............................. 58
Extended Park Starting................................ 58
If Engine Fails To Start ................................ 59
After Starting ................................................ 59
ENGINE BLOCK HEATER — IF EQUIPPED ...........59
ENGINE BREAK-IN RECOMMENDATIONS .........60
PARKING BRAKE .................................................60 AUTOMATIC TRANSMISSION ............................. 62
Key Ignition Park Interlock .......................... 62
Brake/Transmission Shift Interlock (BTSI)
System ......................................................... 63 Nine-Speed Automatic Transmission ........ 63
POWER STEERING .............................................. 67
Power Steering Fluid Check ....................... 68
CRUISE CONTROL — IF EQUIPPED ..................... 68
To Activate.................................................... 69
To Set A Desired Speed............................... 69
To Vary The Speed Setting .......................... 69
To Accelerate For Passing ........................... 69
To Resume Speed ....................................... 70
To Deactivate .............................................. 70
PARKSENSE REAR PARK ASSIST —
IF EQUIPPED ......................................................... 70
ParkSense Rear Park Assist Sensors ......... 70
ParkSense Rear Park Assist Alerts ............. 71
ParkSense Rear Park Assist Failure
Indications.................................................... 72 Cleaning The ParkSense Rear Park Assist
System .......................................................... 72 ParkSense Rear Park Assist System Usage
Precautions .................................................. 72
PARKVIEW REAR BACK UP CAMERA ............... 73
REFUELING THE VEHICLE ................................... 74 VEHICLE LOADING ................................................75
Vehicle Certification Label .......................... 75
Gross Vehicle Weight Rating (GVWR) ......... 76
Gross Axle Weight Rating (GAWR) ............. 76
Tire Size ........................................................ 76
Rim Size ....................................................... 76
Inflation Pressure ........................................ 76
Curb Weight ................................................. 76
Overloading .................................................. 76
Loading......................................................... 76
TRAILER TOWING .................................................77
Common Towing Definitions ....................... 77
Trailer Hitch Classification .......................... 78
Trailer Towing Weights (Maximum Trailer
Weight Ratings) ........................................... 79 Trailer And Tongue Weight ......................... 79
Towing Requirements ................................ 79
Towing Tips ................................................. 82
RECREATIONAL TOWING (BEHIND
MOTORHOME) ......................................................83
Towing This Vehicle Behind Another
Vehicle .......................................................... 83 Recreational Towing — Automatic
Transmission................................................ 83
DRIVING TIPS ........................................................84
Driving On Slippery Surfaces ..................... 84
Driving Through Water ............................... 84
21_VM_OM_EN_USC_t.book Page 3
Page 53 of 280

GETTING TO KNOW YOUR INSTRUMENT PANEL51
Door Open Warning Light
This indicator will illuminate when one
or more door(s) are not fully closed.
NOTE:
If the vehicle is moving and a door is opened,
there will also be a single chime.
Electronic Throttle Control (ETC) Warning
Light
This warning light will illuminate to
inform of a problem with the ETC
system. If a problem is detected while
the vehicle is running, the light will
either stay on or flash depending on the nature
of the problem. Cycle the ignition when the
vehicle is safely and completely stopped and
the transmission is placed in the PARK (P)
position. The light should turn off. If the light
remains on with the vehicle running, your
vehicle will usually be drivable; however, see an
authorized dealer for service as soon as
possible. If the light continues to flash when the vehicle is
running, immediate service is required and you
may experience reduced performance, an
elevated/rough idle, or engine stall and your
vehicle may require towing. The light will come
on when the ignition is placed in the ON/RUN or
MAR/ON/RUN position and remain on briefly as
a bulb check. If the light does not come on
during starting, have the system checked by an
authorized dealer.Engine Coolant Temperature Warning Light
This warning light warns of an
overheated engine condition. If the
engine coolant temperature is too
high, this indicator will illuminate and
a single chime will sound. If the temperature
reaches the upper limit, a continuous chime will
sound for four minutes or until the engine is
able to cool, whichever comes first.
If the light turns on while driving, safely pull over
and stop the vehicle. If the Air Conditioning
(A/C) system is on, turn it off. Also, shift the
transmission into NEUTRAL (N) and idle the
vehicle. If the temperature reading does not
return to normal, turn the engine off
immediately and call for service Ú page 207.
Oil Pressure Warning Light
This warning light will illuminate to
indicate low engine oil pressure. If the
light turns on while driving, stop the
vehicle, shut off the engine as soon as
possible, and contact an authorized dealer. A
chime will sound when this light turns on.
Do not operate the vehicle until the cause is
corrected. This light does not indicate how
much oil is in the engine. The engine oil level
must be checked under the hood.
Transmission Temperature Warning Light — If
Equipped
This warning light will illuminate to
warn of a high transmission fluid
temperature. This may occur with
strenuous usage such as trailer
towing. If this light turns on, stop the vehicle and
run the engine at idle or slightly faster, with the
transmission in PARK (P) or NEUTRAL (N), until
the light turns off. Once the light turns off, you
may continue to drive normally.
3
21_VM_OM_EN_USC_t.book Page 51
Page 54 of 280

52GETTING TO KNOW YOUR INSTRUMENT PANEL
Seat Belt Reminder Warning Light
When the ignition is first placed in the
ON/RUN or MAR/ON/RUN position, if
the driver’s seat belt is unbuckled, a
chime will sound and the light will turn
on. When driving, if the driver or front passenger
seat belt remains unbuckled, the Seat Belt
Reminder Light will flash or remain on
continuously and a chime will sound
Ú page 153.
Transmission Fault Warning Light
This light will illuminate (together with
a message in the instrument cluster
display and a buzzer) to indicate a
transmission fault. Contact an
authorized dealer if the message remains after
restarting the engine.
Engine Oil Level Warning Light
This warning light appears on the
panel when the engine oil level falls
below the minimum recommended
value. Restore the correct engine oil
level or contact your authorized dealer for
service.
Yellow Warning Lights
Anti-Lock Brake System (ABS) Warning Light
This light monitors the ABS. The light
will turn on when the ignition is placed
in the ON/RUN or MAR/ON/RUN
position and may stay on for as long
as four seconds.
If the ABS light remains on or turns on while
driving, then the Anti-Lock portion of the brake
system is not functioning and service is
required. However, the conventional brake system will continue to operate normally if the
brake warning light is not on.
If the ABS light is on, the brake system should
be serviced as soon as possible to restore the
benefits of Anti-Lock Brakes. If the ABS light
does not turn on when the ignition is placed in
the ON/RUN or MAR/ON/RUN position, have
the light inspected by an authorized dealer.
Low Fuel Warning Light
When the fuel level reaches
approximately 2–3 gal (9–11 L) this
light will turn on, and remain on until
fuel is added.
Generic Warning Light
The Generic Warning Light will
illuminate if any of the following
conditions occur: Engine Oil Pressure
Sensor Failure, External Light Failure,
Parking Sensor Failure, Fuel Cut-Off Fail/
Intervention, Generic Failure on Trailer, or Air
Bag telltale recovery.
The telltale will blink in case of an Air Bag
Warning Light Failure. Contact an authorized
dealer immediately for service.
WARNING!
If you continue operating the vehicle when
the Transmission Temperature Warning Light
is illuminated you could cause the fluid to boil
over, come in contact with hot engine or
exhaust components and cause a fire.
CAUTION!
Continuous driving with the Transmission
Temperature Warning Light illuminated will
eventually cause severe transmission
damage or transmission failure.
21_VM_OM_EN_USC_t.book Page 52
Page 68 of 280

66STARTING AND OPERATING
DRIVE (D)
This range should be used for most city and
highway driving. It provides the smoothest
upshifts and downshifts, and the best fuel
economy. The transmission automatically
upshifts through all forward gears.
When frequent transmission shifting occurs
(such as when operating the vehicle under
heavy loading conditions, in hilly terrain,
traveling into strong head winds, or while towing
a heavy trailer), use the Electronic Range Select
(ERS) shift control to select a lower gear range
Úpage 67. Under these conditions, using a
lower gear range will improve performance and
extend transmission life by reducing excessive
shifting and heat buildup.
If the transmission temperature exceeds
normal operating limits, the transmission
controller may modify the transmission shift
schedule, reduce engine torque, and/or expand
the range of torque converter clutch
engagement. This is done to prevent
transmission damage due to overheating.
If the transmission becomes extremely hot, the
“Transmission Temperature Warning Light” may
illuminate and the transmission may operate
differently until the transmission cools down. During cold temperatures, transmission
operation may be modified depending on
engine and transmission temperature as well
as vehicle speed. This feature improves warm
up time of the engine and transmission to
achieve maximum efficiency. Engagement of
the torque converter clutch, and shifts into
8th or 9th gear, are inhibited until the
transmission fluid is warm Ú
page 67. Normal
operation will resume once the transmission
temperature has risen to a suitable level.
Transmission Limp Home Mode
Transmission function is monitored
electronically for abnormal conditions. If a
condition is detected that could result in
transmission damage, Transmission Limp
Home Mode is activated. In this mode, the
transmission may operate only in a fixed gear,
or may remain in NEUTRAL. The Malfunction
Indicator Light (MIL) may be illuminated. Limp
Home Mode may allow the vehicle to be driven
to an authorized dealer for service without
damaging the transmission. In the event of a momentary problem, the
transmission can be reset to regain all forward
gears by performing the following steps:
1. Stop the vehicle.
2. Shift the transmission into PARK.
3. Turn the ignition OFF.
4. Wait approximately 10 seconds.
5. Restart the engine.
6. Shift into the desired gear range. If the
problem is no longer detected, the
transmission will return to normal
operation.
NOTE:
Even if the transmission can be reset, we
recommend that you visit an authorized dealer
at your earliest possible convenience. An autho -
rized dealer has diagnostic equipment to
assess the condition of your transmission. If the
transmission cannot be reset, authorized dealer
service is required.
21_VM_OM_EN_USC_t.book Page 66
Page 72 of 280

70STARTING AND OPERATING
To Resume Speed
To resume a previously set speed, push the
RES (+) button and release. Resume can be used
at any speed above 20 mph (32 km/h) up to the maximum speed of 100 mph (160 km/h).
To Deactivate
A tap on the brake pedal, pushing the CAN
button, or normal brake pressure will deactivate
the Cruise Control system without erasing the
set speed from memory.
Pushing the on/off button or turning the ignition
switch off erases the set speed from memory.
PARKSENSE REAR PARK ASSIST — IF
EQUIPPED
The ParkSense system provides an audible
indication of the distance between the rear
fascia/bumper and a detected obstacle when
backing up (e.g. during a parking maneuver)
Ú page 72.
The ParkSense system is automatically
activated when the transmission is placed into
REVERSE. As the distance from an obstacle
behind the vehicle decreases, the audible alert
becomes more frequent. Interaction With Trailer Towing
The ParkSense system is automatically
deactivated when a trailer equipped by Mopar is
hitched to the vehicle. The system will be
automatically activated as soon as the trailer is
removed. If it does not happen, turning the key
ignition switch to OFF and then to ON again
would be needed. If a non-Mopar trailer hitch is
mounted, the sensor deactivation cannot be
guaranteed.
ParkSense Rear Park Assist Sensors
The four ParkSense sensors, located in the rear
fascia/bumper, monitor the area behind the
vehicle that is within the sensors’ field of view.
The sensors can detect obstacles, in the
horizontal direction, from approximately
12 inches (30 cm) up to 55 inches (140 cm)
from the center of the rear fascia/bumper and
up to 24 inches (60 cm) from the corners of the
rear fascia/bumper, depending on the location,
type and orientation of the obstacle.
ParkSense Rear Park Assist Sensors Locations
If several obstacles are detected, the
ParkSense system indicates the nearest
obstacle.
The minimum height of a detectable obstacle
corresponds to the maximum height of an
obstacle that would clear the underside of the
vehicle during the parking maneuver.
21_VM_OM_EN_USC_t.book Page 70
Page 79 of 280

STARTING AND OPERATING77
TRAILER TOWING
In this section you will find safety tips and
information on limits to the type of towing you
can reasonably do with your vehicle. Before
towing a trailer, carefully review this information
to tow your load as efficiently and safely as
possible.
To maintain the New Vehicle Limited Warranty
coverage, follow the requirements and
recommendations in this manual concerning
vehicles used for trailer towing.
Common Towing Definitions
The following trailer towing related definitions
will assist you in understanding the following
information:
Gross Vehicle Weight Rating (GVWR)
The GVWR is the total allowable weight of your
vehicle. This includes driver, passengers, cargo
and tongue weight. The total load must be
limited so that you do not exceed the GVWR
Úpage 75.
Gross Combination Weight Rating (GCWR)
The GCWR is the total allowable weight of your
vehicle and trailer when weighed in
combination.
Gross Trailer Weight (GTW)
The GTW is the weight of the trailer plus the
weight of all cargo, consumables and
equipment (permanent or temporary) loaded in
or on the trailer in its "loaded and ready for
operation" condition.
The recommended way to measure GTW is to
put your fully loaded trailer on a vehicle scale.
The entire weight of the trailer must be
supported by the scale.
Gross Axle Weight Rating (GAWR)
The GAWR is the maximum capacity of the front
and rear axles. Distribute the load over the front
and rear axles evenly. Make sure that you do
not exceed either front or rear GAWR
Úpage 75.
Tongue Weight (TW)
The TW is the downward force exerted on the
hitch ball by the trailer. You must consider this
as part of the load on your vehicle.
Trailer Frontal Area
The frontal area is the maximum height
multiplied by the maximum width of the front of
a trailer.
Trailer Sway Control (TSC)
The TSC can be a mechanical telescoping link
that can be installed between the hitch receiver
and the trailer tongue that typically provides
adjustable friction associated with the
telescoping motion to dampen any unwanted
trailer swaying motions while traveling.
If equipped, the electronic TSC recognizes a
swaying trailer and automatically applies
individual wheel brakes and/or reduces engine
power to attempt to eliminate the trailer sway.
Weight-Carrying Hitch
A weight-carrying hitch supports the trailer
tongue weight, just as if it were luggage located
at a hitch ball or some other connecting point of
the vehicle. These kinds of hitches are commonly
used to tow small and medium sized trailers.
WARNING!
It is important that you do not exceed the
maximum front or rear GAWR. A dangerous
driving condition can result if either rating is
exceeded. You could lose control of the
vehicle and have a collision.
4
21_VM_OM_EN_USC_t.book Page 77
Page 80 of 280

78STARTING AND OPERATING
(Continued)
Weight-Distributing Hitch
The weight-distributing hitch works by applying
leverage through spring (load) bars. They are
typically used for heavier loads to distribute
trailer tongue weight to the tow vehicle's front
axle and the trailer axle(s). When used in
accordance with the manufacturer's directions,
it provides for a more level ride, offering more
consistent steering and brake control thereby
enhancing towing safety. The addition of a
friction/hydraulic sway control also dampens
sway caused by traffic and crosswinds and
contributes positively to tow vehicle and trailer
stability. Trailer Sway Control (TSC) and a weight
distributing (load equalizing) hitch are recommended for heavier Tongue Weights (TW)
and may be required depending on vehicle and
trailer configuration/loading to comply with
Gross Axle Weight Rating (GAWR) requirements.
Trailer Hitch Classification
The following chart provides the industry
standard for the maximum trailer weight a given
trailer hitch class can tow and should be used to
assist you in selecting the correct trailer hitch
for your intended towing condition.
WARNING!
An improperly adjusted Weight Distributing
Hitch system may reduce handling,
stability, braking performance, and could
result in a collision.
Weight Distributing Systems may not be
compatible with Surge Brake Couplers.
Consult with your hitch and trailer manufac
-
turer or a reputable Recreational Vehicle
dealer for additional information.
WARNING! (Continued)
Trailer Hitch Classification Definitions
Class Max. Trailer Hitch Industry Standards
Class I - Light Duty 2,000 lbs (907 kg)
Class II - Medium Duty 3,500 lbs (1,587 kg)
Class III - Heavy Duty 6,000 lbs (2,722 kg)
Class IV - Extra Heavy Duty 10,000 lbs (4,535 kg)
See chart on Ú page 79 for the Maximum Gross Trailer Weight (GTW) towable for your given drivetrain.
All trailer hitches should be professionally installed on your vehicle.
21_VM_OM_EN_USC_t.book Page 78
Page 81 of 280

STARTING AND OPERATING79
Trailer Towing Weights (Maximum Trailer
Weight Ratings)
NOTE:
For trailer towing information (maximum trailer
weight ratings) refer to the following website
addresses:
ramtrucks.com/en/towing_guide/
ramtruck.ca (Canada)
rambodybuilder.com
Trailer And Tongue Weight
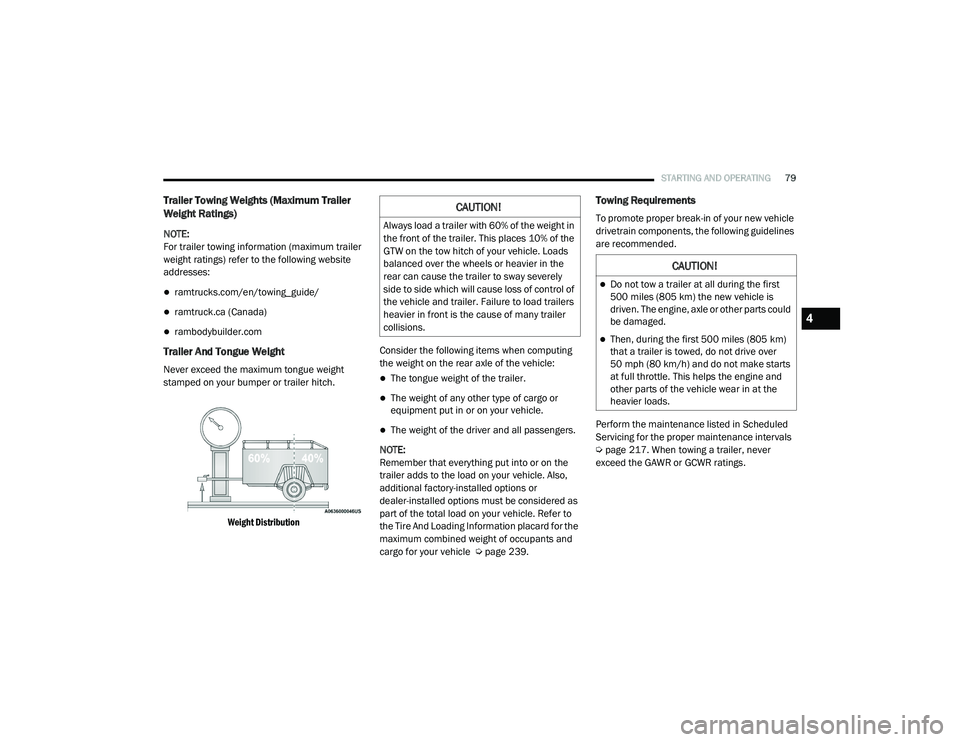
Never exceed the maximum tongue weight
stamped on your bumper or trailer hitch.
Weight Distribution
Consider the following items when computing
the weight on the rear axle of the vehicle:The tongue weight of the trailer.
The weight of any other type of cargo or
equipment put in or on your vehicle.
The weight of the driver and all passengers.
NOTE:
Remember that everything put into or on the
trailer adds to the load on your vehicle. Also,
additional factory-installed options or
dealer-installed options must be considered as
part of the total load on your vehicle. Refer to
the Tire And Loading Information placard for the
maximum combined weight of occupants and
cargo for your vehicle Ú page 239.
Towing Requirements
To promote proper break-in of your new vehicle
drivetrain components, the following guidelines
are recommended.
Perform the maintenance listed in Scheduled
Servicing for the proper maintenance intervals
Úpage 217. When towing a trailer, never
exceed the GAWR or GCWR ratings.CAUTION!
Always load a trailer with 60% of the weight in
the front of the trailer. This places 10% of the
GTW on the tow hitch of your vehicle. Loads
balanced over the wheels or heavier in the
rear can cause the trailer to sway severely
side to side which will cause loss of control of
the vehicle and trailer. Failure to load trailers
heavier in front is the cause of many trailer
collisions.
CAUTION!
Do not tow a trailer at all during the first
500 miles (805 km) the new vehicle is driven. The engine, axle or other parts could
be damaged.
Then, during the first 500 miles (805 km)
that a trailer is towed, do not drive over
50 mph (80 km/h) and do not make starts
at full throttle. This helps the engine and
other parts of the vehicle wear in at the
heavier loads.
4
21_VM_OM_EN_USC_t.book Page 79