2021 RAM PROMASTER CITY navigation
[x] Cancel search: navigationPage 2 of 280

WARNING: Operating, servicing and maintaining a passenger vehicle or off-highway
motor vehicle can expose you to chemicals including engine exhaust, carbon monoxide,
phthalates, and lead, which are known to the State of California to cause cancer and birth defects
or other reproductive harm. To minimize exposure, avoid breathing exhaust, do not idle the
engine except as necessary, service your vehicle in a well-ventilated area and wear gloves or wash
your hands frequently when servicing your vehicle. For more information go to
www.P65Warnings.ca.gov/passenger-vehicle.
This Owner’s Manual illustrates and describes the operation of features and equipment that are either standard or optional on this vehicle. This manual may
also include a description of features and equipment that are no longer available or were not ordered on this vehicle. Please disregard any features and
equipment that are no longer available or were not ordered on this vehicle. FCA US LLC reserves the right to make changes in design and specifications, and/or
make additions to or improvements to its products without imposing any obligation upon itself to install them on products previously manufactured.
With respect to vehicles sold in Canada, the name FCA US LLC shall be deemed to be deleted and the name FCA Canada Inc. used in substitution therefore.
If you are the first registered retail owner of your vehicle, you may obtain a complimentary printed copy of the Warranty Booklet by calling
1-866-726-4636 (U.S.) or 1-800-387-1143 (Canada), or by contacting your dealer.
This Owner’s Manual is intended to familiarize you with the important features of your vehicle. Your most up-to-date Owner’s Manual, Navigation/Uconnect
manuals and Warranty Booklet can be found by visiting the website on the back cover. U.S. residents can purchase replacement kits by visiting
www.techauthority.com and Canadian residents can purchase replacement kits by calling 1-800-387-1143.
The driver’s primary responsibility is the safe operation of the vehicle. Driving while distracted can result in loss of vehicle control, resulting in an accident and
personal injury. FCA US LLC strongly recommends that the driver use extreme caution when using any device or feature that may take their attention off the
road. Use of any electrical devices, such as cellular telephones, computers, portable radios, vehicle navigation or other devices, by the driver while the vehicle
is moving is dangerous and could lead to a serious accident. Texting while driving is also dangerous and should never be done while the vehicle is moving. If you
find yourself unable to devote your full attention to vehicle operation, pull off the road to a safe location and stop your vehicle. Some states or provinces prohibit
the use of cellular telephones or texting while driving. It is always the driver’s responsibility to comply with all local laws.
This Owner’s Manual has been prepared to help you get acquainted with your new Ram brand vehicle and to provide a convenient reference for common
questions.
Not all features shown in this manual may apply to your vehicle. For additional information on accessories to help personalize your vehicle, visit
www.mopar.com/en-us/care/owners-manual.html (U.S.), www.owners.mopar.ca (Canada) or your local Ram brand dealer.
DRIVING AND ALCOHOL
Drunk driving is one of the most frequent causes of accidents. Your driving ability can be seriously
impaired with blood alcohol levels far below the legal minimum. If you are drinking, don’t drive. Ride with
a designated non-drinking driver, call a cab, a friend or use public transportation.
WARNING
Driving after drinking can lead to an accident. Your perceptions are less sharp, your reflexes are slower
and your judgment is impaired when you have been drinking. Never drink and then drive.
Page 6 of 280

4
MULTIMEDIA
UCONNECT SYSTEMS ..........................................86
CYBERSECURITY ..................................................86
UCONNECT SETTINGS .........................................87 Uconnect 3/3 NAV Settings ........................ 87
UCONNECT INTRODUCTION.................................97
Identifying Your Radio ................................. 97
Safety And General Information ................. 99
UCONNECT MODES ........................................... 100
Radio Mode ................................................100
Media Mode ...............................................107Phone Mode ..............................................109
NAVIGATION MODE — IF EQUIPPED ................ 121
Operating Navigation Mode —
If Equipped .................................................121
STEERING WHEEL AUDIO CONTROLS — IF
EQUIPPED ........................................................... 142
Radio Operation .........................................142
Media Mode ...............................................142
RAM TELEMATICS - IF EQUIPPED .................... 142
Ram Telematics General Information ......143
RADIO OPERATION AND MOBILE PHONES.... 143
Regulatory And Safety Information........... 144
SAFETY
SAFETY FEATURES ............................................ 145 Four-Wheel Anti-Lock Brake
System (ABS) ..............................................145 Electronic Brake Control (EBC) System ...146 AUXILIARY DRIVING SYSTEMS.........................149
Tire Pressure Monitoring
System (TPMS) ........................................... 149
OCCUPANT RESTRAINT SYSTEMS .................. 153
Occupant Restraint Systems .................... 153
Important Safety Precautions ................... 153
Seat Belt Systems ..................................... 154
Supplemental Restraint Systems (SRS)... 161
Child Restraints ......................................... 170
Transporting Pets ...................................... 184
SAFETY TIPS ....................................................... 185
Transporting Passengers .......................... 185Exhaust Gas .............................................. 185
Safety Checks You Should Make Inside
The Vehicle ................................................ 185 Periodic Safety Checks You Should Make
Outside The Vehicle ................................... 187
IN CASE OF EMERGENCY
HAZARD WARNING FLASHERS........................188
FUSES ..................................................................188
General Information .................................. 188Underhood Fuses ...................................... 189
Interior Fuses ............................................. 192
Central Unit Fuse Panel............................. 193 JACKING AND TIRE CHANGING ...................... 194
Jack Location — If Equipped ..................... 194
Removing The Spare Tire — If Equipped .. 194Preparations For Jacking ......................... 196
Jacking Instructions................................... 197
Vehicles With Alloy Wheels ....................... 200Vehicles Equipped With Wheel Covers .... 201
TIRE SERVICE KIT — IF EQUIPPED .................. 202
Tire Service Kit Storage............................. 202
Tire Service Kit Usage ............................... 202
JUMP STARTING ................................................ 204
Preparations For Jump Starting ................ 205
Jump Starting Procedure .......................... 206
IF YOUR ENGINE OVERHEATS ......................... 207
IGNITION KEY REMOVAL OVERRIDE ............... 208
GEAR SELECTOR OVERRIDE ............................ 209
FREEING A STUCK VEHICLE ............................ 209
TOWING A DISABLED VEHICLE ........................ 211
ENHANCED ACCIDENT RESPONSE SYSTEM
(EARS) ................................................................ 212
EVENT DATA RECORDER (EDR) ....................... 212
BULB REPLACEMENT ........................................ 213 Replacement Bulbs ................................... 213
Replacing Exterior Bulbs ........................... 214
Replacing Interior Bulbs ............................ 215
21_VM_OM_EN_USC_t.book Page 4
Page 75 of 280

STARTING AND OPERATING73
(Continued)
If it’s necessary to keep the ball mount and
hitch ball assembly mounted for a long period,
it is possible to filter out the ball mount and
hitch ball assembly presence in the sensor field
of view. The filtering operation must be
performed only by an authorized dealer.
PARKVIEW REAR BACK UP CAMERA
Your vehicle is equipped with the ParkView Rear
Back Up Camera that allows you to see an
on-screen image of the rear surroundings of
your vehicle whenever the gear selector is put
into REVERSE. The image will be displayed on
the touchscreen display along with a caution
note to “check entire surroundings” across the
top of the screen. After five seconds this note
will disappear. The ParkView camera is located
on the rear of the vehicle above the rear license
plate. The Rear Back Up Camera can also be activated
when the vehicle is not in REVERSE through the
Uconnect system Ú
page 87.
NOTE:
If one of the rear cargo doors is not completely
closed, the Back Up Camera cannot provide an
accurate image of the area behind the vehicle.
A dedicated message will appear on the
Uconnect display indicating the camera is not in
the correct position.
The Camera Delay setting can be set to on/off
in the rear camera settings menu. When the
vehicle is shifted out of REVERSE and the
Camera Delay is turned off, the rear camera
mode is exited and the navigation or audio
screen appears on display again.
When the transmission is shifted out of
REVERSE, and Camera Delay is activated in the
menu screen, the camera image will continue to
be displayed for up to 10 seconds, unless the
speed of the vehicle is greater than 8 mph
(13 km/h), the transmission is in PARK, or the
ignition is placed in the OFF position.
Before using ParkSense, it is strongly
recommended that the ball mount and
hitch ball assembly is disconnected from
the vehicle when the vehicle is not used for
towing. Failure to do so can result in injury
or damage to vehicles or obstacles
because the hitch ball will be much closer
to the obstacle than the rear fascia when
the loudspeaker sounds the continuous
tone. Also, the sensors could detect the ball
mount and hitch ball assembly, depending
on its size and shape, giving a false indica -
tion that an obstacle is behind the vehicle.
CAUTION!
ParkSense is only a parking aid and it is
unable to recognize every obstacle,
including small obstacles. Parking curbs
might be temporarily detected or not
detected at all. Obstacles located above or
below the sensors will not be detected
when they are in close proximity.
WARNING! (Continued)
The vehicle must be driven slowly when
using ParkSense in order to be able to stop
in time when an obstacle is detected. It is
recommended that the driver looks over
his/her shoulder when using ParkSense.
CAUTION! (Continued)
4
21_VM_OM_EN_USC_t.book Page 73
Page 92 of 280
90MULTIMEDIA
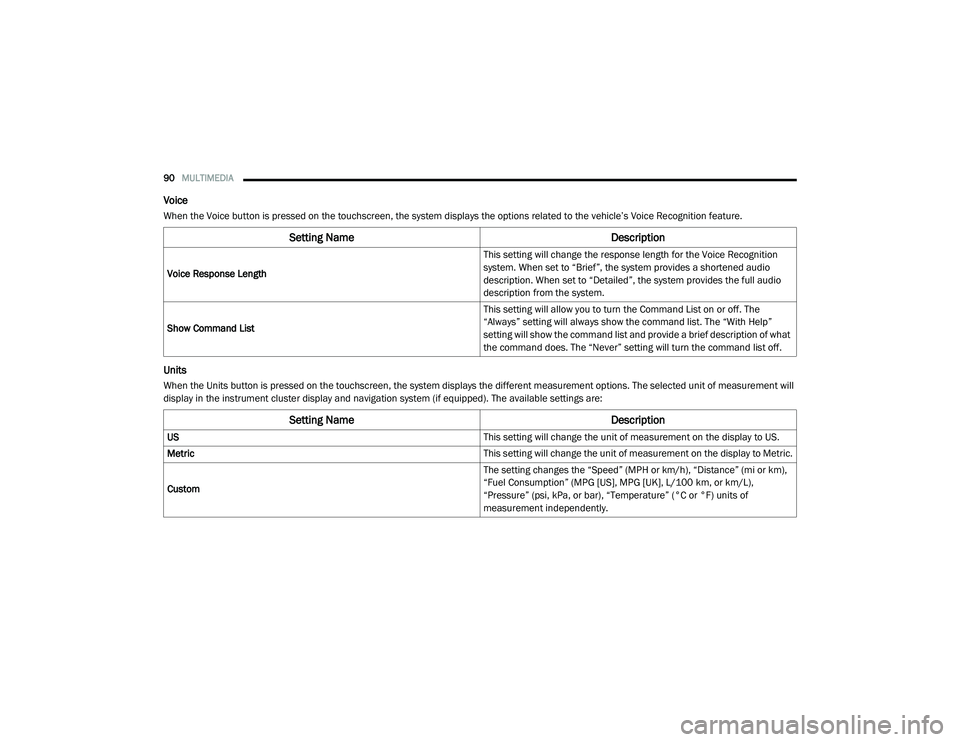
Voice
When the Voice button is pressed on the touchscreen, the system displays the options related to the vehicle’s Voice Recognition feature.
Units
When the Units button is pressed on the touchscreen, the system displays the different measurement options. The selected unit of measurement will
display in the instrument cluster display and navigation system (if equipped). The available settings are:
Setting Name Description
Voice Response Length This setting will change the response length for the Voice Recognition
system. When set to “Brief”, the system provides a shortened audio
description. When set to “Detailed”, the system provides the full audio
description from the system.
Show Command List This setting will allow you to turn the Command List on or off. The
“Always” setting will always show the command list. The “With Help”
setting will show the command list and provide a brief description of what
the command does. The “Never” setting will turn the command list off.
Setting Name
Description
US This setting will change the unit of measurement on the display to US.
Metric This setting will change the unit of measurement on the display to Metric.
Custom The setting changes the “Speed” (MPH or km/h), “Distance” (mi or km),
“Fuel Consumption” (MPG [US], MPG [UK], L/100 km, or km/L),
“Pressure” (psi, kPa, or bar), “Temperature” (°C or °F) units of
measurement independently.
21_VM_OM_EN_USC_t.book Page 90
Page 100 of 280
98MULTIMEDIA
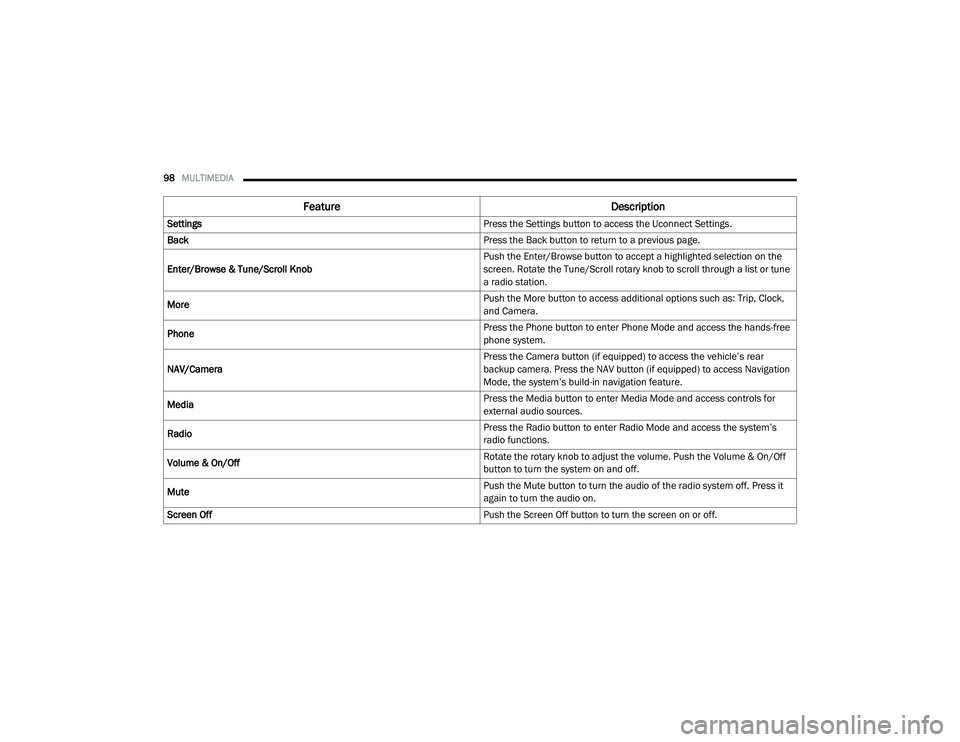
Feature Description
Settings Press the Settings button to access the Uconnect Settings.
Back Press the Back button to return to a previous page.
Enter/Browse & Tune/Scroll Knob Push the Enter/Browse button to accept a highlighted selection on the
screen. Rotate the Tune/Scroll rotary knob to scroll through a list or tune
a radio station.
More Push the More button to access additional options such as: Trip, Clock,
and Camera.
Phone Press the Phone button to enter Phone Mode and access the hands-free
phone system.
NAV/Camera Press the Camera button (if equipped) to access the vehicle’s rear
backup camera. Press the NAV button (if equipped) to access Navigation
Mode, the system’s build-in navigation feature.
Media Press the Media button to enter Media Mode and access controls for
external audio sources.
Radio Press the Radio button to enter Radio Mode and access the system’s
radio functions.
Volume & On/Off Rotate the rotary knob to adjust the volume. Push the Volume & On/Off
button to turn the system on and off.
Mute Push the Mute button to turn the audio of the radio system off. Press it
again to turn the audio on.
Screen Off Push the Screen Off button to turn the screen on or off.
21_VM_OM_EN_USC_t.book Page 98
Page 123 of 280
MULTIMEDIA121
Siri® Eyes Free — If Equipped
When used with your Apple® iPhone®
connected to your vehicle, Siri lets you use your
voice to send text messages, select media,
place phone calls and much more. Siri uses
your natural language to understand what you
mean and responds back to confirm your
requests. The system is designed to keep your
eyes on the road and your hands on the wheel
by letting Siri help you perform useful tasks.
To enable Siri, push and hold, then release the
Uconnect Voice Recognition (VR) button on the
steering wheel. After you hear a double beep,
you can ask Siri to play podcasts and music, get
directions, read text messages, and many other
useful requests.
Bluetooth® Communication Link
Mobile phones may lose connection to the
Uconnect Phone. When this happens, the
connection can generally be re-established by
restarting the mobile phone. Your mobile phone
is recommended to remain in Bluetooth® ON
mode. Power-Up
After switching the ignition key from OFF to
either the ON/RUN or ACC position, or after a
language change, you must wait at least
15 seconds prior to using the system
Ú
page 265.
NAVIGATION MODE — IF EQUIPPED
Operating Navigation Mode — If Equipped
Planning A Route
Using the search bar provides a wide range of
ways to find places and then navigate to them.
You can search for your destination in different
ways:
A specific address
A partial address
A type of place
A zip code
A city to navigate to a city center
A Point of Interest (POI) near your current
location
Latitude and longitude coordinates Using Search
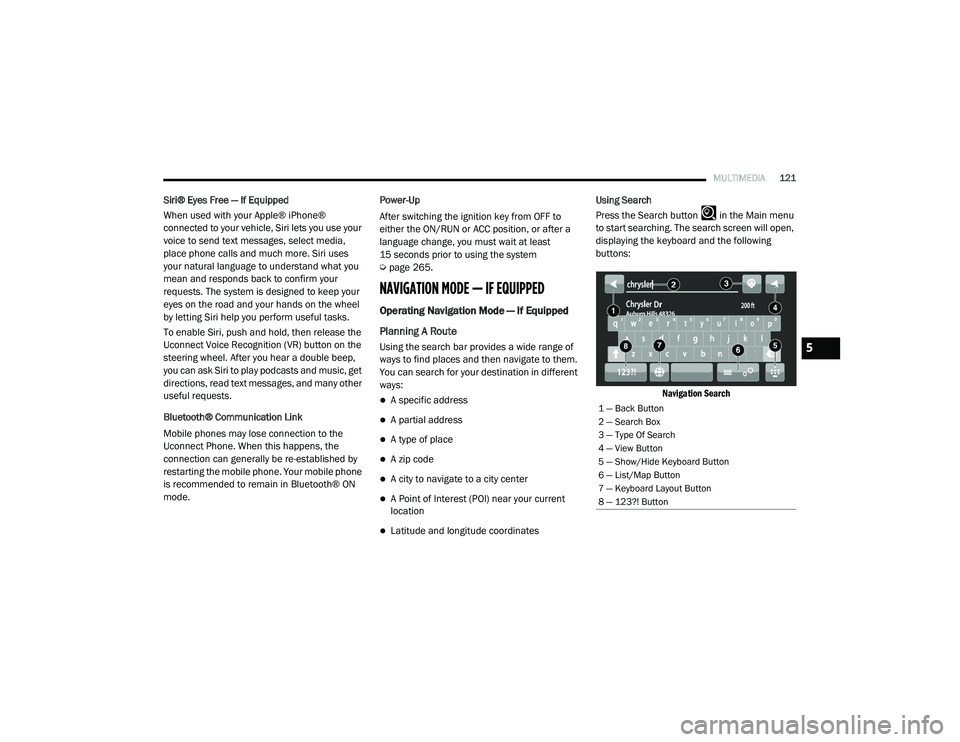
Press the Search button in the Main menu
to start searching. The search screen will open,
displaying the keyboard and the following
buttons:
Navigation Search
1 — Back Button
2 — Search Box
3 — Type Of Search
4 — View Button
5 — Show/Hide Keyboard Button
6 — List/Map Button
7 — Keyboard Layout Button
8 — 123?! Button
5
21_VM_OM_EN_USC_t.book Page 121
Page 132 of 280
130MULTIMEDIA
Voice Command — If Equipped
About Voice command
Instead of pressing the touchscreen to control
your navigation system, you can use your voice
to control navigation.
For example, to switch to 2D view, you can say
“2D view”.
To view a list of available commands, press the
“Help” button in the Main menu and then press
“What can I say?”.
Using Voice Control The following example shows how to use voice
control to plan a journey to your Home address:
1. Push the Voice Recognition button on
the steering wheel to turn on the
microphone.
A screen will pop up with examples of com -
mands.
NOTE:
Press the Help button in the Main menu then
press “What can I say?” to see a full list of
commands.
2. When you hear a beep, say a command of your choice. For example, you can say
“Navigate home”.
NOTE:
For accurate results, speak normally without
trying to articulate words in an unnatural way. If
there is excessive road noise, for example, you
may need to speak directly into the microphone.
3. If the command is correct, say “Yes”. NOTE:
If the command is incorrect, say “No” and
repeat the command after you hear the prompt
and tone again. Your navigation system plans a
route from your current location to your destina-
tion. To stop your navigation system from
listening out for further commands, say
“Cancel”.
Guidance View
The guidance view is used to guide you along
the route to your destination. As soon as you
start driving, your navigation system will
immediately start guiding you to your
destination with spoken instructions and visual
instructions on the touchscreen. You can also
see your current location and details along your
route, including 3D buildings in some cities. The
guidance view is normally in 3D. To show a 2D
map with the map moving in your direction of
travel, change the 2D and 3D settings
Ú
page 135.
WARNING!
ALWAYS drive safely with your hands on the
wheel. You have full responsibility and
assume all risks related to the use of the
Uconnect features and applications in this
vehicle. Only use Uconnect when it is safe to
do so. Failure to do so may result in an
accident involving serious injury or death.
21_VM_OM_EN_USC_t.book Page 130
Page 135 of 280
MULTIMEDIA133
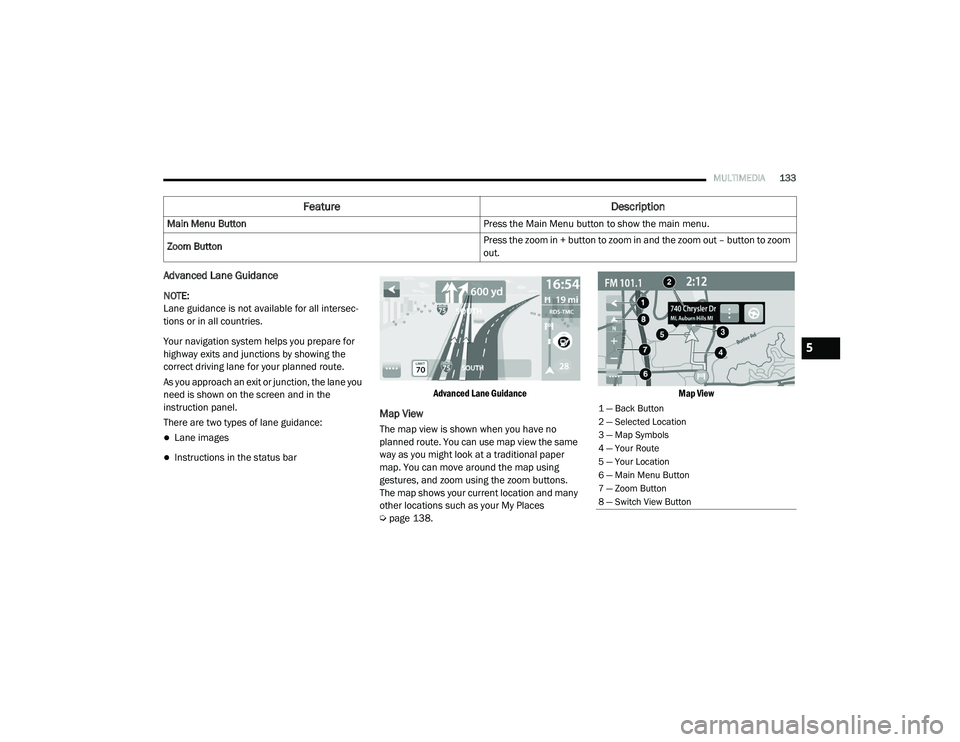
Advanced Lane Guidance
NOTE:
Lane guidance is not available for all intersec -
tions or in all countries.
Your navigation system helps you prepare for
highway exits and junctions by showing the
correct driving lane for your planned route.
As you approach an exit or junction, the lane you
need is shown on the screen and in the
instruction panel.
There are two types of lane guidance:
Lane images
Instructions in the status bar
Advanced Lane Guidance
Map View
The map view is shown when you have no
planned route. You can use map view the same
way as you might look at a traditional paper
map. You can move around the map using
gestures, and zoom using the zoom buttons.
The map shows your current location and many
other locations such as your My Places
Ú
page 138.
Map View
Main Menu Button
Press the Main Menu button to show the main menu.
Zoom Button Press the zoom in + button to zoom in and the zoom out – button to zoom
out.
Feature
Description
1 — Back Button
2 — Selected Location
3 — Map Symbols
4 — Your Route
5 — Your Location
6 — Main Menu Button
7 — Zoom Button
8 — Switch View Button
5
21_VM_OM_EN_USC_t.book Page 133