2021 RAM PROMASTER CITY warning
[x] Cancel search: warningPage 24 of 280
22GETTING TO KNOW YOUR VEHICLE
Rear Adjustment — If Equipped
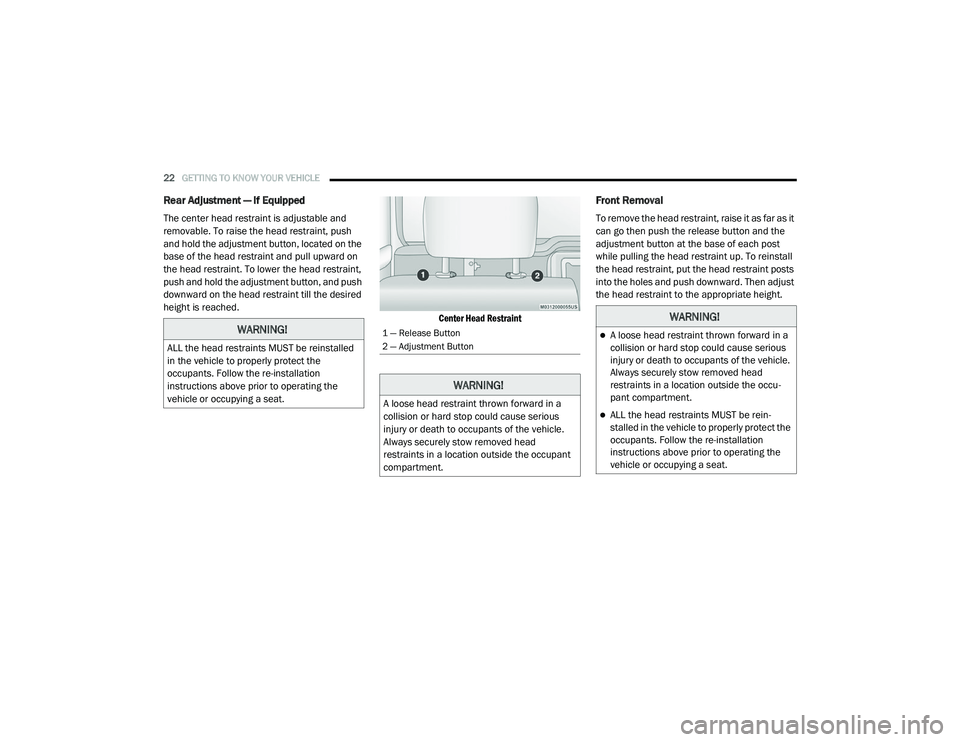
The center head restraint is adjustable and
removable. To raise the head restraint, push
and hold the adjustment button, located on the
base of the head restraint and pull upward on
the head restraint. To lower the head restraint,
push and hold the adjustment button, and push
downward on the head restraint till the desired
height is reached.
Center Head Restraint
Front Removal
To remove the head restraint, raise it as far as it
can go then push the release button and the
adjustment button at the base of each post
while pulling the head restraint up. To reinstall
the head restraint, put the head restraint posts
into the holes and push downward. Then adjust
the head restraint to the appropriate height.
WARNING!
ALL the head restraints MUST be reinstalled
in the vehicle to properly protect the
occupants. Follow the re-installation
instructions above prior to operating the
vehicle or occupying a seat.
1 — Release Button
2 — Adjustment Button
WARNING!
A loose head restraint thrown forward in a
collision or hard stop could cause serious
injury or death to occupants of the vehicle.
Always securely stow removed head
restraints in a location outside the occupant
compartment.
WARNING!
A loose head restraint thrown forward in a
collision or hard stop could cause serious
injury or death to occupants of the vehicle.
Always securely stow removed head
restraints in a location outside the occu-
pant compartment.
ALL the head restraints MUST be rein -
stalled in the vehicle to properly protect the
occupants. Follow the re-installation
instructions above prior to operating the
vehicle or occupying a seat.
21_VM_OM_EN_USC_t.book Page 22
Page 25 of 280
GETTING TO KNOW YOUR VEHICLE23
Rear Removal — If Equipped
Outboard Head Restraints
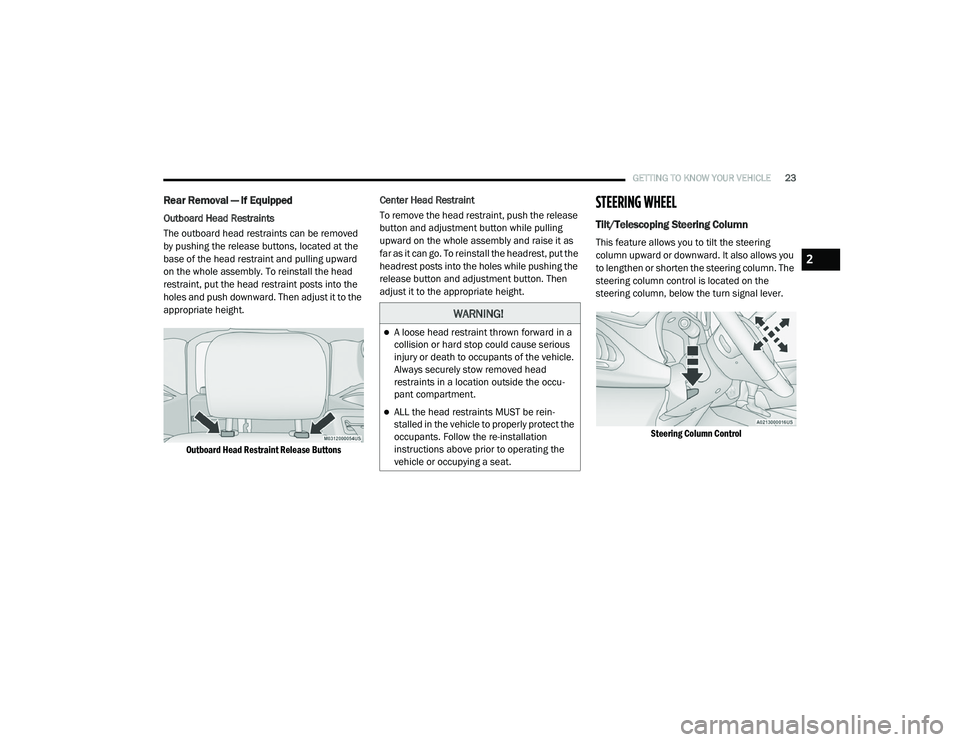
The outboard head restraints can be removed
by pushing the release buttons, located at the
base of the head restraint and pulling upward
on the whole assembly. To reinstall the head
restraint, put the head restraint posts into the
holes and push downward. Then adjust it to the
appropriate height.
Outboard Head Restraint Release Buttons
Center Head Restraint
To remove the head restraint, push the release
button and adjustment button while pulling
upward on the whole assembly and raise it as
far as it can go. To reinstall the headrest, put the
headrest posts into the holes while pushing the
release button and adjustment button. Then
adjust it to the appropriate height.
STEERING WHEEL
Tilt/Telescoping Steering Column
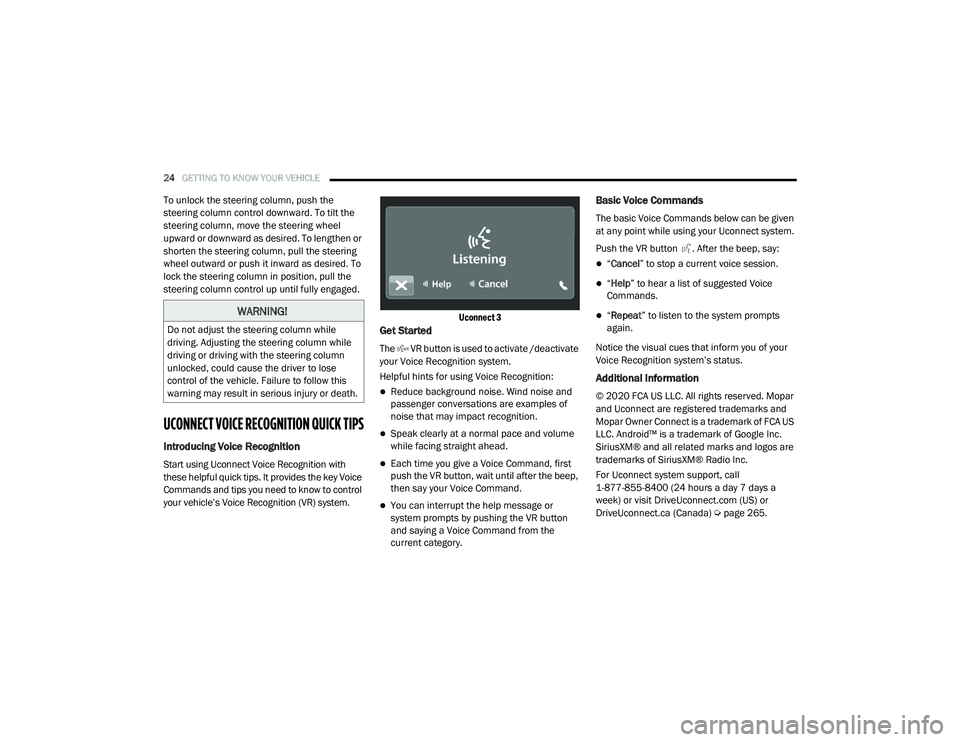
This feature allows you to tilt the steering
column upward or downward. It also allows you
to lengthen or shorten the steering column. The
steering column control is located on the
steering column, below the turn signal lever.
Steering Column Control
WARNING!
A loose head restraint thrown forward in a
collision or hard stop could cause serious
injury or death to occupants of the vehicle.
Always securely stow removed head
restraints in a location outside the occu -
pant compartment.
ALL the head restraints MUST be rein -
stalled in the vehicle to properly protect the
occupants. Follow the re-installation
instructions above prior to operating the
vehicle or occupying a seat.
2
21_VM_OM_EN_USC_t.book Page 23
Page 26 of 280
24GETTING TO KNOW YOUR VEHICLE
To unlock the steering column, push the
steering column control downward. To tilt the
steering column, move the steering wheel
upward or downward as desired. To lengthen or
shorten the steering column, pull the steering
wheel outward or push it inward as desired. To
lock the steering column in position, pull the
steering column control up until fully engaged.
UCONNECT VOICE RECOGNITION QUICK TIPS
Introducing Voice Recognition
Start using Uconnect Voice Recognition with
these helpful quick tips. It provides the key Voice
Commands and tips you need to know to control
your vehicle’s Voice Recognition (VR) system.
Uconnect 3
Get Started
The VR button is used to activate /deactivate
your Voice Recognition system.
Helpful hints for using Voice Recognition:
Reduce background noise. Wind noise and
passenger conversations are examples of
noise that may impact recognition.
Speak clearly at a normal pace and volume
while facing straight ahead.
Each time you give a Voice Command, first
push the VR button, wait until after the beep,
then say your Voice Command.
You can interrupt the help message or
system prompts by pushing the VR button
and saying a Voice Command from the
current category.
Basic Voice Commands
The basic Voice Commands below can be given
at any point while using your Uconnect system.
Push the VR button . After the beep, say:
“
Cancel ” to stop a current voice session.
“Help ” to hear a list of suggested Voice
Commands.
“ Repeat ” to listen to the system prompts
again.
Notice the visual cues that inform you of your
Voice Recognition system’s status.
Additional Information
© 2020 FCA US LLC. All rights reserved. Mopar
and Uconnect are registered trademarks and
Mopar Owner Connect is a trademark of FCA US
LLC. Android™ is a trademark of Google Inc.
SiriusXM® and all related marks and logos are
trademarks of SiriusXM® Radio Inc.
For Uconnect system support, call
1-877-855-8400 (24 hours a day 7 days a
week) or visit DriveUconnect.com (US) or DriveUconnect.ca (Canada) Ú page 265.
WARNING!
Do not adjust the steering column while
driving. Adjusting the steering column while
driving or driving with the steering column
unlocked, could cause the driver to lose
control of the vehicle. Failure to follow this
warning may result in serious injury or death.
21_VM_OM_EN_USC_t.book Page 24
Page 27 of 280
GETTING TO KNOW YOUR VEHICLE25
MIRRORS
Inside Rearview Mirror
Manual Mirror — If Equipped
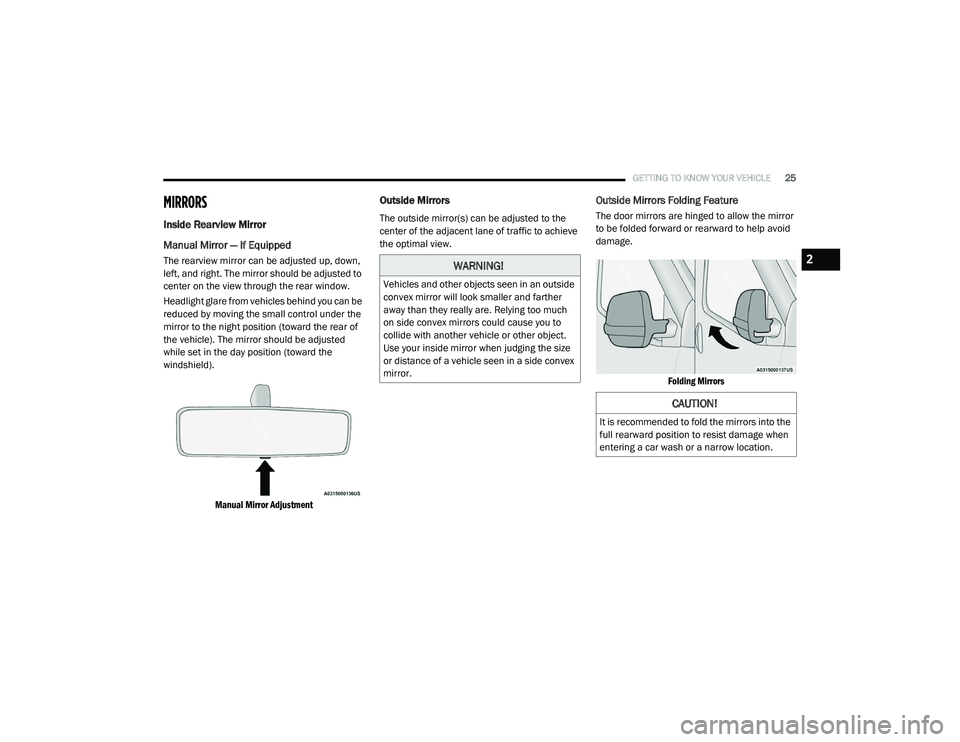
The rearview mirror can be adjusted up, down,
left, and right. The mirror should be adjusted to
center on the view through the rear window.
Headlight glare from vehicles behind you can be
reduced by moving the small control under the
mirror to the night position (toward the rear of
the vehicle). The mirror should be adjusted
while set in the day position (toward the
windshield).
Manual Mirror Adjustment
Outside Mirrors
The outside mirror(s) can be adjusted to the
center of the adjacent lane of traffic to achieve
the optimal view.
Outside Mirrors Folding Feature
The door mirrors are hinged to allow the mirror
to be folded forward or rearward to help avoid
damage.
Folding Mirrors
WARNING!
Vehicles and other objects seen in an outside
convex mirror will look smaller and farther
away than they really are. Relying too much
on side convex mirrors could cause you to
collide with another vehicle or other object.
Use your inside mirror when judging the size
or distance of a vehicle seen in a side convex
mirror.
CAUTION!
It is recommended to fold the mirrors into the
full rearward position to resist damage when
entering a car wash or a narrow location.
2
21_VM_OM_EN_USC_t.book Page 25
Page 37 of 280
GETTING TO KNOW YOUR VEHICLE35
WINDOWS
Power Window Controls — If Equipped
The window switches on the driver’s door
control all door windows.
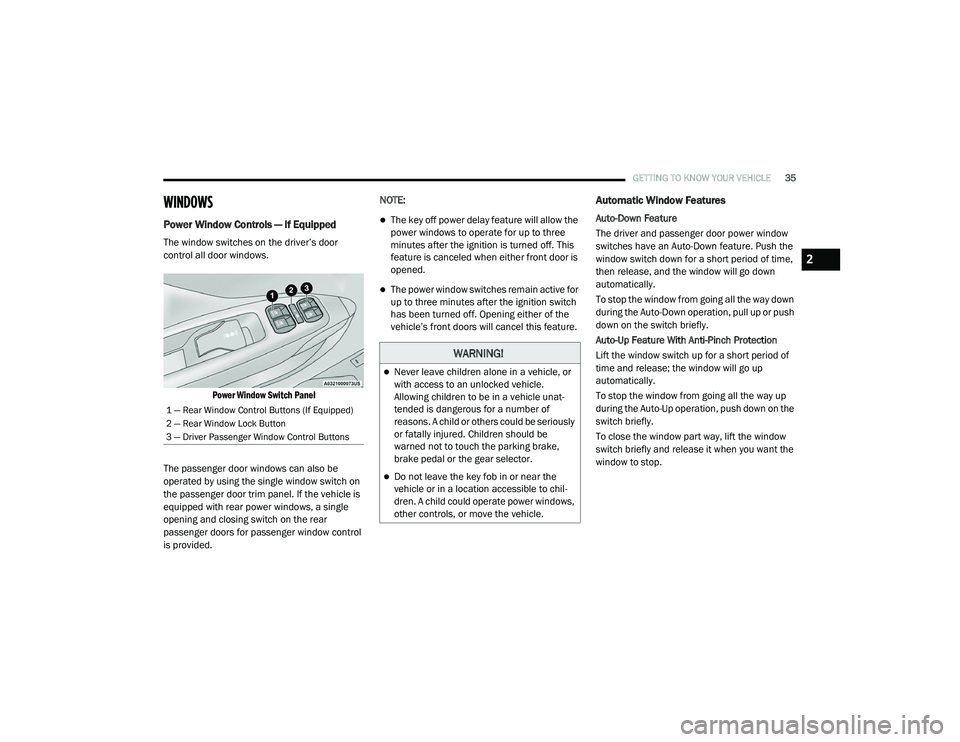
Power Window Switch Panel
The passenger door windows can also be
operated by using the single window switch on
the passenger door trim panel. If the vehicle is
equipped with rear power windows, a single
opening and closing switch on the rear
passenger doors for passenger window control
is provided. NOTE:
The key off power delay feature will allow the
power windows to operate for up to three
minutes after the ignition is turned off. This
feature is canceled when either front door is
opened.
The power window switches remain active for
up to three minutes after the ignition switch
has been turned off. Opening either of the
vehicle’s front doors will cancel this feature.
Automatic Window Features
Auto-Down Feature
The driver and passenger door power window
switches have an Auto-Down feature. Push the
window switch down for a short period of time,
then release, and the window will go down
automatically.
To stop the window from going all the way down
during the Auto-Down operation, pull up or push
down on the switch briefly.
Auto-Up Feature With Anti-Pinch Protection
Lift the window switch up for a short period of
time and release; the window will go up
automatically.
To stop the window from going all the way up
during the Auto-Up operation, push down on the
switch briefly.
To close the window part way, lift the window
switch briefly and release it when you want the
window to stop.
1 — Rear Window Control Buttons (If Equipped)
2 — Rear Window Lock Button
3 — Driver Passenger Window Control Buttons
WARNING!
Never leave children alone in a vehicle, or
with access to an unlocked vehicle.
Allowing children to be in a vehicle unat
-
tended is dangerous for a number of
reasons. A child or others could be seriously
or fatally injured. Children should be
warned not to touch the parking brake,
brake pedal or the gear selector.
Do not leave the key fob in or near the
vehicle or in a location accessible to chil -
dren. A child could operate power windows,
other controls, or move the vehicle.
2
21_VM_OM_EN_USC_t.book Page 35
Page 38 of 280
36GETTING TO KNOW YOUR VEHICLE
If the window runs into any obstacle during
auto-closure, it will reverse direction and then
go back down. Remove the obstacle and use
the window switch again to close the window.
Power Windows System Initialization
The power windows may be reset if any of the
following occurs:
On the front doors:
Fuse or battery are disconnected when
the window is moving
50 window movements without ever
closing the window
On the rear doors (in addition to the condi -
tions for the front doors):
Fuse or battery are disconnected when
the window is moving
The auto-reverse system is activated
while the window is moving and the door
is opening
50 window movements without ever
closing the window
One door opening with the window
moving, without ever closing the door
Three door opening with the window in
motion. During these maneuvers, the
upper stop position is never reached
Proceed as follows for initialization:
1. Completely close the driver's door window, keeping the window switch pushed for at
least five seconds after the (upper) end of
travel position.
2. Proceed in the same way on the passenger's window switches.
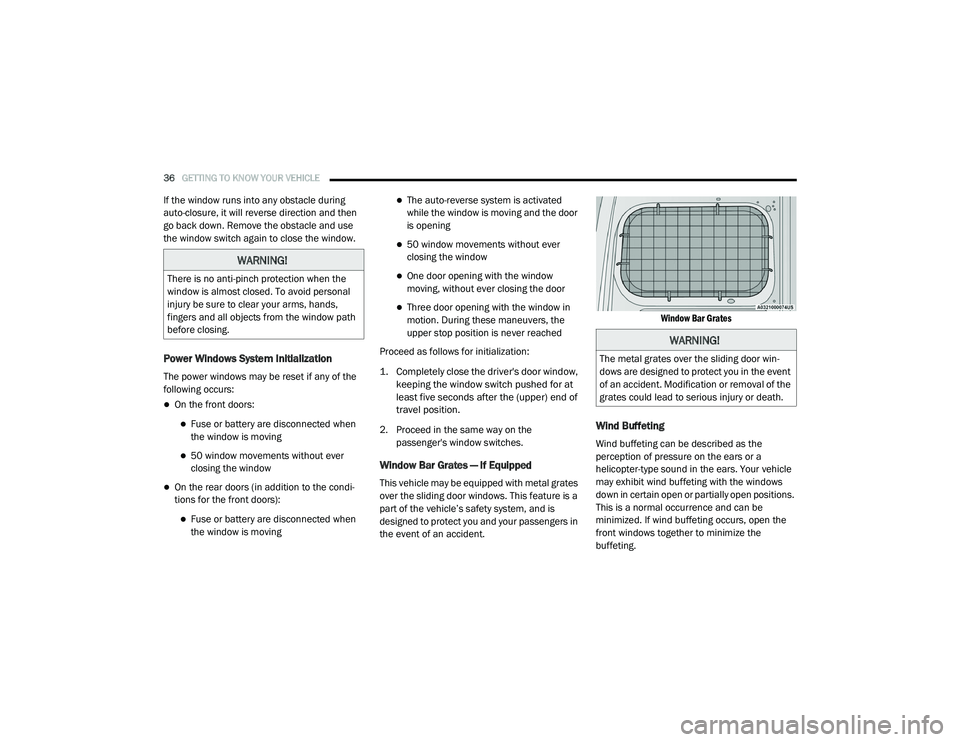
Window Bar Grates — If Equipped
This vehicle may be equipped with metal grates
over the sliding door windows. This feature is a
part of the vehicle’s safety system, and is
designed to protect you and your passengers in
the event of an accident.
Window Bar Grates
Wind Buffeting
Wind buffeting can be described as the
perception of pressure on the ears or a
helicopter-type sound in the ears. Your vehicle
may exhibit wind buffeting with the windows
down in certain open or partially open positions.
This is a normal occurrence and can be
minimized. If wind buffeting occurs, open the
front windows together to minimize the
buffeting.
WARNING!
There is no anti-pinch protection when the
window is almost closed. To avoid personal
injury be sure to clear your arms, hands,
fingers and all objects from the window path
before closing.
WARNING!
The metal grates over the sliding door win
-
dows are designed to protect you in the event
of an accident. Modification or removal of the
grates could lead to serious injury or death.
21_VM_OM_EN_USC_t.book Page 36
Page 39 of 280
GETTING TO KNOW YOUR VEHICLE37
HOOD
Opening
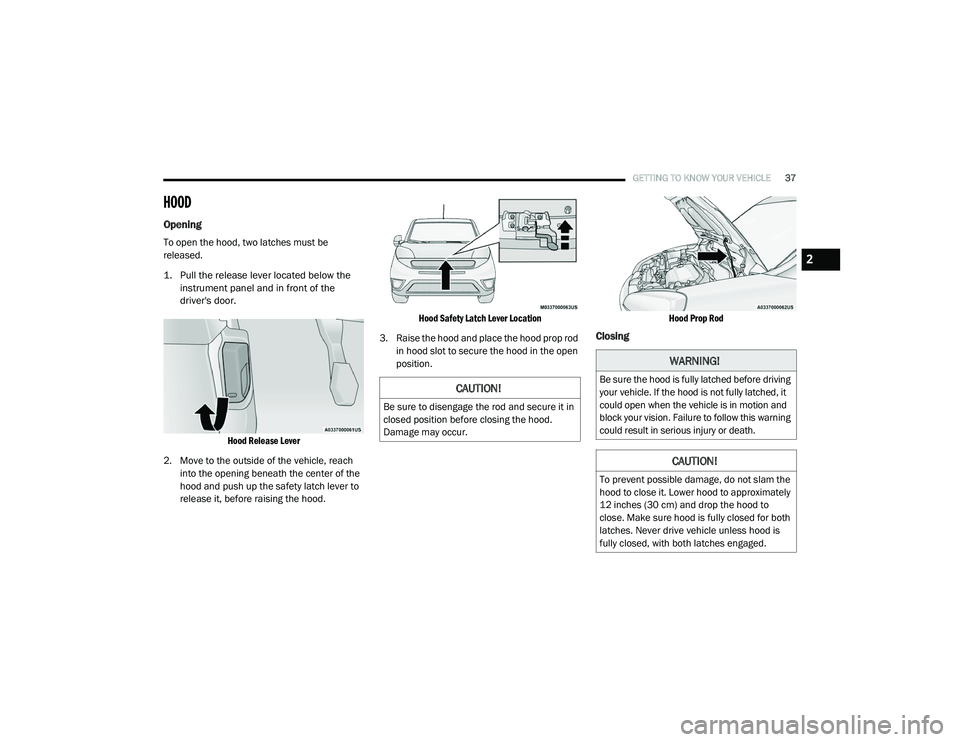
To open the hood, two latches must be
released.
1. Pull the release lever located below the
instrument panel and in front of the
driver's door.
Hood Release Lever
2. Move to the outside of the vehicle, reach into the opening beneath the center of the
hood and push up the safety latch lever to
release it, before raising the hood.
Hood Safety Latch Lever Location
3. Raise the hood and place the hood prop rod in hood slot to secure the hood in the open
position.
Hood Prop Rod
Closing
CAUTION!
Be sure to disengage the rod and secure it in
closed position before closing the hood.
Damage may occur.
WARNING!
Be sure the hood is fully latched before driving
your vehicle. If the hood is not fully latched, it
could open when the vehicle is in motion and
block your vision. Failure to follow this warning
could result in serious injury or death.
CAUTION!
To prevent possible damage, do not slam the
hood to close it. Lower hood to approximately
12 inches (30 cm) and drop the hood to
close. Make sure hood is fully closed for both
latches. Never drive vehicle unless hood is
fully closed, with both latches engaged.
2
21_VM_OM_EN_USC_t.book Page 37
Page 40 of 280
38GETTING TO KNOW YOUR VEHICLE
(Continued)
CARGO AREA FEATURES
Rear Cargo Tie-Downs
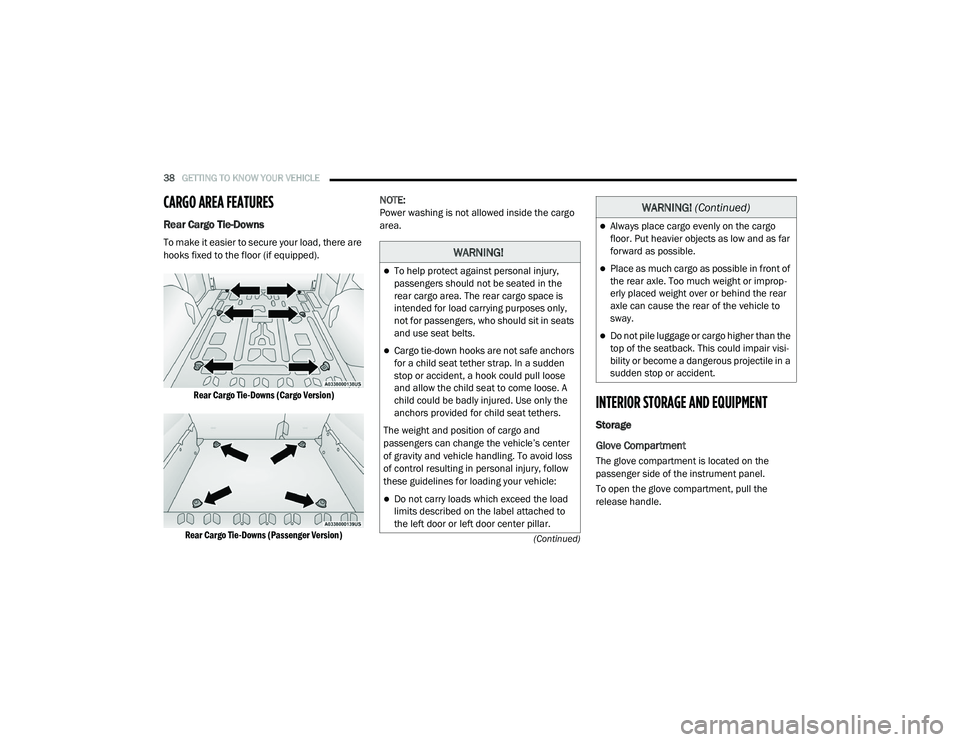
To make it easier to secure your load, there are
hooks fixed to the floor (if equipped).
Rear Cargo Tie-Downs (Cargo Version)
Rear Cargo Tie-Downs (Passenger Version)
NOTE:
Power washing is not allowed inside the cargo
area.
INTERIOR STORAGE AND EQUIPMENT
Storage
Glove Compartment
The glove compartment is located on the
passenger side of the instrument panel.
To open the glove compartment, pull the
release handle.
WARNING!
To help protect against personal injury,
passengers should not be seated in the
rear cargo area. The rear cargo space is
intended for load carrying purposes only,
not for passengers, who should sit in seats
and use seat belts.
Cargo tie-down hooks are not safe anchors
for a child seat tether strap. In a sudden
stop or accident, a hook could pull loose
and allow the child seat to come loose. A
child could be badly injured. Use only the
anchors provided for child seat tethers.
The weight and position of cargo and
passengers can change the vehicle’s center
of gravity and vehicle handling. To avoid loss
of control resulting in personal injury, follow
these guidelines for loading your vehicle:
Do not carry loads which exceed the load
limits described on the label attached to
the left door or left door center pillar.
Always place cargo evenly on the cargo
floor. Put heavier objects as low and as far
forward as possible.
Place as much cargo as possible in front of
the rear axle. Too much weight or improp -
erly placed weight over or behind the rear
axle can cause the rear of the vehicle to
sway.
Do not pile luggage or cargo higher than the
top of the seatback. This could impair visi-
bility or become a dangerous projectile in a
sudden stop or accident.
WARNING! (Continued)
21_VM_OM_EN_USC_t.book Page 38